


Application portability with HIP
Many scientific applications run on AMD-equipped computing platforms and supercomputers, including Frontier, the first Exascale system in the world. These applications, coming from a myriad of science domains, were ported to run on AMD GPUs using the Heterogeneous-compute Interface for Portability (HIP) abstraction layer. HIP enables these High-Performance Computing (HPC) facilities to transition their CUDA codes to run and take advantage of the latest AMD GPUs. The effort involved in porting these scientific applications varies from a few hours to a few weeks and largely depends on the complexity of the original source code. Figure 1 shows several examples of applications that have been ported and the corresponding porting effort.
In this post, we introduce the HIP portability layer, the tools in the AMD ROCm™ stack that can be used to automatically convert CUDA code to HIP, and show how we can run the same code in both AMD and NVIDIA® GPUs with a portable HIP build system.

Figure 1: Porting scientific applications to support AMD Instinct™ GPUs wih HIP
HIP API
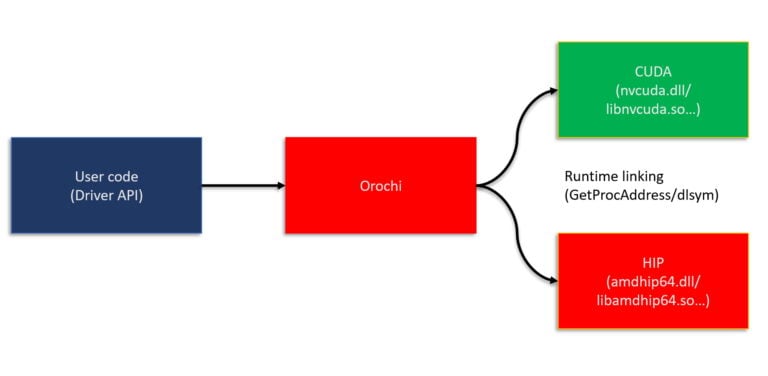
The Heterogeneous-compute Interface for Portability (HIP) is a C++ runtime API and kernel language that enables developers to design platform-independent GPU programs that can run on both AMD and NVIDIA GPUs. HIP interface and syntax are very similar to CUDA, which facilitates its adoption by GPU programmers and enables fast translation of CUDA API calls. Most of such calls can be converted in place by simply replacing cuda with hip, as HIP supports a strong subset of the CUDA runtime functionality. Furthermore, as illustrated in Figure 2, HIP code provides the ease of maintaining a single code base which can be run on both AMD and NVIDIA platforms.

Figure 2: HIP to device flowchart illustrating the platform-independent abstraction layer.
Figure 3 shows the various programming paradigms and tools that could be used to accelerate codes on the GPUs and the corresponding abstraction level across the system stack. HIP sits closer to the hardware than other GPU programming abstraction layers, and as such, it is capable of accelerating codes with minimal overhead. This feature results in HIP code that runs on NVIDIA accelerators with similar performance as the original CUDA code. Furthermore, both AMD and NVIDIA share the host-device architecture, where the CPU is the host and the GPU is the device. The host supports C++, C, Fortran, and Python. C++ is the most common and best-supported language, with the entry point being the main() function. The host runs the HIP API and HIP function calls that map to either CUDA or HIP. Kernels run on the device, which supports C-like syntax. Lastly, the HIP API provides many useful functions for device and memory management, and error handling. HIP is open-source and you can contribute to it.

Figure 3: GPU programming abstraction levels.
Converting CUDA applications to HIP
Manually converting large and complex existing CUDA code projects to HIP is an error-prone and time-consuming process. Given the syntactic similarity between HIP and CUDA, it is possible to build automated conversion tools to translate CUDA code to portable HIP C++. The AMD ROCm™ stack has translation utilities and scripts that significantly speed up the process. These utilities can be used in isolation or combined as part of an iterative process to port larger, more complex CUDA applications, thus reducing manual effort and time to deployment of CUDA applications on AMD-based systems.
What tools to use?
The final choice of the tool or strategy to translate CUDA to HIP depends on multiple factors, including the code complexity and the developer’s design choices. To elucidate, we encourage developers to use the following questionnaire as a template to gather more information about their project:
- How complex is the code structure?
- Uses object-oriented programming?
- Relies on templated classes?
- Dependencies on other libraries and packages?
- Has device-specific code?
- What are the design considerations?
- Should we maintain separate backends for CUDA and HIP?
- Is the code base under active development?
- What is the frequency of updates?
- Are the development efforts focused on a particular feature?
Once the requirements and objectives assessment is complete, developers can choose one of the following strategies to translate their CUDA code to HIP.
A unified wrapper/header
In scenarios where maintaining separate code repositories for CUDA and HIP is not desired and the application does not have any device specific code, one can create a header file with macro definitions that creates an alias of HIP API calls and links it to the existing CUDA APIs. Consider the following snippet as an example:
Copied!
...
#define cudaFree hipFree
#define cudaFreeArray hipFreeArray
#define cudaFreeHost hipHostFree
#define cudaMalloc hipMalloc
#define cudaMallocArray hipMallocArray
#define cudaMallocHost hipHostMalloc
#define cudaMallocManaged hipMallocManaged
#define cudaMemcpy hipMemcpy
...
Here is a header file that you can use as a starting point for your porting project.
Alternatively, one can also use macro definitions to build a unified wrapper as illustrated in the code snippet below. Depending on the architecture the code is compiled for, the wrappers framework calls the corresponding CUDA or HIP APIs under the hood.
Copied!
...
#ifdef _CUDA_ENABLED
	using deviceStream_t = cudaStream_t;
#elif _HIP_ENABLED
	using deviceStream_t = hipStream_t;
#endif
...
| Pros | Cons |
|---|---|
| Easy to maintain | Can take several iterations to link all CUDA APIs |
| Highly portable | Existing optimizations in CUDA may not apply to HIP |
| Add new features easily | Requires manual intervention where CUDA APIs do not have any HIP equivalents |
General tips
- Starting the port on an NVIDIA GPU is often the easiest approach since you can incrementally port pieces of the code to HIP while leaving the rest in CUDA. Recall that on NVIDIA GPUs, HIP is just a thin layer over CUDA, so the two code types can interoperate on nvcc platforms. Also, the HIP port can be compared with the original CUDA code for function and performance.
- Once the CUDA code is ported to HIP and is running on NVIDIA GPUs, compile the HIP code using the HIP compiler on an AMD GPU.
Hipify tools
AMD’s ROCm™ software stack includes utilities that can help translate CUDA APIs into HIP APIs. The following two utilities can be found:
- hipify-clang: a preprocessor that operates within the HIP/Clang compiler tool chain, converting the code as a preliminary step within the compilation process
- hipify-perl: a perl-based script that relies on regular expressions for translation
The hipify tools can scan code to identify any unsupported CUDA functions. A list of supported CUDA APIs can be found in ROCm’s HIPIFY Documentation website.
Hipify-clang
hipify-clang is a preprocessor that uses the Clang compiler to parse the CUDA code and perform semantic translation. It translates CUDA source into an abstract syntax tree, which is traversed by transformation matchers. After applying all the matchers, the output HIP source is produced.
| Pros | Cons |
|---|---|
| Clang-based translator, thus even complicated contructs are parsed successfully | Input CUDA code should be correct, incorrect code will not be translated to HIP |
Supports Clang options like -I, -D, --cuda-path, etc. |
CUDA should be installed and provided in case of multiple installations by --cuda-path option |
| Seamless support of new CUDA versions as it is Clang’s responsibility | All the includes and defines should be provided to transform code successfully |
General usage of hipify-clang is given as:
Copied!
hipify-clang [options] <source0> [... <sourceN>]
where, the available options can be identified by using the command:
Copied!
hipify-clang --help
Consider a simple vectorAdd example, where the original CUDA code takes two vectors A and B and performs elementwise addition and stores the values in a new vector C:
Copied!
C[i] = A[i] + B[i], where i=0,1,.....,N-1
To convert the CUDA code to HIP, one can use hipify-clang as follows:
Copied!
hipify-clang --cuda-path=/your-path/to/cuda -I /your-path/to/cuda/include -o /your-path/to/desired-output-dir/vectorAdd_hip.cpp vectorAdd.cu
The translated HIP code vectorAdd_hip.cpp looks like:
Copied!
#include <hip/hip_runtime.h>
#include <stdio.h>

// Macro for checking errors in CUDA API calls
#define cudaErrorCheck(call)                                                             \
do{                                                                                       \
    hipError_t cuErr = call;                                                             \
    if(hipSuccess != cuErr){                                                             \
      printf("CUDA Error - %s:%d: '%s'\n", __FILE__, __LINE__, hipGetErrorString(cuErr));\
      exit(0);                                                                            \
    }                                                                                     \
}while(0)

// Size of array
#define N 1048576

// Kernel
__global__ void add_vectors_cuda(double *a, double *b, double *c)
{
    int id = blockDim.x * blockIdx.x + threadIdx.x;
    if(id < N) c[id] = a[id] + b[id];
}

// Main program
int main()
{
    // Number of bytes to allocate for N doubles
    size_t bytes = N*sizeof(double);

    // Allocate memory for arrays A, B, and C on host
    double *A = (double*)malloc(bytes);
    double *B = (double*)malloc(bytes);
    double *C = (double*)malloc(bytes);

    // Allocate memory for arrays d_A, d_B, and d_C on device
    double *d_A, *d_B, *d_C;
    cudaErrorCheck( hipMalloc(&d_A, bytes) );
    cudaErrorCheck( hipMalloc(&d_B, bytes) );
    cudaErrorCheck( hipMalloc(&d_C, bytes) );
    ...
A quick inspection of the translated code shows:
- The HIP runtime header has been introduced automatically at the top.
- CUDA types and APIs such as
cudaError_t,cudaMalloc, etc. have been replaced with HIP counterparts. - User definitions, function names, and variables remain the same.
- From ROCm 5.3, the default HIP kernel launch syntax is the same as that in CUDA. The previous
hipLaunchKernelGGLsyntax continues to be supported and can be used by specifiying the--hip-kernel-execution-syntaxoption to hipify-clang.
Hipify-perl
hipify-perl script modifies the CUDA source code directly using a series of simple string replacements.
| Pros | Cons |
|---|---|
| Ease of use | Current disability of transforming the following constructs: macros expansion, namespaces, some templates, host/device function calls, complex argument list parsing |
| It doesn’t check the input source CUDA code for correctness | Can take several iterations along with manual intervention |
| It doesn’t have dependencies on 3rd party tools, including CUDA | No compiler support to check if includes and defines exists |
General usage of hipify-perl is given as:
Copied!
hipify-perl [OPTIONS] INPUT_FILE
where, the available options can be identified by using the command:
Copied!
hipify-perl --help
Using the same vectorAdd example, we can use hipify-perl to convert the CUDA code to HIP as follows:
Copied!
$ hipify-perl -o=your-path/to/desired-output-dir/vectorAdd_hip.cpp vectorAdd.cu
  warning: vectorAdd.cu:#4 : #define cudaErrorCheck(call)                                                              \
  warning: vectorAdd.cu:#36 :     cudaErrorCheck( hipMalloc(&d_A, bytes) );
  warning: vectorAdd.cu:#37 :     cudaErrorCheck( hipMalloc(&d_B, bytes) );
  warning: vectorAdd.cu:#38 :     cudaErrorCheck( hipMalloc(&d_C, bytes) );
  warning: vectorAdd.cu:#49 :     cudaErrorCheck( hipMemcpy(d_A, A, bytes, hipMemcpyHostToDevice) );
  warning: vectorAdd.cu:#50 :     cudaErrorCheck( hipMemcpy(d_B, B, bytes, hipMemcpyHostToDevice) );
  warning: vectorAdd.cu:#71 :     cudaErrorCheck( hipMemcpy(C, d_C, bytes, hipMemcpyDeviceToHost) );
  warning: vectorAdd.cu:#90 :     cudaErrorCheck( hipFree(d_A) );
  warning: vectorAdd.cu:#91 :     cudaErrorCheck( hipFree(d_B) );
  warning: vectorAdd.cu:#92 :     cudaErrorCheck( hipFree(d_C) );
In contrast to hipify-clang, running the hipify-perl script generates a lot of warnings. Since hipify-perl uses string matching and replacements to translate the supported CUDA APIs to corresponding HIP APIs, it is unable to find a replacement for the user-defined cudaErrorCheck() function and prints out warnings for each line where it finds this function call. A quick inspection of the translated code stored in the specified output directory shows:
- The translated code generated by hipify-perl is the same as that translated by hipify-clang.
- User-defined functions, macros, and variables are not changed.
- From ROCm v5.3, the default HIP kernel launch syntax is the same as that in CUDA. The previous
hipLaunchKernelGGLsyntax continues to be supported and can be used by specifiying the--hip-kernel-execution-syntaxoption to hipify-perl.
General tips for using Hipify tools
- hipify-perl is easier to use and does not rely on third-party libraries like CUDA.
- Translating code with hipify-perl may need several iterations. After the first pass, build the code using
hipcc. Correct any compiler errors or warnings and compile again. Continue this cycle until a working HIP code is achieved. - Other pre-packaged utilities can also be used to help gather information about the CUDA to HIP code translation. For example, you could use:
- The hipexamine-perl.sh tool to scan a source directory to determine which files contain CUDA code and how much of that code can be automatically hipified.
- The hipconvertinplace-perl.sh script to perform in-place conversion for all code files in the specified directory.
- The “in-place” conversion may not always be the right choice, especially if you wish to have both CUDA and HIP code side-by-side.
- The similarity seen in hipify-perl and hipify-clang translated codes may hold true for simple examples such as the one considered here. However, hipify-perl has known limitations and its use should call for caution.
Portable HIP build system
One of the most powerful features of HIP is that, if the original code is using HIP supported CUDA API, then the HIP translated code can run on both AMD and NVIDIA GPUs. Currently, many applications that target both platforms have dual repositories and a build system for HIP and CUDA, respectively. With ROCm™ we can have a portable HIP build system to avoid maintaining two separate code bases for the same project.
In a portable HIP build system, it is possible to select either an amd or an nvidia platform to run on. By setting the HIP_PLATFORM environment variable, we can choose the path hipcc targets. If HIP_PLATFORM=amd, then hipcc will call the clang compiler and the ROCclr runtime to compile code for AMD GPUs. If HIP_PLATFORM=nvidia, then hipcc will call nvcc, the CUDA compiler driver, to compile code for NVIDIA GPUs. The platform selection also determines which headers are included and which libraries are used for linking.
This section shows how to achieve portability with two widely known build systems, Make and CMake.
Portable Make build system
In the Makefile example below, we can choose to build for either AMD or NVIDIA GPUs by simply setting HIP_PLATFORM to the desired default device, amd or nvidia. Setting the -x flag to either cu or hip will instruct the build system to compile to the desired device regardless of the file extension. However, it should be noted that in the end, both compilers map to LLVM.
Copied!
EXECUTABLE = vectoradd

all: $(EXECUTABLE) test
.PHONY: test

SOURCE = vectorAdd_hip.cpp
CXXFLAGS = -g -O2 -fPIC
HIPCC_FLAGS = -O2 -g
HIP_PLATFORM ?= amd
HIP_PATH ?= $(shell hipconfig --path)

ifeq ($(HIP_PLATFORM), nvidia)
	HIPCC_FLAGS += -x cu -I${HIP_PATH}/include/
	LDFLAGS = -lcudadevrt -lcudart_static -lrt
endif

ifeq ($(HIP_PLATFORM), amd)
   HIPCC_FLAGS += -x hip
   LDFLAGS = -L${ROCM_PATH}/hip/lib -lamdhip64
endif

$(EXECUTABLE):
	hipcc $(HIPCC_FLAGS) $(LDFLAGS) -o $(EXECUTABLE) $(SOURCE)
test:
	./$(EXECUTABLE)
clean:
	rm -f $(EXECUTABLE)
For code that will run on an AMD platform, we need to have ROCm™ installed, and set the CXX variable to the recommended clang++, e.g. export CXX=${ROCM_PATH}/llvm/bin/clang++, then build with make and run the same vectorAdd application as in the previous section.
Copied!
make
./vectoradd
For code that will run on an NVIDIA platform, we need to install both CUDA and ROCm™, which provides the HIP portability layer, and set HIP_PLATFORM=nvidia to override the default and instead compile for NVIDIA GPUs.
Copied!
HIP_PLATFORM=nvidia
make
./vectoradd
Portable CMake build system
Similarly to the previous Make example, the idea is to have a build system that allows users to switch between the two GPU runtimes, HIP and CUDA. The code below shows how to implement the switching in CMakeLists.txt
Copied!
...
if (NOT CMAKE_GPU_RUNTIME)
   set(GPU_RUNTIME "HIP" CACHE STRING "Switches between HIP and CUDA")
else (NOT CMAKE_GPU_RUNTIME)
   set(GPU_RUNTIME "${CMAKE_GPU_RUNTIME}" CACHE STRING "Switches between HIP and CUDA")
endif (NOT CMAKE_GPU_RUNTIME)
Next, to build the HIP code on both AMD and NVIDIA systems, it is necessary to enable HIP language support in CMake and setup hipcc as the compiler along with corresponding compile device flags:
Copied!
enable_language(HIP)

if (${GPU_RUNTIME} MATCHES "HIP")
   set (VECTORADD_CXX_FLAGS "-fPIC")
elseif (${GPU_RUNTIME} MATCHES "CUDA")
   set (VECTORADD_CXX_FLAGS "-I $ENV{ROCM_PATH}/include")
else ()
   message (FATAL_ERROR "GPU runtime not supported!")
endif ()

set(CMAKE_CXX_COMPILER hipcc)

set (CMAKE_CXX_FLAGS "${CMAKE_CXX_FLAGS} ${VECTORADD_CXX_FLAGS}")
set (CMAKE_CXX_FLAGS_RELEASE "${CMAKE_CXX_FLAGS_RELEASE} ${VECTORADD_CXX_FLAGS}")
set (CMAKE_CXX_FLAGS_DEBUG "${CMAKE_CXX_FLAGS_DEBUG} ${VECTORADD_CXX_FLAGS} -ggdb")
Finally, an executable is created and the target must be linked with the corresponding runtime on AMD and NVIDIA systems:
Copied!
set (SOURCE vectorAdd_hip.cpp)

add_executable(vectoradd ${SOURCE})
if (${GPU_RUNTIME} MATCHES "HIP")
   target_link_libraries (vectoradd "-L$ENV{ROCM_PATH}/lib" amdhip64)
elseif (${GPU_RUNTIME} MATCHES "CUDA")
   target_link_libraries (vectoradd cudadevrt cudart_static rt)
endif ()
Provided that ROCm™ and CMake are installed, the code can be configured to run on AMD GPUs with cmake and the executable can be built and launched by running the following commands:
Copied!
mkdir build && cd build
cmake ..
make
./vectoradd
For code intended to run on NVIDIA GPUs, both CUDA and ROCm™ stacks must be installed in addition to CMake. Similar to the Make example, HIP_PLATFORM must be setup and the code must be configured with the CUDA GPU runtime instead:
Copied!
mkdir build && cd build
export HIP_PLATFORM=nvidia
cmake -DCMAKE_GPU_RUNTIME=CUDA ..
make
./vectoradd
If HIP_PLATFORM is not properly setup on NVIDIA systems, CMake and Make will still configure and build the code, however, run-time errors may be observed, such as this:
Copied!
./vectoradd
CUDA Error - vectorAdd_hip.cpp:38: 'invalid device ordinal'
On both AMD and NVIDIA GPUs, CMake will detect and build GPU targets for the underlying architecture automatically, however, in cases where the target must be built for a different architecture, users can explicitly specify CMAKE_HIP_ARCHITECTURES or CMAKE_CUDA_ARCHITECTURES. For more details, refer to CMake documentation.
Additional porting considerations
During the porting process, it is important to check for inline PTX assembly code, CUDA instrinsics, hardcoded dependencies, unsupported functions, any code that limits the size of the register file on NVIDIA hardware, and any other constructs that the hipify tools cannot convert. Since the hipify tools do not run the application, it is necessary to manually change any hardcoded constructs, an example being the warp size set to 32. For this reason, it is recommended to avoid hardcoding the warp size, and instead rely on the WarpSize device definition, #define WARPSIZE size, or props.warpSize to get the right value from the runtime. THe hipify tools do not convert build scripts either. Setting the appropriate flags and paths to build the newly converted HIP code has to be done manually.
Additional code examples that convert CUDA code to HIP and accompanying portable build systems are found in the HIP training series repository.
Conclusion
We have shown a variety of ROCm™ tools that developers can leverage to convert their codes from CUDA to HIP. These tools speed up and ease the conversion process significantly. We have also illustrated one of the most powerful features of HIP, which is its ability to run on both AMD and NVIDIA GPUs, by showing examples of portable build systems with both Make and CMake.
Unlike many other GPU-programmming paradigms, the HIP API is a thin layer that sits close to the hardware, enabling HIP code to run with similar performance as its counterpart on NVIDIA GPUs.
Next time
Stay tuned as we release further posts in this series that will cover more advanced topics. If you have any questions or comments, you can reach out to us on GitHub Discussions.