


User Debug Markers
User markers can help application developers to correlate the data seen in RGP with their application behavior. User Markers are currently not supported for OpenCL or HIP.
DirectX12 User Markers
For DirectX12, there are two recommended ways to instrument your application with user markers that can be viewed within RGP:
-
using Microsoft® PIX3 event instrumentation, or
-
using the debug marker support in AMD GPU Services (AGS) Library.
Using PIX3 event instrumentation for DirectX12 user debug markers
If your application has been instrumented with PIX3 user markers, then to view the markers within RGP is a simple matter of recompiling the source code of the application with a slightly modified PIX header file. The steps described here require a WinPixEventRuntime version of at least 1.0.200127001.
The PIX3 event instrumentation functions supported by RGP are:
Copied!
void PIXBeginEvent(ID3D12GraphicsCommandList* commandList, ...)
void PIXEndEvent(ID3D12GraphicsCommandList* commandList)
void PIXSetMarker(ID3D12GraphicsCommandList* commandList, ...)
The steps to update the PIX header file are:
1. Copy the entire samples\AmdDxExt folder provided in the RGP package to the location where the PIX header files (pix3.h, pix3_win.h) reside (typically at WinPixEventRuntime.[x.x]\Include\WinPixEventRuntime).
-
Add
#include "AmdDxExt\AmdPix3.h"to the top ofPIXEvents.h:
When using WinPixEventRuntime version 1.0.210209001 or newer:
Copied!
#if defined(USE_PIX) || !defined(PIX_XBOX)
  #define PIX_CONTEXT_EMIT_CPU_EVENTS

  #ifndef PIX_XBOX
    #include "AmdDxExt\\AmdPix3.h"
    #define PIX_AMD_EXT
  #endif
#endif
When using WinPixEventRuntime version 1.0.200127001:
Copied!
#include "PIXEventsCommon.h"

#if defined(XBOX) || defined(_XBOX_ONE) || defined(_DURANGO)
# define PIX_XBOX
#else
#include "AmdDxExt\\AmdPix3.h"
#endif
3. Update the PIXEvents.h file to add an Rgp prefix to the the existing calls to PIXBeginEventOnContextCpu, PIXEndEventOnContextCpu and PIXSetMarkerOnContextCpu:
When using WinPixEventRuntime version 1.0.231030001 or newer:
Copied!
#ifdef PIX_CONTEXT_EMIT_CPU_EVENTS
#ifdef PIX_AMD_EXT
  RgpPIXBeginEventOnContextCpu(destination, eventSize, context, color, formatString, args...);
#else
  PIXBeginEventOnContextCpu(destination, eventSize, context, color, formatString, args...);
#endif
#endif
Copied!
#ifdef PIX_CONTEXT_EMIT_CPU_EVENTS
#ifdef PIX_AMD_EXT
  RgpPIXSetMarkerOnContextCpu(destination, eventSize, context, color, formatString, args...);
#else
  PIXSetMarkerOnContextCpu(destination, eventSize, context, color, formatString, args...);
#endif
#endif
Copied!
#ifdef PIX_CONTEXT_EMIT_CPU_EVENTS
#ifdef PIX_AMD_EXT
  RgpPIXEndEventOnContextCpu(destination, context);
#else
  destination = PIXEndEventOnContextCpu(context);
#endif
#endif
When using WinPixEventRuntime version 1.0.210209001 up to 1.0.230302001:
Copied!
#ifdef PIX_CONTEXT_EMIT_CPU_EVENTS
#ifdef PIX_AMD_EXT
  RgpPIXBeginEventOnContextCpuLegacy(context, color, formatString, args...);
#else
  PIXBeginEventOnContextCpu(context, color, formatString, args...);
#endif
#endif
Copied!
#ifdef PIX_CONTEXT_EMIT_CPU_EVENTS
#ifdef PIX_AMD_EXT
  RgpPIXSetMarkerOnContextCpuLegacy(context, color, formatString, args...);
#else
  PIXSetMarkerOnContextCpu(context, color, formatString, args...);
#endif
#endif
Copied!
#ifdef PIX_CONTEXT_EMIT_CPU_EVENTS
#ifdef PIX_AMD_EXT
  RgpPIXEndEventOnContextCpuLegacy(context);
#else
  PIXEndEventOnContextCpu(context);
#endif
#endif
When using WinPixEventRuntime version 1.0.200127001:
Copied!
#if PIX_XBOX
  PIXBeginEvent(color, formatString, args...);
#else
#ifdef PIX_AMD_EXT
  RgpPIXBeginEventOnContextCpuLegacy(context, color, formatString, args...);
#else
  PIXBeginEventOnContextCpu(context, color, formatString, args...);
#endif
#endif
Copied!
#if PIX_XBOX
  PIXEndEvent();
#else
#ifdef PIX_AMD_EXT
   RgpPIXEndEventOnContextCpuLegacy(context);
#else
   PIXEndEventOnContextCpu(context);
#endif
#endif
Copied!
#if PIX_XBOX
  PIXSetMarker(color, formatString, args...);
#else
#ifdef PIX_AMD_EXT
  RgpPIXSetMarkerOnContextCpuLegacy(context, color, formatString, args...);
#else
  PIXSetMarkerOnContextCpu(context, color, formatString, args...);
#endif
#endif
4. Recompile the application. Note that the RGP user markers are only enabled when the corresponding PIX event instrumentation is also enabled with one of the preprocessor symbols: USE_PIX, DBG, _DEBUG, PROFILE, or PROFILE_BUILD.
The PIX3 event instrumentation within the application continues to be usable for Microsoft PIX tool without additional side effects or overhead.
To find a more complete description of how to use the PIX event instrumentation, refer to https://blogs.msdn.microsoft.com/pix/winpixeventruntime/.
See many examples of using PIX event instrumentation at https://github.com/Microsoft/DirectX-Graphics-Samples.
Using AGS for DirectX12 user debug markers
The AMD GPU Services (AGS) library provides software developers with the ability to query AMD GPU software and hardware state information that is not normally available through standard operating systems or graphic APIs. AGS includes support for querying graphics driver version info, GPU performance, CrossFire™ (AMD’s multi-GPU rendering technology) configuration info, and Eyefinity (AMD’s multi-display rendering technology) configuration info. AGS also exposes the explicit Crossfire API extension, GCN shader extensions, and additional extensions supported in the AMD drivers for DirectX® 11 and DirectX 12. One of the features in AGS is the support for DirectX 12 user debug markers.
User markers can be inserted into your application using AGS function calls. The inserted user markers can then be viewed within RGP. The main steps to obtaining user markers are described below.
Articles and blogs about AGS can be found here: https://gpuopen.com/amd-gpu-services-ags-library/
Additional API documentation for AGS can be found at: https://gpuopen-librariesandsdks.github.io/ags/
Download AGS
Download the AGS library from: https://github.com/GPUOpen-LibrariesAndSDKs/AGS_SDK/
The library consists of pre-built Windows libraries, DLLs, sample and documentation. You will need to use files in the following two dirs.
-
Headers: AGS_SDK-master\ags_lib\inc
-
Libraries: AGS_SDK-master\ags_lib\lib
Integrate AGS header, libs, and DLL into your project
AGS requires one header (amd_ags.h) to be included in your source code. Add the location of the AGS header to the Visual Studio project settings and include the header in the relevant code files.
#include “amd_ags.h”
Link your exe against correct AGS library for your project (32 or 64bit, MD or MT static library, debug or release, or DLL).
|
Library Name |
AGS Runtime DLL required |
Library Type |
|
|---|---|---|---|
|
64 Bit |
amd_ags_x64.lib |
amd_ags_x64.dll |
DLL |
|
amd_ags_x64_2015_MD.lib |
NA |
VS2015 Lib (multithreaded dll runtime library) |
|
|
amd_ags_x64_2015_MT.lib |
NA |
VS2015 Lib (multithreaded static runtime library) |
|
|
amd_ags_x64_2015_MDd.lib |
NA |
VS2015 Lib (debug multithreaded dll runtime library) |
|
|
amd_ags_x64_2015_MTd.lib |
NA |
VS2015 Lib (debug multithreaded static runtime library) |
|
|
amd_ags_x64_2017_MD.lib |
NA |
VS2017 Lib (multithreaded dll runtime library) |
|
|
amd_ags_x64_2017_MT.lib |
NA |
VS2017 Lib (multithreaded static runtime library |
|
|
amd_ags_x64_2017_MDd.lib |
NA |
VS2017 Lib (debug multithreaded dll runtime library) |
|
|
amd_ags_x64_2017_MTd.lib |
NA |
VS2017 Lib (debug multithreaded static runtime library) |
|
|
amd_ags_x64_2019_MD.lib |
NA |
VS2019 Lib (multithreaded dll runtime library) |
|
|
amd_ags_x64_2019_MT.lib |
NA |
VS2019 Lib (multithreaded static runtime library |
|
|
amd_ags_x64_2019_MDd.lib |
NA |
VS2019 Lib (debug multithreaded dll runtime library) |
|
|
amd_ags_x64_2019_MTd.lib |
NA |
VS2019 Lib (debug multithreaded static runtime library) |
|
|
32 Bit |
amd_ags_x86.lib |
amd_ags_x86.dll |
DLL |
|
amd_ags_x86_2015_MD.lib |
NA |
VS2015 Lib (multithreaded dll runtime library) |
|
|
amd_ags_x86_2015_MT.lib |
NA |
VS2015 Lib (multithreaded static runtime library) |
|
|
amd_ags_x86_2015_MDd.lib |
NA |
VS2015 Lib (debug multithreaded dll runtime library) |
|
|
amd_ags_x86_2015_MTd.lib |
NA |
VS2015 Lib (debug multithreaded static runtime library) |
|
|
amd_ags_x86_2017_MD.lib |
NA |
VS2017 Lib (multithreaded dll runtime library) |
|
|
amd_ags_x86_2017_MT.lib |
NA |
VS2017 Lib (multithreaded static runtime library) |
|
|
amd_ags_x86_2017_MDd.lib |
NA |
VS2017 Lib (debug multithreaded dll runtime library) |
|
|
amd_ags_x86_2017_MTd.lib |
NA |
VS2017 Lib (debug multithreaded static runtime library) |
|
|
amd_ags_x86_2019_MD.lib |
NA |
VS2019 Lib (multithreaded dll runtime library) |
|
|
amd_ags_x86_2019_MT.lib |
NA |
VS2019 Lib (multithreaded static runtime library |
|
|
amd_ags_x86_2019_MDd.lib |
NA |
VS2019 Lib (debug multithreaded dll runtime library) |
|
|
amd_ags_x86_2019_MTd.lib |
NA |
VS2019 Lib (debug multithreaded static runtime library) |
Initialize AGS
When you have your project building the first thing to do is to initialize the AGS context.
Copied!
// Specify AGS configuration (optional memory allocation callbacks)
AGSConfiguration config = {};

// Initialize AGS
AGSReturnCode agsInitReturn = agsInitialize(AGS_MAKE_VERSION(AMD_AGS_VERSION_MAJOR, AMD_AGS_VERSION_MINOR, AMD_AGS_VERSION_PATCH), &config, &m_AGSContext, &m_AmdgpuInfo);

// Report error on AGS initialization failure
if (agsInitReturn != AGS_SUCCESS)
{
        printf("\\\\nError: AGS Library was NOT initialized - Return Code %d\\\\n", agsInitReturn);
}
Initialize the DirectX12 Extension
Once the AGS extension has been successfully created we need to create the DirectX12 extension as follows:
Copied!
// Create the device using AGS
AGSDX12DeviceCreationParams dxCreateParams = {hardwareAdapter.Get(), __uuidof(ID3D12Device), D3D_FEATURE_LEVEL_11_0};
AGSDX12ReturnedParams dxReturnedParams;
AGSReturnCode dxInitReturn = agsDriverExtensionsDX12_CreateDevice(m_AGSContext, &dxCreateParams, nullptr, &dxReturnedParams);

// Report error on AGS DX12 device creation failure
if (dxInitReturn != AGS_SUCCESS)
{
        printf("Error: AGS DX12 extension could not create a device - Return Code %d\\n", agsInitReturn);
}
else
{
        printf("AGS DX12 device was created.\\n");
        m_device = dxReturnedParams.pDevice;

        // Check whether user markers are supported by the current driver
        if (dxReturnedParams.extensionsSupported.userMarkers == 1)
        {
                printf("AGS_DX12_EXTENSION_USER_MARKERS are supported.\\n");
        }
        else
        {
                printf("AGS_DX12_EXTENSION_USER_MARKERS are NOT supported.\\n");
        }
}
Please note that the above code checks if the driver is capable of supporting user markers by looking at the extensions supported by the driver. This step may fail on older drivers.
Insert Markers in Application
The main functions provided by AGS for marking applications are:
Copied!
agsDriverExtensionsDX12_PushMarker;
agsDriverExtensionsDX12_PopMarker;
agsDriverExtensionsDX12_SetMarker;
The below example shows how a draw call can be enclosed within a “Draw Particles” user marker, followed by inserting a marker.
Copied!
// Push a marker
agsDriverExtensionsDX12_PushMarker(m_AGSContext, pCommandList, "DrawParticles");

// This draw call will be in the "Draw Particles" User Marker
pCommandList->DrawInstanced(ParticleCount, 1, 0, 0);

// Pop a marker
agsDriverExtensionsDX12_PopMarker(m_AGSContext, pCommandList);

// Insert a marker
agsDriverExtensionsDX12_SetMarker(m_AGSContext, pCommandList, "Finished Drawing Particles");
Vulkan User Markers
Debug Utils Extension
Vulkan has support for user debug markers using the VK_EXT_debug_utils extension. Documentation on this extension can be seen here:
https://www.lunarg.com/wp-content/uploads/2018/05/Vulkan-Debug-Utils_05_18_v1.pdf
A code sample can be seen at:
https://github.com/SaschaWillems/Vulkan/blob/master/examples/debugutils/debugutils.cpp
Debug Marker Extension
An older, deprecated extension, VK_EXT_debug_marker, also exists. The following article has details on this older extension:
Both VK_EXT_debug_utils and VK_EXT_debug_marker extensions are supported in RGP. Inserting user markers via these extensions should generate user events in your RGP profile which can be viewed in the RGP user interface.
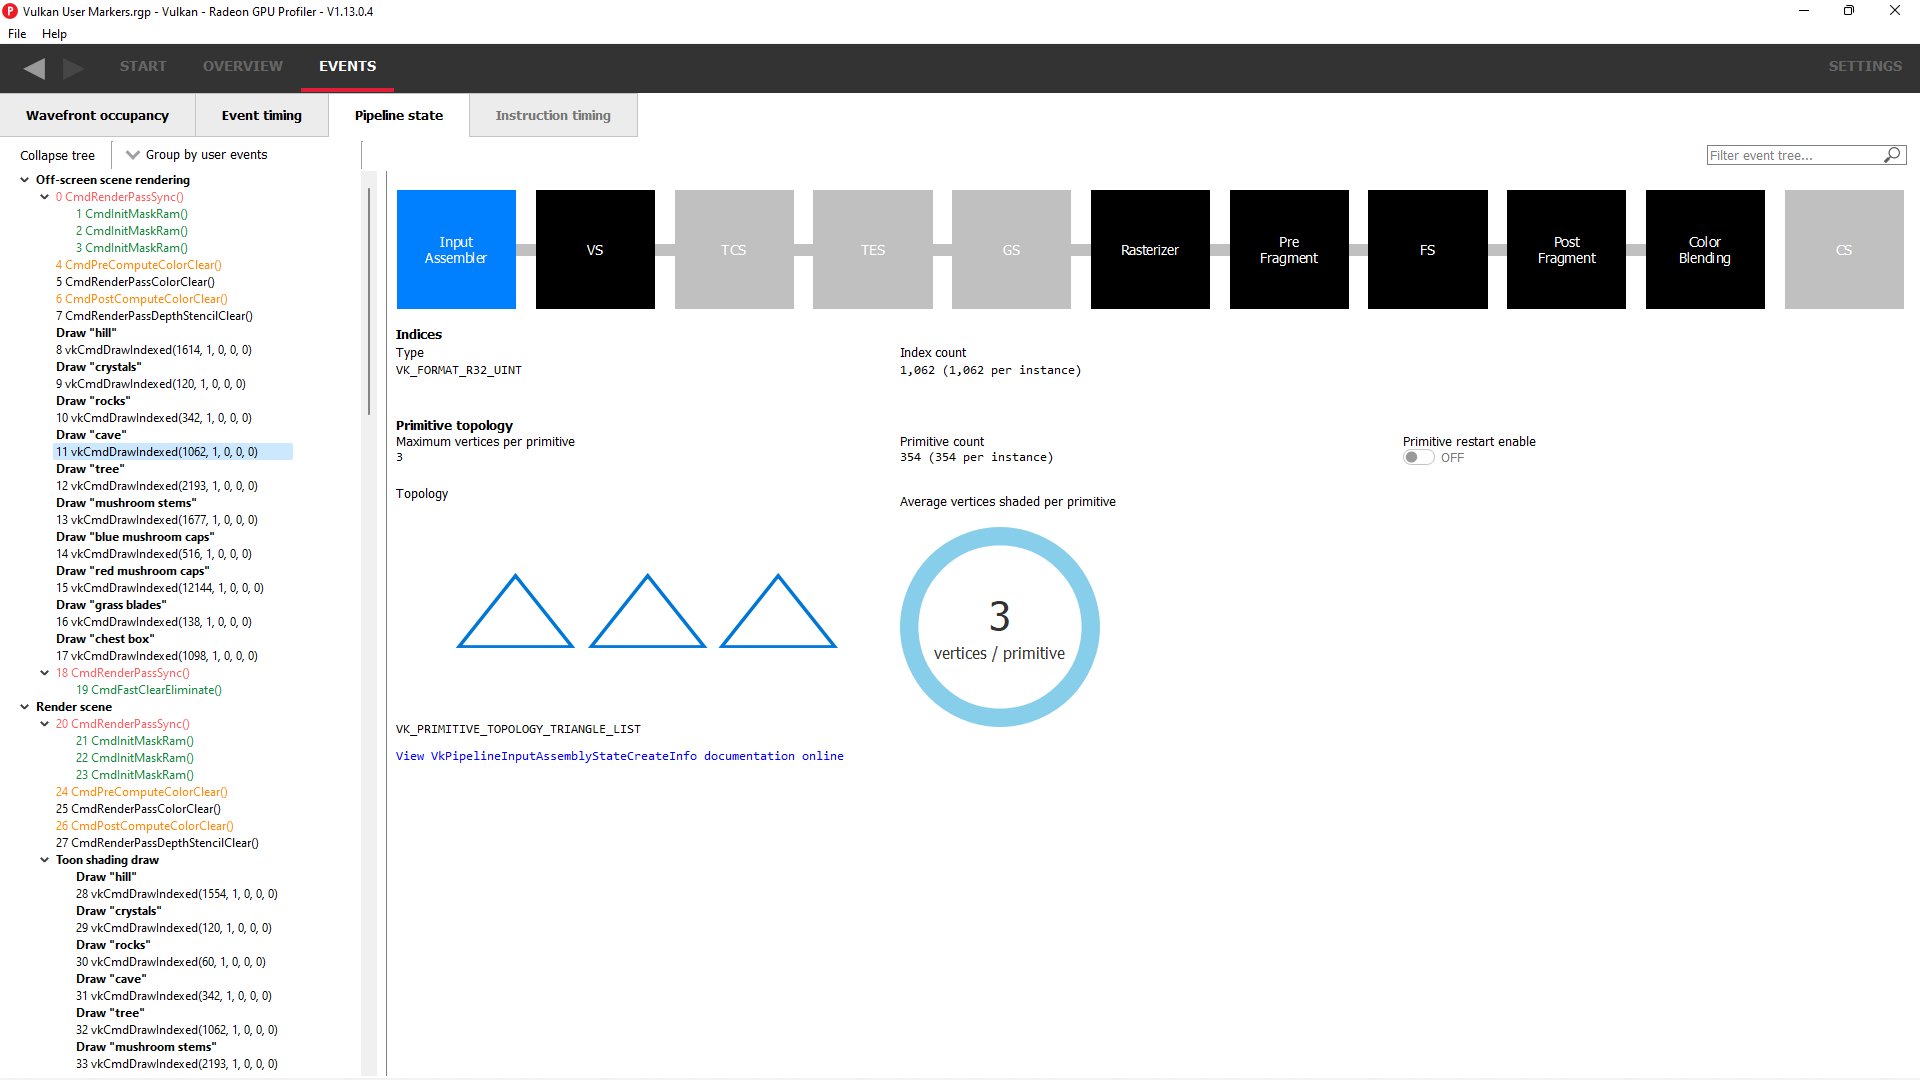
Viewing User Markers
The RGP file captured for a frame of the above application contains many user markers. The user markers can be seen in the “Event timing” and “Pipeline state” views when you choose the “Group by User Marker” option as shown below.
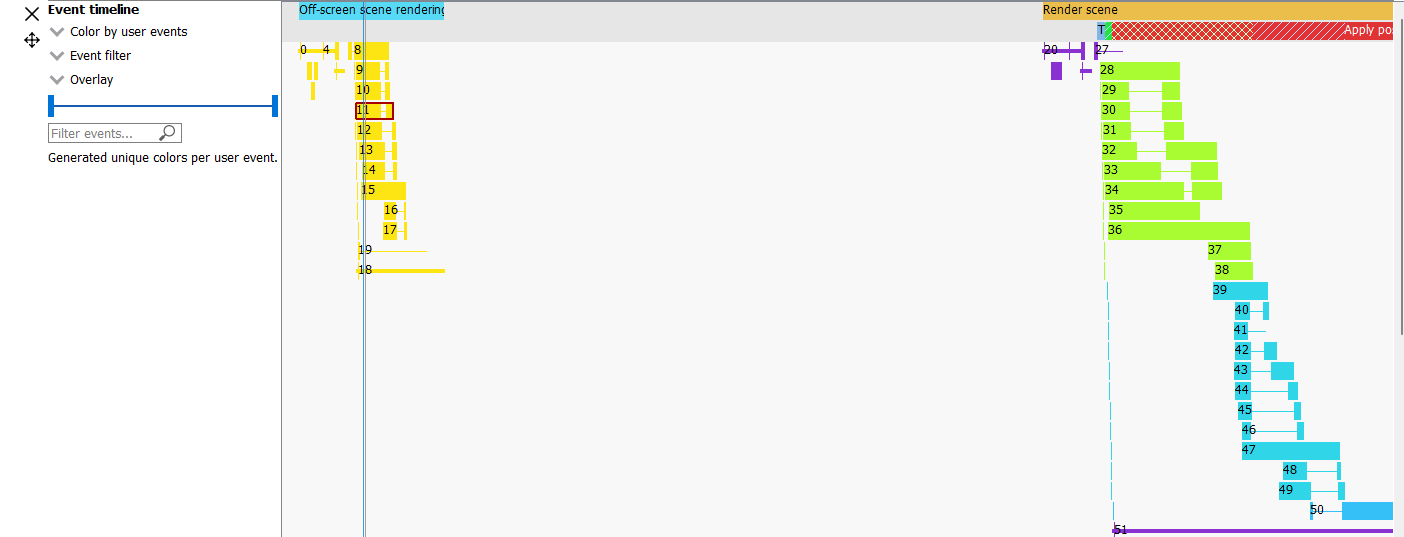
“Draw Particles” User marker with the draw calls enclosed in the User Marker
User markers can also be seen in the wavefront occupancy view when you color by user events. Coloring by user events is also possible in the event timing view. As seen below, any events enclosed by the same user marker will be shown with the same color. Any events not enclosed by user markers are shown in grey. The coloration is only affected by the Push/PopMarker combination; the SetMarker has no effect on the user event color since these markers simply mark a particular moment in time.
Additionally, the user event names are displayed in an Overlay at the top of the event timeline view.
The full user event hierarchy is also visible on the third line of the side pane when clicking on individual events. If the event does not contain a user event hierarchy, nothing will be shown.
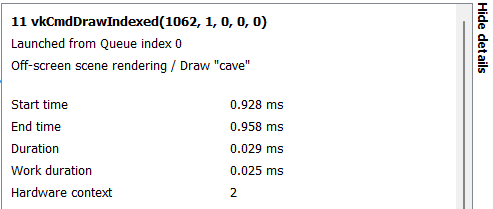
Events enclosed by user markers are colored in the wavefront occupancy view. They are also visible in the side panel.