Overview
Key Features:
- [ ](#shader development)Shader Development
- [ ](#debugging shaders and performance tuning)Debugging Shaders and Performance Tuning
- [ ](#managing effect data)Managing Effect Data
- [ ](#involving_artists in the shader creation)Artist Interface
- [ ](#custom component creation)Custom Component Creation
- [ ](#collada opengl effects)COLLADA OpenGL Effects Exporter and Mesh Importer
Application Design and Philosophy
Real-time high performance shaders are at the heart of all new visual effects and they will continue to be the foundation of an amazing graphical experience for the future. The RenderMonkey IDE has been created to fill the need for shader content creation tools in a coherent environment—flexible and powerful for programmers, yet familiar and intuitive for artists. With the introduction of the DirectX, OpenGL and OpenGL ES high level shading languages, the complexity of real-time shaders has increased. The rapid evolution of the shading capabilities of graphics hardware had caused an explosion in the the amount of shader content necessary for real-time graphics projects, fueling the need for a powerful real-time shader IDE. The RenderMonkey environment not only allows easy shader prototyping and development, but also provides a mechanism for managing the shaders and all of the associated visual resources in a single environment.
Standard Graphics APIs
The RenderMonkey IDE enables shader production on any hardware supporting standard graphics APIs—the latest release of the RenderMonkey IDE provides integrated support for DirectX 9.1, OpenGL 2.0, and OpenGL ES 2.0.
Programmers and Artists
RenderMonkey has been designed to meet the needs of [ ](#shader development)programmers and [ ](#involving_artists in the shader creation)artists, allowing both to collaborate on shader effects. Separate interfaces exist in RenderMonkey for programming by technical shader developers as well as for purely visual modification by non-technical artists. RenderMonkey allows anyone interested in creating shaders to dive straight into the shader creation process.
The program allows the structure of an effect, including the body of the shader and all assets, to be [ ](#managing effect data)visualized in a tree structure. Users can view the gradual build-up of an effect by examining individual rendering passes in the application’s rendering windows or by dynamically examining the contents of all renderable textures. RenderMonkey enables quick debugging of shaders via interactive output of intermediate results computed by the shader. This can be particularly useful in teaching environments where visualizing an intermediate result is fundamental to understanding. RenderMonkey has been chosen by several universities to teach shader technology in their graphics curriculum.
The application includes a variety of convenient features which give programmers fine control over their development environment. Optimization hints are included to aid in the analysis of shader performance,while both artists and programmers have access to familiar and intuitive GUI widgets for interactively editing parameters to shaders. The visual results of these modifications are instantly viewable on the integrated rendering preview window.
Integrating Into Existing Production Pipelines
RenderMonkey makes adoption of shader technology easier for both developers and artists, providing easy integration into existing workflows and the ability to customize desired components to suit the needs for any production. Studios using RenderMonkey can rapidly prototype shader effects in the early stages of a project, enabling key visual effect decisions to be made sooner, and thereby improving the final look of any product with minimal impact on schedules.
RenderMonkey can be easily customized and integrated into any developer’s regular workflow through the use of the RenderMonkey SDK. The application ships with a standard set of plug-in examples and also contains a plug-in wizard, enabling easy creation of custom components. The SDK gives developers full access to the entire run-time database of shader data. The SDK is written in standard C++ with all of the necessary components for plug-in development. It also provides libraries for user interface widget creation to allow developers to maintain the look and feel of the application without investing significant effort into UI development.
Shader Development
Shader Editors
For each shading language supported by RenderMonkey, there is an associated shader editor with user-customizable syntax highlighting. Users can customize text editing settings, such as font, keyword colors and tab inserting / spacing via the shader editor preferences.
The shader editors provide users with integrated compilation error reporting– mapping errors to the corresponding line in the source code.The DirectX shader editors also aid shader development with a set of convenient optimization hints.
Use Engine-driven Shader Parameters in RenderMonkey
Developers must use engine parameters in shaders in order to write shader-based effects for any real-world application. Frequently used engine-driven parameters are, for example, transformation matrices, time, random numbers etc. RenderMonkey provides a number of predefined variables that allow this engine specific behaviour to be replicated in RenderMonkey. To simplify integration, the names of the predefined variables can be customized to match those used in the engine. Support is included for nearly 80 different engine-driven parameters, such as a full set of transformation matrices (including inverse and transpose matrices), mouse parameters, randomly generated variables, viewport parameters, camera parameters, geometric object data etc. By default, the RenderMonkey semantics match the variable annotations for the latest version of the Microsoft FX file format (0.8)
Edit Shader Parameters Using Convenient GUI Widgets
All shader parameters in RenderMonkey can be edited using intuitive GUI widgets associated with the parameter type. The users can edit colors using a color wheel widget, scalar, and vector variables with convenient numeric sliders, modify texture / sampler states while previewing texture surfaces associated with those texture stages and many more.
Advanced Feature Set for DirectX Effect Creation
RenderMonkey version 1.71 supports the latest version of DirectX 9.1 and includes support for all available shader models. Developers can create effects that use multiple render target support, which allows for a variety of interesting algorithms, such as deferred shading, to be used. Each draw call in a DirectX effect of RenderMonkey can output to up to 4 separate render targets at a time (Note that you must use shader model 2.0 or higher for this functionality).
Additionally, developers can set up any back buffer and depth / stencil buffer formats for rendering, specify multisampling type for the rendered effect and control clear color and default camera settings.
Shader programmers can also use HLSL include files for DirectX shader development. RenderMonkey ships with a set of useful library functions that developers can use in their shader development (HLSL include files “RmInclude.h” and “RmMath.h” located in the directory UserData/HLSLIncludes). Developers can set up the include path in the style similar to the Visual Studio project include path.
RenderMonkey ships with a .FX file format exporter. This supports the latest version of the Microsoft Standard .FX annotations (0.8). The exporter minimizes name space collisions for easier compilation and integration of effects. RenderMonkey also outputs appropriate UI annotations for each RenderMonkey variable and associated parameters (such as min/max clamping bounds for scalars, etc), thus allowing better integration with the Maya preview plug-in shipped with the latest Microsoft DirectX 9.1 SDK for XNA preview pipeline.
Generate New Look-Up Tables and Geometric Objects to Suit Your Needs
The RenderMonkey IDE provides standard plug-ins for procedural texture generation. Programmers and artists can specify functions in HLSL to procedurally generate 2D textures, cube maps and volume textures. The newly generated textures can be previewed dynamically via the texture preview mechanism and/or saved to file for later use. This allows very easy creation of texture look-up tables for any effect. RenderMonkey also allows users to save the contents of any renderable texture to file at any point. Thus anything rendered in the preview window can also be saved as a look-up texture or for any other additional purpose (such as shader debugging).
Similarly, RenderMonkey provides several plug-ins for geometry object generation. Users can generate any basic geometric shapes using modifiable parameters. The generated objects can also be saved (in the .X file format) for later use. RenderMonkey allows automatic generation of edge quads for any model. This can be used for shadow volume generation or for fur fins.
To generate a procedural texture or geometry model, the user selects from a list of available generator plug-ins and specifies parameters for the plug-in. The data can be saved to either texture or model files via the “Save…” menu for each node. If the user doesn’t save procedurally generated data, its parameters (for example, texture shader or geometry parameters) are saved along with the node and the data will be regenerated upon workspace load. Procedural geometry and texture data is available for use for DirectX, OpenGL and OpenGL ES workspaces.
Debugging Shaders and Performance Tuning
Interactive preview with full error reporting
The DirectX, OpenGL, and OpenGL ES preview windows respond immediately to any changes to the database while rendering effects. This means that editing any shader parameter instantly modifies rendering in the preview window, making it very easy to iterate on the effect’s look and feel.
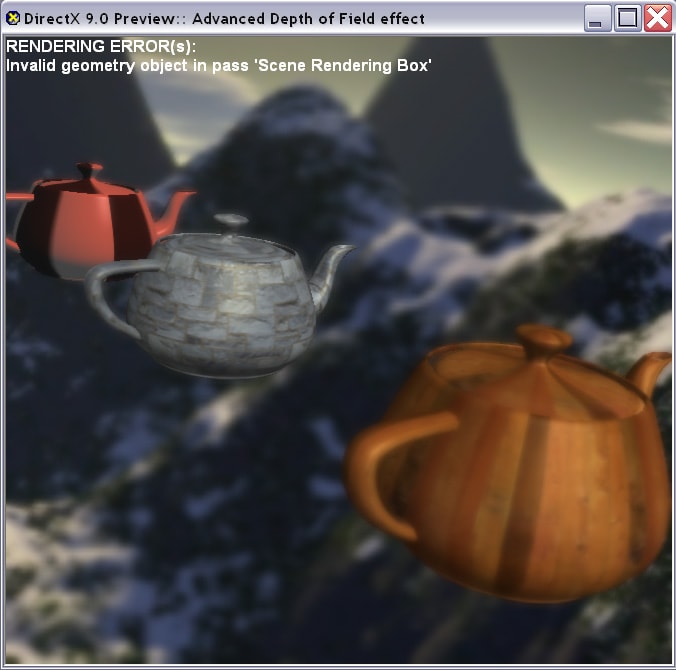
The preview window also provides automatic error reporting for any invalid or missing resources required to render the current effect. Examples of this type of error include: rendering an effect which has a constant not bound correctly to a RenderMonkey variable node; attempts to render using an invalid stream map, missing geometry objects or textures, invalid render target.
For these errors, an error message is displayed in both the output window and also overlaid on the preview window. The example image shown on the left displays an error because a geometry object is missing for one of the draw calls.
RenderMonkey also initializes renderable textures to green to notify the developer if they are used before being primed, and may therefore contain garbage information.
Know What the Algorithm is Actually Doing – Easy Ways to Determine When Things Go Wrong
There are many different ways to debug a shader algorithm in RenderMonkey. The simplest way is to just output a desired quantity as resulting color to the preview window (for example, view vector as colors). The interactivity of RenderMonkey’s shader development and preview pipeline makes this a very simple and intuitive debugging technique.
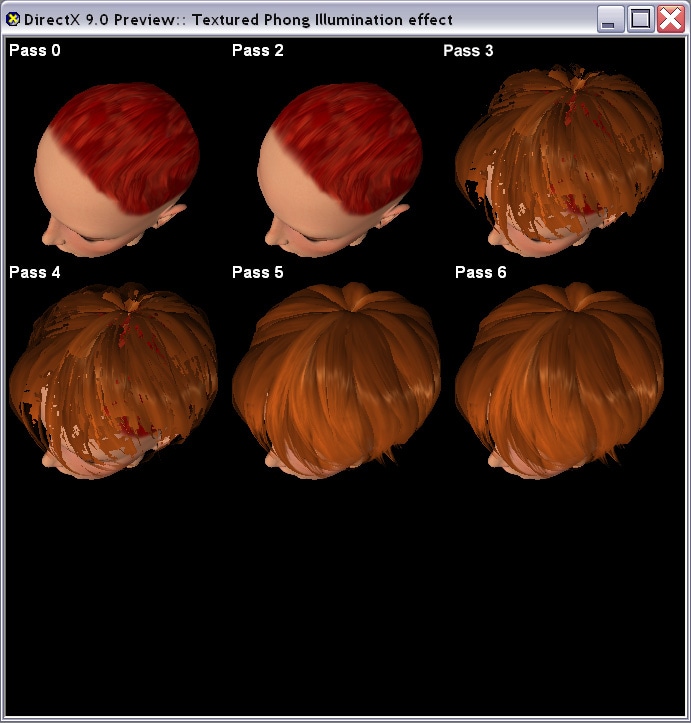
For multipass effects, users can select pass build-up preview mode by pressing “p” in the preview window (this feature is available for the DirectX, OpenGL and OpenGL ES preview pipelines). Each individual pass is rendered to a small viewport in the preview window. The results of previous passes are composited as necessary.
If a draw call renders to a render target or multiple render targets, the contents of each render target will be displayed in a separate viewport. This technique is useful both during the creation of multi-pass effects, and also in educational environments to help explain the algorithm to students. It also aids in quick debugging as it is quite easy to see if individual draw calls output erroneous results or are composited incorrectly.
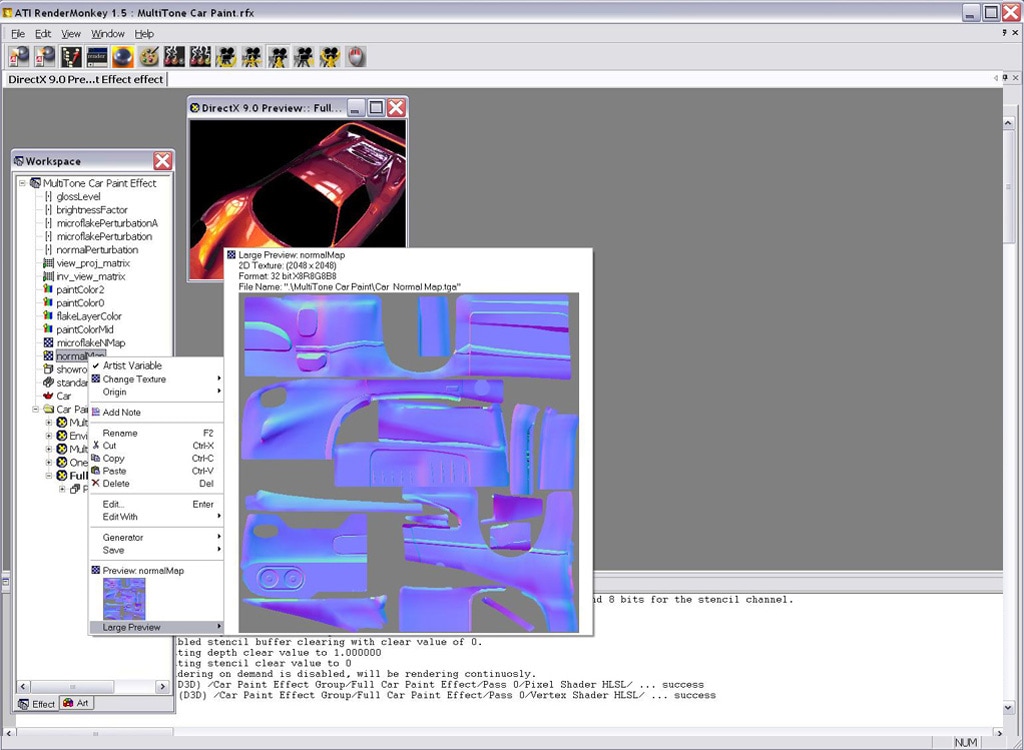
Renderable Textures Contents Preview
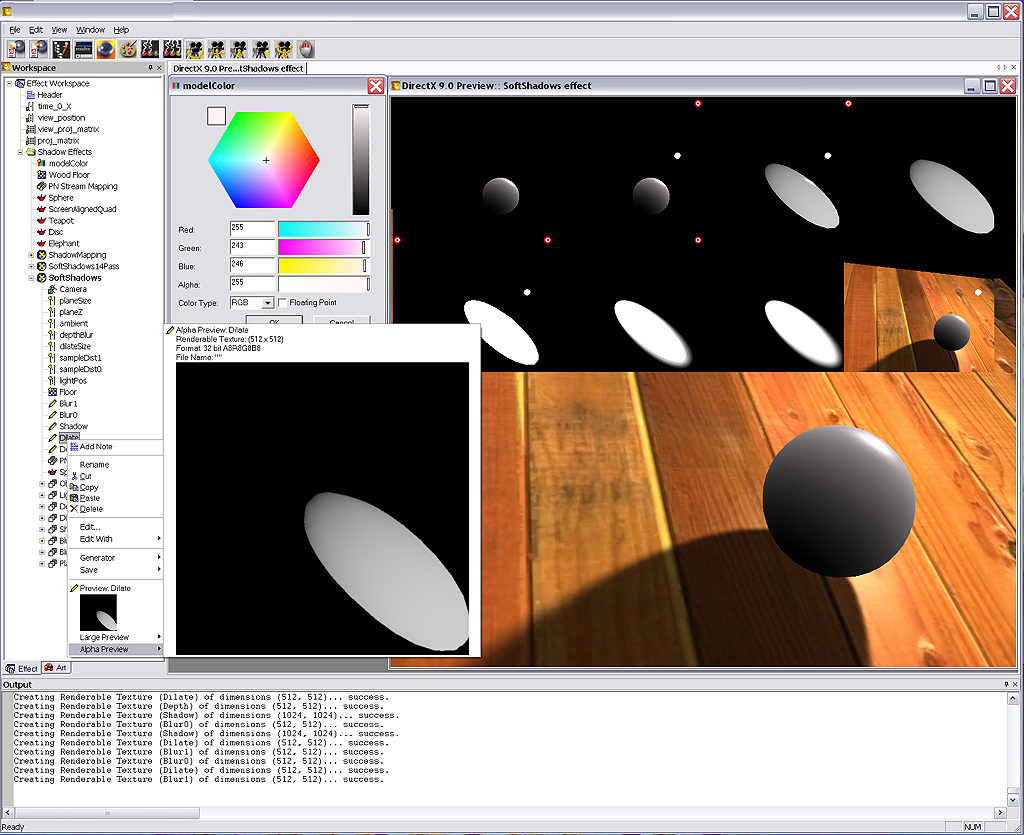
Shader developers can also preview the contents of their offscreen buffers in different ways while creating shader-based effects in RenderMonkey. The contents for any renderable texture used by the active effect can be previewed by simply right-clicking on the renderable texture node and viewing the thumbnail for that texture. The thumbnail can be expanded to view the entire texture with all relevant texture information (size / format) displayed and a separate thumbnail exists to preview the contents of the alpha channel of that texture. The user also has an option to save the contents of a renderable texture into a file by using the “Save” context menu option for that renderable texture node.
In order to preview the contents of a renderable texture, the users can use the pass preview option (described above). The other option is enabled by pressing “r” in the preview window. This preview option allows the user to dynamically view the contents of each renderable texture used in the final effect.
The contents are displayed in the state that they will be after the execution of the final draw call in the effect. This way it becomes very simple to view, for example, the contents of a shadow map, as the user rotates the camera around in the preview window.
During any shader development, there comes the time when we want to optimize the performance of the shader.
The RenderMonkey IDE aids developers in several ways.
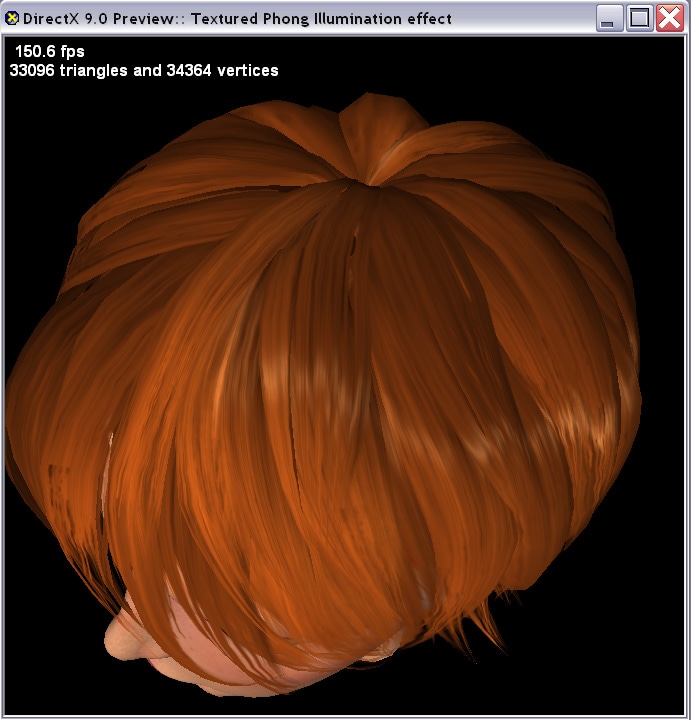
During rendering in the OpenGL, OpenGL ES and DirectX preview window, developers have access to frame statistics during each frame rendering. Pressing “s” in the preview window, displays the frame rate for the currently active effect as well as additional statistics for all draw calls included in the rendering (number of primitives and number of vertices).
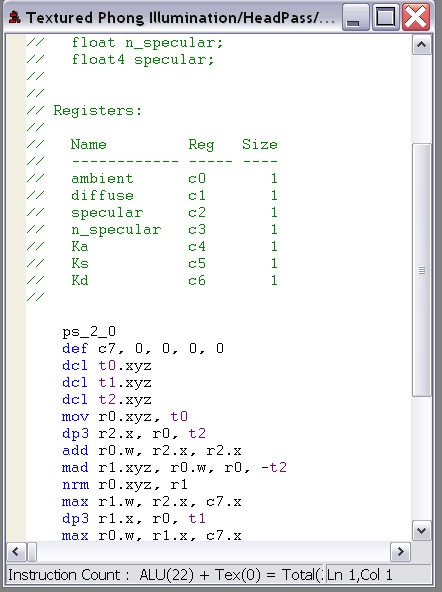
Developers creating DirectX HLSL shaders can also view a disassembly of the compiled shader. The disassembly includes an integrated ALU and texture ops instruction counter. This can be used to fine tune high level algorithms to generate optimal code.
Managing Effect Data
RenderMonkey stores all settings and data necessary to encapsulate the effect in an extensible XML workspace file. The users can manipulate this effect data when loaded into RenderMonkey via a convenient view into the effect database called the workspace tree view. The workspace editor can be used to access all elements, or nodes, in the workspace, for editing or viewing their contents.
To make creation of texture and geometry objects in RenderMonkey more streamlined, the application will scan user-defined default texture and model repository directories at run-time for all supported texture and geometry object formats and compile a list for quick addition of new texture / model nodes. The location of the default data repository can be customized by the user via the application preferences dialogue.
![]()
RenderMonkey makes extensive use of informative tooltips, making viewing the contents of a node as simple as moving the mouse cursor over the nodes. Node specific data is displayed in the tooltip, such as the number of primitives and vertices in a geometry object; renderable texture dimensions and surface format; or renderable states set and their values for a render state block.
RenderMonkey remembers user preferences for window placement and sizing and stores that information per-workspace. This, with the improved docking window support, allows the users to customize the IDE exactly to their liking. The users can also select from a number of application settings for the main application and selected plug-ins (for example, the text editor may be customized to allow user specified tabs, fonts etc. ). The application will remember user preferences for the last plug-in editing a particular node type. This way if the application has multiple plug-ins that can edit the same node type, the users don’t have to go through the steps of repeatedly selecting a non-default plug-in editor. The application will remember the settings and automatically select the appropriate plug-in the next time the user edits the node.
To facilitate sharing of shaders amongst developers, RenderMonkey IDE now provides a package import / export capability. Any effect workspace can be exported to a single zip file that contains all of the textures and models necessary to render the effect. These packaged workspaces can be easily imported back into RenderMonkey without requiring any subsequent modifications to fix up geometry & texture paths.
Artist Interface
Involving Artists in the Shader Creation Process
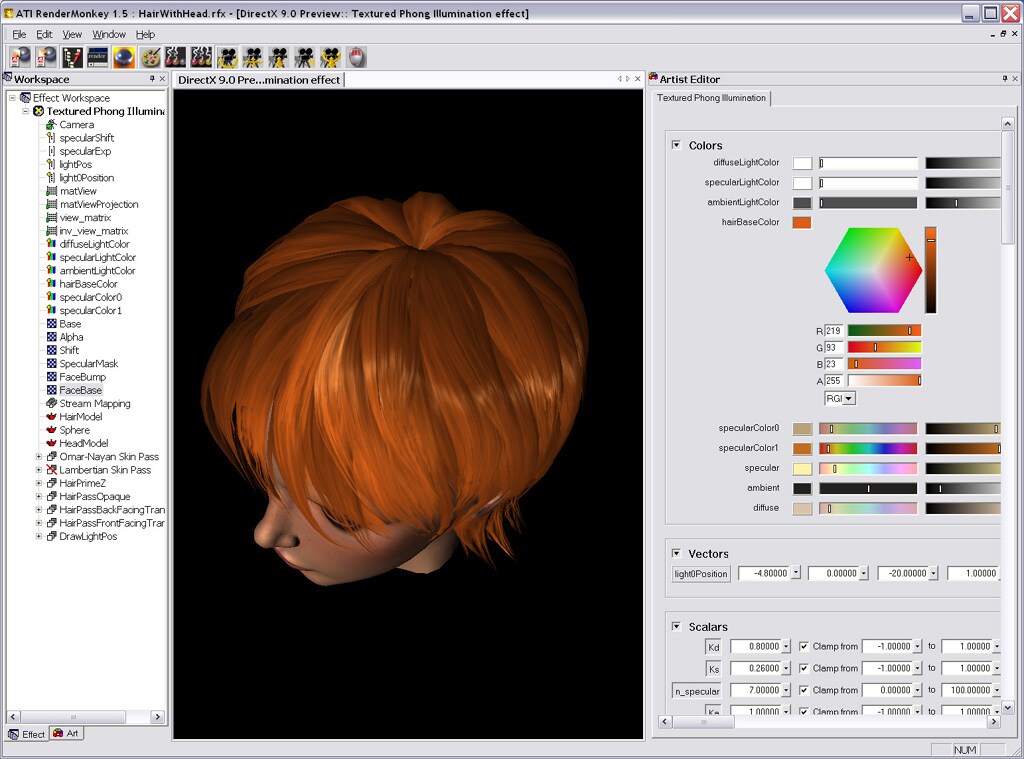
Creating shader-based effects in real-time should not be the sole domain of programmers. Artists are intimately involved in the process, often from the intial prototype stage. RenderMonkey provides several interfaces and tools which are artist focused to help artists collaborate in the shader creation process.
Artist interfaces in RenderMonkey
A shader developer can mark certain variables in the shader effect workspace as “artist-editable”. An artist working on this effect can then filter their view of the effect (using the Art tab). This will restrict the artists view of the workspace to display only those variables. The variables can then be edited by the artists using the standard GUI widgets. If necessary, the developer is also free to customize these widgets using the SDK to include interfaces that more closely match those used by the artists in other tools. RenderMonkey also includes an Artist Interfaceplugin – which includes all of the artists editable parameters in a single interface. The appearace of this plugin should be familiar to artists who have used standard DCC applications such as Maya and 3DStudioMax. The artists can use color wheels and scalar sliders in a single page interface. As with all of the editors, all changes are immediately reflected in the rendering window. Easy Texture / Model Resource Management
Using textures in RenderMonkey is very simple and convenient. The creation of new texture nodes is intuitive with the use of default texture repository directories and quick access menus (as described [ ](#managing effect data)here). Once the user has created a texture node, to view the texture image stored in that node, the user has to simply right-click on the node and view the displayed image thumbnail for the texture surface.
RenderMonkey provides an option to view the texture as a full size image in a large thumbnail with all relevant texture information (size / format) attached and the contents of the alpha channel stored in this texture.
If the user clicks on the large thumbnail of the texture, RenderMonkey will launch an associated editor application for that texture image. The user can specify their preferred application (e.g. Photoshop) which will be used whenever the user edits the texture by clicking on its thumbnail. A similar mechanism exists for editing geometry objects.
For users who used external editors for models & textures, RenderMonkey supports the ability to automatically reload these files whenever they have changed. The user can select to turn on automatic update of textures and models, and then RenderMonkey will automatically reload textures and rebuild geometric objects’ data whenever the associated files change on disk. Alternatively, the user can do this manually on-demoand by pressing “t” or “m” in the preview window. This will cause RenderMonkey to reload all resources from files and rebuild all run-time resources for the effect.
Supported Geometry and Texture Formats:
- Support for floating texture surface formats via DDS import
- Standard texture file formats supported: BMP, JPEG, TGA, GIF, PNG, NMF (ATI normal map)
- Geometry file support: 3DS, OBJ, X, NMF
Custom Component Creation
RenderMonkey ships with a plug-in SDK that allows developers to extend the existing capabilities of this powerful IDE to suit their needs. More information on can be found in the SDK.
COLLADA OpenGL Effects Exporter and Mesh Importer
OpenGL effects can now be exported from RenderMonkey in COLLADA 1.4.1 format. The exporter outputs geometry, shaders, and the texture assets using COLLADA 1.4.1’s profile_GLSL. It is possible to view the COLLADA output using the COLLADA OpenGL Effects Viewer that we provide on the download page. This is a Windows-based binary plug-in for OpenSceneGraph 2.2 . Also included in the download is the Open Source code for the viewer and instructions on how to build it.
RenderMonkey also has a new geometry importer that will load triangle meshes from COLLADA 1.4.1 documents. This is an ideal way to load COLLADA geometries and prototype COLLADA effects for your content pipeline.
More information about COLLADA can be found at: