


Example 2: Ball Shooter
This guide walks you through creating a simple shooting range environment and training an agent to shoot moving targets in Unreal Engine. The goal is to aim correctly before shooting and take down targets one by one.
In this example, we will create a dynamic shooting range environment with a single agent that learns to shoot moving targets using reinforcement learning. The agent interacts with the environment by observing the target’s movements and performing actions through actuators to rotate and shoot.
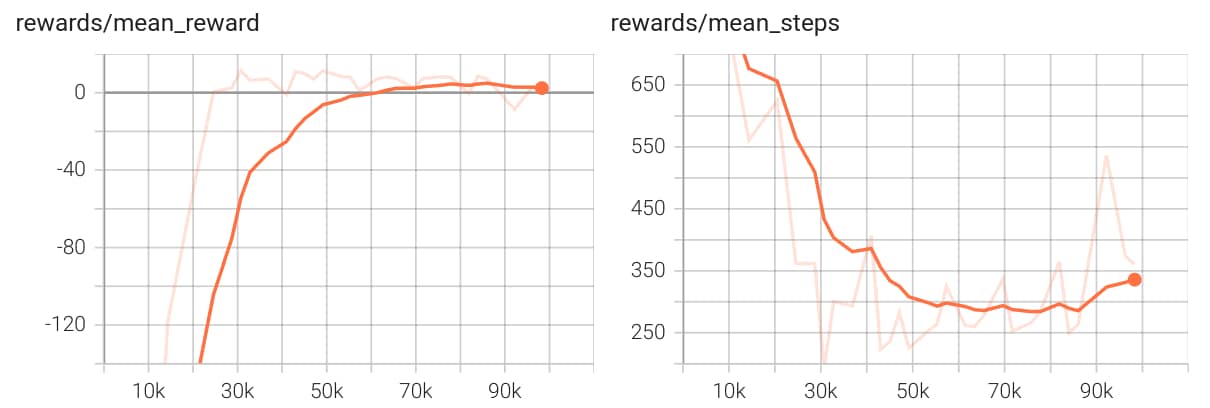
We will train our agent by having it repeatedly attempt to hit the moving targets. Each attempt is referred to as an episode and ends when the agent successfully hits the target three times, or runs out of time.
Periodically, the agent will review its performance during previous episodes and update its policy to improve further. To quantify the agent’s performance, we define a reward function: hitting the target earns a reward, missing incurs a penalty, and each step taken without hitting the target incurs a small penalty. The agent can then use the learned policy to decide which actions to take during gameplay.
The Structure of the Environment in Unreal Engine
To build the game (called environment hereafter) where the agent will learn to shoot moving targets, we need the following in our Unreal Engine project:
-
Map: The game map includes the floor, four walls, the agent, and the environment definition.
-
Ball Blueprint: The projectile that the agent shoots, which is spawned by the agent when it takes the shoot action.
-
Target Blueprint: The object that the agent will shoot, which moves randomly around the map and is destroyed when hit three times by a ball.
-
Agent blueprint: A subclass of Character, which includes the shape and appearance of the agent.
-
Shooting Actuator: A custom discrete
Actuatorthat allows the agent to shoot the ball. -
Discrete Rotation Actuator: A custom discrete
Actuatorthat allows the agent to rotate. -
Trainer blueprint: A subclass of
BlueprintTrainer, which includes the logic to compute therewardandstatusof the training, as well asSensorsActuators. -
Environment definition: A subclass of
BlueprintScholaEnvironment, which includes the logic ofinitializingandresettingthe environment between different episodes of training. -
Registering the agent: Connect the agent to the environment definition and trainer.
Initial Setup
-
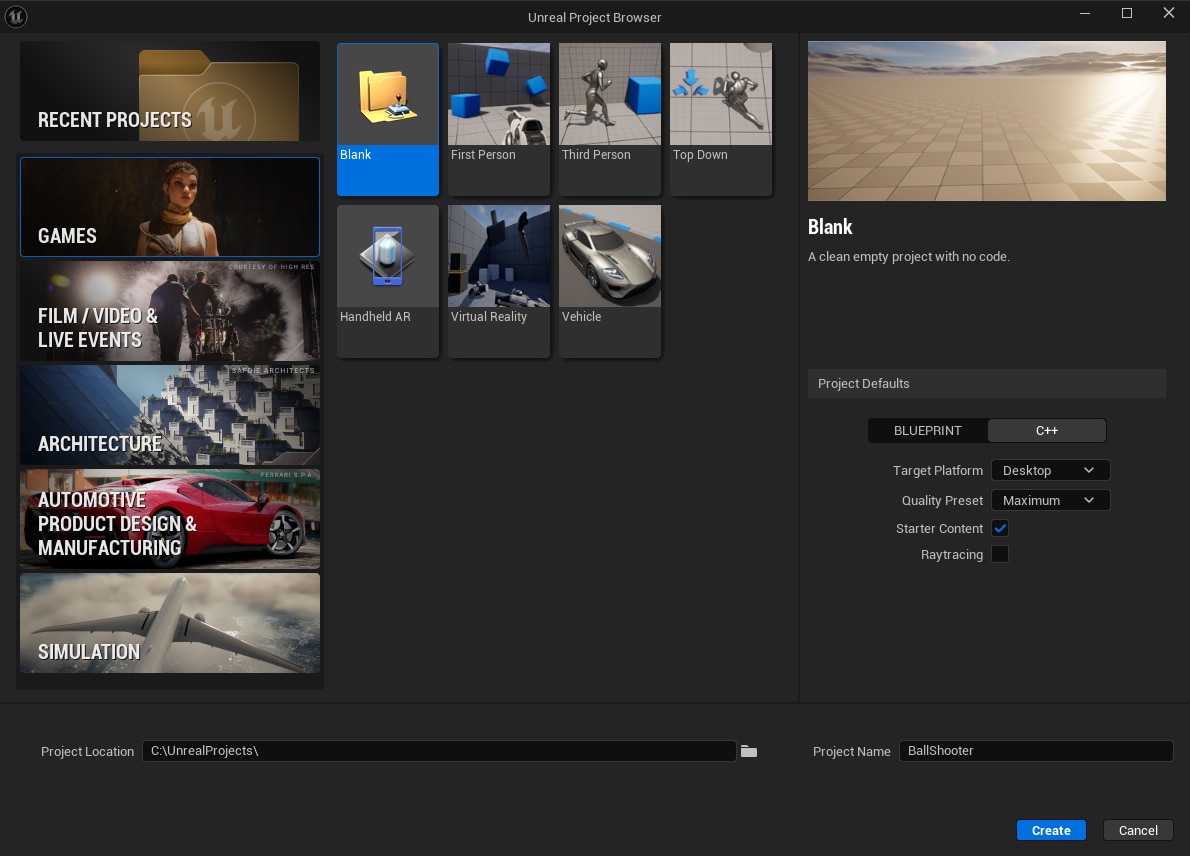
Create a new blank project with a desired name and location.
-
Install the Schola plugin to the project using the Getting Started with Schola guide.
-
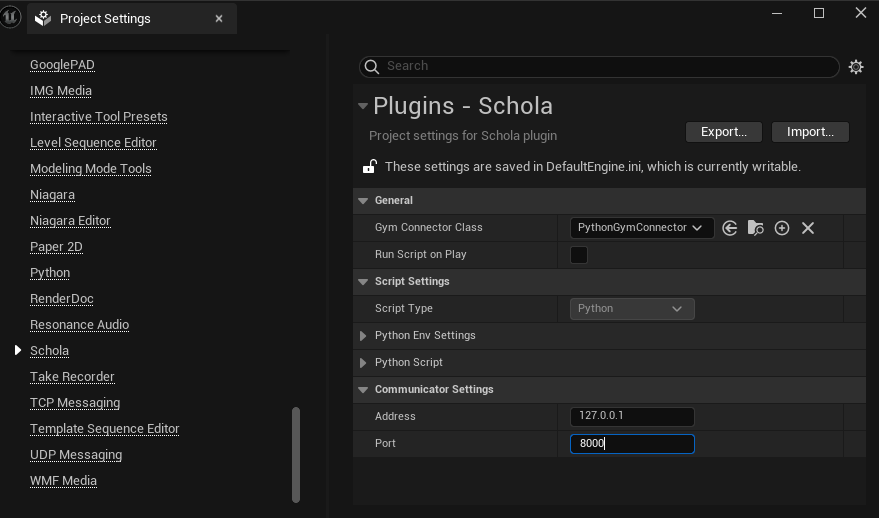
Go to Edit → Project Settings, and scroll down to find Schola.
Note
If you don’t see Schola in the Project Settings, please check whether Schola is installed in Edit → Plugins Menu. Please refer to the Getting Started with Schola guide for more information.

-
For
Gym Connector Class, selectPython Gym Connector

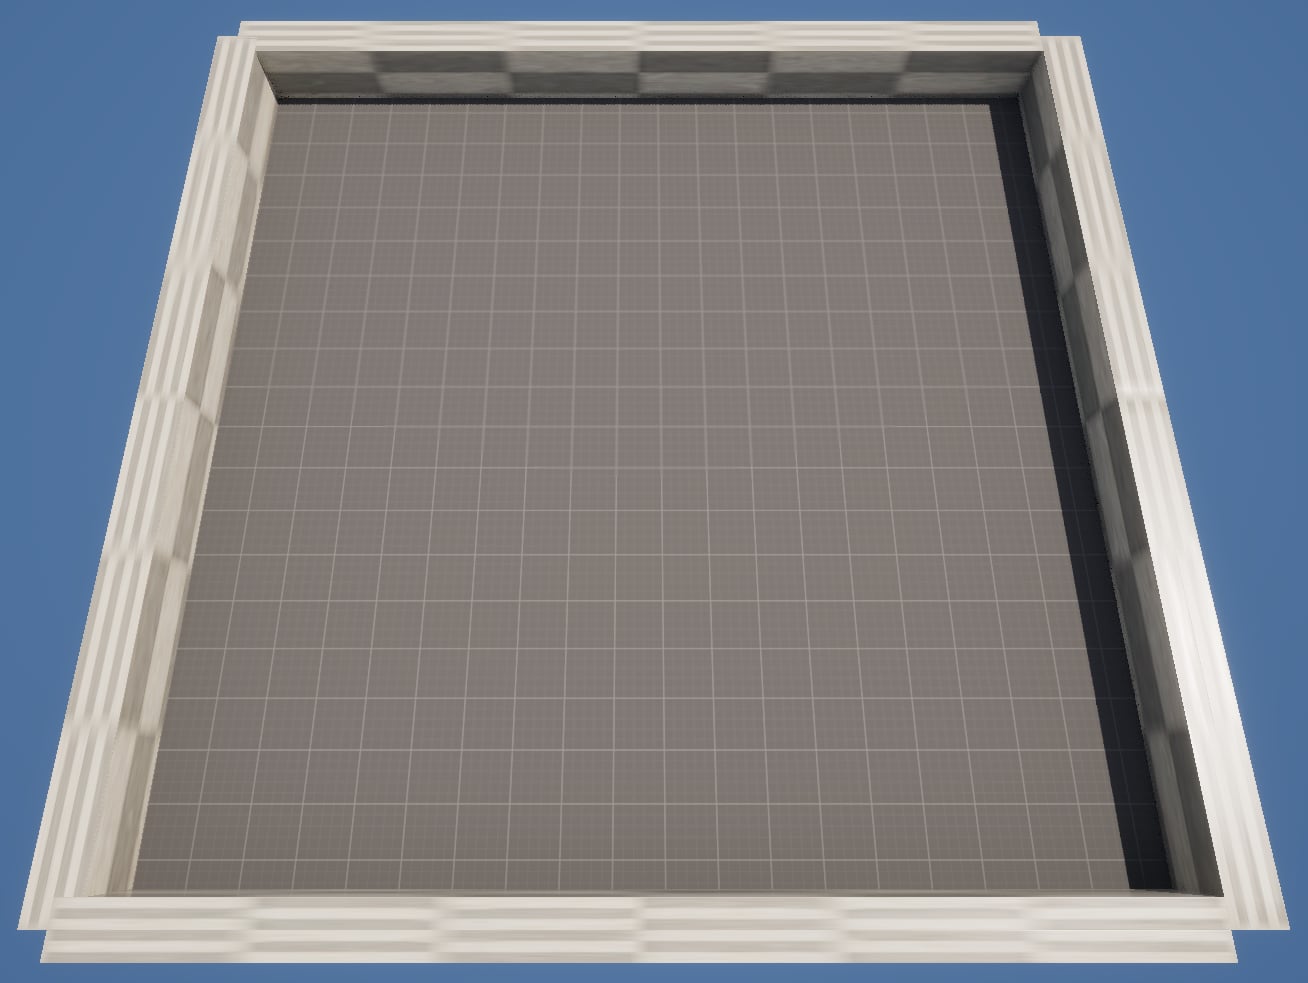
Creating the Map
-
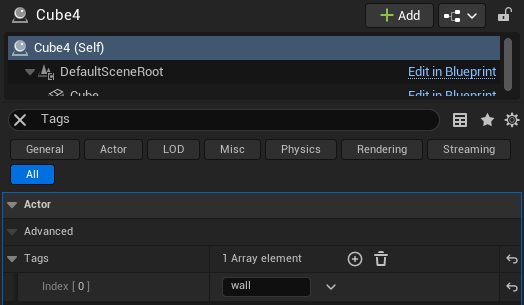
Create a shooting range with a floor and four walls in the map.
-
For the walls, in
Details→Tags, add a new element, and set the value towall. This tag is used by theRayCastObserverto detect different objects.
Creating the Ball
The Ball class is the projectile that the agent shoots. The ball is spawned by the agent when it takes the shooting action and is destroyed upon hitting a wall or target.
-
Create a new Blueprint Class with parent class Actor, and name it
BallShooterBall. -
Add a Sphere Static Mesh Component to the blueprint, and optionally select a good-looking material.
-
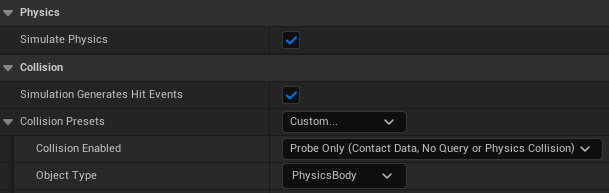
Enable
Details→Physics→Simulate Physics. -
Enable
Details→Collision→Simulation Generates Hit Events. -
Enable
Details→Collision→Generate Overlap Events. -
Set
Details→Collision→Collision PresetstoCustom. -
Set
Details→Collision→Collision Presets→Collision EnabledtoProbe Only. This prevents the ball from blocking the agent’sRay Cast Observervision.
-
-
Add a Sphere Collision Component, making it slightly larger than the Sphere.
-
Scale the
DefaultSceneRootto 0.5×0.5×0.5.
Creating the Target
The target is the object that the agent will shoot. The target moves randomly around the map and is destroyed when hit three times by a ball. The Event Tick will apply a random force to the target to move it around the map. The OnTakeAnyDamage_Event will be triggered when hit by a ball, adjust the target’s hitpoint, and destroy the target when the hitpoint reaches zero.
-
Create a new Blueprint Class with parent class Actor, and name it
BallShooterTarget. -
Add a Sphere Static Mesh Component to the blueprint, and optionally select a good-looking material.
-
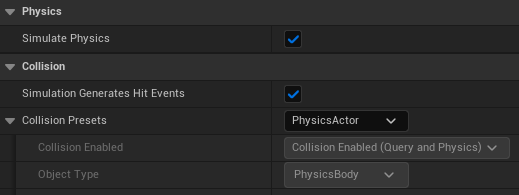
Enable
Details→Physics→Simulate Physics. -
Enable
Details→Collision→Simulation Generates Hit Events. -
Enable
Details→Collision→Generate Overlap Events. -
Set
Details→Collision→Collision PresetstoPhysicsActor.
-
-
Add a Sphere Collision Component, making it slightly larger than the Sphere.
-
Scale the
DefaultSceneRootto 3x3x3. -
Add a new boolean variable. Name it
isHit. It stores whether the agent is hit by a ball in the current step. -
Add a new Transform variable. Name it
initialTransform. It stores the initial transform of the target when the episode starts. -
Add a new integer variable. Name it
hitPoint, and set the default value to 3. It stores the number of times the target is hit by a ball. The target will be destroyed when the hitpoint reaches zero. -
Add a new float variable. Name it
forceMagnitude, and set the default value to 50. It stores the magnitude of the random force applied to the target on each tick. -
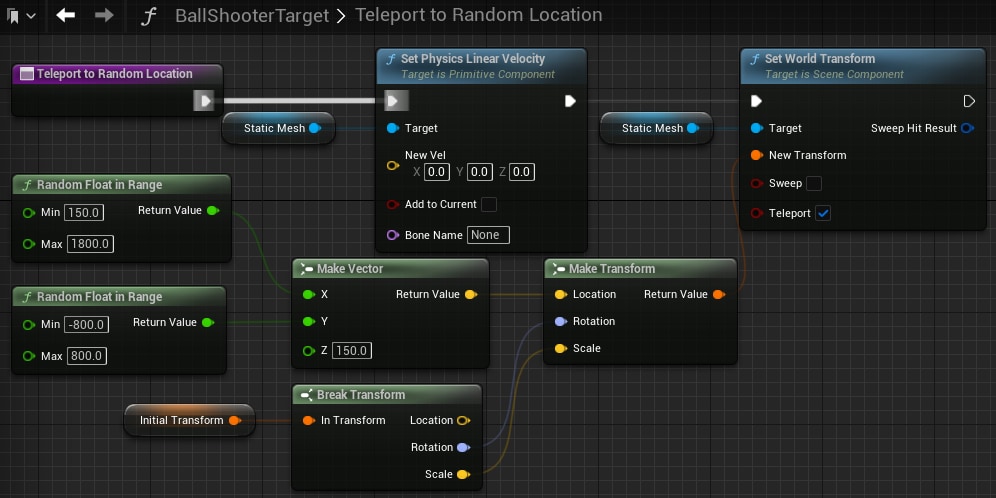
Create a new function
teleportToRandomLocationas shown below, and set the Make Vector node’s random ranges to the range of the shooting range. This function will teleport the target to a random location within the shooting range. -
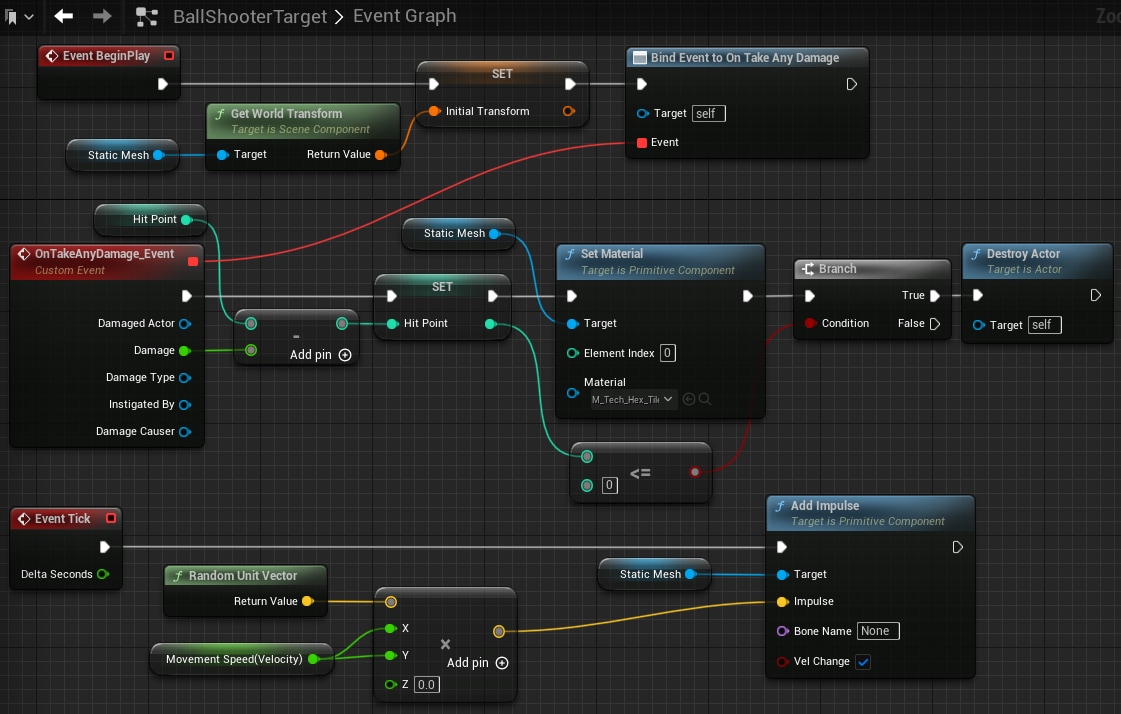
Set the Event Graph as shown below.
-
The Event Begin Play will save the initial transform of the target and bind the
OnTakeAnyDamage_Eventonce. -
The
OnTakeAnyDamage_Eventwill be triggered when hit by a ball, adjust the Target’s hitpoint, and destroy the target when the hitpoint reaches zero. -
The Event Tick will apply a random force to the target to move it around the shooting range.
-
-
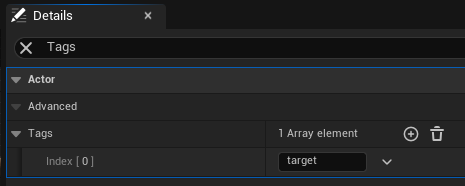
In
Details→Tags, add a new element, and set the value totarget. This tag is used by theRayCastObserverto detect different objects.
Begin Object Class=/Script/BlueprintGraph.K2Node_Event Name="K2Node_Event_0" ExportPath="/Script/BlueprintGraph.K2Node_Event'/Game/Examples/BallShooter/Blueprints/BallShooterTarget.BallShooterTarget:EventGraph.K2Node_Event_0'"
EventReference=(MemberParent="/Script/CoreUObject.Class'/Script/Engine.Actor'",MemberName="ReceiveBeginPlay")
bOverrideFunction=True
NodePosX=384
NodePosY=-179
bCommentBubblePinned=True
NodeGuid=2CCA15C6EBDC4A05B981686EE64A743D
CustomProperties Pin (PinId=AFE20AD2F1AC460E8A175A7848D57D02,PinName="OutputDelegate",Direction="EGPD_Output",PinType.PinCategory="delegate",PinType.PinSubCategory="",PinType.PinSubCategoryObject=None,PinType.PinSubCategoryMemberReference=(MemberParent="/Script/CoreUObject.Class'/Script/Engine.Actor'",MemberName="ReceiveBeginPlay"),PinType.PinValueType=(),PinType.ContainerType=None,PinType.bIsReference=False,PinType.bIsConst=False,PinType.bIsWeakPointer=False,PinType.bIsUObjectWrapper=False,PinType.bSerializeAsSinglePrecisionFloat=False,PersistentGuid=00000000000000000000000000000000,bHidden=False,bNotConnectable=False,bDefaultValueIsReadOnly=False,bDefaultValueIsIgnored=False,bAdvancedView=False,bOrphanedPin=False,)
CustomProperties Pin (PinId=41C0213C09824F329C292973890EEF05,PinName="then",Direction="EGPD_Output",PinType.PinCategory="exec",PinType.PinSubCategory="",PinType.PinSubCategoryObject=None,PinType.PinSubCategoryMemberReference=(),PinType.PinValueType=(),PinType.ContainerType=None,PinType.bIsReference=False,PinType.bIsConst=False,PinType.bIsWeakPointer=False,PinType.bIsUObjectWrapper=False,PinType.bSerializeAsSinglePrecisionFloat=False,LinkedTo=(K2Node_VariableSet_2 63A40FD38B15469A97ED217DA4FDEA78,),PersistentGuid=00000000000000000000000000000000,bHidden=False,bNotConnectable=False,bDefaultValueIsReadOnly=False,bDefaultValueIsIgnored=False,bAdvancedView=False,bOrphanedPin=False,)
End Object
Begin Object Class=/Script/BlueprintGraph.K2Node_Event Name="K2Node_Event_2" ExportPath="/Script/BlueprintGraph.K2Node_Event'/Game/Examples/BallShooter/Blueprints/BallShooterTarget.BallShooterTarget:EventGraph.K2Node_Event_2'"
EventReference=(MemberParent="/Script/CoreUObject.Class'/Script/Engine.Actor'",MemberName="ReceiveTick")
bOverrideFunction=True
NodePosX=352
NodePosY=350
bCommentBubblePinned=True
NodeGuid=0565982A64E84C6B822CBA62F9FDE228
CustomProperties Pin (PinId=F23E7A79C92A4D54AC952535D7193E1B,PinName="OutputDelegate",Direction="EGPD_Output",PinType.PinCategory="delegate",PinType.PinSubCategory="",PinType.PinSubCategoryObject=None,PinType.PinSubCategoryMemberReference=(MemberParent="/Script/CoreUObject.Class'/Script/Engine.Actor'",MemberName="ReceiveTick"),PinType.PinValueType=(),PinType.ContainerType=None,PinType.bIsReference=False,PinType.bIsConst=False,PinType.bIsWeakPointer=False,PinType.bIsUObjectWrapper=False,PinType.bSerializeAsSinglePrecisionFloat=False,PersistentGuid=00000000000000000000000000000000,bHidden=False,bNotConnectable=False,bDefaultValueIsReadOnly=False,bDefaultValueIsIgnored=False,bAdvancedView=False,bOrphanedPin=False,)
CustomProperties Pin (PinId=9A88272E78F8429D9DD5395CDD0797E5,PinName="then",Direction="EGPD_Output",PinType.PinCategory="exec",PinType.PinSubCategory="",PinType.PinSubCategoryObject=None,PinType.PinSubCategoryMemberReference=(),PinType.PinValueType=(),PinType.ContainerType=None,PinType.bIsReference=False,PinType.bIsConst=False,PinType.bIsWeakPointer=False,PinType.bIsUObjectWrapper=False,PinType.bSerializeAsSinglePrecisionFloat=False,LinkedTo=(K2Node_CallFunction_9 D03F8CBC5DB043E099F82A1B9B7AAA92,),PersistentGuid=00000000000000000000000000000000,bHidden=False,bNotConnectable=False,bDefaultValueIsReadOnly=False,bDefaultValueIsIgnored=False,bAdvancedView=False,bOrphanedPin=False,)
CustomProperties Pin (PinId=DF4F7B56883C4E18950B1F733D7A0BCD,PinName="DeltaSeconds",PinToolTip="Delta Seconds\nFloat (single-precision)",Direction="EGPD_Output",PinType.PinCategory="real",PinType.PinSubCategory="float",PinType.PinSubCategoryObject=None,PinType.PinSubCategoryMemberReference=(),PinType.PinValueType=(),PinType.ContainerType=None,PinType.bIsReference=False,PinType.bIsConst=False,PinType.bIsWeakPointer=False,PinType.bIsUObjectWrapper=False,PinType.bSerializeAsSinglePrecisionFloat=False,DefaultValue="0.0",AutogeneratedDefaultValue="0.0",PersistentGuid=00000000000000000000000000000000,bHidden=False,bNotConnectable=False,bDefaultValueIsReadOnly=False,bDefaultValueIsIgnored=False,bAdvancedView=False,bOrphanedPin=False,)
End Object
Begin Object Class=/Script/BlueprintGraph.K2Node_CallFunction Name="K2Node_CallFunction_9" ExportPath="/Script/BlueprintGraph.K2Node_CallFunction'/Game/Examples/BallShooter/Blueprints/BallShooterTarget.BallShooterTarget:EventGraph.K2Node_CallFunction_9'"
FunctionReference=(MemberParent="/Script/CoreUObject.Class'/Script/Engine.PrimitiveComponent'",MemberName="AddImpulse")
NodePosX=1216
NodePosY=336
NodeGuid=413CE93B82E244C3AEEDB95457770AA8
CustomProperties Pin (PinId=D03F8CBC5DB043E099F82A1B9B7AAA92,PinName="execute",PinType.PinCategory="exec",PinType.PinSubCategory="",PinType.PinSubCategoryObject=None,PinType.PinSubCategoryMemberReference=(),PinType.PinValueType=(),PinType.ContainerType=None,PinType.bIsReference=False,PinType.bIsConst=False,PinType.bIsWeakPointer=False,PinType.bIsUObjectWrapper=False,PinType.bSerializeAsSinglePrecisionFloat=False,LinkedTo=(K2Node_Event_2 9A88272E78F8429D9DD5395CDD0797E5,),PersistentGuid=00000000000000000000000000000000,bHidden=False,bNotConnectable=False,bDefaultValueIsReadOnly=False,bDefaultValueIsIgnored=False,bAdvancedView=False,bOrphanedPin=False,)
CustomProperties Pin (PinId=E32E1356E92D467CBBD9135FD8566169,PinName="then",Direction="EGPD_Output",PinType.PinCategory="exec",PinType.PinSubCategory="",PinType.PinSubCategoryObject=None,PinType.PinSubCategoryMemberReference=(),PinType.PinValueType=(),PinType.ContainerType=None,PinType.bIsReference=False,PinType.bIsConst=False,PinType.bIsWeakPointer=False,PinType.bIsUObjectWrapper=False,PinType.bSerializeAsSinglePrecisionFloat=False,PersistentGuid=00000000000000000000000000000000,bHidden=False,bNotConnectable=False,bDefaultValueIsReadOnly=False,bDefaultValueIsIgnored=False,bAdvancedView=False,bOrphanedPin=False,)
CustomProperties Pin (PinId=17D5A55E77DA4E2BA9A1F23684018E8C,PinName="self",PinFriendlyName=NSLOCTEXT("K2Node", "Target", "Target"),PinType.PinCategory="object",PinType.PinSubCategory="",PinType.PinSubCategoryObject="/Script/CoreUObject.Class'/Script/Engine.PrimitiveComponent'",PinType.PinSubCategoryMemberReference=(),PinType.PinValueType=(),PinType.ContainerType=None,PinType.bIsReference=False,PinType.bIsConst=False,PinType.bIsWeakPointer=False,PinType.bIsUObjectWrapper=False,PinType.bSerializeAsSinglePrecisionFloat=False,LinkedTo=(K2Node_VariableGet_5 6AE40937E6F34B9E832BE25958BF25DA,),PersistentGuid=00000000000000000000000000000000,bHidden=False,bNotConnectable=False,bDefaultValueIsReadOnly=False,bDefaultValueIsIgnored=False,bAdvancedView=False,bOrphanedPin=False,)
CustomProperties Pin (PinId=458AC91B448043E187D11A8783BDB38E,PinName="Impulse",PinType.PinCategory="struct",PinType.PinSubCategory="",PinType.PinSubCategoryObject="/Script/CoreUObject.ScriptStruct'/Script/CoreUObject.Vector'",PinType.PinSubCategoryMemberReference=(),PinType.PinValueType=(),PinType.ContainerType=None,PinType.bIsReference=False,PinType.bIsConst=False,PinType.bIsWeakPointer=False,PinType.bIsUObjectWrapper=False,PinType.bSerializeAsSinglePrecisionFloat=False,DefaultValue="0, 0, 0",AutogeneratedDefaultValue="0, 0, 0",LinkedTo=(K2Node_PromotableOperator_2 5CDDA8B4303D4F68A8BA7AB347CCB913,),PersistentGuid=00000000000000000000000000000000,bHidden=False,bNotConnectable=False,bDefaultValueIsReadOnly=False,bDefaultValueIsIgnored=False,bAdvancedView=False,bOrphanedPin=False,)
CustomProperties Pin (PinId=125676BCAA3C482EB8DE3FE934BC6DC5,PinName="BoneName",PinType.PinCategory="name",PinType.PinSubCategory="",PinType.PinSubCategoryObject=None,PinType.PinSubCategoryMemberReference=(),PinType.PinValueType=(),PinType.ContainerType=None,PinType.bIsReference=False,PinType.bIsConst=False,PinType.bIsWeakPointer=False,PinType.bIsUObjectWrapper=False,PinType.bSerializeAsSinglePrecisionFloat=False,DefaultValue="None",AutogeneratedDefaultValue="None",PersistentGuid=00000000000000000000000000000000,bHidden=False,bNotConnectable=False,bDefaultValueIsReadOnly=False,bDefaultValueIsIgnored=False,bAdvancedView=False,bOrphanedPin=False,)
CustomProperties Pin (PinId=C9FC4584083D45B78573AEBB5692136A,PinName="bVelChange",PinType.PinCategory="bool",PinType.PinSubCategory="",PinType.PinSubCategoryObject=None,PinType.PinSubCategoryMemberReference=(),PinType.PinValueType=(),PinType.ContainerType=None,PinType.bIsReference=False,PinType.bIsConst=False,PinType.bIsWeakPointer=False,PinType.bIsUObjectWrapper=False,PinType.bSerializeAsSinglePrecisionFloat=False,DefaultValue="true",AutogeneratedDefaultValue="false",PersistentGuid=00000000000000000000000000000000,bHidden=False,bNotConnectable=False,bDefaultValueIsReadOnly=False,bDefaultValueIsIgnored=False,bAdvancedView=False,bOrphanedPin=False,)
End Object
Begin Object Class=/Script/BlueprintGraph.K2Node_VariableGet Name="K2Node_VariableGet_5" ExportPath="/Script/BlueprintGraph.K2Node_VariableGet'/Game/Examples/BallShooter/Blueprints/BallShooterTarget.BallShooterTarget:EventGraph.K2Node_VariableGet_5'"
VariableReference=(MemberName="StaticMesh",bSelfContext=True)
NodePosX=1024
NodePosY=408
NodeGuid=181D83EC744A4D71B39DE4B69C62B403
CustomProperties Pin (PinId=6AE40937E6F34B9E832BE25958BF25DA,PinName="StaticMesh",Direction="EGPD_Output",PinType.PinCategory="object",PinType.PinSubCategory="",PinType.PinSubCategoryObject="/Script/CoreUObject.Class'/Script/Engine.StaticMeshComponent'",PinType.PinSubCategoryMemberReference=(),PinType.PinValueType=(),PinType.ContainerType=None,PinType.bIsReference=False,PinType.bIsConst=False,PinType.bIsWeakPointer=False,PinType.bIsUObjectWrapper=False,PinType.bSerializeAsSinglePrecisionFloat=False,LinkedTo=(K2Node_CallFunction_9 17D5A55E77DA4E2BA9A1F23684018E8C,),PersistentGuid=00000000000000000000000000000000,bHidden=False,bNotConnectable=False,bDefaultValueIsReadOnly=False,bDefaultValueIsIgnored=False,bAdvancedView=False,bOrphanedPin=False,)
CustomProperties Pin (PinId=7B41047C6F9146208C2EF1D1259C1493,PinName="self",PinFriendlyName=NSLOCTEXT("K2Node", "Target", "Target"),PinType.PinCategory="object",PinType.PinSubCategory="",PinType.PinSubCategoryObject="/Script/Engine.BlueprintGeneratedClass'/Game/Examples/BallShooter/Blueprints/BallShooterTarget.BallShooterTarget_C'",PinType.PinSubCategoryMemberReference=(),PinType.PinValueType=(),PinType.ContainerType=None,PinType.bIsReference=False,PinType.bIsConst=False,PinType.bIsWeakPointer=False,PinType.bIsUObjectWrapper=False,PinType.bSerializeAsSinglePrecisionFloat=False,PersistentGuid=00000000000000000000000000000000,bHidden=True,bNotConnectable=False,bDefaultValueIsReadOnly=False,bDefaultValueIsIgnored=False,bAdvancedView=False,bOrphanedPin=False,)
End Object
Begin Object Class=/Script/BlueprintGraph.K2Node_CallFunction Name="K2Node_CallFunction_6" ExportPath="/Script/BlueprintGraph.K2Node_CallFunction'/Game/Examples/BallShooter/Blueprints/BallShooterTarget.BallShooterTarget:EventGraph.K2Node_CallFunction_6'"
bIsPureFunc=True
FunctionReference=(MemberParent="/Script/CoreUObject.Class'/Script/Engine.KismetMathLibrary'",MemberName="RandomUnitVector")
NodePosX=528
NodePosY=416
NodeGuid=9CBD0F474099451FB78F36BBF38FDED1
CustomProperties Pin (PinId=2696CB7CAAEE45F1AC49EEC37E8A032E,PinName="self",PinFriendlyName=NSLOCTEXT("K2Node", "Target", "Target"),PinType.PinCategory="object",PinType.PinSubCategory="",PinType.PinSubCategoryObject="/Script/CoreUObject.Class'/Script/Engine.KismetMathLibrary'",PinType.PinSubCategoryMemberReference=(),PinType.PinValueType=(),PinType.ContainerType=None,PinType.bIsReference=False,PinType.bIsConst=False,PinType.bIsWeakPointer=False,PinType.bIsUObjectWrapper=False,PinType.bSerializeAsSinglePrecisionFloat=False,DefaultObject="/Script/Engine.Default__KismetMathLibrary",PersistentGuid=00000000000000000000000000000000,bHidden=True,bNotConnectable=False,bDefaultValueIsReadOnly=False,bDefaultValueIsIgnored=False,bAdvancedView=False,bOrphanedPin=False,)
CustomProperties Pin (PinId=095A83500ACA461394E101CB77122856,PinName="ReturnValue",Direction="EGPD_Output",PinType.PinCategory="struct",PinType.PinSubCategory="",PinType.PinSubCategoryObject="/Script/CoreUObject.ScriptStruct'/Script/CoreUObject.Vector'",PinType.PinSubCategoryMemberReference=(),PinType.PinValueType=(),PinType.ContainerType=None,PinType.bIsReference=False,PinType.bIsConst=False,PinType.bIsWeakPointer=False,PinType.bIsUObjectWrapper=False,PinType.bSerializeAsSinglePrecisionFloat=False,DefaultValue="0, 0, 0",AutogeneratedDefaultValue="0, 0, 0",LinkedTo=(K2Node_PromotableOperator_2 64909F2337B041DB9FCB067215DA0F6C,),PersistentGuid=00000000000000000000000000000000,bHidden=False,bNotConnectable=False,bDefaultValueIsReadOnly=False,bDefaultValueIsIgnored=False,bAdvancedView=False,bOrphanedPin=False,)
End Object
Begin Object Class=/Script/BlueprintGraph.K2Node_PromotableOperator Name="K2Node_PromotableOperator_2" ExportPath="/Script/BlueprintGraph.K2Node_PromotableOperator'/Game/Examples/BallShooter/Blueprints/BallShooterTarget.BallShooterTarget:EventGraph.K2Node_PromotableOperator_2'"
OperationName="Multiply"
bIsPureFunc=True
FunctionReference=(MemberParent="/Script/CoreUObject.Class'/Script/Engine.KismetMathLibrary'",MemberName="Multiply_VectorVector")
NodePosX=768
NodePosY=441
NodeGuid=03E7CEDC016D48A7BDB18439CABF2F5A
CustomProperties Pin (PinId=64909F2337B041DB9FCB067215DA0F6C,PinName="A",PinType.PinCategory="struct",PinType.PinSubCategory="",PinType.PinSubCategoryObject="/Script/CoreUObject.ScriptStruct'/Script/CoreUObject.Vector'",PinType.PinSubCategoryMemberReference=(),PinType.PinValueType=(),PinType.ContainerType=None,PinType.bIsReference=False,PinType.bIsConst=False,PinType.bIsWeakPointer=False,PinType.bIsUObjectWrapper=False,PinType.bSerializeAsSinglePrecisionFloat=False,LinkedTo=(K2Node_CallFunction_6 095A83500ACA461394E101CB77122856,),PersistentGuid=00000000000000000000000000000000,bHidden=False,bNotConnectable=False,bDefaultValueIsReadOnly=False,bDefaultValueIsIgnored=False,bAdvancedView=False,bOrphanedPin=False,)
CustomProperties Pin (PinId=ED0B3BA25C994FF8A060EE24225B851A,PinName="B",PinType.PinCategory="struct",PinType.PinSubCategory="",PinType.PinSubCategoryObject="/Script/CoreUObject.ScriptStruct'/Script/CoreUObject.Vector'",PinType.PinSubCategoryMemberReference=(),PinType.PinValueType=(),PinType.ContainerType=None,PinType.bIsReference=False,PinType.bIsConst=False,PinType.bIsWeakPointer=False,PinType.bIsUObjectWrapper=False,PinType.bSerializeAsSinglePrecisionFloat=False,DefaultValue="55.000000,44.000000,0.000000",SubPins=(K2Node_PromotableOperator_2 DF9A27C74DC0C9A02CE419A78A7DD0AF,K2Node_PromotableOperator_2 3D7B56534270CEBFA76769B73395F386,K2Node_PromotableOperator_2 A7FE9B9A40FADEC0F3298D9F29BA886F,),PersistentGuid=00000000000000000000000000000000,bHidden=True,bNotConnectable=False,bDefaultValueIsReadOnly=False,bDefaultValueIsIgnored=False,bAdvancedView=False,bOrphanedPin=False,)
CustomProperties Pin (PinId=DF9A27C74DC0C9A02CE419A78A7DD0AF,PinName="B_X",PinFriendlyName="X",PinType.PinCategory="real",PinType.PinSubCategory="double",PinType.PinSubCategoryObject=None,PinType.PinSubCategoryMemberReference=(),PinType.PinValueType=(),PinType.ContainerType=None,PinType.bIsReference=False,PinType.bIsConst=False,PinType.bIsWeakPointer=False,PinType.bIsUObjectWrapper=False,PinType.bSerializeAsSinglePrecisionFloat=False,DefaultValue="0.0",AutogeneratedDefaultValue="0.0",LinkedTo=(K2Node_VariableGet_3 8C7A99D845DDEB94CEFC55AE39AC862D,),ParentPin=K2Node_PromotableOperator_2 ED0B3BA25C994FF8A060EE24225B851A,PersistentGuid=00000000000000000000000000000000,bHidden=False,bNotConnectable=False,bDefaultValueIsReadOnly=False,bDefaultValueIsIgnored=False,bAdvancedView=False,bOrphanedPin=False,)
CustomProperties Pin (PinId=3D7B56534270CEBFA76769B73395F386,PinName="B_Y",PinFriendlyName="Y",PinType.PinCategory="real",PinType.PinSubCategory="double",PinType.PinSubCategoryObject=None,PinType.PinSubCategoryMemberReference=(),PinType.PinValueType=(),PinType.ContainerType=None,PinType.bIsReference=False,PinType.bIsConst=False,PinType.bIsWeakPointer=False,PinType.bIsUObjectWrapper=False,PinType.bSerializeAsSinglePrecisionFloat=False,DefaultValue="0.0",AutogeneratedDefaultValue="0.0",LinkedTo=(K2Node_VariableGet_3 8C7A99D845DDEB94CEFC55AE39AC862D,),ParentPin=K2Node_PromotableOperator_2 ED0B3BA25C994FF8A060EE24225B851A,PersistentGuid=00000000000000000000000000000000,bHidden=False,bNotConnectable=False,bDefaultValueIsReadOnly=False,bDefaultValueIsIgnored=False,bAdvancedView=False,bOrphanedPin=False,)
CustomProperties Pin (PinId=A7FE9B9A40FADEC0F3298D9F29BA886F,PinName="B_Z",PinFriendlyName="Z",PinType.PinCategory="real",PinType.PinSubCategory="double",PinType.PinSubCategoryObject=None,PinType.PinSubCategoryMemberReference=(),PinType.PinValueType=(),PinType.ContainerType=None,PinType.bIsReference=False,PinType.bIsConst=False,PinType.bIsWeakPointer=False,PinType.bIsUObjectWrapper=False,PinType.bSerializeAsSinglePrecisionFloat=False,DefaultValue="0.0",AutogeneratedDefaultValue="0.0",ParentPin=K2Node_PromotableOperator_2 ED0B3BA25C994FF8A060EE24225B851A,PersistentGuid=00000000000000000000000000000000,bHidden=False,bNotConnectable=False,bDefaultValueIsReadOnly=False,bDefaultValueIsIgnored=False,bAdvancedView=False,bOrphanedPin=False,)
CustomProperties Pin (PinId=5CDDA8B4303D4F68A8BA7AB347CCB913,PinName="ReturnValue",Direction="EGPD_Output",PinType.PinCategory="struct",PinType.PinSubCategory="",PinType.PinSubCategoryObject="/Script/CoreUObject.ScriptStruct'/Script/CoreUObject.Vector'",PinType.PinSubCategoryMemberReference=(),PinType.PinValueType=(),PinType.ContainerType=None,PinType.bIsReference=False,PinType.bIsConst=False,PinType.bIsWeakPointer=False,PinType.bIsUObjectWrapper=False,PinType.bSerializeAsSinglePrecisionFloat=False,LinkedTo=(K2Node_CallFunction_9 458AC91B448043E187D11A8783BDB38E,),PersistentGuid=00000000000000000000000000000000,bHidden=False,bNotConnectable=False,bDefaultValueIsReadOnly=False,bDefaultValueIsIgnored=False,bAdvancedView=False,bOrphanedPin=False,)
End Object
Begin Object Class=/Script/BlueprintGraph.K2Node_VariableGet Name="K2Node_VariableGet_0" ExportPath="/Script/BlueprintGraph.K2Node_VariableGet'/Game/Examples/BallShooter/Blueprints/BallShooterTarget.BallShooterTarget:EventGraph.K2Node_VariableGet_0'"
VariableReference=(MemberName="StaticMesh",bSelfContext=True)
NodePosX=416
NodePosY=-71
NodeGuid=FABC622310D6447FB3CAA39E40D76BAC
CustomProperties Pin (PinId=75F59976F5134D4C8837508DFD5E2C4F,PinName="StaticMesh",Direction="EGPD_Output",PinType.PinCategory="object",PinType.PinSubCategory="",PinType.PinSubCategoryObject="/Script/CoreUObject.Class'/Script/Engine.StaticMeshComponent'",PinType.PinSubCategoryMemberReference=(),PinType.PinValueType=(),PinType.ContainerType=None,PinType.bIsReference=False,PinType.bIsConst=False,PinType.bIsWeakPointer=False,PinType.bIsUObjectWrapper=False,PinType.bSerializeAsSinglePrecisionFloat=False,LinkedTo=(K2Node_CallFunction_16 C713530B1B764327AF3D78727E8519FC,),PersistentGuid=00000000000000000000000000000000,bHidden=False,bNotConnectable=False,bDefaultValueIsReadOnly=False,bDefaultValueIsIgnored=False,bAdvancedView=False,bOrphanedPin=False,)
CustomProperties Pin (PinId=9139932516A741C6929B9C49449D13B8,PinName="self",PinFriendlyName=NSLOCTEXT("K2Node", "Target", "Target"),PinType.PinCategory="object",PinType.PinSubCategory="",PinType.PinSubCategoryObject="/Script/Engine.BlueprintGeneratedClass'/Game/Examples/BallShooter/Blueprints/BallShooterTarget.BallShooterTarget_C'",PinType.PinSubCategoryMemberReference=(),PinType.PinValueType=(),PinType.ContainerType=None,PinType.bIsReference=False,PinType.bIsConst=False,PinType.bIsWeakPointer=False,PinType.bIsUObjectWrapper=False,PinType.bSerializeAsSinglePrecisionFloat=False,PersistentGuid=00000000000000000000000000000000,bHidden=True,bNotConnectable=False,bDefaultValueIsReadOnly=False,bDefaultValueIsIgnored=False,bAdvancedView=False,bOrphanedPin=False,)
End Object
Begin Object Class=/Script/BlueprintGraph.K2Node_VariableSet Name="K2Node_VariableSet_2" ExportPath="/Script/BlueprintGraph.K2Node_VariableSet'/Game/Examples/BallShooter/Blueprints/BallShooterTarget.BallShooterTarget:EventGraph.K2Node_VariableSet_2'"
VariableReference=(MemberName="initialTransform",MemberGuid=117B9D31FA334F709CC7F2A103BFBED8,bSelfContext=True)
NodePosX=816
NodePosY=-160
NodeGuid=F33E5EFD6EDA44E9A14DC7EF85FB51BE
CustomProperties Pin (PinId=63A40FD38B15469A97ED217DA4FDEA78,PinName="execute",PinType.PinCategory="exec",PinType.PinSubCategory="",PinType.PinSubCategoryObject=None,PinType.PinSubCategoryMemberReference=(),PinType.PinValueType=(),PinType.ContainerType=None,PinType.bIsReference=False,PinType.bIsConst=False,PinType.bIsWeakPointer=False,PinType.bIsUObjectWrapper=False,PinType.bSerializeAsSinglePrecisionFloat=False,LinkedTo=(K2Node_Event_0 41C0213C09824F329C292973890EEF05,),PersistentGuid=00000000000000000000000000000000,bHidden=False,bNotConnectable=False,bDefaultValueIsReadOnly=False,bDefaultValueIsIgnored=False,bAdvancedView=False,bOrphanedPin=False,)
CustomProperties Pin (PinId=93E45A8C95194842A6D552F16C7F160F,PinName="then",Direction="EGPD_Output",PinType.PinCategory="exec",PinType.PinSubCategory="",PinType.PinSubCategoryObject=None,PinType.PinSubCategoryMemberReference=(),PinType.PinValueType=(),PinType.ContainerType=None,PinType.bIsReference=False,PinType.bIsConst=False,PinType.bIsWeakPointer=False,PinType.bIsUObjectWrapper=False,PinType.bSerializeAsSinglePrecisionFloat=False,LinkedTo=(K2Node_AssignDelegate_3 4CE6B6194B21A8F3BEE9B2A178E1E4C6,),PersistentGuid=00000000000000000000000000000000,bHidden=False,bNotConnectable=False,bDefaultValueIsReadOnly=False,bDefaultValueIsIgnored=False,bAdvancedView=False,bOrphanedPin=False,)
CustomProperties Pin (PinId=4BF57179C76944978937F4B3C5045FA6,PinName="initialTransform",PinType.PinCategory="struct",PinType.PinSubCategory="",PinType.PinSubCategoryObject="/Script/CoreUObject.ScriptStruct'/Script/CoreUObject.Transform'",PinType.PinSubCategoryMemberReference=(),PinType.PinValueType=(),PinType.ContainerType=None,PinType.bIsReference=False,PinType.bIsConst=False,PinType.bIsWeakPointer=False,PinType.bIsUObjectWrapper=False,PinType.bSerializeAsSinglePrecisionFloat=False,LinkedTo=(K2Node_CallFunction_16 911242CFE9534A7ABA8A89110A9C22FC,),PersistentGuid=00000000000000000000000000000000,bHidden=False,bNotConnectable=False,bDefaultValueIsReadOnly=False,bDefaultValueIsIgnored=False,bAdvancedView=False,bOrphanedPin=False,)
CustomProperties Pin (PinId=6693269C392E400C91A690571C2EC4E4,PinName="Output_Get",PinToolTip="Retrieves the value of the variable, can use instead of a separate Get node",Direction="EGPD_Output",PinType.PinCategory="struct",PinType.PinSubCategory="",PinType.PinSubCategoryObject="/Script/CoreUObject.ScriptStruct'/Script/CoreUObject.Transform'",PinType.PinSubCategoryMemberReference=(),PinType.PinValueType=(),PinType.ContainerType=None,PinType.bIsReference=False,PinType.bIsConst=False,PinType.bIsWeakPointer=False,PinType.bIsUObjectWrapper=False,PinType.bSerializeAsSinglePrecisionFloat=False,PersistentGuid=00000000000000000000000000000000,bHidden=False,bNotConnectable=False,bDefaultValueIsReadOnly=False,bDefaultValueIsIgnored=False,bAdvancedView=False,bOrphanedPin=False,)
CustomProperties Pin (PinId=13C57048AF32480288539AB99D419622,PinName="self",PinFriendlyName=NSLOCTEXT("K2Node", "Target", "Target"),PinType.PinCategory="object",PinType.PinSubCategory="",PinType.PinSubCategoryObject="/Script/Engine.BlueprintGeneratedClass'/Game/Examples/BallShooter/Blueprints/BallShooterTarget.BallShooterTarget_C'",PinType.PinSubCategoryMemberReference=(),PinType.PinValueType=(),PinType.ContainerType=None,PinType.bIsReference=False,PinType.bIsConst=False,PinType.bIsWeakPointer=False,PinType.bIsUObjectWrapper=False,PinType.bSerializeAsSinglePrecisionFloat=False,PersistentGuid=00000000000000000000000000000000,bHidden=True,bNotConnectable=False,bDefaultValueIsReadOnly=False,bDefaultValueIsIgnored=False,bAdvancedView=False,bOrphanedPin=False,)
End Object
Begin Object Class=/Script/BlueprintGraph.K2Node_CallFunction Name="K2Node_CallFunction_16" ExportPath="/Script/BlueprintGraph.K2Node_CallFunction'/Game/Examples/BallShooter/Blueprints/BallShooterTarget.BallShooterTarget:EventGraph.K2Node_CallFunction_16'"
bIsPureFunc=True
bIsConstFunc=True
FunctionReference=(MemberParent="/Script/CoreUObject.Class'/Script/Engine.SceneComponent'",MemberName="K2_GetComponentToWorld")
NodePosX=576
NodePosY=-112
NodeGuid=685EED9C6F4341A5B0596D5BB3DD6123
CustomProperties Pin (PinId=C713530B1B764327AF3D78727E8519FC,PinName="self",PinFriendlyName=NSLOCTEXT("K2Node", "Target", "Target"),PinType.PinCategory="object",PinType.PinSubCategory="",PinType.PinSubCategoryObject="/Script/CoreUObject.Class'/Script/Engine.SceneComponent'",PinType.PinSubCategoryMemberReference=(),PinType.PinValueType=(),PinType.ContainerType=None,PinType.bIsReference=False,PinType.bIsConst=False,PinType.bIsWeakPointer=False,PinType.bIsUObjectWrapper=False,PinType.bSerializeAsSinglePrecisionFloat=False,LinkedTo=(K2Node_VariableGet_0 75F59976F5134D4C8837508DFD5E2C4F,),PersistentGuid=00000000000000000000000000000000,bHidden=False,bNotConnectable=False,bDefaultValueIsReadOnly=False,bDefaultValueIsIgnored=False,bAdvancedView=False,bOrphanedPin=False,)
CustomProperties Pin (PinId=911242CFE9534A7ABA8A89110A9C22FC,PinName="ReturnValue",Direction="EGPD_Output",PinType.PinCategory="struct",PinType.PinSubCategory="",PinType.PinSubCategoryObject="/Script/CoreUObject.ScriptStruct'/Script/CoreUObject.Transform'",PinType.PinSubCategoryMemberReference=(),PinType.PinValueType=(),PinType.ContainerType=None,PinType.bIsReference=False,PinType.bIsConst=False,PinType.bIsWeakPointer=False,PinType.bIsUObjectWrapper=False,PinType.bSerializeAsSinglePrecisionFloat=False,LinkedTo=(K2Node_VariableSet_2 4BF57179C76944978937F4B3C5045FA6,),PersistentGuid=00000000000000000000000000000000,bHidden=False,bNotConnectable=False,bDefaultValueIsReadOnly=False,bDefaultValueIsIgnored=False,bAdvancedView=False,bOrphanedPin=False,)
End Object
Begin Object Class=/Script/BlueprintGraph.K2Node_VariableGet Name="K2Node_VariableGet_3" ExportPath="/Script/BlueprintGraph.K2Node_VariableGet'/Game/Examples/BallShooter/Blueprints/BallShooterTarget.BallShooterTarget:EventGraph.K2Node_VariableGet_3'"
VariableReference=(MemberName="forceMagnitude",MemberGuid=9625F03643621E11AAE951BE6BB30C4A,bSelfContext=True)
NodePosX=512
NodePosY=505
NodeGuid=29A580674239DD6C843F9C921840EB8A
CustomProperties Pin (PinId=8C7A99D845DDEB94CEFC55AE39AC862D,PinName="forceMagnitude",Direction="EGPD_Output",PinType.PinCategory="real",PinType.PinSubCategory="double",PinType.PinSubCategoryObject=None,PinType.PinSubCategoryMemberReference=(),PinType.PinValueType=(),PinType.ContainerType=None,PinType.bIsReference=False,PinType.bIsConst=False,PinType.bIsWeakPointer=False,PinType.bIsUObjectWrapper=False,PinType.bSerializeAsSinglePrecisionFloat=False,DefaultValue="0.0",AutogeneratedDefaultValue="0.0",LinkedTo=(K2Node_PromotableOperator_2 3D7B56534270CEBFA76769B73395F386,K2Node_PromotableOperator_2 DF9A27C74DC0C9A02CE419A78A7DD0AF,),PersistentGuid=00000000000000000000000000000000,bHidden=False,bNotConnectable=False,bDefaultValueIsReadOnly=False,bDefaultValueIsIgnored=False,bAdvancedView=False,bOrphanedPin=False,)
CustomProperties Pin (PinId=ECD78977497496BCAC2B0F9ED92BF720,PinName="self",PinFriendlyName=NSLOCTEXT("K2Node", "Target", "Target"),PinType.PinCategory="object",PinType.PinSubCategory="",PinType.PinSubCategoryObject="/Script/Engine.BlueprintGeneratedClass'/Game/Examples/BallShooter/Blueprints/BallShooterTarget.BallShooterTarget_C'",PinType.PinSubCategoryMemberReference=(),PinType.PinValueType=(),PinType.ContainerType=None,PinType.bIsReference=False,PinType.bIsConst=False,PinType.bIsWeakPointer=False,PinType.bIsUObjectWrapper=False,PinType.bSerializeAsSinglePrecisionFloat=False,PersistentGuid=00000000000000000000000000000000,bHidden=True,bNotConnectable=False,bDefaultValueIsReadOnly=False,bDefaultValueIsIgnored=False,bAdvancedView=False,bOrphanedPin=False,)
End Object
Begin Object Class=/Script/BlueprintGraph.K2Node_CallFunction Name="K2Node_CallFunction_2" ExportPath="/Script/BlueprintGraph.K2Node_CallFunction'/Game/Examples/BallShooter/Blueprints/BallShooterTarget.BallShooterTarget:EventGraph.K2Node_CallFunction_2'"
FunctionReference=(MemberParent="/Script/CoreUObject.Class'/Script/Engine.PrimitiveComponent'",MemberName="SetMaterial")
NodePosX=976
NodePosY=49
NodeGuid=716CBAB94F76F2B59DA7E6B3C7C10EB9
CustomProperties Pin (PinId=246991731F0046009D9041432D5C1B1C,PinName="execute",PinToolTip="\nExec",PinType.PinCategory="exec",PinType.PinSubCategory="",PinType.PinSubCategoryObject=None,PinType.PinSubCategoryMemberReference=(),PinType.PinValueType=(),PinType.ContainerType=None,PinType.bIsReference=False,PinType.bIsConst=False,PinType.bIsWeakPointer=False,PinType.bIsUObjectWrapper=False,PinType.bSerializeAsSinglePrecisionFloat=False,LinkedTo=(K2Node_VariableSet_0 D9403E8F448AB29F0FA9BBA7D169F39C,),PersistentGuid=00000000000000000000000000000000,bHidden=False,bNotConnectable=False,bDefaultValueIsReadOnly=False,bDefaultValueIsIgnored=False,bAdvancedView=False,bOrphanedPin=False,)
CustomProperties Pin (PinId=0D2E4CD443C1409A9CD5046B9A915F3D,PinName="then",PinToolTip="\nExec",Direction="EGPD_Output",PinType.PinCategory="exec",PinType.PinSubCategory="",PinType.PinSubCategoryObject=None,PinType.PinSubCategoryMemberReference=(),PinType.PinValueType=(),PinType.ContainerType=None,PinType.bIsReference=False,PinType.bIsConst=False,PinType.bIsWeakPointer=False,PinType.bIsUObjectWrapper=False,PinType.bSerializeAsSinglePrecisionFloat=False,LinkedTo=(K2Node_IfThenElse_1 524C58DA4AE74FD1A4299F2487A268D0,),PersistentGuid=00000000000000000000000000000000,bHidden=False,bNotConnectable=False,bDefaultValueIsReadOnly=False,bDefaultValueIsIgnored=False,bAdvancedView=False,bOrphanedPin=False,)
CustomProperties Pin (PinId=6DE912F36ABB49A88DF998E48DF00A24,PinName="self",PinFriendlyName=NSLOCTEXT("K2Node", "Target", "Target"),PinToolTip="Target\nPrimitive Component Object Reference",PinType.PinCategory="object",PinType.PinSubCategory="",PinType.PinSubCategoryObject="/Script/CoreUObject.Class'/Script/Engine.PrimitiveComponent'",PinType.PinSubCategoryMemberReference=(),PinType.PinValueType=(),PinType.ContainerType=None,PinType.bIsReference=False,PinType.bIsConst=False,PinType.bIsWeakPointer=False,PinType.bIsUObjectWrapper=False,PinType.bSerializeAsSinglePrecisionFloat=False,LinkedTo=(K2Node_VariableGet_1 59073AE422DB4BD1A62082A3211A9F72,),PersistentGuid=00000000000000000000000000000000,bHidden=False,bNotConnectable=False,bDefaultValueIsReadOnly=False,bDefaultValueIsIgnored=False,bAdvancedView=False,bOrphanedPin=False,)
CustomProperties Pin (PinId=ADBF0806D3BC47CCAAB1F12F247926C3,PinName="ElementIndex",PinToolTip="Element Index\nInteger\n\nThe element to access the material of.",PinType.PinCategory="int",PinType.PinSubCategory="",PinType.PinSubCategoryObject=None,PinType.PinSubCategoryMemberReference=(),PinType.PinValueType=(),PinType.ContainerType=None,PinType.bIsReference=False,PinType.bIsConst=False,PinType.bIsWeakPointer=False,PinType.bIsUObjectWrapper=False,PinType.bSerializeAsSinglePrecisionFloat=False,DefaultValue="0",AutogeneratedDefaultValue="0",PersistentGuid=00000000000000000000000000000000,bHidden=False,bNotConnectable=False,bDefaultValueIsReadOnly=False,bDefaultValueIsIgnored=False,bAdvancedView=False,bOrphanedPin=False,)
CustomProperties Pin (PinId=82E2AF47E8984FAF9D2DE7F13F7132E4,PinName="Material",PinToolTip="Material\nMaterial Interface Object Reference",PinType.PinCategory="object",PinType.PinSubCategory="",PinType.PinSubCategoryObject="/Script/CoreUObject.Class'/Script/Engine.MaterialInterface'",PinType.PinSubCategoryMemberReference=(),PinType.PinValueType=(),PinType.ContainerType=None,PinType.bIsReference=False,PinType.bIsConst=False,PinType.bIsWeakPointer=False,PinType.bIsUObjectWrapper=False,PinType.bSerializeAsSinglePrecisionFloat=False,DefaultObject="/Game/StarterContent/Materials/M_Tech_Hex_Tile_Pulse.M_Tech_Hex_Tile_Pulse",PersistentGuid=00000000000000000000000000000000,bHidden=False,bNotConnectable=False,bDefaultValueIsReadOnly=False,bDefaultValueIsIgnored=False,bAdvancedView=False,bOrphanedPin=False,)
End Object
Begin Object Class=/Script/BlueprintGraph.K2Node_VariableGet Name="K2Node_VariableGet_4" ExportPath="/Script/BlueprintGraph.K2Node_VariableGet'/Game/Examples/BallShooter/Blueprints/BallShooterTarget.BallShooterTarget:EventGraph.K2Node_VariableGet_4'"
VariableReference=(MemberName="hitPoint",MemberGuid=D7C5C3689C5041E19F06CC4B01F35D8D,bSelfContext=True)
NodePosX=448
NodePosY=3
NodeGuid=857FD03545D1AE11CD5E38BEEEF5D912
CustomProperties Pin (PinId=BD211A180BAF4C52B617AC18864E712A,PinName="hitPoint",Direction="EGPD_Output",PinType.PinCategory="int",PinType.PinSubCategory="",PinType.PinSubCategoryObject=None,PinType.PinSubCategoryMemberReference=(),PinType.PinValueType=(),PinType.ContainerType=None,PinType.bIsReference=False,PinType.bIsConst=False,PinType.bIsWeakPointer=False,PinType.bIsUObjectWrapper=False,PinType.bSerializeAsSinglePrecisionFloat=False,DefaultValue="0",AutogeneratedDefaultValue="0",LinkedTo=(K2Node_PromotableOperator_4 E7623A644E94FF44019DA0BB95F63A28,),PersistentGuid=00000000000000000000000000000000,bHidden=False,bNotConnectable=False,bDefaultValueIsReadOnly=False,bDefaultValueIsIgnored=False,bAdvancedView=False,bOrphanedPin=False,)
CustomProperties Pin (PinId=EA6A42BAD586464596E364BF9CA6F1E7,PinName="self",PinFriendlyName=NSLOCTEXT("K2Node", "Target", "Target"),PinType.PinCategory="object",PinType.PinSubCategory="",PinType.PinSubCategoryObject="/Script/Engine.BlueprintGeneratedClass'/Game/Examples/BallShooter/Blueprints/BallShooterTarget.BallShooterTarget_C'",PinType.PinSubCategoryMemberReference=(),PinType.PinValueType=(),PinType.ContainerType=None,PinType.bIsReference=False,PinType.bIsConst=False,PinType.bIsWeakPointer=False,PinType.bIsUObjectWrapper=False,PinType.bSerializeAsSinglePrecisionFloat=False,PersistentGuid=00000000000000000000000000000000,bHidden=True,bNotConnectable=False,bDefaultValueIsReadOnly=False,bDefaultValueIsIgnored=False,bAdvancedView=False,bOrphanedPin=False,)
End Object
Begin Object Class=/Script/BlueprintGraph.K2Node_VariableGet Name="K2Node_VariableGet_1" ExportPath="/Script/BlueprintGraph.K2Node_VariableGet'/Game/Examples/BallShooter/Blueprints/BallShooterTarget.BallShooterTarget:EventGraph.K2Node_VariableGet_1'"
VariableReference=(MemberName="StaticMesh",bSelfContext=True)
NodePosX=800
NodePosY=19
NodeGuid=0C32F3CD499FCE8BB687C084251684A1
CustomProperties Pin (PinId=59073AE422DB4BD1A62082A3211A9F72,PinName="StaticMesh",Direction="EGPD_Output",PinType.PinCategory="object",PinType.PinSubCategory="",PinType.PinSubCategoryObject="/Script/CoreUObject.Class'/Script/Engine.StaticMeshComponent'",PinType.PinSubCategoryMemberReference=(),PinType.PinValueType=(),PinType.ContainerType=None,PinType.bIsReference=False,PinType.bIsConst=False,PinType.bIsWeakPointer=False,PinType.bIsUObjectWrapper=False,PinType.bSerializeAsSinglePrecisionFloat=False,LinkedTo=(K2Node_CallFunction_2 6DE912F36ABB49A88DF998E48DF00A24,),PersistentGuid=00000000000000000000000000000000,bHidden=False,bNotConnectable=False,bDefaultValueIsReadOnly=False,bDefaultValueIsIgnored=False,bAdvancedView=False,bOrphanedPin=False,)
CustomProperties Pin (PinId=6CBD5B5CFAC144D18F17820CDB4A05F5,PinName="self",PinFriendlyName=NSLOCTEXT("K2Node", "Target", "Target"),PinType.PinCategory="object",PinType.PinSubCategory="",PinType.PinSubCategoryObject="/Script/Engine.BlueprintGeneratedClass'/Game/Examples/BallShooter/Blueprints/BallShooterTarget.BallShooterTarget_C'",PinType.PinSubCategoryMemberReference=(),PinType.PinValueType=(),PinType.ContainerType=None,PinType.bIsReference=False,PinType.bIsConst=False,PinType.bIsWeakPointer=False,PinType.bIsUObjectWrapper=False,PinType.bSerializeAsSinglePrecisionFloat=False,PersistentGuid=00000000000000000000000000000000,bHidden=True,bNotConnectable=False,bDefaultValueIsReadOnly=False,bDefaultValueIsIgnored=False,bAdvancedView=False,bOrphanedPin=False,)
End Object
Begin Object Class=/Script/BlueprintGraph.K2Node_IfThenElse Name="K2Node_IfThenElse_1" ExportPath="/Script/BlueprintGraph.K2Node_IfThenElse'/Game/Examples/BallShooter/Blueprints/BallShooterTarget.BallShooterTarget:EventGraph.K2Node_IfThenElse_1'"
NodePosX=1248
NodePosY=66
NodeGuid=0FD357714BC4917315ED53883A0F625E
CustomProperties Pin (PinId=524C58DA4AE74FD1A4299F2487A268D0,PinName="execute",PinType.PinCategory="exec",PinType.PinSubCategory="",PinType.PinSubCategoryObject=None,PinType.PinSubCategoryMemberReference=(),PinType.PinValueType=(),PinType.ContainerType=None,PinType.bIsReference=False,PinType.bIsConst=False,PinType.bIsWeakPointer=False,PinType.bIsUObjectWrapper=False,PinType.bSerializeAsSinglePrecisionFloat=False,LinkedTo=(K2Node_CallFunction_2 0D2E4CD443C1409A9CD5046B9A915F3D,),PersistentGuid=00000000000000000000000000000000,bHidden=False,bNotConnectable=False,bDefaultValueIsReadOnly=False,bDefaultValueIsIgnored=False,bAdvancedView=False,bOrphanedPin=False,)
CustomProperties Pin (PinId=129F14A31FB948B8B6DFA9FCD13B8941,PinName="Condition",PinType.PinCategory="bool",PinType.PinSubCategory="",PinType.PinSubCategoryObject=None,PinType.PinSubCategoryMemberReference=(),PinType.PinValueType=(),PinType.ContainerType=None,PinType.bIsReference=False,PinType.bIsConst=False,PinType.bIsWeakPointer=False,PinType.bIsUObjectWrapper=False,PinType.bSerializeAsSinglePrecisionFloat=False,DefaultValue="true",AutogeneratedDefaultValue="true",LinkedTo=(K2Node_PromotableOperator_1 92862260BACD4F599114167F03A4A0D8,),PersistentGuid=00000000000000000000000000000000,bHidden=False,bNotConnectable=False,bDefaultValueIsReadOnly=False,bDefaultValueIsIgnored=False,bAdvancedView=False,bOrphanedPin=False,)
CustomProperties Pin (PinId=98652266D76E424D8D10D9CB84BA0D3D,PinName="then",PinFriendlyName=NSLOCTEXT("K2Node", "true", "true"),Direction="EGPD_Output",PinType.PinCategory="exec",PinType.PinSubCategory="",PinType.PinSubCategoryObject=None,PinType.PinSubCategoryMemberReference=(),PinType.PinValueType=(),PinType.ContainerType=None,PinType.bIsReference=False,PinType.bIsConst=False,PinType.bIsWeakPointer=False,PinType.bIsUObjectWrapper=False,PinType.bSerializeAsSinglePrecisionFloat=False,LinkedTo=(K2Node_CallFunction_0 78E7DB62332D4AE4B98C08D0F2B2D57B,),PersistentGuid=00000000000000000000000000000000,bHidden=False,bNotConnectable=False,bDefaultValueIsReadOnly=False,bDefaultValueIsIgnored=False,bAdvancedView=False,bOrphanedPin=False,)
CustomProperties Pin (PinId=DB2454663EC6443991EE34A5EF62181D,PinName="else",PinFriendlyName=NSLOCTEXT("K2Node", "false", "false"),Direction="EGPD_Output",PinType.PinCategory="exec",PinType.PinSubCategory="",PinType.PinSubCategoryObject=None,PinType.PinSubCategoryMemberReference=(),PinType.PinValueType=(),PinType.ContainerType=None,PinType.bIsReference=False,PinType.bIsConst=False,PinType.bIsWeakPointer=False,PinType.bIsUObjectWrapper=False,PinType.bSerializeAsSinglePrecisionFloat=False,PersistentGuid=00000000000000000000000000000000,bHidden=False,bNotConnectable=False,bDefaultValueIsReadOnly=False,bDefaultValueIsIgnored=False,bAdvancedView=False,bOrphanedPin=False,)
End Object
Begin Object Class=/Script/BlueprintGraph.K2Node_PromotableOperator Name="K2Node_PromotableOperator_1" ExportPath="/Script/BlueprintGraph.K2Node_PromotableOperator'/Game/Examples/BallShooter/Blueprints/BallShooterTarget.BallShooterTarget:EventGraph.K2Node_PromotableOperator_1'"
OperationName="LessEqual"
bIsPureFunc=True
FunctionReference=(MemberParent="/Script/CoreUObject.Class'/Script/Engine.KismetMathLibrary'",MemberName="LessEqual_IntInt")
NodePosX=992
NodePosY=275
NodeGuid=6DDC989E4EA80A277C7FA08C4951D814
CustomProperties Pin (PinId=B93C99D5E2E14926B2205BDEC9769FF7,PinName="A",PinType.PinCategory="int",PinType.PinSubCategory="",PinType.PinSubCategoryObject=None,PinType.PinSubCategoryMemberReference=(),PinType.PinValueType=(),PinType.ContainerType=None,PinType.bIsReference=False,PinType.bIsConst=False,PinType.bIsWeakPointer=False,PinType.bIsUObjectWrapper=False,PinType.bSerializeAsSinglePrecisionFloat=False,LinkedTo=(K2Node_VariableSet_0 F509E174443DDADDDE9B1BA0EBC32F47,),PersistentGuid=00000000000000000000000000000000,bHidden=False,bNotConnectable=False,bDefaultValueIsReadOnly=False,bDefaultValueIsIgnored=False,bAdvancedView=False,bOrphanedPin=False,)
CustomProperties Pin (PinId=72F2CB414EAA4AD29781C52721BEE73B,PinName="B",PinType.PinCategory="int",PinType.PinSubCategory="",PinType.PinSubCategoryObject=None,PinType.PinSubCategoryMemberReference=(),PinType.PinValueType=(),PinType.ContainerType=None,PinType.bIsReference=False,PinType.bIsConst=False,PinType.bIsWeakPointer=False,PinType.bIsUObjectWrapper=False,PinType.bSerializeAsSinglePrecisionFloat=False,PersistentGuid=00000000000000000000000000000000,bHidden=False,bNotConnectable=False,bDefaultValueIsReadOnly=False,bDefaultValueIsIgnored=False,bAdvancedView=False,bOrphanedPin=False,)
CustomProperties Pin (PinId=92862260BACD4F599114167F03A4A0D8,PinName="ReturnValue",Direction="EGPD_Output",PinType.PinCategory="bool",PinType.PinSubCategory="",PinType.PinSubCategoryObject=None,PinType.PinSubCategoryMemberReference=(),PinType.PinValueType=(),PinType.ContainerType=None,PinType.bIsReference=False,PinType.bIsConst=False,PinType.bIsWeakPointer=False,PinType.bIsUObjectWrapper=False,PinType.bSerializeAsSinglePrecisionFloat=False,LinkedTo=(K2Node_IfThenElse_1 129F14A31FB948B8B6DFA9FCD13B8941,),PersistentGuid=00000000000000000000000000000000,bHidden=False,bNotConnectable=False,bDefaultValueIsReadOnly=False,bDefaultValueIsIgnored=False,bAdvancedView=False,bOrphanedPin=False,)
CustomProperties Pin (PinId=F3D88F62F0C04CF0BE9CF78C6D9047D2,PinName="ErrorTolerance",PinType.PinCategory="",PinType.PinSubCategory="",PinType.PinSubCategoryObject=None,PinType.PinSubCategoryMemberReference=(),PinType.PinValueType=(),PinType.ContainerType=None,PinType.bIsReference=False,PinType.bIsConst=False,PinType.bIsWeakPointer=False,PinType.bIsUObjectWrapper=False,PinType.bSerializeAsSinglePrecisionFloat=False,PersistentGuid=00000000000000000000000000000000,bHidden=True,bNotConnectable=False,bDefaultValueIsReadOnly=False,bDefaultValueIsIgnored=False,bAdvancedView=False,bOrphanedPin=False,)
End Object
Begin Object Class=/Script/BlueprintGraph.K2Node_CallFunction Name="K2Node_CallFunction_0" ExportPath="/Script/BlueprintGraph.K2Node_CallFunction'/Game/Examples/BallShooter/Blueprints/BallShooterTarget.BallShooterTarget:EventGraph.K2Node_CallFunction_0'"
FunctionReference=(MemberName="K2_DestroyActor",bSelfContext=True)
NodePosX=1440
NodePosY=48
NodeGuid=1A72E0524762F0ED4C198C95D3973A3F
CustomProperties Pin (PinId=78E7DB62332D4AE4B98C08D0F2B2D57B,PinName="execute",PinType.PinCategory="exec",PinType.PinSubCategory="",PinType.PinSubCategoryObject=None,PinType.PinSubCategoryMemberReference=(),PinType.PinValueType=(),PinType.ContainerType=None,PinType.bIsReference=False,PinType.bIsConst=False,PinType.bIsWeakPointer=False,PinType.bIsUObjectWrapper=False,PinType.bSerializeAsSinglePrecisionFloat=False,LinkedTo=(K2Node_IfThenElse_1 98652266D76E424D8D10D9CB84BA0D3D,),PersistentGuid=00000000000000000000000000000000,bHidden=False,bNotConnectable=False,bDefaultValueIsReadOnly=False,bDefaultValueIsIgnored=False,bAdvancedView=False,bOrphanedPin=False,)
CustomProperties Pin (PinId=92500A558C0A42358BDAB500DFF17F82,PinName="then",Direction="EGPD_Output",PinType.PinCategory="exec",PinType.PinSubCategory="",PinType.PinSubCategoryObject=None,PinType.PinSubCategoryMemberReference=(),PinType.PinValueType=(),PinType.ContainerType=None,PinType.bIsReference=False,PinType.bIsConst=False,PinType.bIsWeakPointer=False,PinType.bIsUObjectWrapper=False,PinType.bSerializeAsSinglePrecisionFloat=False,PersistentGuid=00000000000000000000000000000000,bHidden=False,bNotConnectable=False,bDefaultValueIsReadOnly=False,bDefaultValueIsIgnored=False,bAdvancedView=False,bOrphanedPin=False,)
CustomProperties Pin (PinId=1636095D785B48E197A94E1F61DD19C6,PinName="self",PinFriendlyName=NSLOCTEXT("K2Node", "Target", "Target"),PinType.PinCategory="object",PinType.PinSubCategory="",PinType.PinSubCategoryObject="/Script/CoreUObject.Class'/Script/Engine.Actor'",PinType.PinSubCategoryMemberReference=(),PinType.PinValueType=(),PinType.ContainerType=None,PinType.bIsReference=False,PinType.bIsConst=False,PinType.bIsWeakPointer=False,PinType.bIsUObjectWrapper=False,PinType.bSerializeAsSinglePrecisionFloat=False,PersistentGuid=00000000000000000000000000000000,bHidden=False,bNotConnectable=False,bDefaultValueIsReadOnly=False,bDefaultValueIsIgnored=False,bAdvancedView=False,bOrphanedPin=False,)
End Object
Begin Object Class=/Script/BlueprintGraph.K2Node_CustomEvent Name="K2Node_CustomEvent_3" ExportPath="/Script/BlueprintGraph.K2Node_CustomEvent'/Game/Examples/BallShooter/Blueprints/BallShooterTarget.BallShooterTarget:EventGraph.K2Node_CustomEvent_3'"
CustomFunctionName="OnTakeAnyDamage_Event"
NodePosX=336
NodePosY=48
NodeGuid=4DF9983B47BD7131F3BDCE883F6D12B0
CustomProperties Pin (PinId=7358A2FA42F0CC6FD9BC598DEBDC8BB0,PinName="OutputDelegate",Direction="EGPD_Output",PinType.PinCategory="delegate",PinType.PinSubCategory="",PinType.PinSubCategoryObject=None,PinType.PinSubCategoryMemberReference=(MemberParent="/Script/Engine.BlueprintGeneratedClass'/Game/Examples/BallShooter/Blueprints/BallShooterTarget.BallShooterTarget_C'",MemberName="OnTakeAnyDamage_Event",MemberGuid=4DF9983B47BD7131F3BDCE883F6D12B0),PinType.PinValueType=(),PinType.ContainerType=None,PinType.bIsReference=False,PinType.bIsConst=False,PinType.bIsWeakPointer=False,PinType.bIsUObjectWrapper=False,PinType.bSerializeAsSinglePrecisionFloat=False,LinkedTo=(K2Node_AssignDelegate_3 CD761D93470FA54B3CABCCBFC97D3F7A,),PersistentGuid=00000000000000000000000000000000,bHidden=False,bNotConnectable=False,bDefaultValueIsReadOnly=False,bDefaultValueIsIgnored=False,bAdvancedView=False,bOrphanedPin=False,)
CustomProperties Pin (PinId=26F5296347E339FBA91BF58A478BE4D4,PinName="then",Direction="EGPD_Output",PinType.PinCategory="exec",PinType.PinSubCategory="",PinType.PinSubCategoryObject=None,PinType.PinSubCategoryMemberReference=(),PinType.PinValueType=(),PinType.ContainerType=None,PinType.bIsReference=False,PinType.bIsConst=False,PinType.bIsWeakPointer=False,PinType.bIsUObjectWrapper=False,PinType.bSerializeAsSinglePrecisionFloat=False,LinkedTo=(K2Node_VariableSet_0 D7284DC74823F20FCE4C51B76B9DEB3C,),PersistentGuid=00000000000000000000000000000000,bHidden=False,bNotConnectable=False,bDefaultValueIsReadOnly=False,bDefaultValueIsIgnored=False,bAdvancedView=False,bOrphanedPin=False,)
CustomProperties Pin (PinId=7C0BC124439835043123C8ABEAF49DEB,PinName="DamagedActor",Direction="EGPD_Output",PinType.PinCategory="object",PinType.PinSubCategory="",PinType.PinSubCategoryObject="/Script/CoreUObject.Class'/Script/Engine.Actor'",PinType.PinSubCategoryMemberReference=(),PinType.PinValueType=(),PinType.ContainerType=None,PinType.bIsReference=False,PinType.bIsConst=False,PinType.bIsWeakPointer=False,PinType.bIsUObjectWrapper=False,PinType.bSerializeAsSinglePrecisionFloat=False,PersistentGuid=00000000000000000000000000000000,bHidden=False,bNotConnectable=False,bDefaultValueIsReadOnly=False,bDefaultValueIsIgnored=False,bAdvancedView=False,bOrphanedPin=False,)
CustomProperties Pin (PinId=E46D90B54DF5C3DE6DE5089CD702FFF1,PinName="Damage",Direction="EGPD_Output",PinType.PinCategory="real",PinType.PinSubCategory="float",PinType.PinSubCategoryObject=None,PinType.PinSubCategoryMemberReference=(),PinType.PinValueType=(),PinType.ContainerType=None,PinType.bIsReference=False,PinType.bIsConst=False,PinType.bIsWeakPointer=False,PinType.bIsUObjectWrapper=False,PinType.bSerializeAsSinglePrecisionFloat=False,LinkedTo=(K2Node_PromotableOperator_4 E87931584547D727DED560980619C9B2,),PersistentGuid=00000000000000000000000000000000,bHidden=False,bNotConnectable=False,bDefaultValueIsReadOnly=False,bDefaultValueIsIgnored=False,bAdvancedView=False,bOrphanedPin=False,)
CustomProperties Pin (PinId=E93AA56B4B0A0A00071DDCBB1F856A21,PinName="DamageType",Direction="EGPD_Output",PinType.PinCategory="object",PinType.PinSubCategory="",PinType.PinSubCategoryObject="/Script/CoreUObject.Class'/Script/Engine.DamageType'",PinType.PinSubCategoryMemberReference=(),PinType.PinValueType=(),PinType.ContainerType=None,PinType.bIsReference=False,PinType.bIsConst=True,PinType.bIsWeakPointer=False,PinType.bIsUObjectWrapper=False,PinType.bSerializeAsSinglePrecisionFloat=False,PersistentGuid=00000000000000000000000000000000,bHidden=False,bNotConnectable=False,bDefaultValueIsReadOnly=False,bDefaultValueIsIgnored=False,bAdvancedView=False,bOrphanedPin=False,)
CustomProperties Pin (PinId=A07A48104ACBFDA7696102968514B055,PinName="InstigatedBy",Direction="EGPD_Output",PinType.PinCategory="object",PinType.PinSubCategory="",PinType.PinSubCategoryObject="/Script/CoreUObject.Class'/Script/Engine.Controller'",PinType.PinSubCategoryMemberReference=(),PinType.PinValueType=(),PinType.ContainerType=None,PinType.bIsReference=False,PinType.bIsConst=False,PinType.bIsWeakPointer=False,PinType.bIsUObjectWrapper=False,PinType.bSerializeAsSinglePrecisionFloat=False,PersistentGuid=00000000000000000000000000000000,bHidden=False,bNotConnectable=False,bDefaultValueIsReadOnly=False,bDefaultValueIsIgnored=False,bAdvancedView=False,bOrphanedPin=False,)
CustomProperties Pin (PinId=81D7F3B946E2CB3C18A670B976ECB56F,PinName="DamageCauser",Direction="EGPD_Output",PinType.PinCategory="object",PinType.PinSubCategory="",PinType.PinSubCategoryObject="/Script/CoreUObject.Class'/Script/Engine.Actor'",PinType.PinSubCategoryMemberReference=(),PinType.PinValueType=(),PinType.ContainerType=None,PinType.bIsReference=False,PinType.bIsConst=False,PinType.bIsWeakPointer=False,PinType.bIsUObjectWrapper=False,PinType.bSerializeAsSinglePrecisionFloat=False,PersistentGuid=00000000000000000000000000000000,bHidden=False,bNotConnectable=False,bDefaultValueIsReadOnly=False,bDefaultValueIsIgnored=False,bAdvancedView=False,bOrphanedPin=False,)
CustomProperties UserDefinedPin (PinName="DamagedActor",PinType=(PinCategory="object",PinSubCategoryObject="/Script/CoreUObject.Class'/Script/Engine.Actor'"),DesiredPinDirection=EGPD_Output)
CustomProperties UserDefinedPin (PinName="Damage",PinType=(PinCategory="real",PinSubCategory="float"),DesiredPinDirection=EGPD_Output)
CustomProperties UserDefinedPin (PinName="DamageType",PinType=(PinCategory="object",PinSubCategoryObject="/Script/CoreUObject.Class'/Script/Engine.DamageType'",bIsConst=True),DesiredPinDirection=EGPD_Output)
CustomProperties UserDefinedPin (PinName="InstigatedBy",PinType=(PinCategory="object",PinSubCategoryObject="/Script/CoreUObject.Class'/Script/Engine.Controller'"),DesiredPinDirection=EGPD_Output)
CustomProperties UserDefinedPin (PinName="DamageCauser",PinType=(PinCategory="object",PinSubCategoryObject="/Script/CoreUObject.Class'/Script/Engine.Actor'"),DesiredPinDirection=EGPD_Output)
End Object
Begin Object Class=/Script/BlueprintGraph.K2Node_AssignDelegate Name="K2Node_AssignDelegate_3" ExportPath="/Script/BlueprintGraph.K2Node_AssignDelegate'/Game/Examples/BallShooter/Blueprints/BallShooterTarget.BallShooterTarget:EventGraph.K2Node_AssignDelegate_3'"
DelegateReference=(MemberParent="/Script/CoreUObject.Class'/Script/Engine.Actor'",MemberName="OnTakeAnyDamage")
NodePosX=1072
NodePosY=-176
NodeGuid=4D098B5A4C93474BE8DD7BBEE1C82ACA
CustomProperties Pin (PinId=4CE6B6194B21A8F3BEE9B2A178E1E4C6,PinName="execute",PinType.PinCategory="exec",PinType.PinSubCategory="",PinType.PinSubCategoryObject=None,PinType.PinSubCategoryMemberReference=(),PinType.PinValueType=(),PinType.ContainerType=None,PinType.bIsReference=False,PinType.bIsConst=False,PinType.bIsWeakPointer=False,PinType.bIsUObjectWrapper=False,PinType.bSerializeAsSinglePrecisionFloat=False,LinkedTo=(K2Node_VariableSet_2 93E45A8C95194842A6D552F16C7F160F,),PersistentGuid=00000000000000000000000000000000,bHidden=False,bNotConnectable=False,bDefaultValueIsReadOnly=False,bDefaultValueIsIgnored=False,bAdvancedView=False,bOrphanedPin=False,)
CustomProperties Pin (PinId=FF3F8D9C4E0243B1485A5EA8DC4318E7,PinName="then",Direction="EGPD_Output",PinType.PinCategory="exec",PinType.PinSubCategory="",PinType.PinSubCategoryObject=None,PinType.PinSubCategoryMemberReference=(),PinType.PinValueType=(),PinType.ContainerType=None,PinType.bIsReference=False,PinType.bIsConst=False,PinType.bIsWeakPointer=False,PinType.bIsUObjectWrapper=False,PinType.bSerializeAsSinglePrecisionFloat=False,PersistentGuid=00000000000000000000000000000000,bHidden=False,bNotConnectable=False,bDefaultValueIsReadOnly=False,bDefaultValueIsIgnored=False,bAdvancedView=False,bOrphanedPin=False,)
CustomProperties Pin (PinId=C888CDBB4BB10EE8E9C4F4993FB344C0,PinName="self",PinFriendlyName=NSLOCTEXT("K2Node", "BaseMCDelegateSelfPinName", "Target"),PinType.PinCategory="object",PinType.PinSubCategory="",PinType.PinSubCategoryObject="/Script/CoreUObject.Class'/Script/Engine.Actor'",PinType.PinSubCategoryMemberReference=(),PinType.PinValueType=(),PinType.ContainerType=None,PinType.bIsReference=False,PinType.bIsConst=False,PinType.bIsWeakPointer=False,PinType.bIsUObjectWrapper=False,PinType.bSerializeAsSinglePrecisionFloat=False,PersistentGuid=00000000000000000000000000000000,bHidden=False,bNotConnectable=False,bDefaultValueIsReadOnly=False,bDefaultValueIsIgnored=False,bAdvancedView=False,bOrphanedPin=False,)
CustomProperties Pin (PinId=CD761D93470FA54B3CABCCBFC97D3F7A,PinName="Delegate",PinFriendlyName=NSLOCTEXT("K2Node", "PinFriendlyDelegatetName", "Event"),PinType.PinCategory="delegate",PinType.PinSubCategory="",PinType.PinSubCategoryObject=None,PinType.PinSubCategoryMemberReference=(MemberParent="/Script/CoreUObject.Package'/Script/Engine'",MemberName="TakeAnyDamageSignature__DelegateSignature"),PinType.PinValueType=(),PinType.ContainerType=None,PinType.bIsReference=True,PinType.bIsConst=True,PinType.bIsWeakPointer=False,PinType.bIsUObjectWrapper=False,PinType.bSerializeAsSinglePrecisionFloat=False,LinkedTo=(K2Node_CustomEvent_3 7358A2FA42F0CC6FD9BC598DEBDC8BB0,),PersistentGuid=00000000000000000000000000000000,bHidden=False,bNotConnectable=False,bDefaultValueIsReadOnly=False,bDefaultValueIsIgnored=False,bAdvancedView=False,bOrphanedPin=False,)
End Object
Begin Object Class=/Script/BlueprintGraph.K2Node_VariableSet Name="K2Node_VariableSet_0" ExportPath="/Script/BlueprintGraph.K2Node_VariableSet'/Game/Examples/BallShooter/Blueprints/BallShooterTarget.BallShooterTarget:EventGraph.K2Node_VariableSet_0'"
VariableReference=(MemberName="hitPoint",MemberGuid=D7C5C3689C5041E19F06CC4B01F35D8D,bSelfContext=True)
NodePosX=768
NodePosY=83
NodeGuid=693A5D93461F4B1114035281FE39A1D3
CustomProperties Pin (PinId=D7284DC74823F20FCE4C51B76B9DEB3C,PinName="execute",PinType.PinCategory="exec",PinType.PinSubCategory="",PinType.PinSubCategoryObject=None,PinType.PinSubCategoryMemberReference=(),PinType.PinValueType=(),PinType.ContainerType=None,PinType.bIsReference=False,PinType.bIsConst=False,PinType.bIsWeakPointer=False,PinType.bIsUObjectWrapper=False,PinType.bSerializeAsSinglePrecisionFloat=False,LinkedTo=(K2Node_CustomEvent_3 26F5296347E339FBA91BF58A478BE4D4,),PersistentGuid=00000000000000000000000000000000,bHidden=False,bNotConnectable=False,bDefaultValueIsReadOnly=False,bDefaultValueIsIgnored=False,bAdvancedView=False,bOrphanedPin=False,)
CustomProperties Pin (PinId=D9403E8F448AB29F0FA9BBA7D169F39C,PinName="then",Direction="EGPD_Output",PinType.PinCategory="exec",PinType.PinSubCategory="",PinType.PinSubCategoryObject=None,PinType.PinSubCategoryMemberReference=(),PinType.PinValueType=(),PinType.ContainerType=None,PinType.bIsReference=False,PinType.bIsConst=False,PinType.bIsWeakPointer=False,PinType.bIsUObjectWrapper=False,PinType.bSerializeAsSinglePrecisionFloat=False,LinkedTo=(K2Node_CallFunction_2 246991731F0046009D9041432D5C1B1C,),PersistentGuid=00000000000000000000000000000000,bHidden=False,bNotConnectable=False,bDefaultValueIsReadOnly=False,bDefaultValueIsIgnored=False,bAdvancedView=False,bOrphanedPin=False,)
CustomProperties Pin (PinId=4150C6D043D920B4430419A329CAE5D9,PinName="hitPoint",PinType.PinCategory="int",PinType.PinSubCategory="",PinType.PinSubCategoryObject=None,PinType.PinSubCategoryMemberReference=(),PinType.PinValueType=(),PinType.ContainerType=None,PinType.bIsReference=False,PinType.bIsConst=False,PinType.bIsWeakPointer=False,PinType.bIsUObjectWrapper=False,PinType.bSerializeAsSinglePrecisionFloat=False,DefaultValue="0",AutogeneratedDefaultValue="0",LinkedTo=(K2Node_PromotableOperator_4 3F35A8C846C4F375C8997AB732E8C4CA,),PersistentGuid=00000000000000000000000000000000,bHidden=False,bNotConnectable=False,bDefaultValueIsReadOnly=False,bDefaultValueIsIgnored=False,bAdvancedView=False,bOrphanedPin=False,)
CustomProperties Pin (PinId=F509E174443DDADDDE9B1BA0EBC32F47,PinName="Output_Get",PinToolTip="Retrieves the value of the variable, can use instead of a separate Get node",Direction="EGPD_Output",PinType.PinCategory="int",PinType.PinSubCategory="",PinType.PinSubCategoryObject=None,PinType.PinSubCategoryMemberReference=(),PinType.PinValueType=(),PinType.ContainerType=None,PinType.bIsReference=False,PinType.bIsConst=False,PinType.bIsWeakPointer=False,PinType.bIsUObjectWrapper=False,PinType.bSerializeAsSinglePrecisionFloat=False,DefaultValue="0",AutogeneratedDefaultValue="0",LinkedTo=(K2Node_PromotableOperator_1 B93C99D5E2E14926B2205BDEC9769FF7,),PersistentGuid=00000000000000000000000000000000,bHidden=False,bNotConnectable=False,bDefaultValueIsReadOnly=False,bDefaultValueIsIgnored=False,bAdvancedView=False,bOrphanedPin=False,)
CustomProperties Pin (PinId=5C8B48614FE6DEE19BDBBB81FABBBE79,PinName="self",PinFriendlyName=NSLOCTEXT("K2Node", "Target", "Target"),PinType.PinCategory="object",PinType.PinSubCategory="",PinType.PinSubCategoryObject="/Script/Engine.BlueprintGeneratedClass'/Game/Examples/BallShooter/Blueprints/BallShooterTarget.BallShooterTarget_C'",PinType.PinSubCategoryMemberReference=(),PinType.PinValueType=(),PinType.ContainerType=None,PinType.bIsReference=False,PinType.bIsConst=False,PinType.bIsWeakPointer=False,PinType.bIsUObjectWrapper=False,PinType.bSerializeAsSinglePrecisionFloat=False,PersistentGuid=00000000000000000000000000000000,bHidden=True,bNotConnectable=False,bDefaultValueIsReadOnly=False,bDefaultValueIsIgnored=False,bAdvancedView=False,bOrphanedPin=False,)
End Object
Begin Object Class=/Script/BlueprintGraph.K2Node_PromotableOperator Name="K2Node_PromotableOperator_4" ExportPath="/Script/BlueprintGraph.K2Node_PromotableOperator'/Game/Examples/BallShooter/Blueprints/BallShooterTarget.BallShooterTarget:EventGraph.K2Node_PromotableOperator_4'"
OperationName="Subtract"
bIsPureFunc=True
FunctionReference=(MemberParent="/Script/CoreUObject.Class'/Script/Engine.KismetMathLibrary'",MemberName="Subtract_DoubleDouble")
NodePosX=608
NodePosY=123
NodeGuid=8AD9E09F4F9A0F92CDCDA4B70AB5C088
CustomProperties Pin (PinId=E7623A644E94FF44019DA0BB95F63A28,PinName="A",PinToolTip="A\nInteger",PinType.PinCategory="int",PinType.PinSubCategory="",PinType.PinSubCategoryObject=None,PinType.PinSubCategoryMemberReference=(),PinType.PinValueType=(),PinType.ContainerType=None,PinType.bIsReference=False,PinType.bIsConst=False,PinType.bIsWeakPointer=False,PinType.bIsUObjectWrapper=False,PinType.bSerializeAsSinglePrecisionFloat=False,LinkedTo=(K2Node_VariableGet_4 BD211A180BAF4C52B617AC18864E712A,),PersistentGuid=00000000000000000000000000000000,bHidden=False,bNotConnectable=False,bDefaultValueIsReadOnly=False,bDefaultValueIsIgnored=False,bAdvancedView=False,bOrphanedPin=False,)
CustomProperties Pin (PinId=E87931584547D727DED560980619C9B2,PinName="B",PinToolTip="B\nFloat (double-precision)",PinType.PinCategory="real",PinType.PinSubCategory="double",PinType.PinSubCategoryObject=None,PinType.PinSubCategoryMemberReference=(),PinType.PinValueType=(),PinType.ContainerType=None,PinType.bIsReference=False,PinType.bIsConst=False,PinType.bIsWeakPointer=False,PinType.bIsUObjectWrapper=False,PinType.bSerializeAsSinglePrecisionFloat=False,LinkedTo=(K2Node_CustomEvent_3 E46D90B54DF5C3DE6DE5089CD702FFF1,),PersistentGuid=00000000000000000000000000000000,bHidden=False,bNotConnectable=False,bDefaultValueIsReadOnly=False,bDefaultValueIsIgnored=False,bAdvancedView=False,bOrphanedPin=False,)
CustomProperties Pin (PinId=3F35A8C846C4F375C8997AB732E8C4CA,PinName="ReturnValue",PinToolTip="Return Value\nInteger\n\nSubtraction (A – B)",Direction="EGPD_Output",PinType.PinCategory="int",PinType.PinSubCategory="",PinType.PinSubCategoryObject=None,PinType.PinSubCategoryMemberReference=(),PinType.PinValueType=(),PinType.ContainerType=None,PinType.bIsReference=False,PinType.bIsConst=False,PinType.bIsWeakPointer=False,PinType.bIsUObjectWrapper=False,PinType.bSerializeAsSinglePrecisionFloat=False,LinkedTo=(K2Node_VariableSet_0 4150C6D043D920B4430419A329CAE5D9,),PersistentGuid=00000000000000000000000000000000,bHidden=False,bNotConnectable=False,bDefaultValueIsReadOnly=False,bDefaultValueIsIgnored=False,bAdvancedView=False,bOrphanedPin=False,)
End Object
Begin Object Class=/Script/BlueprintGraph.K2Node_FunctionEntry Name="K2Node_FunctionEntry_0" ExportPath="/Script/BlueprintGraph.K2Node_FunctionEntry'/Game/Examples/BallShooter/Blueprints/BallShooterTarget.BallShooterTarget:teleportToRandomLocation.K2Node_FunctionEntry_0'"
ExtraFlags=201457664
FunctionReference=(MemberName="teleportToRandomLocation")
bIsEditable=True
NodePosX=352
NodePosY=-158
NodeGuid=A8D1F6244F7FBB2BDF30FE884DA87EA9
CustomProperties Pin (PinId=F9D7FE1A402AF20F0B9E14A8C2166F96,PinName="then",Direction="EGPD_Output",PinType.PinCategory="exec",PinType.PinSubCategory="",PinType.PinSubCategoryObject=None,PinType.PinSubCategoryMemberReference=(),PinType.PinValueType=(),PinType.ContainerType=None,PinType.bIsReference=False,PinType.bIsConst=False,PinType.bIsWeakPointer=False,PinType.bIsUObjectWrapper=False,PinType.bSerializeAsSinglePrecisionFloat=False,LinkedTo=(K2Node_CallFunction_26 402E8C567DEB45EE9EF64BF565D72E63,),PersistentGuid=00000000000000000000000000000000,bHidden=False,bNotConnectable=False,bDefaultValueIsReadOnly=False,bDefaultValueIsIgnored=False,bAdvancedView=False,bOrphanedPin=False,)
End Object
Begin Object Class=/Script/BlueprintGraph.K2Node_VariableGet Name="K2Node_VariableGet_8" ExportPath="/Script/BlueprintGraph.K2Node_VariableGet'/Game/Examples/BallShooter/Blueprints/BallShooterTarget.BallShooterTarget:teleportToRandomLocation.K2Node_VariableGet_8'"
VariableReference=(MemberName="initialTransform",MemberGuid=117B9D31FA334F709CC7F2A103BFBED8,bSelfContext=True)
NodePosX=480
NodePosY=231
NodeGuid=25301E1583CB416F96E156D242622B9D
CustomProperties Pin (PinId=2551D2760C23467888C758D07B618D73,PinName="initialTransform",Direction="EGPD_Output",PinType.PinCategory="struct",PinType.PinSubCategory="",PinType.PinSubCategoryObject="/Script/CoreUObject.ScriptStruct'/Script/CoreUObject.Transform'",PinType.PinSubCategoryMemberReference=(),PinType.PinValueType=(),PinType.ContainerType=None,PinType.bIsReference=False,PinType.bIsConst=False,PinType.bIsWeakPointer=False,PinType.bIsUObjectWrapper=False,PinType.bSerializeAsSinglePrecisionFloat=False,LinkedTo=(K2Node_CallFunction_19 4D1BB4BF5448474C832990837694AC86,),PersistentGuid=00000000000000000000000000000000,bHidden=False,bNotConnectable=False,bDefaultValueIsReadOnly=False,bDefaultValueIsIgnored=False,bAdvancedView=False,bOrphanedPin=False,)
CustomProperties Pin (PinId=D7D414A319CD43FCB6BBDBC7CDB7538A,PinName="self",PinFriendlyName=NSLOCTEXT("K2Node", "Target", "Target"),PinType.PinCategory="object",PinType.PinSubCategory="",PinType.PinSubCategoryObject="/Script/Engine.BlueprintGeneratedClass'/Game/Examples/BallShooter/Blueprints/BallShooterTarget.BallShooterTarget_C'",PinType.PinSubCategoryMemberReference=(),PinType.PinValueType=(),PinType.ContainerType=None,PinType.bIsReference=False,PinType.bIsConst=False,PinType.bIsWeakPointer=False,PinType.bIsUObjectWrapper=False,PinType.bSerializeAsSinglePrecisionFloat=False,PersistentGuid=00000000000000000000000000000000,bHidden=True,bNotConnectable=False,bDefaultValueIsReadOnly=False,bDefaultValueIsIgnored=False,bAdvancedView=False,bOrphanedPin=False,)
End Object
Begin Object Class=/Script/BlueprintGraph.K2Node_CallFunction Name="K2Node_CallFunction_14" ExportPath="/Script/BlueprintGraph.K2Node_CallFunction'/Game/Examples/BallShooter/Blueprints/BallShooterTarget.BallShooterTarget:teleportToRandomLocation.K2Node_CallFunction_14'"
bIsPureFunc=True
FunctionReference=(MemberParent="/Script/CoreUObject.Class'/Script/Engine.KismetMathLibrary'",MemberName="RandomFloatInRange")
NodePosX=352
NodePosY=96
NodeGuid=B0DD50E75DBD4D21B42D18CEFCA89CFC
CustomProperties Pin (PinId=127EB58AABA84992A4AEB9B2F809C647,PinName="self",PinFriendlyName=NSLOCTEXT("K2Node", "Target", "Target"),PinToolTip="Target\nKismet Math Library Object Reference",PinType.PinCategory="object",PinType.PinSubCategory="",PinType.PinSubCategoryObject="/Script/CoreUObject.Class'/Script/Engine.KismetMathLibrary'",PinType.PinSubCategoryMemberReference=(),PinType.PinValueType=(),PinType.ContainerType=None,PinType.bIsReference=False,PinType.bIsConst=False,PinType.bIsWeakPointer=False,PinType.bIsUObjectWrapper=False,PinType.bSerializeAsSinglePrecisionFloat=False,DefaultObject="/Script/Engine.Default__KismetMathLibrary",PersistentGuid=00000000000000000000000000000000,bHidden=True,bNotConnectable=False,bDefaultValueIsReadOnly=False,bDefaultValueIsIgnored=False,bAdvancedView=False,bOrphanedPin=False,)
CustomProperties Pin (PinId=44E7BA32C0EA48E2A7F46536BBD5E93E,PinName="Min",PinToolTip="Min\nFloat (double-precision)",PinType.PinCategory="real",PinType.PinSubCategory="double",PinType.PinSubCategoryObject=None,PinType.PinSubCategoryMemberReference=(),PinType.PinValueType=(),PinType.ContainerType=None,PinType.bIsReference=False,PinType.bIsConst=False,PinType.bIsWeakPointer=False,PinType.bIsUObjectWrapper=False,PinType.bSerializeAsSinglePrecisionFloat=False,DefaultValue="-800.000000",AutogeneratedDefaultValue="0.0",PersistentGuid=00000000000000000000000000000000,bHidden=False,bNotConnectable=False,bDefaultValueIsReadOnly=False,bDefaultValueIsIgnored=False,bAdvancedView=False,bOrphanedPin=False,)
CustomProperties Pin (PinId=CF826947D39E4D679AF60A88E827CA6B,PinName="Max",PinToolTip="Max\nFloat (double-precision)",PinType.PinCategory="real",PinType.PinSubCategory="double",PinType.PinSubCategoryObject=None,PinType.PinSubCategoryMemberReference=(),PinType.PinValueType=(),PinType.ContainerType=None,PinType.bIsReference=False,PinType.bIsConst=False,PinType.bIsWeakPointer=False,PinType.bIsUObjectWrapper=False,PinType.bSerializeAsSinglePrecisionFloat=False,DefaultValue="800.000000",AutogeneratedDefaultValue="0.0",PersistentGuid=00000000000000000000000000000000,bHidden=False,bNotConnectable=False,bDefaultValueIsReadOnly=False,bDefaultValueIsIgnored=False,bAdvancedView=False,bOrphanedPin=False,)
CustomProperties Pin (PinId=29295E2127204048864195389DD7DD6A,PinName="ReturnValue",PinToolTip="Return Value\nFloat (double-precision)\n\nGenerate a random number between Min and Max",Direction="EGPD_Output",PinType.PinCategory="real",PinType.PinSubCategory="double",PinType.PinSubCategoryObject=None,PinType.PinSubCategoryMemberReference=(),PinType.PinValueType=(),PinType.ContainerType=None,PinType.bIsReference=False,PinType.bIsConst=False,PinType.bIsWeakPointer=False,PinType.bIsUObjectWrapper=False,PinType.bSerializeAsSinglePrecisionFloat=False,DefaultValue="0.0",AutogeneratedDefaultValue="0.0",LinkedTo=(K2Node_CallFunction_7 D4ED07BB1E8749EB9B53C1EB92E6E8F4,),PersistentGuid=00000000000000000000000000000000,bHidden=False,bNotConnectable=False,bDefaultValueIsReadOnly=False,bDefaultValueIsIgnored=False,bAdvancedView=False,bOrphanedPin=False,)
End Object
Begin Object Class=/Script/BlueprintGraph.K2Node_CallFunction Name="K2Node_CallFunction_15" ExportPath="/Script/BlueprintGraph.K2Node_CallFunction'/Game/Examples/BallShooter/Blueprints/BallShooterTarget.BallShooterTarget:teleportToRandomLocation.K2Node_CallFunction_15'"
bIsPureFunc=True
FunctionReference=(MemberParent="/Script/CoreUObject.Class'/Script/Engine.KismetMathLibrary'",MemberName="RandomFloatInRange")
NodePosX=352
NodePosY=-32
NodeGuid=F4ABCEC0592C498DAC98782DE3E068E4
CustomProperties Pin (PinId=ABDCDB5EC3A44EB5A929CA85631967E8,PinName="self",PinFriendlyName=NSLOCTEXT("K2Node", "Target", "Target"),PinToolTip="Target\nKismet Math Library Object Reference",PinType.PinCategory="object",PinType.PinSubCategory="",PinType.PinSubCategoryObject="/Script/CoreUObject.Class'/Script/Engine.KismetMathLibrary'",PinType.PinSubCategoryMemberReference=(),PinType.PinValueType=(),PinType.ContainerType=None,PinType.bIsReference=False,PinType.bIsConst=False,PinType.bIsWeakPointer=False,PinType.bIsUObjectWrapper=False,PinType.bSerializeAsSinglePrecisionFloat=False,DefaultObject="/Script/Engine.Default__KismetMathLibrary",PersistentGuid=00000000000000000000000000000000,bHidden=True,bNotConnectable=False,bDefaultValueIsReadOnly=False,bDefaultValueIsIgnored=False,bAdvancedView=False,bOrphanedPin=False,)
CustomProperties Pin (PinId=F2858179E12C4048AD34BD1BAC4E4CBA,PinName="Min",PinToolTip="Min\nFloat (double-precision)",PinType.PinCategory="real",PinType.PinSubCategory="double",PinType.PinSubCategoryObject=None,PinType.PinSubCategoryMemberReference=(),PinType.PinValueType=(),PinType.ContainerType=None,PinType.bIsReference=False,PinType.bIsConst=False,PinType.bIsWeakPointer=False,PinType.bIsUObjectWrapper=False,PinType.bSerializeAsSinglePrecisionFloat=False,DefaultValue="150.000000",AutogeneratedDefaultValue="0.0",PersistentGuid=00000000000000000000000000000000,bHidden=False,bNotConnectable=False,bDefaultValueIsReadOnly=False,bDefaultValueIsIgnored=False,bAdvancedView=False,bOrphanedPin=False,)
CustomProperties Pin (PinId=E287A71B9AFD41A988289225A4CE6D10,PinName="Max",PinToolTip="Max\nFloat (double-precision)",PinType.PinCategory="real",PinType.PinSubCategory="double",PinType.PinSubCategoryObject=None,PinType.PinSubCategoryMemberReference=(),PinType.PinValueType=(),PinType.ContainerType=None,PinType.bIsReference=False,PinType.bIsConst=False,PinType.bIsWeakPointer=False,PinType.bIsUObjectWrapper=False,PinType.bSerializeAsSinglePrecisionFloat=False,DefaultValue="1800.000000",AutogeneratedDefaultValue="0.0",PersistentGuid=00000000000000000000000000000000,bHidden=False,bNotConnectable=False,bDefaultValueIsReadOnly=False,bDefaultValueIsIgnored=False,bAdvancedView=False,bOrphanedPin=False,)
CustomProperties Pin (PinId=1BEB4724B0E9492D99851EEC631AC9BC,PinName="ReturnValue",PinToolTip="Return Value\nFloat (double-precision)\n\nGenerate a random number between Min and Max",Direction="EGPD_Output",PinType.PinCategory="real",PinType.PinSubCategory="double",PinType.PinSubCategoryObject=None,PinType.PinSubCategoryMemberReference=(),PinType.PinValueType=(),PinType.ContainerType=None,PinType.bIsReference=False,PinType.bIsConst=False,PinType.bIsWeakPointer=False,PinType.bIsUObjectWrapper=False,PinType.bSerializeAsSinglePrecisionFloat=False,DefaultValue="0.0",AutogeneratedDefaultValue="0.0",LinkedTo=(K2Node_CallFunction_7 596AF96C5D3349EE9ADAF4EA254A0F75,),PersistentGuid=00000000000000000000000000000000,bHidden=False,bNotConnectable=False,bDefaultValueIsReadOnly=False,bDefaultValueIsIgnored=False,bAdvancedView=False,bOrphanedPin=False,)
End Object
Begin Object Class=/Script/BlueprintGraph.K2Node_CallFunction Name="K2Node_CallFunction_19" ExportPath="/Script/BlueprintGraph.K2Node_CallFunction'/Game/Examples/BallShooter/Blueprints/BallShooterTarget.BallShooterTarget:teleportToRandomLocation.K2Node_CallFunction_19'"
bIsPureFunc=True
FunctionReference=(MemberParent="/Script/CoreUObject.Class'/Script/Engine.KismetMathLibrary'",MemberName="BreakTransform")
NodePosX=672
NodePosY=208
NodeGuid=ECBD5E5D0C684F5987DE538BCE389778
CustomProperties Pin (PinId=E533022AE7E54F3380C08BF4315D483C,PinName="self",PinFriendlyName=NSLOCTEXT("K2Node", "Target", "Target"),PinToolTip="Target\nKismet Math Library Object Reference",PinType.PinCategory="object",PinType.PinSubCategory="",PinType.PinSubCategoryObject="/Script/CoreUObject.Class'/Script/Engine.KismetMathLibrary'",PinType.PinSubCategoryMemberReference=(),PinType.PinValueType=(),PinType.ContainerType=None,PinType.bIsReference=False,PinType.bIsConst=False,PinType.bIsWeakPointer=False,PinType.bIsUObjectWrapper=False,PinType.bSerializeAsSinglePrecisionFloat=False,DefaultObject="/Script/Engine.Default__KismetMathLibrary",PersistentGuid=00000000000000000000000000000000,bHidden=True,bNotConnectable=False,bDefaultValueIsReadOnly=False,bDefaultValueIsIgnored=False,bAdvancedView=False,bOrphanedPin=False,)
CustomProperties Pin (PinId=4D1BB4BF5448474C832990837694AC86,PinName="InTransform",PinToolTip="In Transform\nTransform (by ref)",PinType.PinCategory="struct",PinType.PinSubCategory="",PinType.PinSubCategoryObject="/Script/CoreUObject.ScriptStruct'/Script/CoreUObject.Transform'",PinType.PinSubCategoryMemberReference=(),PinType.PinValueType=(),PinType.ContainerType=None,PinType.bIsReference=True,PinType.bIsConst=True,PinType.bIsWeakPointer=False,PinType.bIsUObjectWrapper=False,PinType.bSerializeAsSinglePrecisionFloat=False,LinkedTo=(K2Node_VariableGet_8 2551D2760C23467888C758D07B618D73,),PersistentGuid=00000000000000000000000000000000,bHidden=False,bNotConnectable=False,bDefaultValueIsReadOnly=False,bDefaultValueIsIgnored=True,bAdvancedView=False,bOrphanedPin=False,)
CustomProperties Pin (PinId=4E5FC4F16953490C8E628A8D3C169A0C,PinName="Location",PinToolTip="Location\nVector",Direction="EGPD_Output",PinType.PinCategory="struct",PinType.PinSubCategory="",PinType.PinSubCategoryObject="/Script/CoreUObject.ScriptStruct'/Script/CoreUObject.Vector'",PinType.PinSubCategoryMemberReference=(),PinType.PinValueType=(),PinType.ContainerType=None,PinType.bIsReference=False,PinType.bIsConst=False,PinType.bIsWeakPointer=False,PinType.bIsUObjectWrapper=False,PinType.bSerializeAsSinglePrecisionFloat=False,DefaultValue="0, 0, 0",AutogeneratedDefaultValue="0, 0, 0",PersistentGuid=00000000000000000000000000000000,bHidden=False,bNotConnectable=False,bDefaultValueIsReadOnly=False,bDefaultValueIsIgnored=False,bAdvancedView=False,bOrphanedPin=False,)
CustomProperties Pin (PinId=33427BB06C49481E91FF452B351CE2A7,PinName="Rotation",PinToolTip="Rotation\nRotator",Direction="EGPD_Output",PinType.PinCategory="struct",PinType.PinSubCategory="",PinType.PinSubCategoryObject="/Script/CoreUObject.ScriptStruct'/Script/CoreUObject.Rotator'",PinType.PinSubCategoryMemberReference=(),PinType.PinValueType=(),PinType.ContainerType=None,PinType.bIsReference=False,PinType.bIsConst=False,PinType.bIsWeakPointer=False,PinType.bIsUObjectWrapper=False,PinType.bSerializeAsSinglePrecisionFloat=False,DefaultValue="0, 0, 0",AutogeneratedDefaultValue="0, 0, 0",LinkedTo=(K2Node_CallFunction_21 5284EF2A31E64D779FF827A9F1863578,),PersistentGuid=00000000000000000000000000000000,bHidden=False,bNotConnectable=False,bDefaultValueIsReadOnly=False,bDefaultValueIsIgnored=False,bAdvancedView=False,bOrphanedPin=False,)
CustomProperties Pin (PinId=2F5EE13446D7418691993A7EDF7C6BF5,PinName="Scale",PinToolTip="Scale\nVector",Direction="EGPD_Output",PinType.PinCategory="struct",PinType.PinSubCategory="",PinType.PinSubCategoryObject="/Script/CoreUObject.ScriptStruct'/Script/CoreUObject.Vector'",PinType.PinSubCategoryMemberReference=(),PinType.PinValueType=(),PinType.ContainerType=None,PinType.bIsReference=False,PinType.bIsConst=False,PinType.bIsWeakPointer=False,PinType.bIsUObjectWrapper=False,PinType.bSerializeAsSinglePrecisionFloat=False,DefaultValue="0, 0, 0",AutogeneratedDefaultValue="0, 0, 0",LinkedTo=(K2Node_CallFunction_21 51D2D545967D448CAFDEE7081612AD02,),PersistentGuid=00000000000000000000000000000000,bHidden=False,bNotConnectable=False,bDefaultValueIsReadOnly=False,bDefaultValueIsIgnored=False,bAdvancedView=False,bOrphanedPin=False,)
End Object
Begin Object Class=/Script/BlueprintGraph.K2Node_CallFunction Name="K2Node_CallFunction_7" ExportPath="/Script/BlueprintGraph.K2Node_CallFunction'/Game/Examples/BallShooter/Blueprints/BallShooterTarget.BallShooterTarget:teleportToRandomLocation.K2Node_CallFunction_7'"
bIsPureFunc=True
FunctionReference=(MemberParent="/Script/CoreUObject.Class'/Script/Engine.KismetMathLibrary'",MemberName="MakeVector")
NodePosX=672
NodePosY=64
NodeGuid=C92DF1EDAA4A45ED95CC1203DB951B84
CustomProperties Pin (PinId=D0AF6C060B194529B80D6DA82CB22E5D,PinName="self",PinFriendlyName=NSLOCTEXT("K2Node", "Target", "Target"),PinToolTip="Target\nKismet Math Library Object Reference",PinType.PinCategory="object",PinType.PinSubCategory="",PinType.PinSubCategoryObject="/Script/CoreUObject.Class'/Script/Engine.KismetMathLibrary'",PinType.PinSubCategoryMemberReference=(),PinType.PinValueType=(),PinType.ContainerType=None,PinType.bIsReference=False,PinType.bIsConst=False,PinType.bIsWeakPointer=False,PinType.bIsUObjectWrapper=False,PinType.bSerializeAsSinglePrecisionFloat=False,DefaultObject="/Script/Engine.Default__KismetMathLibrary",PersistentGuid=00000000000000000000000000000000,bHidden=True,bNotConnectable=False,bDefaultValueIsReadOnly=False,bDefaultValueIsIgnored=False,bAdvancedView=False,bOrphanedPin=False,)
CustomProperties Pin (PinId=596AF96C5D3349EE9ADAF4EA254A0F75,PinName="X",PinToolTip="X\nFloat (double-precision)",PinType.PinCategory="real",PinType.PinSubCategory="double",PinType.PinSubCategoryObject=None,PinType.PinSubCategoryMemberReference=(),PinType.PinValueType=(),PinType.ContainerType=None,PinType.bIsReference=False,PinType.bIsConst=False,PinType.bIsWeakPointer=False,PinType.bIsUObjectWrapper=False,PinType.bSerializeAsSinglePrecisionFloat=False,DefaultValue="0.0",AutogeneratedDefaultValue="0.0",LinkedTo=(K2Node_CallFunction_15 1BEB4724B0E9492D99851EEC631AC9BC,),PersistentGuid=00000000000000000000000000000000,bHidden=False,bNotConnectable=False,bDefaultValueIsReadOnly=False,bDefaultValueIsIgnored=False,bAdvancedView=False,bOrphanedPin=False,)
CustomProperties Pin (PinId=D4ED07BB1E8749EB9B53C1EB92E6E8F4,PinName="Y",PinToolTip="Y\nFloat (double-precision)",PinType.PinCategory="real",PinType.PinSubCategory="double",PinType.PinSubCategoryObject=None,PinType.PinSubCategoryMemberReference=(),PinType.PinValueType=(),PinType.ContainerType=None,PinType.bIsReference=False,PinType.bIsConst=False,PinType.bIsWeakPointer=False,PinType.bIsUObjectWrapper=False,PinType.bSerializeAsSinglePrecisionFloat=False,DefaultValue="0.0",AutogeneratedDefaultValue="0.0",LinkedTo=(K2Node_CallFunction_14 29295E2127204048864195389DD7DD6A,),PersistentGuid=00000000000000000000000000000000,bHidden=False,bNotConnectable=False,bDefaultValueIsReadOnly=False,bDefaultValueIsIgnored=False,bAdvancedView=False,bOrphanedPin=False,)
CustomProperties Pin (PinId=A6AEE0A3B9BC4CE8A6A93E7A59FC5EE8,PinName="Z",PinToolTip="Z\nFloat (double-precision)",PinType.PinCategory="real",PinType.PinSubCategory="double",PinType.PinSubCategoryObject=None,PinType.PinSubCategoryMemberReference=(),PinType.PinValueType=(),PinType.ContainerType=None,PinType.bIsReference=False,PinType.bIsConst=False,PinType.bIsWeakPointer=False,PinType.bIsUObjectWrapper=False,PinType.bSerializeAsSinglePrecisionFloat=False,DefaultValue="150.000000",AutogeneratedDefaultValue="0.0",PersistentGuid=00000000000000000000000000000000,bHidden=False,bNotConnectable=False,bDefaultValueIsReadOnly=False,bDefaultValueIsIgnored=False,bAdvancedView=False,bOrphanedPin=False,)
CustomProperties Pin (PinId=6FFCDE5357E6431FA2BCDACF2A89AAAB,PinName="ReturnValue",PinToolTip="Return Value\nVector\n\nMakes a vector {X, Y, Z}",Direction="EGPD_Output",PinType.PinCategory="struct",PinType.PinSubCategory="",PinType.PinSubCategoryObject="/Script/CoreUObject.ScriptStruct'/Script/CoreUObject.Vector'",PinType.PinSubCategoryMemberReference=(),PinType.PinValueType=(),PinType.ContainerType=None,PinType.bIsReference=False,PinType.bIsConst=False,PinType.bIsWeakPointer=False,PinType.bIsUObjectWrapper=False,PinType.bSerializeAsSinglePrecisionFloat=False,DefaultValue="0, 0, 0",AutogeneratedDefaultValue="0, 0, 0",LinkedTo=(K2Node_CallFunction_21 ECF3143DA1CC4BC5AE02B5C43369620B,),PersistentGuid=00000000000000000000000000000000,bHidden=False,bNotConnectable=False,bDefaultValueIsReadOnly=False,bDefaultValueIsIgnored=False,bAdvancedView=False,bOrphanedPin=False,)
End Object
Begin Object Class=/Script/BlueprintGraph.K2Node_CallFunction Name="K2Node_CallFunction_21" ExportPath="/Script/BlueprintGraph.K2Node_CallFunction'/Game/Examples/BallShooter/Blueprints/BallShooterTarget.BallShooterTarget:teleportToRandomLocation.K2Node_CallFunction_21'"
bIsPureFunc=True
FunctionReference=(MemberParent="/Script/CoreUObject.Class'/Script/Engine.KismetMathLibrary'",MemberName="MakeTransform")
NodePosX=960
NodePosY=64
NodeGuid=2BA81BBF7594407EB9279789F125D73C
CustomProperties Pin (PinId=8C14A5E0718043F49597549A2543F67B,PinName="self",PinFriendlyName=NSLOCTEXT("K2Node", "Target", "Target"),PinToolTip="Target\nKismet Math Library Object Reference",PinType.PinCategory="object",PinType.PinSubCategory="",PinType.PinSubCategoryObject="/Script/CoreUObject.Class'/Script/Engine.KismetMathLibrary'",PinType.PinSubCategoryMemberReference=(),PinType.PinValueType=(),PinType.ContainerType=None,PinType.bIsReference=False,PinType.bIsConst=False,PinType.bIsWeakPointer=False,PinType.bIsUObjectWrapper=False,PinType.bSerializeAsSinglePrecisionFloat=False,DefaultObject="/Script/Engine.Default__KismetMathLibrary",PersistentGuid=00000000000000000000000000000000,bHidden=True,bNotConnectable=False,bDefaultValueIsReadOnly=False,bDefaultValueIsIgnored=False,bAdvancedView=False,bOrphanedPin=False,)
CustomProperties Pin (PinId=ECF3143DA1CC4BC5AE02B5C43369620B,PinName="Location",PinToolTip="Location\nVector",PinType.PinCategory="struct",PinType.PinSubCategory="",PinType.PinSubCategoryObject="/Script/CoreUObject.ScriptStruct'/Script/CoreUObject.Vector'",PinType.PinSubCategoryMemberReference=(),PinType.PinValueType=(),PinType.ContainerType=None,PinType.bIsReference=False,PinType.bIsConst=False,PinType.bIsWeakPointer=False,PinType.bIsUObjectWrapper=False,PinType.bSerializeAsSinglePrecisionFloat=False,DefaultValue="0, 0, 0",AutogeneratedDefaultValue="0, 0, 0",LinkedTo=(K2Node_CallFunction_7 6FFCDE5357E6431FA2BCDACF2A89AAAB,),PersistentGuid=00000000000000000000000000000000,bHidden=False,bNotConnectable=False,bDefaultValueIsReadOnly=False,bDefaultValueIsIgnored=False,bAdvancedView=False,bOrphanedPin=False,)
CustomProperties Pin (PinId=5284EF2A31E64D779FF827A9F1863578,PinName="Rotation",PinToolTip="Rotation\nRotator",PinType.PinCategory="struct",PinType.PinSubCategory="",PinType.PinSubCategoryObject="/Script/CoreUObject.ScriptStruct'/Script/CoreUObject.Rotator'",PinType.PinSubCategoryMemberReference=(),PinType.PinValueType=(),PinType.ContainerType=None,PinType.bIsReference=False,PinType.bIsConst=False,PinType.bIsWeakPointer=False,PinType.bIsUObjectWrapper=False,PinType.bSerializeAsSinglePrecisionFloat=False,DefaultValue="0, 0, 0",AutogeneratedDefaultValue="0, 0, 0",LinkedTo=(K2Node_CallFunction_19 33427BB06C49481E91FF452B351CE2A7,),PersistentGuid=00000000000000000000000000000000,bHidden=False,bNotConnectable=False,bDefaultValueIsReadOnly=False,bDefaultValueIsIgnored=False,bAdvancedView=False,bOrphanedPin=False,)
CustomProperties Pin (PinId=51D2D545967D448CAFDEE7081612AD02,PinName="Scale",PinToolTip="Scale\nVector",PinType.PinCategory="struct",PinType.PinSubCategory="",PinType.PinSubCategoryObject="/Script/CoreUObject.ScriptStruct'/Script/CoreUObject.Vector'",PinType.PinSubCategoryMemberReference=(),PinType.PinValueType=(),PinType.ContainerType=None,PinType.bIsReference=False,PinType.bIsConst=False,PinType.bIsWeakPointer=False,PinType.bIsUObjectWrapper=False,PinType.bSerializeAsSinglePrecisionFloat=False,DefaultValue="1.000000,1.000000,1.000000",AutogeneratedDefaultValue="1.000000,1.000000,1.000000",LinkedTo=(K2Node_CallFunction_19 2F5EE13446D7418691993A7EDF7C6BF5,),PersistentGuid=00000000000000000000000000000000,bHidden=False,bNotConnectable=False,bDefaultValueIsReadOnly=False,bDefaultValueIsIgnored=False,bAdvancedView=False,bOrphanedPin=False,)
CustomProperties Pin (PinId=8A0F1D415FA3439C97015CBACFDC6DAD,PinName="ReturnValue",PinToolTip="Return Value\nTransform\n\nMake a transform from location, rotation and scale",Direction="EGPD_Output",PinType.PinCategory="struct",PinType.PinSubCategory="",PinType.PinSubCategoryObject="/Script/CoreUObject.ScriptStruct'/Script/CoreUObject.Transform'",PinType.PinSubCategoryMemberReference=(),PinType.PinValueType=(),PinType.ContainerType=None,PinType.bIsReference=False,PinType.bIsConst=False,PinType.bIsWeakPointer=False,PinType.bIsUObjectWrapper=False,PinType.bSerializeAsSinglePrecisionFloat=False,LinkedTo=(K2Node_CallFunction_18 1FB0E705404F435080AA08BAAEB80A44,),PersistentGuid=00000000000000000000000000000000,bHidden=False,bNotConnectable=False,bDefaultValueIsReadOnly=False,bDefaultValueIsIgnored=False,bAdvancedView=False,bOrphanedPin=False,)
End Object
Begin Object Class=/Script/BlueprintGraph.K2Node_VariableGet Name="K2Node_VariableGet_9" ExportPath="/Script/BlueprintGraph.K2Node_VariableGet'/Game/Examples/BallShooter/Blueprints/BallShooterTarget.BallShooterTarget:teleportToRandomLocation.K2Node_VariableGet_9'"
VariableReference=(MemberName="StaticMesh",bSelfContext=True)
NodePosX=1024
NodePosY=-103
NodeGuid=458798A5F3BF4310B0118EC6DB5A7D1F
CustomProperties Pin (PinId=93F82AF5B43C45EC974F992610798D4D,PinName="StaticMesh",Direction="EGPD_Output",PinType.PinCategory="object",PinType.PinSubCategory="",PinType.PinSubCategoryObject="/Script/CoreUObject.Class'/Script/Engine.StaticMeshComponent'",PinType.PinSubCategoryMemberReference=(),PinType.PinValueType=(),PinType.ContainerType=None,PinType.bIsReference=False,PinType.bIsConst=False,PinType.bIsWeakPointer=False,PinType.bIsUObjectWrapper=False,PinType.bSerializeAsSinglePrecisionFloat=False,LinkedTo=(K2Node_CallFunction_18 9818BD70BD0441DC8DF3FFEFB56C1A7E,),PersistentGuid=00000000000000000000000000000000,bHidden=False,bNotConnectable=False,bDefaultValueIsReadOnly=False,bDefaultValueIsIgnored=False,bAdvancedView=False,bOrphanedPin=False,)
CustomProperties Pin (PinId=B052017A28BC49408498734D4F7085AC,PinName="self",PinFriendlyName=NSLOCTEXT("K2Node", "Target", "Target"),PinType.PinCategory="object",PinType.PinSubCategory="",PinType.PinSubCategoryObject="/Script/Engine.BlueprintGeneratedClass'/Game/Examples/BallShooter/Blueprints/BallShooterTarget.BallShooterTarget_C'",PinType.PinSubCategoryMemberReference=(),PinType.PinValueType=(),PinType.ContainerType=None,PinType.bIsReference=False,PinType.bIsConst=False,PinType.bIsWeakPointer=False,PinType.bIsUObjectWrapper=False,PinType.bSerializeAsSinglePrecisionFloat=False,PersistentGuid=00000000000000000000000000000000,bHidden=True,bNotConnectable=False,bDefaultValueIsReadOnly=False,bDefaultValueIsIgnored=False,bAdvancedView=False,bOrphanedPin=False,)
End Object
Begin Object Class=/Script/BlueprintGraph.K2Node_VariableGet Name="K2Node_VariableGet_12" ExportPath="/Script/BlueprintGraph.K2Node_VariableGet'/Game/Examples/BallShooter/Blueprints/BallShooterTarget.BallShooterTarget:teleportToRandomLocation.K2Node_VariableGet_12'"
VariableReference=(MemberName="StaticMesh",bSelfContext=True)
NodePosX=592
NodePosY=-103
NodeGuid=7F053BC36F104DC7A0FF6CEB34E25575
CustomProperties Pin (PinId=A6D970868F614804A2457540027B60C3,PinName="StaticMesh",Direction="EGPD_Output",PinType.PinCategory="object",PinType.PinSubCategory="",PinType.PinSubCategoryObject="/Script/CoreUObject.Class'/Script/Engine.StaticMeshComponent'",PinType.PinSubCategoryMemberReference=(),PinType.PinValueType=(),PinType.ContainerType=None,PinType.bIsReference=False,PinType.bIsConst=False,PinType.bIsWeakPointer=False,PinType.bIsUObjectWrapper=False,PinType.bSerializeAsSinglePrecisionFloat=False,LinkedTo=(K2Node_CallFunction_26 16F374719B0B4BD29626635BE02E163E,),PersistentGuid=00000000000000000000000000000000,bHidden=False,bNotConnectable=False,bDefaultValueIsReadOnly=False,bDefaultValueIsIgnored=False,bAdvancedView=False,bOrphanedPin=False,)
CustomProperties Pin (PinId=D3BC73D22906447DA61529984527D584,PinName="self",PinFriendlyName=NSLOCTEXT("K2Node", "Target", "Target"),PinType.PinCategory="object",PinType.PinSubCategory="",PinType.PinSubCategoryObject="/Script/Engine.BlueprintGeneratedClass'/Game/Examples/BallShooter/Blueprints/BallShooterTarget.BallShooterTarget_C'",PinType.PinSubCategoryMemberReference=(),PinType.PinValueType=(),PinType.ContainerType=None,PinType.bIsReference=False,PinType.bIsConst=False,PinType.bIsWeakPointer=False,PinType.bIsUObjectWrapper=False,PinType.bSerializeAsSinglePrecisionFloat=False,PersistentGuid=00000000000000000000000000000000,bHidden=True,bNotConnectable=False,bDefaultValueIsReadOnly=False,bDefaultValueIsIgnored=False,bAdvancedView=False,bOrphanedPin=False,)
End Object
Begin Object Class=/Script/BlueprintGraph.K2Node_CallFunction Name="K2Node_CallFunction_18" ExportPath="/Script/BlueprintGraph.K2Node_CallFunction'/Game/Examples/BallShooter/Blueprints/BallShooterTarget.BallShooterTarget:teleportToRandomLocation.K2Node_CallFunction_18'"
FunctionReference=(MemberParent="/Script/CoreUObject.Class'/Script/Engine.SceneComponent'",MemberName="K2_SetWorldTransform")
NodePosX=1184
NodePosY=-176
NodeGuid=3674ABB1C5294D90AB6F167E61F62B02
CustomProperties Pin (PinId=7716D680F3494EA0A20A9C6AAFA464C2,PinName="execute",PinToolTip="\nExec",PinType.PinCategory="exec",PinType.PinSubCategory="",PinType.PinSubCategoryObject=None,PinType.PinSubCategoryMemberReference=(),PinType.PinValueType=(),PinType.ContainerType=None,PinType.bIsReference=False,PinType.bIsConst=False,PinType.bIsWeakPointer=False,PinType.bIsUObjectWrapper=False,PinType.bSerializeAsSinglePrecisionFloat=False,LinkedTo=(K2Node_CallFunction_26 AC43C329E4CE42129D951460402E37E4,),PersistentGuid=00000000000000000000000000000000,bHidden=False,bNotConnectable=False,bDefaultValueIsReadOnly=False,bDefaultValueIsIgnored=False,bAdvancedView=False,bOrphanedPin=False,)
CustomProperties Pin (PinId=D2CD3BA17B9E4B3C8EB85A4230694CE4,PinName="then",PinToolTip="\nExec",Direction="EGPD_Output",PinType.PinCategory="exec",PinType.PinSubCategory="",PinType.PinSubCategoryObject=None,PinType.PinSubCategoryMemberReference=(),PinType.PinValueType=(),PinType.ContainerType=None,PinType.bIsReference=False,PinType.bIsConst=False,PinType.bIsWeakPointer=False,PinType.bIsUObjectWrapper=False,PinType.bSerializeAsSinglePrecisionFloat=False,PersistentGuid=00000000000000000000000000000000,bHidden=False,bNotConnectable=False,bDefaultValueIsReadOnly=False,bDefaultValueIsIgnored=False,bAdvancedView=False,bOrphanedPin=False,)
CustomProperties Pin (PinId=9818BD70BD0441DC8DF3FFEFB56C1A7E,PinName="self",PinFriendlyName=NSLOCTEXT("K2Node", "Target", "Target"),PinToolTip="Target\nScene Component Object Reference",PinType.PinCategory="object",PinType.PinSubCategory="",PinType.PinSubCategoryObject="/Script/CoreUObject.Class'/Script/Engine.SceneComponent'",PinType.PinSubCategoryMemberReference=(),PinType.PinValueType=(),PinType.ContainerType=None,PinType.bIsReference=False,PinType.bIsConst=False,PinType.bIsWeakPointer=False,PinType.bIsUObjectWrapper=False,PinType.bSerializeAsSinglePrecisionFloat=False,LinkedTo=(K2Node_VariableGet_9 93F82AF5B43C45EC974F992610798D4D,),PersistentGuid=00000000000000000000000000000000,bHidden=False,bNotConnectable=False,bDefaultValueIsReadOnly=False,bDefaultValueIsIgnored=False,bAdvancedView=False,bOrphanedPin=False,)
CustomProperties Pin (PinId=1FB0E705404F435080AA08BAAEB80A44,PinName="NewTransform",PinToolTip="New Transform\nTransform (by ref)\n\nNew transform in world space for the component.",PinType.PinCategory="struct",PinType.PinSubCategory="",PinType.PinSubCategoryObject="/Script/CoreUObject.ScriptStruct'/Script/CoreUObject.Transform'",PinType.PinSubCategoryMemberReference=(),PinType.PinValueType=(),PinType.ContainerType=None,PinType.bIsReference=True,PinType.bIsConst=True,PinType.bIsWeakPointer=False,PinType.bIsUObjectWrapper=False,PinType.bSerializeAsSinglePrecisionFloat=False,LinkedTo=(K2Node_CallFunction_21 8A0F1D415FA3439C97015CBACFDC6DAD,),PersistentGuid=00000000000000000000000000000000,bHidden=False,bNotConnectable=False,bDefaultValueIsReadOnly=False,bDefaultValueIsIgnored=True,bAdvancedView=False,bOrphanedPin=False,)
CustomProperties Pin (PinId=6FCA56F9E1A345BEB5DC285F4262D898,PinName="bSweep",PinToolTip="Sweep\nBoolean\n\nWhether we sweep to the destination location, triggering overlaps along the way and stopping short of the target if blocked by something. Only the root component is swept and checked for blocking collision, child components move without sweeping. If collision is off, this has no effect.",PinType.PinCategory="bool",PinType.PinSubCategory="",PinType.PinSubCategoryObject=None,PinType.PinSubCategoryMemberReference=(),PinType.PinValueType=(),PinType.ContainerType=None,PinType.bIsReference=False,PinType.bIsConst=False,PinType.bIsWeakPointer=False,PinType.bIsUObjectWrapper=False,PinType.bSerializeAsSinglePrecisionFloat=False,DefaultValue="false",AutogeneratedDefaultValue="false",PersistentGuid=00000000000000000000000000000000,bHidden=False,bNotConnectable=False,bDefaultValueIsReadOnly=False,bDefaultValueIsIgnored=False,bAdvancedView=False,bOrphanedPin=False,)
CustomProperties Pin (PinId=C1F6D5CB5235402BAA93264ED74D8EA5,PinName="SweepHitResult",PinToolTip="Sweep Hit Result\nHit Result Structure\n\nHit result from any impact if sweep is true.",Direction="EGPD_Output",PinType.PinCategory="struct",PinType.PinSubCategory="",PinType.PinSubCategoryObject="/Script/CoreUObject.ScriptStruct'/Script/Engine.HitResult'",PinType.PinSubCategoryMemberReference=(),PinType.PinValueType=(),PinType.ContainerType=None,PinType.bIsReference=False,PinType.bIsConst=False,PinType.bIsWeakPointer=False,PinType.bIsUObjectWrapper=False,PinType.bSerializeAsSinglePrecisionFloat=False,PersistentGuid=00000000000000000000000000000000,bHidden=False,bNotConnectable=False,bDefaultValueIsReadOnly=False,bDefaultValueIsIgnored=False,bAdvancedView=False,bOrphanedPin=False,)
CustomProperties Pin (PinId=396CEA7F4CD6410EB995DC49D187CDE4,PinName="bTeleport",PinToolTip="Teleport\nBoolean\n\nWhether we teleport the physics state (if physics collision is enabled for this object). If true, physics velocity for this object is unchanged (so ragdoll parts are not affected by change in location). If false, physics velocity is updated based on the change in position (affecting ragdoll parts). If CCD is on and not teleporting, this will affect objects along the entire sweep volume.",PinType.PinCategory="bool",PinType.PinSubCategory="",PinType.PinSubCategoryObject=None,PinType.PinSubCategoryMemberReference=(),PinType.PinValueType=(),PinType.ContainerType=None,PinType.bIsReference=False,PinType.bIsConst=False,PinType.bIsWeakPointer=False,PinType.bIsUObjectWrapper=False,PinType.bSerializeAsSinglePrecisionFloat=False,DefaultValue="true",AutogeneratedDefaultValue="false",PersistentGuid=00000000000000000000000000000000,bHidden=False,bNotConnectable=False,bDefaultValueIsReadOnly=False,bDefaultValueIsIgnored=False,bAdvancedView=False,bOrphanedPin=False,)
End Object
Begin Object Class=/Script/BlueprintGraph.K2Node_CallFunction Name="K2Node_CallFunction_26" ExportPath="/Script/BlueprintGraph.K2Node_CallFunction'/Game/Examples/BallShooter/Blueprints/BallShooterTarget.BallShooterTarget:teleportToRandomLocation.K2Node_CallFunction_26'"
FunctionReference=(MemberParent="/Script/CoreUObject.Class'/Script/Engine.PrimitiveComponent'",MemberName="SetPhysicsLinearVelocity")
NodePosX=768
NodePosY=-176
NodeGuid=6CD578D83871438C9049B553BA6D6061
CustomProperties Pin (PinId=402E8C567DEB45EE9EF64BF565D72E63,PinName="execute",PinToolTip="\nExec",PinType.PinCategory="exec",PinType.PinSubCategory="",PinType.PinSubCategoryObject=None,PinType.PinSubCategoryMemberReference=(),PinType.PinValueType=(),PinType.ContainerType=None,PinType.bIsReference=False,PinType.bIsConst=False,PinType.bIsWeakPointer=False,PinType.bIsUObjectWrapper=False,PinType.bSerializeAsSinglePrecisionFloat=False,LinkedTo=(K2Node_FunctionEntry_0 F9D7FE1A402AF20F0B9E14A8C2166F96,),PersistentGuid=00000000000000000000000000000000,bHidden=False,bNotConnectable=False,bDefaultValueIsReadOnly=False,bDefaultValueIsIgnored=False,bAdvancedView=False,bOrphanedPin=False,)
CustomProperties Pin (PinId=AC43C329E4CE42129D951460402E37E4,PinName="then",PinToolTip="\nExec",Direction="EGPD_Output",PinType.PinCategory="exec",PinType.PinSubCategory="",PinType.PinSubCategoryObject=None,PinType.PinSubCategoryMemberReference=(),PinType.PinValueType=(),PinType.ContainerType=None,PinType.bIsReference=False,PinType.bIsConst=False,PinType.bIsWeakPointer=False,PinType.bIsUObjectWrapper=False,PinType.bSerializeAsSinglePrecisionFloat=False,LinkedTo=(K2Node_CallFunction_18 7716D680F3494EA0A20A9C6AAFA464C2,),PersistentGuid=00000000000000000000000000000000,bHidden=False,bNotConnectable=False,bDefaultValueIsReadOnly=False,bDefaultValueIsIgnored=False,bAdvancedView=False,bOrphanedPin=False,)
CustomProperties Pin (PinId=16F374719B0B4BD29626635BE02E163E,PinName="self",PinFriendlyName=NSLOCTEXT("K2Node", "Target", "Target"),PinToolTip="Target\nPrimitive Component Object Reference",PinType.PinCategory="object",PinType.PinSubCategory="",PinType.PinSubCategoryObject="/Script/CoreUObject.Class'/Script/Engine.PrimitiveComponent'",PinType.PinSubCategoryMemberReference=(),PinType.PinValueType=(),PinType.ContainerType=None,PinType.bIsReference=False,PinType.bIsConst=False,PinType.bIsWeakPointer=False,PinType.bIsUObjectWrapper=False,PinType.bSerializeAsSinglePrecisionFloat=False,LinkedTo=(K2Node_VariableGet_12 A6D970868F614804A2457540027B60C3,),PersistentGuid=00000000000000000000000000000000,bHidden=False,bNotConnectable=False,bDefaultValueIsReadOnly=False,bDefaultValueIsIgnored=False,bAdvancedView=False,bOrphanedPin=False,)
CustomProperties Pin (PinId=9C0C3F6F40EC44B288B7A4376D372B28,PinName="NewVel",PinToolTip="New Vel\nVector\n\nNew linear velocity to apply to physics.",PinType.PinCategory="struct",PinType.PinSubCategory="",PinType.PinSubCategoryObject="/Script/CoreUObject.ScriptStruct'/Script/CoreUObject.Vector'",PinType.PinSubCategoryMemberReference=(),PinType.PinValueType=(),PinType.ContainerType=None,PinType.bIsReference=False,PinType.bIsConst=False,PinType.bIsWeakPointer=False,PinType.bIsUObjectWrapper=False,PinType.bSerializeAsSinglePrecisionFloat=False,DefaultValue="0, 0, 0",AutogeneratedDefaultValue="0, 0, 0",PersistentGuid=00000000000000000000000000000000,bHidden=False,bNotConnectable=False,bDefaultValueIsReadOnly=False,bDefaultValueIsIgnored=False,bAdvancedView=False,bOrphanedPin=False,)
CustomProperties Pin (PinId=F050BBBEB6FB416C88899F89A2503F67,PinName="bAddToCurrent",PinToolTip="Add to Current\nBoolean\n\nIf true, NewVel is added to the existing velocity of the body.",PinType.PinCategory="bool",PinType.PinSubCategory="",PinType.PinSubCategoryObject=None,PinType.PinSubCategoryMemberReference=(),PinType.PinValueType=(),PinType.ContainerType=None,PinType.bIsReference=False,PinType.bIsConst=False,PinType.bIsWeakPointer=False,PinType.bIsUObjectWrapper=False,PinType.bSerializeAsSinglePrecisionFloat=False,DefaultValue="false",AutogeneratedDefaultValue="false",PersistentGuid=00000000000000000000000000000000,bHidden=False,bNotConnectable=False,bDefaultValueIsReadOnly=False,bDefaultValueIsIgnored=False,bAdvancedView=False,bOrphanedPin=False,)
CustomProperties Pin (PinId=7CF2DB1B3DDB4747BB1827A9ADA728AA,PinName="BoneName",PinToolTip="Bone Name\nName\n\nIf a SkeletalMeshComponent, name of body to modify velocity of. \'None\' indicates root body.",PinType.PinCategory="name",PinType.PinSubCategory="",PinType.PinSubCategoryObject=None,PinType.PinSubCategoryMemberReference=(),PinType.PinValueType=(),PinType.ContainerType=None,PinType.bIsReference=False,PinType.bIsConst=False,PinType.bIsWeakPointer=False,PinType.bIsUObjectWrapper=False,PinType.bSerializeAsSinglePrecisionFloat=False,DefaultValue="None",AutogeneratedDefaultValue="None",PersistentGuid=00000000000000000000000000000000,bHidden=False,bNotConnectable=False,bDefaultValueIsReadOnly=False,bDefaultValueIsIgnored=False,bAdvancedView=False,bOrphanedPin=False,)
End Object
Creating the Agent
-
Create a new Blueprint Class with parent class Pawn, and name it
BallShooterAgent. -
Add any desired static meshes as the agent’s body, and optionally select good-looking materials.
-
Add an Arrow Component, and set it as the agent’s forward direction. Name it
Projectile Indicator. -
Save and close the blueprint, and place a
BallShooterAgentat the center of the map.
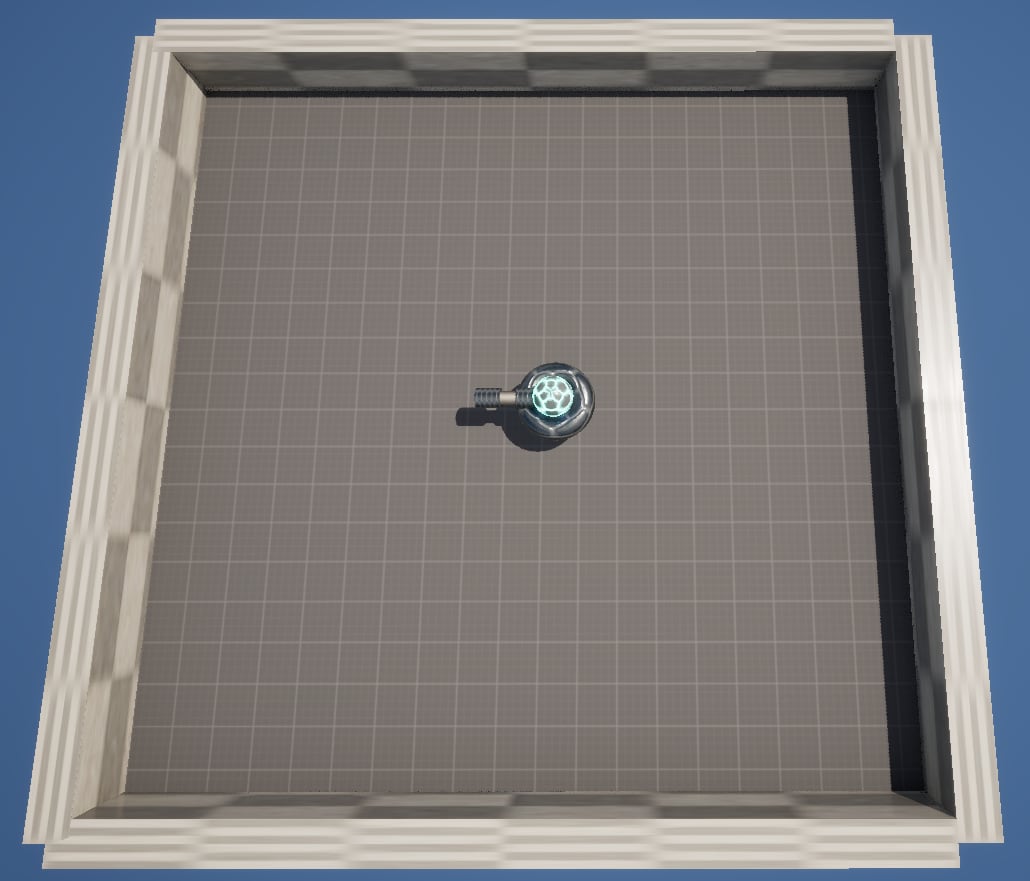
Creating the Ball Shooter Shooting Actuator
There are a variety of built-in actuator classes available in Schola, such as the TeleportActuator and MovementInputActuator. However, some games may require custom actuators. In this example, we will create a custom BlueprintDiscreteActuator (subclass of DiscreteActuator) to shoot the ball. This actuator has two possible actions: shoot a ball or do nothing. The GetActionSpace() function will return the action space, and the TakeAction() function will take the action. We will also create two helper functions, getInitialVelocity() and getInitialLocation(), to get the initial velocity and location for spawning the ball.
Note
A BinaryActuator can also be used here instead of the DiscreteActuator.
-
Create a new Blueprint Class with parent class
BlueprintDiscreteActuator, and name itBallShooterShootingActuator. -
Add a new float variable. Name it
ballSpawnSpeed, and set the default value to 2000. This stores the speed of the ball when shot. -
Add a new Rotator variable. Name it
projectileSpawnDirection. This stores the direction in which the ball will be spawned. Adjust the values to ensure the ball is spawned in the correct direction. -
Add a new float variable. Name it
ballSpawnOffset. This stores the offset from the agent’s location where the ball will be spawned. Set the default value to 200, and adjust if necessary to ensure the ball is spawned in front of, not inside the agent. -
Add a new integer variable. Name it
countOfBallsShot. It stores the number of balls shot by the agent in the current time step. -
Add a new Actor variable. Name it
Agent. This stores the agent that owns the actuator. -
Convert the function
TakeAction()into an event. This allows us to bind theBall Hit Eventto the spawned ball. -
Set the
getInitialVelocity(),getInitialLocation(),GetActionSpace(), andTakeAction()blueprints as shown below.
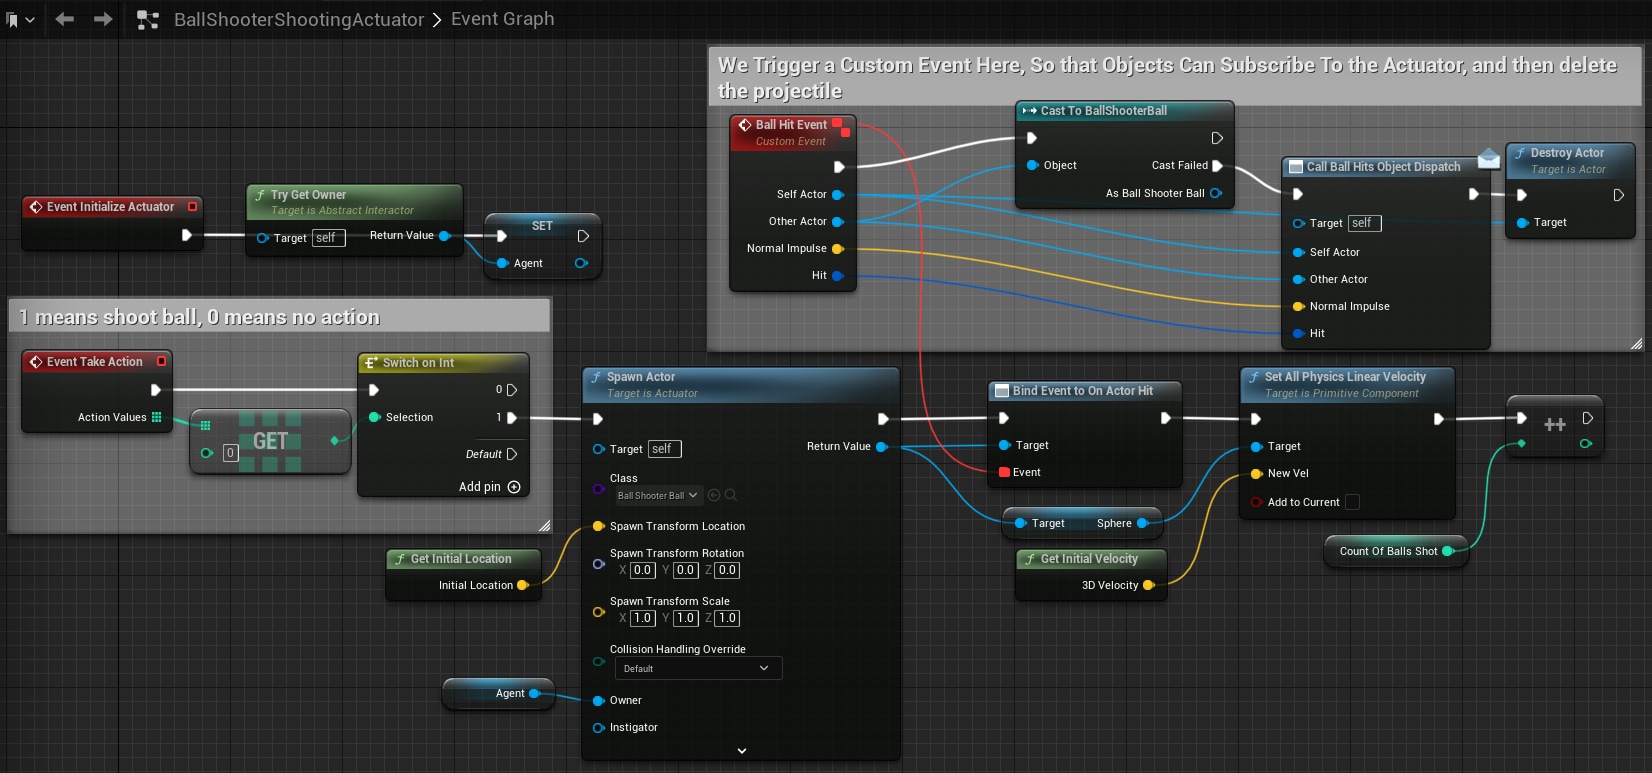
Begin Object Class=/Script/BlueprintGraph.K2Node_Event Name="K2Node_Event_0" ExportPath="/Script/BlueprintGraph.K2Node_Event'/Game/Examples/BallShooter/Blueprints/BallShooterShootingActuator.BallShooterShootingActuator:EventGraph.K2Node_Event_0'"
EventReference=(MemberParent="/Script/CoreUObject.Class'/Script/Schola.BlueprintDiscreteActuator'",MemberName="TakeAction")
bOverrideFunction=True
NodePosX=-112
NodePosY=253
NodeGuid=4EC539E947BDA46A3E6A9DA2527840AE
CustomProperties Pin (PinId=F22F5E964DCC3CB779E9A2879F05178C,PinName="OutputDelegate",Direction="EGPD_Output",PinType.PinCategory="delegate",PinType.PinSubCategory="",PinType.PinSubCategoryObject=None,PinType.PinSubCategoryMemberReference=(MemberParent="/Script/CoreUObject.Class'/Script/Schola.BlueprintDiscreteActuator'",MemberName="TakeAction"),PinType.PinValueType=(),PinType.ContainerType=None,PinType.bIsReference=False,PinType.bIsConst=False,PinType.bIsWeakPointer=False,PinType.bIsUObjectWrapper=False,PinType.bSerializeAsSinglePrecisionFloat=False,PersistentGuid=00000000000000000000000000000000,bHidden=False,bNotConnectable=False,bDefaultValueIsReadOnly=False,bDefaultValueIsIgnored=False,bAdvancedView=False,bOrphanedPin=False,)
CustomProperties Pin (PinId=B498900541FA474760D1A2855A53CCA0,PinName="then",Direction="EGPD_Output",PinType.PinCategory="exec",PinType.PinSubCategory="",PinType.PinSubCategoryObject=None,PinType.PinSubCategoryMemberReference=(),PinType.PinValueType=(),PinType.ContainerType=None,PinType.bIsReference=False,PinType.bIsConst=False,PinType.bIsWeakPointer=False,PinType.bIsUObjectWrapper=False,PinType.bSerializeAsSinglePrecisionFloat=False,LinkedTo=(K2Node_SwitchInteger_0 C12A42274C66BC0CEB0D7FA941F9BCEC,),PersistentGuid=00000000000000000000000000000000,bHidden=False,bNotConnectable=False,bDefaultValueIsReadOnly=False,bDefaultValueIsIgnored=False,bAdvancedView=False,bOrphanedPin=False,)
CustomProperties Pin (PinId=F88637024C579E9E2EBE1B8A61852FF9,PinName="Action",PinToolTip="Action\nDiscrete Point Structure (by ref)",Direction="EGPD_Output",PinType.PinCategory="struct",PinType.PinSubCategory="",PinType.PinSubCategoryObject="/Script/CoreUObject.ScriptStruct'/Script/Schola.DiscretePoint'",PinType.PinSubCategoryMemberReference=(),PinType.PinValueType=(),PinType.ContainerType=None,PinType.bIsReference=True,PinType.bIsConst=True,PinType.bIsWeakPointer=False,PinType.bIsUObjectWrapper=False,PinType.bSerializeAsSinglePrecisionFloat=False,SubPins=(K2Node_Event_0 E34A04B74607DFEDECBF42B9DF9EFBEF,),PersistentGuid=00000000000000000000000000000000,bHidden=True,bNotConnectable=False,bDefaultValueIsReadOnly=False,bDefaultValueIsIgnored=False,bAdvancedView=False,bOrphanedPin=False,)
CustomProperties Pin (PinId=E34A04B74607DFEDECBF42B9DF9EFBEF,PinName="Action_Values",PinFriendlyName=LOCGEN_FORMAT_NAMED(NSLOCTEXT("KismetSchema", "SplitPinFriendlyNameFormat", "{PinDisplayName} {ProtoPinDisplayName}"), "PinDisplayName", "Action", "ProtoPinDisplayName", "Values"),Direction="EGPD_Output",PinType.PinCategory="int",PinType.PinSubCategory="",PinType.PinSubCategoryObject=None,PinType.PinSubCategoryMemberReference=(),PinType.PinValueType=(),PinType.ContainerType=Array,PinType.bIsReference=False,PinType.bIsConst=False,PinType.bIsWeakPointer=False,PinType.bIsUObjectWrapper=False,PinType.bSerializeAsSinglePrecisionFloat=False,LinkedTo=(K2Node_GetArrayItem_1 E01FE6A04A7C418F949FCA9B96F05E00,),ParentPin=K2Node_Event_0 F88637024C579E9E2EBE1B8A61852FF9,PersistentGuid=00000000000000000000000000000000,bHidden=False,bNotConnectable=False,bDefaultValueIsReadOnly=False,bDefaultValueIsIgnored=False,bAdvancedView=False,bOrphanedPin=False,)
End Object
Begin Object Class=/Script/BlueprintGraph.K2Node_AddDelegate Name="K2Node_AddDelegate_3" ExportPath="/Script/BlueprintGraph.K2Node_AddDelegate'/Game/Examples/BallShooter/Blueprints/BallShooterShootingActuator.BallShooterShootingActuator:EventGraph.K2Node_AddDelegate_3'"
DelegateReference=(MemberParent="/Script/CoreUObject.Class'/Script/Engine.Actor'",MemberName="OnActorHit")
NodePosX=992
NodePosY=288
ErrorType=1
NodeGuid=1A8B46AF41B245B777FC39BDC4514ACA
CustomProperties Pin (PinId=9E32995C4A0C7AE32F04AFA5702BFC53,PinName="execute",PinType.PinCategory="exec",PinType.PinSubCategory="",PinType.PinSubCategoryObject=None,PinType.PinSubCategoryMemberReference=(),PinType.PinValueType=(),PinType.ContainerType=None,PinType.bIsReference=False,PinType.bIsConst=False,PinType.bIsWeakPointer=False,PinType.bIsUObjectWrapper=False,PinType.bSerializeAsSinglePrecisionFloat=False,LinkedTo=(K2Node_CallFunction_3 FBA847384DC8A1A9413BACAF465C870F,),PersistentGuid=00000000000000000000000000000000,bHidden=False,bNotConnectable=False,bDefaultValueIsReadOnly=False,bDefaultValueIsIgnored=False,bAdvancedView=False,bOrphanedPin=False,)
CustomProperties Pin (PinId=F1CC19E64C5FA324FE8554A34DBEB42E,PinName="then",Direction="EGPD_Output",PinType.PinCategory="exec",PinType.PinSubCategory="",PinType.PinSubCategoryObject=None,PinType.PinSubCategoryMemberReference=(),PinType.PinValueType=(),PinType.ContainerType=None,PinType.bIsReference=False,PinType.bIsConst=False,PinType.bIsWeakPointer=False,PinType.bIsUObjectWrapper=False,PinType.bSerializeAsSinglePrecisionFloat=False,LinkedTo=(K2Node_CallFunction_1 1D1FB282C0DB4BFEBC413245BCD20FBD,),PersistentGuid=00000000000000000000000000000000,bHidden=False,bNotConnectable=False,bDefaultValueIsReadOnly=False,bDefaultValueIsIgnored=False,bAdvancedView=False,bOrphanedPin=False,)
CustomProperties Pin (PinId=8E66D7A346605B61145C6298F241CDE3,PinName="self",PinFriendlyName=NSLOCTEXT("K2Node", "BaseMCDelegateSelfPinName", "Target"),PinType.PinCategory="object",PinType.PinSubCategory="",PinType.PinSubCategoryObject="/Script/CoreUObject.Class'/Script/Engine.Actor'",PinType.PinSubCategoryMemberReference=(),PinType.PinValueType=(),PinType.ContainerType=None,PinType.bIsReference=False,PinType.bIsConst=False,PinType.bIsWeakPointer=False,PinType.bIsUObjectWrapper=False,PinType.bSerializeAsSinglePrecisionFloat=False,LinkedTo=(K2Node_CallFunction_3 F11AE50B4F325B9F06C43CAD3A198508,),PersistentGuid=00000000000000000000000000000000,bHidden=False,bNotConnectable=False,bDefaultValueIsReadOnly=False,bDefaultValueIsIgnored=False,bAdvancedView=False,bOrphanedPin=False,)
CustomProperties Pin (PinId=FEAB80D74F9BBE3D11A04F8E4E8FFEAB,PinName="Delegate",PinFriendlyName=NSLOCTEXT("K2Node", "PinFriendlyDelegatetName", "Event"),PinType.PinCategory="delegate",PinType.PinSubCategory="",PinType.PinSubCategoryObject=None,PinType.PinSubCategoryMemberReference=(MemberParent="/Script/CoreUObject.Package'/Script/Engine'",MemberName="ActorHitSignature__DelegateSignature"),PinType.PinValueType=(),PinType.ContainerType=None,PinType.bIsReference=True,PinType.bIsConst=True,PinType.bIsWeakPointer=False,PinType.bIsUObjectWrapper=False,PinType.bSerializeAsSinglePrecisionFloat=False,LinkedTo=(K2Node_CustomEvent_3 7698190D458203461FE5FCAE5EB09AF6,),PersistentGuid=00000000000000000000000000000000,bHidden=False,bNotConnectable=False,bDefaultValueIsReadOnly=False,bDefaultValueIsIgnored=False,bAdvancedView=False,bOrphanedPin=False,)
End Object
Begin Object Class=/Script/BlueprintGraph.K2Node_VariableGet Name="K2Node_VariableGet_6" ExportPath="/Script/BlueprintGraph.K2Node_VariableGet'/Game/Examples/BallShooter/Blueprints/BallShooterShootingActuator.BallShooterShootingActuator:EventGraph.K2Node_VariableGet_6'"
VariableReference=(MemberName="countOfBallsShot",MemberGuid=AB55F08246C397E1FA9969966E1980C8,bSelfContext=True)
NodePosX=1376
NodePosY=464
NodeGuid=EBB31EC6457755669EDE6FBC47728BB9
CustomProperties Pin (PinId=EA730ADE49F36E3BD610F4BCB1EA2C77,PinName="countOfBallsShot",Direction="EGPD_Output",PinType.PinCategory="int",PinType.PinSubCategory="",PinType.PinSubCategoryObject=None,PinType.PinSubCategoryMemberReference=(),PinType.PinValueType=(),PinType.ContainerType=None,PinType.bIsReference=False,PinType.bIsConst=False,PinType.bIsWeakPointer=False,PinType.bIsUObjectWrapper=False,PinType.bSerializeAsSinglePrecisionFloat=False,DefaultValue="0",AutogeneratedDefaultValue="0",LinkedTo=(K2Node_MacroInstance_0 87303AF18B794EAD98D8F036FD6681C0,),PersistentGuid=00000000000000000000000000000000,bHidden=False,bNotConnectable=False,bDefaultValueIsReadOnly=False,bDefaultValueIsIgnored=False,bAdvancedView=False,bOrphanedPin=False,)
CustomProperties Pin (PinId=0E250F7B42F7130100AFE99765E835D5,PinName="self",PinFriendlyName=NSLOCTEXT("K2Node", "Target", "Target"),PinType.PinCategory="object",PinType.PinSubCategory="",PinType.PinSubCategoryObject="/Script/Engine.BlueprintGeneratedClass'/Game/Examples/BallShooter/Blueprints/BallShooterShootingActuator.BallShooterShootingActuator_C'",PinType.PinSubCategoryMemberReference=(),PinType.PinValueType=(),PinType.ContainerType=None,PinType.bIsReference=False,PinType.bIsConst=False,PinType.bIsWeakPointer=False,PinType.bIsUObjectWrapper=False,PinType.bSerializeAsSinglePrecisionFloat=False,PersistentGuid=00000000000000000000000000000000,bHidden=True,bNotConnectable=False,bDefaultValueIsReadOnly=False,bDefaultValueIsIgnored=False,bAdvancedView=False,bOrphanedPin=False,)
End Object
Begin Object Class=/Script/BlueprintGraph.K2Node_CallFunction Name="K2Node_CallFunction_3" ExportPath="/Script/BlueprintGraph.K2Node_CallFunction'/Game/Examples/BallShooter/Blueprints/BallShooterShootingActuator.BallShooterShootingActuator:EventGraph.K2Node_CallFunction_3'"
FunctionReference=(MemberName="SpawnActor",bSelfContext=True)
NodePosX=528
NodePosY=272
AdvancedPinDisplay=Hidden
ErrorType=3
NodeGuid=369593B540FEA3FD07137AAD24315140
CustomProperties Pin (PinId=E35CB7E540CE9CDEC24235AEE226BEE4,PinName="execute",PinType.PinCategory="exec",PinType.PinSubCategory="",PinType.PinSubCategoryObject=None,PinType.PinSubCategoryMemberReference=(),PinType.PinValueType=(),PinType.ContainerType=None,PinType.bIsReference=False,PinType.bIsConst=False,PinType.bIsWeakPointer=False,PinType.bIsUObjectWrapper=False,PinType.bSerializeAsSinglePrecisionFloat=False,LinkedTo=(K2Node_SwitchInteger_0 5B2443674D41719223550EA254D0782E,),PersistentGuid=00000000000000000000000000000000,bHidden=False,bNotConnectable=False,bDefaultValueIsReadOnly=False,bDefaultValueIsIgnored=False,bAdvancedView=False,bOrphanedPin=False,)
CustomProperties Pin (PinId=FBA847384DC8A1A9413BACAF465C870F,PinName="then",Direction="EGPD_Output",PinType.PinCategory="exec",PinType.PinSubCategory="",PinType.PinSubCategoryObject=None,PinType.PinSubCategoryMemberReference=(),PinType.PinValueType=(),PinType.ContainerType=None,PinType.bIsReference=False,PinType.bIsConst=False,PinType.bIsWeakPointer=False,PinType.bIsUObjectWrapper=False,PinType.bSerializeAsSinglePrecisionFloat=False,LinkedTo=(K2Node_AddDelegate_3 9E32995C4A0C7AE32F04AFA5702BFC53,),PersistentGuid=00000000000000000000000000000000,bHidden=False,bNotConnectable=False,bDefaultValueIsReadOnly=False,bDefaultValueIsIgnored=False,bAdvancedView=False,bOrphanedPin=False,)
CustomProperties Pin (PinId=E1B12B7C41801F75B28B5E83D0295BD1,PinName="self",PinFriendlyName=NSLOCTEXT("K2Node", "Target", "Target"),PinType.PinCategory="object",PinType.PinSubCategory="",PinType.PinSubCategoryObject="/Script/CoreUObject.Class'/Script/Schola.Actuator'",PinType.PinSubCategoryMemberReference=(),PinType.PinValueType=(),PinType.ContainerType=None,PinType.bIsReference=False,PinType.bIsConst=False,PinType.bIsWeakPointer=False,PinType.bIsUObjectWrapper=False,PinType.bSerializeAsSinglePrecisionFloat=False,PersistentGuid=00000000000000000000000000000000,bHidden=False,bNotConnectable=False,bDefaultValueIsReadOnly=False,bDefaultValueIsIgnored=False,bAdvancedView=False,bOrphanedPin=False,)
CustomProperties Pin (PinId=5C5C75A347418B634D291BA3231AE60C,PinName="Class",PinType.PinCategory="class",PinType.PinSubCategory="",PinType.PinSubCategoryObject="/Script/CoreUObject.Class'/Script/Engine.Actor'",PinType.PinSubCategoryMemberReference=(),PinType.PinValueType=(),PinType.ContainerType=None,PinType.bIsReference=False,PinType.bIsConst=False,PinType.bIsWeakPointer=False,PinType.bIsUObjectWrapper=True,PinType.bSerializeAsSinglePrecisionFloat=False,DefaultObject="/Game/Examples/BallShooter/Blueprints/BallShooterBall.BallShooterBall_C",PersistentGuid=00000000000000000000000000000000,bHidden=False,bNotConnectable=False,bDefaultValueIsReadOnly=False,bDefaultValueIsIgnored=False,bAdvancedView=False,bOrphanedPin=False,)
CustomProperties Pin (PinId=E0CC09184DE77FCFAACCA08B79058CA6,PinName="SpawnTransform",PinType.PinCategory="struct",PinType.PinSubCategory="",PinType.PinSubCategoryObject="/Script/CoreUObject.ScriptStruct'/Script/CoreUObject.Transform'",PinType.PinSubCategoryMemberReference=(),PinType.PinValueType=(),PinType.ContainerType=None,PinType.bIsReference=True,PinType.bIsConst=True,PinType.bIsWeakPointer=False,PinType.bIsUObjectWrapper=False,PinType.bSerializeAsSinglePrecisionFloat=False,SubPins=(K2Node_CallFunction_3 7975A4784115A99A4FA5079EFBF05B78,K2Node_CallFunction_3 F62BA96C41DEBB6C6633C985A011CC37,K2Node_CallFunction_3 04A2A59E47B1EE50D67CB18DEDAC5842,),PersistentGuid=00000000000000000000000000000000,bHidden=True,bNotConnectable=False,bDefaultValueIsReadOnly=False,bDefaultValueIsIgnored=True,bAdvancedView=False,bOrphanedPin=False,)
CustomProperties Pin (PinId=7975A4784115A99A4FA5079EFBF05B78,PinName="SpawnTransform_Location",PinFriendlyName=LOCGEN_FORMAT_NAMED(NSLOCTEXT("KismetSchema", "SplitPinFriendlyNameFormat", "{PinDisplayName} {ProtoPinDisplayName}"), "PinDisplayName", "Spawn Transform", "ProtoPinDisplayName", "Location"),PinType.PinCategory="struct",PinType.PinSubCategory="",PinType.PinSubCategoryObject="/Script/CoreUObject.ScriptStruct'/Script/CoreUObject.Vector'",PinType.PinSubCategoryMemberReference=(),PinType.PinValueType=(),PinType.ContainerType=None,PinType.bIsReference=False,PinType.bIsConst=False,PinType.bIsWeakPointer=False,PinType.bIsUObjectWrapper=False,PinType.bSerializeAsSinglePrecisionFloat=False,DefaultValue="0, 0, 0",AutogeneratedDefaultValue="0, 0, 0",LinkedTo=(K2Node_CallFunction_9 D9DCF3FC417253C6B2B2CB9E826C9ABB,),ParentPin=K2Node_CallFunction_3 E0CC09184DE77FCFAACCA08B79058CA6,PersistentGuid=00000000000000000000000000000000,bHidden=False,bNotConnectable=False,bDefaultValueIsReadOnly=False,bDefaultValueIsIgnored=False,bAdvancedView=False,bOrphanedPin=False,)
CustomProperties Pin (PinId=F62BA96C41DEBB6C6633C985A011CC37,PinName="SpawnTransform_Rotation",PinFriendlyName=LOCGEN_FORMAT_NAMED(NSLOCTEXT("KismetSchema", "SplitPinFriendlyNameFormat", "{PinDisplayName} {ProtoPinDisplayName}"), "PinDisplayName", "Spawn Transform", "ProtoPinDisplayName", "Rotation"),PinType.PinCategory="struct",PinType.PinSubCategory="",PinType.PinSubCategoryObject="/Script/CoreUObject.ScriptStruct'/Script/CoreUObject.Rotator'",PinType.PinSubCategoryMemberReference=(),PinType.PinValueType=(),PinType.ContainerType=None,PinType.bIsReference=False,PinType.bIsConst=False,PinType.bIsWeakPointer=False,PinType.bIsUObjectWrapper=False,PinType.bSerializeAsSinglePrecisionFloat=False,DefaultValue="0, 0, 0",AutogeneratedDefaultValue="0, 0, 0",ParentPin=K2Node_CallFunction_3 E0CC09184DE77FCFAACCA08B79058CA6,PersistentGuid=00000000000000000000000000000000,bHidden=False,bNotConnectable=False,bDefaultValueIsReadOnly=False,bDefaultValueIsIgnored=False,bAdvancedView=False,bOrphanedPin=False,)
CustomProperties Pin (PinId=04A2A59E47B1EE50D67CB18DEDAC5842,PinName="SpawnTransform_Scale",PinFriendlyName=LOCGEN_FORMAT_NAMED(NSLOCTEXT("KismetSchema", "SplitPinFriendlyNameFormat", "{PinDisplayName} {ProtoPinDisplayName}"), "PinDisplayName", "Spawn Transform", "ProtoPinDisplayName", "Scale"),PinType.PinCategory="struct",PinType.PinSubCategory="",PinType.PinSubCategoryObject="/Script/CoreUObject.ScriptStruct'/Script/CoreUObject.Vector'",PinType.PinSubCategoryMemberReference=(),PinType.PinValueType=(),PinType.ContainerType=None,PinType.bIsReference=False,PinType.bIsConst=False,PinType.bIsWeakPointer=False,PinType.bIsUObjectWrapper=False,PinType.bSerializeAsSinglePrecisionFloat=False,DefaultValue="1.000000,1.000000,1.000000",AutogeneratedDefaultValue="1.000000,1.000000,1.000000",ParentPin=K2Node_CallFunction_3 E0CC09184DE77FCFAACCA08B79058CA6,PersistentGuid=00000000000000000000000000000000,bHidden=False,bNotConnectable=False,bDefaultValueIsReadOnly=False,bDefaultValueIsIgnored=False,bAdvancedView=False,bOrphanedPin=False,)
CustomProperties Pin (PinId=558C8900430F593EE6AFF2B5CE5F2796,PinName="CollisionHandlingOverride",PinType.PinCategory="byte",PinType.PinSubCategory="",PinType.PinSubCategoryObject="/Script/CoreUObject.Enum'/Script/Engine.ESpawnActorCollisionHandlingMethod'",PinType.PinSubCategoryMemberReference=(),PinType.PinValueType=(),PinType.ContainerType=None,PinType.bIsReference=False,PinType.bIsConst=False,PinType.bIsWeakPointer=False,PinType.bIsUObjectWrapper=False,PinType.bSerializeAsSinglePrecisionFloat=False,DefaultValue="Undefined",PersistentGuid=00000000000000000000000000000000,bHidden=False,bNotConnectable=False,bDefaultValueIsReadOnly=False,bDefaultValueIsIgnored=False,bAdvancedView=False,bOrphanedPin=False,)
CustomProperties Pin (PinId=FCC1E2094C05DC0F9F13DF8B9B541DF5,PinName="TransformScaleMethod",PinType.PinCategory="byte",PinType.PinSubCategory="",PinType.PinSubCategoryObject="/Script/CoreUObject.Enum'/Script/Engine.ESpawnActorScaleMethod'",PinType.PinSubCategoryMemberReference=(),PinType.PinValueType=(),PinType.ContainerType=None,PinType.bIsReference=False,PinType.bIsConst=False,PinType.bIsWeakPointer=False,PinType.bIsUObjectWrapper=False,PinType.bSerializeAsSinglePrecisionFloat=False,DefaultValue="OverrideRootScale",PersistentGuid=00000000000000000000000000000000,bHidden=False,bNotConnectable=False,bDefaultValueIsReadOnly=False,bDefaultValueIsIgnored=False,bAdvancedView=True,bOrphanedPin=False,)
CustomProperties Pin (PinId=730FA1F54CD0B855B60ACF9F03F7B139,PinName="Owner",PinType.PinCategory="object",PinType.PinSubCategory="",PinType.PinSubCategoryObject="/Script/CoreUObject.Class'/Script/Engine.Actor'",PinType.PinSubCategoryMemberReference=(),PinType.PinValueType=(),PinType.ContainerType=None,PinType.bIsReference=False,PinType.bIsConst=False,PinType.bIsWeakPointer=False,PinType.bIsUObjectWrapper=False,PinType.bSerializeAsSinglePrecisionFloat=False,LinkedTo=(K2Node_VariableGet_4 106DB725497A79BDA704D3A282535EF2,),PersistentGuid=00000000000000000000000000000000,bHidden=False,bNotConnectable=False,bDefaultValueIsReadOnly=False,bDefaultValueIsIgnored=False,bAdvancedView=True,bOrphanedPin=False,)
CustomProperties Pin (PinId=6F0CB4764D7341738B6182B55CAB5D83,PinName="Instigator",PinType.PinCategory="object",PinType.PinSubCategory="",PinType.PinSubCategoryObject="/Script/CoreUObject.Class'/Script/Engine.Pawn'",PinType.PinSubCategoryMemberReference=(),PinType.PinValueType=(),PinType.ContainerType=None,PinType.bIsReference=False,PinType.bIsConst=False,PinType.bIsWeakPointer=False,PinType.bIsUObjectWrapper=False,PinType.bSerializeAsSinglePrecisionFloat=False,PersistentGuid=00000000000000000000000000000000,bHidden=False,bNotConnectable=False,bDefaultValueIsReadOnly=False,bDefaultValueIsIgnored=False,bAdvancedView=False,bOrphanedPin=False,)
CustomProperties Pin (PinId=F11AE50B4F325B9F06C43CAD3A198508,PinName="ReturnValue",Direction="EGPD_Output",PinType.PinCategory="object",PinType.PinSubCategory="",PinType.PinSubCategoryObject="/Script/Engine.BlueprintGeneratedClass'/Game/Examples/BallShooter/Blueprints/BallShooterBall.BallShooterBall_C'",PinType.PinSubCategoryMemberReference=(),PinType.PinValueType=(),PinType.ContainerType=None,PinType.bIsReference=False,PinType.bIsConst=False,PinType.bIsWeakPointer=False,PinType.bIsUObjectWrapper=False,PinType.bSerializeAsSinglePrecisionFloat=False,LinkedTo=(K2Node_VariableGet_1 386B28F1FF63420FA6A32B464A499DC3,K2Node_AddDelegate_3 8E66D7A346605B61145C6298F241CDE3,),PersistentGuid=00000000000000000000000000000000,bHidden=False,bNotConnectable=False,bDefaultValueIsReadOnly=False,bDefaultValueIsIgnored=False,bAdvancedView=False,bOrphanedPin=False,)
End Object
Begin Object Class=/Script/BlueprintGraph.K2Node_SwitchInteger Name="K2Node_SwitchInteger_0" ExportPath="/Script/BlueprintGraph.K2Node_SwitchInteger'/Game/Examples/BallShooter/Blueprints/BallShooterShootingActuator.BallShooterShootingActuator:EventGraph.K2Node_SwitchInteger_0'"
NodePosX=272
NodePosY=256
NodeGuid=6675D39F42EA97E43CC65CA6D4C05C10
CustomProperties Pin (PinId=2F022DCC4282EFC6463C03BF25AED7E8,PinName="Default",Direction="EGPD_Output",PinType.PinCategory="exec",PinType.PinSubCategory="",PinType.PinSubCategoryObject=None,PinType.PinSubCategoryMemberReference=(),PinType.PinValueType=(),PinType.ContainerType=None,PinType.bIsReference=False,PinType.bIsConst=False,PinType.bIsWeakPointer=False,PinType.bIsUObjectWrapper=False,PinType.bSerializeAsSinglePrecisionFloat=False,PersistentGuid=00000000000000000000000000000000,bHidden=False,bNotConnectable=False,bDefaultValueIsReadOnly=False,bDefaultValueIsIgnored=False,bAdvancedView=False,bOrphanedPin=False,)
CustomProperties Pin (PinId=C12A42274C66BC0CEB0D7FA941F9BCEC,PinName="execute",PinType.PinCategory="exec",PinType.PinSubCategory="",PinType.PinSubCategoryObject=None,PinType.PinSubCategoryMemberReference=(),PinType.PinValueType=(),PinType.ContainerType=None,PinType.bIsReference=False,PinType.bIsConst=False,PinType.bIsWeakPointer=False,PinType.bIsUObjectWrapper=False,PinType.bSerializeAsSinglePrecisionFloat=False,LinkedTo=(K2Node_Event_0 B498900541FA474760D1A2855A53CCA0,),PersistentGuid=00000000000000000000000000000000,bHidden=False,bNotConnectable=False,bDefaultValueIsReadOnly=False,bDefaultValueIsIgnored=False,bAdvancedView=False,bOrphanedPin=False,)
CustomProperties Pin (PinId=92D9C180457E76A5E455F6AF7F070E90,PinName="Selection",PinType.PinCategory="int",PinType.PinSubCategory="",PinType.PinSubCategoryObject=None,PinType.PinSubCategoryMemberReference=(),PinType.PinValueType=(),PinType.ContainerType=None,PinType.bIsReference=False,PinType.bIsConst=False,PinType.bIsWeakPointer=False,PinType.bIsUObjectWrapper=False,PinType.bSerializeAsSinglePrecisionFloat=False,DefaultValue="0",AutogeneratedDefaultValue="0",LinkedTo=(K2Node_GetArrayItem_1 255EFC2B1B4E422992B95606B6CDC3D4,),PersistentGuid=00000000000000000000000000000000,bHidden=False,bNotConnectable=False,bDefaultValueIsReadOnly=False,bDefaultValueIsIgnored=False,bAdvancedView=False,bOrphanedPin=False,)
CustomProperties Pin (PinId=9CC6F3A24BE17F614613158A3F9FE82A,PinName="NotEqual_IntInt",PinType.PinCategory="object",PinType.PinSubCategory="",PinType.PinSubCategoryObject="/Script/CoreUObject.Class'/Script/Engine.KismetMathLibrary'",PinType.PinSubCategoryMemberReference=(),PinType.PinValueType=(),PinType.ContainerType=None,PinType.bIsReference=False,PinType.bIsConst=False,PinType.bIsWeakPointer=False,PinType.bIsUObjectWrapper=False,PinType.bSerializeAsSinglePrecisionFloat=False,DefaultObject="/Script/Engine.Default__KismetMathLibrary",PersistentGuid=00000000000000000000000000000000,bHidden=True,bNotConnectable=True,bDefaultValueIsReadOnly=True,bDefaultValueIsIgnored=False,bAdvancedView=False,bOrphanedPin=False,)
CustomProperties Pin (PinId=8E3C666E46D0B58FC80F9D9EA3B33D7C,PinName="0",Direction="EGPD_Output",PinType.PinCategory="exec",PinType.PinSubCategory="",PinType.PinSubCategoryObject=None,PinType.PinSubCategoryMemberReference=(),PinType.PinValueType=(),PinType.ContainerType=None,PinType.bIsReference=False,PinType.bIsConst=False,PinType.bIsWeakPointer=False,PinType.bIsUObjectWrapper=False,PinType.bSerializeAsSinglePrecisionFloat=False,PersistentGuid=00000000000000000000000000000000,bHidden=False,bNotConnectable=False,bDefaultValueIsReadOnly=False,bDefaultValueIsIgnored=False,bAdvancedView=False,bOrphanedPin=False,)
CustomProperties Pin (PinId=5B2443674D41719223550EA254D0782E,PinName="1",Direction="EGPD_Output",PinType.PinCategory="exec",PinType.PinSubCategory="",PinType.PinSubCategoryObject=None,PinType.PinSubCategoryMemberReference=(),PinType.PinValueType=(),PinType.ContainerType=None,PinType.bIsReference=False,PinType.bIsConst=False,PinType.bIsWeakPointer=False,PinType.bIsUObjectWrapper=False,PinType.bSerializeAsSinglePrecisionFloat=False,LinkedTo=(K2Node_CallFunction_3 E35CB7E540CE9CDEC24235AEE226BEE4,),PersistentGuid=00000000000000000000000000000000,bHidden=False,bNotConnectable=False,bDefaultValueIsReadOnly=False,bDefaultValueIsIgnored=False,bAdvancedView=False,bOrphanedPin=False,)
End Object
Begin Object Class=/Script/BlueprintGraph.K2Node_MacroInstance Name="K2Node_MacroInstance_0" ExportPath="/Script/BlueprintGraph.K2Node_MacroInstance'/Game/Examples/BallShooter/Blueprints/BallShooterShootingActuator.BallShooterShootingActuator:EventGraph.K2Node_MacroInstance_0'"
MacroGraphReference=(MacroGraph="/Script/Engine.EdGraph'/Engine/EditorBlueprintResources/StandardMacros.StandardMacros:IncrementInt'",GraphBlueprint="/Script/Engine.Blueprint'/Engine/EditorBlueprintResources/StandardMacros.StandardMacros'",GraphGuid=ABF609A74436C3ED7357E59E21A41B9A)
NodePosX=1584
NodePosY=304
NodeGuid=A5E3928545321952255D1E86E2FDE37D
CustomProperties Pin (PinId=8B6CC46ACB7B462CB9C0BED88C8D273E,PinName=" ",PinType.PinCategory="exec",PinType.PinSubCategory="",PinType.PinSubCategoryObject=None,PinType.PinSubCategoryMemberReference=(),PinType.PinValueType=(),PinType.ContainerType=None,PinType.bIsReference=False,PinType.bIsConst=False,PinType.bIsWeakPointer=False,PinType.bIsUObjectWrapper=False,PinType.bSerializeAsSinglePrecisionFloat=False,LinkedTo=(K2Node_CallFunction_1 DBD0341389B04B01BF6ED384F3A29201,),PersistentGuid=00000000000000000000000000000000,bHidden=False,bNotConnectable=False,bDefaultValueIsReadOnly=False,bDefaultValueIsIgnored=False,bAdvancedView=False,bOrphanedPin=False,)
CustomProperties Pin (PinId=87303AF18B794EAD98D8F036FD6681C0,PinName="Value",PinType.PinCategory="int",PinType.PinSubCategory="",PinType.PinSubCategoryObject=None,PinType.PinSubCategoryMemberReference=(),PinType.PinValueType=(),PinType.ContainerType=None,PinType.bIsReference=True,PinType.bIsConst=False,PinType.bIsWeakPointer=False,PinType.bIsUObjectWrapper=False,PinType.bSerializeAsSinglePrecisionFloat=False,LinkedTo=(K2Node_VariableGet_6 EA730ADE49F36E3BD610F4BCB1EA2C77,),PersistentGuid=00000000000000000000000000000000,bHidden=False,bNotConnectable=False,bDefaultValueIsReadOnly=False,bDefaultValueIsIgnored=False,bAdvancedView=False,bOrphanedPin=False,)
CustomProperties Pin (PinId=DC32235719594428B1BE814E397CD70B,PinName=" ",Direction="EGPD_Output",PinType.PinCategory="exec",PinType.PinSubCategory="",PinType.PinSubCategoryObject=None,PinType.PinSubCategoryMemberReference=(),PinType.PinValueType=(),PinType.ContainerType=None,PinType.bIsReference=False,PinType.bIsConst=False,PinType.bIsWeakPointer=False,PinType.bIsUObjectWrapper=False,PinType.bSerializeAsSinglePrecisionFloat=False,PersistentGuid=00000000000000000000000000000000,bHidden=False,bNotConnectable=False,bDefaultValueIsReadOnly=False,bDefaultValueIsIgnored=False,bAdvancedView=False,bOrphanedPin=False,)
CustomProperties Pin (PinId=433F7C281F5049E6861C3007C65C43CF,PinName="Result",Direction="EGPD_Output",PinType.PinCategory="int",PinType.PinSubCategory="",PinType.PinSubCategoryObject=None,PinType.PinSubCategoryMemberReference=(),PinType.PinValueType=(),PinType.ContainerType=None,PinType.bIsReference=False,PinType.bIsConst=False,PinType.bIsWeakPointer=False,PinType.bIsUObjectWrapper=False,PinType.bSerializeAsSinglePrecisionFloat=False,PersistentGuid=00000000000000000000000000000000,bHidden=False,bNotConnectable=False,bDefaultValueIsReadOnly=False,bDefaultValueIsIgnored=False,bAdvancedView=False,bOrphanedPin=False,)
End Object
Begin Object Class=/Script/BlueprintGraph.K2Node_VariableGet Name="K2Node_VariableGet_1" ExportPath="/Script/BlueprintGraph.K2Node_VariableGet'/Game/Examples/BallShooter/Blueprints/BallShooterShootingActuator.BallShooterShootingActuator:EventGraph.K2Node_VariableGet_1'"
VariableReference=(MemberParent="/Script/Engine.BlueprintGeneratedClass'/Game/Examples/BallShooter/Blueprints/BallShooterBall.BallShooterBall_C'",MemberName="Sphere")
SelfContextInfo=NotSelfContext
NodePosX=1008
NodePosY=432
ErrorType=1
NodeGuid=157267CB49C0E90911ABBF8812C5C445
CustomProperties Pin (PinId=00E43854261F47DDBAAAD4EAA511DA3B,PinName="Sphere",Direction="EGPD_Output",PinType.PinCategory="object",PinType.PinSubCategory="",PinType.PinSubCategoryObject="/Script/CoreUObject.Class'/Script/Engine.StaticMeshComponent'",PinType.PinSubCategoryMemberReference=(),PinType.PinValueType=(),PinType.ContainerType=None,PinType.bIsReference=False,PinType.bIsConst=False,PinType.bIsWeakPointer=False,PinType.bIsUObjectWrapper=False,PinType.bSerializeAsSinglePrecisionFloat=False,LinkedTo=(K2Node_CallFunction_1 8DF606EB14A443DBB90786C0BFF8B0FF,),PersistentGuid=00000000000000000000000000000000,bHidden=False,bNotConnectable=False,bDefaultValueIsReadOnly=False,bDefaultValueIsIgnored=False,bAdvancedView=False,bOrphanedPin=False,)
CustomProperties Pin (PinId=386B28F1FF63420FA6A32B464A499DC3,PinName="self",PinFriendlyName=NSLOCTEXT("K2Node", "Target", "Target"),PinType.PinCategory="object",PinType.PinSubCategory="",PinType.PinSubCategoryObject="/Script/Engine.BlueprintGeneratedClass'/Game/Examples/BallShooter/Blueprints/BallShooterBall.BallShooterBall_C'",PinType.PinSubCategoryMemberReference=(),PinType.PinValueType=(),PinType.ContainerType=None,PinType.bIsReference=False,PinType.bIsConst=False,PinType.bIsWeakPointer=False,PinType.bIsUObjectWrapper=False,PinType.bSerializeAsSinglePrecisionFloat=False,LinkedTo=(K2Node_CallFunction_3 F11AE50B4F325B9F06C43CAD3A198508,),PersistentGuid=00000000000000000000000000000000,bHidden=False,bNotConnectable=False,bDefaultValueIsReadOnly=False,bDefaultValueIsIgnored=False,bAdvancedView=False,bOrphanedPin=False,)
End Object
Begin Object Class=/Script/BlueprintGraph.K2Node_CallFunction Name="K2Node_CallFunction_1" ExportPath="/Script/BlueprintGraph.K2Node_CallFunction'/Game/Examples/BallShooter/Blueprints/BallShooterShootingActuator.BallShooterShootingActuator:EventGraph.K2Node_CallFunction_1'"
FunctionReference=(MemberParent="/Script/CoreUObject.Class'/Script/Engine.PrimitiveComponent'",MemberName="SetAllPhysicsLinearVelocity")
NodePosX=1280
NodePosY=272
NodeGuid=3F7275FA4A567E0B3CD5EAB43953ECB6
CustomProperties Pin (PinId=1D1FB282C0DB4BFEBC413245BCD20FBD,PinName="execute",PinType.PinCategory="exec",PinType.PinSubCategory="",PinType.PinSubCategoryObject=None,PinType.PinSubCategoryMemberReference=(),PinType.PinValueType=(),PinType.ContainerType=None,PinType.bIsReference=False,PinType.bIsConst=False,PinType.bIsWeakPointer=False,PinType.bIsUObjectWrapper=False,PinType.bSerializeAsSinglePrecisionFloat=False,LinkedTo=(K2Node_AddDelegate_3 F1CC19E64C5FA324FE8554A34DBEB42E,),PersistentGuid=00000000000000000000000000000000,bHidden=False,bNotConnectable=False,bDefaultValueIsReadOnly=False,bDefaultValueIsIgnored=False,bAdvancedView=False,bOrphanedPin=False,)
CustomProperties Pin (PinId=DBD0341389B04B01BF6ED384F3A29201,PinName="then",Direction="EGPD_Output",PinType.PinCategory="exec",PinType.PinSubCategory="",PinType.PinSubCategoryObject=None,PinType.PinSubCategoryMemberReference=(),PinType.PinValueType=(),PinType.ContainerType=None,PinType.bIsReference=False,PinType.bIsConst=False,PinType.bIsWeakPointer=False,PinType.bIsUObjectWrapper=False,PinType.bSerializeAsSinglePrecisionFloat=False,LinkedTo=(K2Node_MacroInstance_0 8B6CC46ACB7B462CB9C0BED88C8D273E,),PersistentGuid=00000000000000000000000000000000,bHidden=False,bNotConnectable=False,bDefaultValueIsReadOnly=False,bDefaultValueIsIgnored=False,bAdvancedView=False,bOrphanedPin=False,)
CustomProperties Pin (PinId=8DF606EB14A443DBB90786C0BFF8B0FF,PinName="self",PinFriendlyName=NSLOCTEXT("K2Node", "Target", "Target"),PinType.PinCategory="object",PinType.PinSubCategory="",PinType.PinSubCategoryObject="/Script/CoreUObject.Class'/Script/Engine.PrimitiveComponent'",PinType.PinSubCategoryMemberReference=(),PinType.PinValueType=(),PinType.ContainerType=None,PinType.bIsReference=False,PinType.bIsConst=False,PinType.bIsWeakPointer=False,PinType.bIsUObjectWrapper=False,PinType.bSerializeAsSinglePrecisionFloat=False,LinkedTo=(K2Node_VariableGet_1 00E43854261F47DDBAAAD4EAA511DA3B,),PersistentGuid=00000000000000000000000000000000,bHidden=False,bNotConnectable=False,bDefaultValueIsReadOnly=False,bDefaultValueIsIgnored=False,bAdvancedView=False,bOrphanedPin=False,)
CustomProperties Pin (PinId=D362A8392425461A9AF71315804DCD0C,PinName="NewVel",PinType.PinCategory="struct",PinType.PinSubCategory="",PinType.PinSubCategoryObject="/Script/CoreUObject.ScriptStruct'/Script/CoreUObject.Vector'",PinType.PinSubCategoryMemberReference=(),PinType.PinValueType=(),PinType.ContainerType=None,PinType.bIsReference=False,PinType.bIsConst=False,PinType.bIsWeakPointer=False,PinType.bIsUObjectWrapper=False,PinType.bSerializeAsSinglePrecisionFloat=False,DefaultValue="0, 0, 0",AutogeneratedDefaultValue="0, 0, 0",LinkedTo=(K2Node_CallFunction_8 DAF9703B44CDDF9126E57F8E9CE19EA1,),PersistentGuid=00000000000000000000000000000000,bHidden=False,bNotConnectable=False,bDefaultValueIsReadOnly=False,bDefaultValueIsIgnored=False,bAdvancedView=False,bOrphanedPin=False,)
CustomProperties Pin (PinId=B3F98F9A6866411C8EAB71738452865B,PinName="bAddToCurrent",PinType.PinCategory="bool",PinType.PinSubCategory="",PinType.PinSubCategoryObject=None,PinType.PinSubCategoryMemberReference=(),PinType.PinValueType=(),PinType.ContainerType=None,PinType.bIsReference=False,PinType.bIsConst=False,PinType.bIsWeakPointer=False,PinType.bIsUObjectWrapper=False,PinType.bSerializeAsSinglePrecisionFloat=False,DefaultValue="false",AutogeneratedDefaultValue="false",PersistentGuid=00000000000000000000000000000000,bHidden=False,bNotConnectable=False,bDefaultValueIsReadOnly=False,bDefaultValueIsIgnored=False,bAdvancedView=False,bOrphanedPin=False,)
End Object
Begin Object Class=/Script/UnrealEd.EdGraphNode_Comment Name="EdGraphNode_Comment_1" ExportPath="/Script/UnrealEd.EdGraphNode_Comment'/Game/Examples/BallShooter/Blueprints/BallShooterShootingActuator.BallShooterShootingActuator:EventGraph.EdGraphNode_Comment_1'"
bCommentBubbleVisible_InDetailsPanel=False
NodePosX=-128
NodePosY=192
NodeWidth=624
NodeHeight=272
bCommentBubblePinned=False
bCommentBubbleVisible=False
NodeComment="1 means shoot ball, 0 means no action"
NodeGuid=B557E25A422B44B43C9A478EED807932
End Object
Begin Object Class=/Script/BlueprintGraph.K2Node_GetArrayItem Name="K2Node_GetArrayItem_1" ExportPath="/Script/BlueprintGraph.K2Node_GetArrayItem'/Game/Examples/BallShooter/Blueprints/BallShooterShootingActuator.BallShooterShootingActuator:EventGraph.K2Node_GetArrayItem_1'"
NodePosX=80
NodePosY=320
NodeGuid=20C3A22D3EC44ABAB1B68BEB3A71D6AD
CustomProperties Pin (PinId=E01FE6A04A7C418F949FCA9B96F05E00,PinName="Array",PinType.PinCategory="int",PinType.PinSubCategory="",PinType.PinSubCategoryObject=None,PinType.PinSubCategoryMemberReference=(),PinType.PinValueType=(),PinType.ContainerType=Array,PinType.bIsReference=False,PinType.bIsConst=False,PinType.bIsWeakPointer=False,PinType.bIsUObjectWrapper=False,PinType.bSerializeAsSinglePrecisionFloat=False,LinkedTo=(K2Node_Event_0 E34A04B74607DFEDECBF42B9DF9EFBEF,),PersistentGuid=00000000000000000000000000000000,bHidden=False,bNotConnectable=False,bDefaultValueIsReadOnly=False,bDefaultValueIsIgnored=False,bAdvancedView=False,bOrphanedPin=False,)
CustomProperties Pin (PinId=CD02F99034A44BE0A3B45ED0BB624415,PinName="Dimension 1",PinType.PinCategory="int",PinType.PinSubCategory="",PinType.PinSubCategoryObject=None,PinType.PinSubCategoryMemberReference=(),PinType.PinValueType=(),PinType.ContainerType=None,PinType.bIsReference=False,PinType.bIsConst=False,PinType.bIsWeakPointer=False,PinType.bIsUObjectWrapper=False,PinType.bSerializeAsSinglePrecisionFloat=False,DefaultValue="0",AutogeneratedDefaultValue="0",PersistentGuid=00000000000000000000000000000000,bHidden=False,bNotConnectable=False,bDefaultValueIsReadOnly=False,bDefaultValueIsIgnored=False,bAdvancedView=False,bOrphanedPin=False,)
CustomProperties Pin (PinId=255EFC2B1B4E422992B95606B6CDC3D4,PinName="Output",Direction="EGPD_Output",PinType.PinCategory="int",PinType.PinSubCategory="",PinType.PinSubCategoryObject=None,PinType.PinSubCategoryMemberReference=(),PinType.PinValueType=(),PinType.ContainerType=None,PinType.bIsReference=True,PinType.bIsConst=False,PinType.bIsWeakPointer=False,PinType.bIsUObjectWrapper=False,PinType.bSerializeAsSinglePrecisionFloat=False,LinkedTo=(K2Node_SwitchInteger_0 92D9C180457E76A5E455F6AF7F070E90,),PersistentGuid=00000000000000000000000000000000,bHidden=False,bNotConnectable=False,bDefaultValueIsReadOnly=False,bDefaultValueIsIgnored=False,bAdvancedView=False,bOrphanedPin=False,)
End Object
Begin Object Class=/Script/BlueprintGraph.K2Node_CallDelegate Name="K2Node_CallDelegate_1" ExportPath="/Script/BlueprintGraph.K2Node_CallDelegate'/Game/Examples/BallShooter/Blueprints/BallShooterShootingActuator.BallShooterShootingActuator:EventGraph.K2Node_CallDelegate_1'"
DelegateReference=(MemberName="Ball Hits Object Dispatch",MemberGuid=CC9DDE8045AECFBF95FF6DA2FFA232A3,bSelfContext=True)
NodePosX=1328
NodePosY=32
NodeGuid=54FAD6CF4E8723135F183CBAF7D1CCDE
CustomProperties Pin (PinId=9645B4514D59568C7A83A6B12291157D,PinName="execute",PinType.PinCategory="exec",PinType.PinSubCategory="",PinType.PinSubCategoryObject=None,PinType.PinSubCategoryMemberReference=(),PinType.PinValueType=(),PinType.ContainerType=None,PinType.bIsReference=False,PinType.bIsConst=False,PinType.bIsWeakPointer=False,PinType.bIsUObjectWrapper=False,PinType.bSerializeAsSinglePrecisionFloat=False,LinkedTo=(K2Node_DynamicCast_0 120C8D3D55D9457D9BA34AE929E685AB,),PersistentGuid=00000000000000000000000000000000,bHidden=False,bNotConnectable=False,bDefaultValueIsReadOnly=False,bDefaultValueIsIgnored=False,bAdvancedView=False,bOrphanedPin=False,)
CustomProperties Pin (PinId=E298186B4ECA1EFEA30618BA9F452D44,PinName="then",Direction="EGPD_Output",PinType.PinCategory="exec",PinType.PinSubCategory="",PinType.PinSubCategoryObject=None,PinType.PinSubCategoryMemberReference=(),PinType.PinValueType=(),PinType.ContainerType=None,PinType.bIsReference=False,PinType.bIsConst=False,PinType.bIsWeakPointer=False,PinType.bIsUObjectWrapper=False,PinType.bSerializeAsSinglePrecisionFloat=False,LinkedTo=(K2Node_CallFunction_2 0C78AB97425249748608D7A6CBE33679,),PersistentGuid=00000000000000000000000000000000,bHidden=False,bNotConnectable=False,bDefaultValueIsReadOnly=False,bDefaultValueIsIgnored=False,bAdvancedView=False,bOrphanedPin=False,)
CustomProperties Pin (PinId=1608B0C845EEB87FFC382A819C4A36B8,PinName="self",PinFriendlyName=NSLOCTEXT("K2Node", "BaseMCDelegateSelfPinName", "Target"),PinType.PinCategory="object",PinType.PinSubCategory="",PinType.PinSubCategoryObject="/Script/Engine.BlueprintGeneratedClass'/Game/Examples/BallShooter/Blueprints/BallShooterShootingActuator.BallShooterShootingActuator_C'",PinType.PinSubCategoryMemberReference=(),PinType.PinValueType=(),PinType.ContainerType=None,PinType.bIsReference=False,PinType.bIsConst=False,PinType.bIsWeakPointer=False,PinType.bIsUObjectWrapper=False,PinType.bSerializeAsSinglePrecisionFloat=False,PersistentGuid=00000000000000000000000000000000,bHidden=False,bNotConnectable=False,bDefaultValueIsReadOnly=False,bDefaultValueIsIgnored=False,bAdvancedView=False,bOrphanedPin=False,)
CustomProperties Pin (PinId=0B5E994F445EDFEC93AA179DBD807D91,PinName="SelfActor",PinType.PinCategory="object",PinType.PinSubCategory="",PinType.PinSubCategoryObject="/Script/CoreUObject.Class'/Script/Engine.Actor'",PinType.PinSubCategoryMemberReference=(),PinType.PinValueType=(),PinType.ContainerType=None,PinType.bIsReference=False,PinType.bIsConst=False,PinType.bIsWeakPointer=False,PinType.bIsUObjectWrapper=False,PinType.bSerializeAsSinglePrecisionFloat=False,LinkedTo=(K2Node_CustomEvent_3 9EF2C93546CE98328C485FB315D38E03,),PersistentGuid=00000000000000000000000000000000,bHidden=False,bNotConnectable=False,bDefaultValueIsReadOnly=False,bDefaultValueIsIgnored=False,bAdvancedView=False,bOrphanedPin=False,)
CustomProperties Pin (PinId=D1130C5D4D2B05D5771FECA50DA6882F,PinName="OtherActor",PinType.PinCategory="object",PinType.PinSubCategory="",PinType.PinSubCategoryObject="/Script/CoreUObject.Class'/Script/Engine.Actor'",PinType.PinSubCategoryMemberReference=(),PinType.PinValueType=(),PinType.ContainerType=None,PinType.bIsReference=False,PinType.bIsConst=False,PinType.bIsWeakPointer=False,PinType.bIsUObjectWrapper=False,PinType.bSerializeAsSinglePrecisionFloat=False,LinkedTo=(K2Node_CustomEvent_3 1A2749E247BF207194674099F5C6D6EC,),PersistentGuid=00000000000000000000000000000000,bHidden=False,bNotConnectable=False,bDefaultValueIsReadOnly=False,bDefaultValueIsIgnored=False,bAdvancedView=False,bOrphanedPin=False,)
CustomProperties Pin (PinId=D8B70D454BCD8FF6C87F8A913E553860,PinName="NormalImpulse",PinType.PinCategory="struct",PinType.PinSubCategory="",PinType.PinSubCategoryObject="/Script/CoreUObject.ScriptStruct'/Script/CoreUObject.Vector'",PinType.PinSubCategoryMemberReference=(),PinType.PinValueType=(),PinType.ContainerType=None,PinType.bIsReference=False,PinType.bIsConst=False,PinType.bIsWeakPointer=False,PinType.bIsUObjectWrapper=False,PinType.bSerializeAsSinglePrecisionFloat=False,LinkedTo=(K2Node_CustomEvent_3 D46790224AF90B9C21E525AE89147AB1,),PersistentGuid=00000000000000000000000000000000,bHidden=False,bNotConnectable=False,bDefaultValueIsReadOnly=False,bDefaultValueIsIgnored=False,bAdvancedView=False,bOrphanedPin=False,)
CustomProperties Pin (PinId=EBCEDFF747DE73A3BB790AA9D3173CCD,PinName="Hit",PinType.PinCategory="struct",PinType.PinSubCategory="",PinType.PinSubCategoryObject="/Script/CoreUObject.ScriptStruct'/Script/Engine.HitResult'",PinType.PinSubCategoryMemberReference=(),PinType.PinValueType=(),PinType.ContainerType=None,PinType.bIsReference=True,PinType.bIsConst=True,PinType.bIsWeakPointer=False,PinType.bIsUObjectWrapper=False,PinType.bSerializeAsSinglePrecisionFloat=False,LinkedTo=(K2Node_CustomEvent_3 0F6572E2421F5760149CC3A4E24E3E9B,),PersistentGuid=00000000000000000000000000000000,bHidden=False,bNotConnectable=False,bDefaultValueIsReadOnly=False,bDefaultValueIsIgnored=False,bAdvancedView=False,bOrphanedPin=False,)
End Object
Begin Object Class=/Script/BlueprintGraph.K2Node_CustomEvent Name="K2Node_CustomEvent_3" ExportPath="/Script/BlueprintGraph.K2Node_CustomEvent'/Game/Examples/BallShooter/Blueprints/BallShooterShootingActuator.BallShooterShootingActuator:EventGraph.K2Node_CustomEvent_3'"
CustomFunctionName="Ball Hit Event"
NodePosX=688
NodePosY=-16
ErrorType=1
NodeGuid=E30991F14D929D4A9ED1A68E10537E5C
CustomProperties Pin (PinId=7698190D458203461FE5FCAE5EB09AF6,PinName="OutputDelegate",Direction="EGPD_Output",PinType.PinCategory="delegate",PinType.PinSubCategory="",PinType.PinSubCategoryObject=None,PinType.PinSubCategoryMemberReference=(MemberParent="/Script/Engine.BlueprintGeneratedClass'/Game/Examples/BallShooter/Blueprints/BallShooterShootingActuator.BallShooterShootingActuator_C'",MemberName="Ball Hit Event",MemberGuid=E30991F14D929D4A9ED1A68E10537E5C),PinType.PinValueType=(),PinType.ContainerType=None,PinType.bIsReference=False,PinType.bIsConst=False,PinType.bIsWeakPointer=False,PinType.bIsUObjectWrapper=False,PinType.bSerializeAsSinglePrecisionFloat=False,LinkedTo=(K2Node_AddDelegate_3 FEAB80D74F9BBE3D11A04F8E4E8FFEAB,),PersistentGuid=00000000000000000000000000000000,bHidden=False,bNotConnectable=False,bDefaultValueIsReadOnly=False,bDefaultValueIsIgnored=False,bAdvancedView=False,bOrphanedPin=False,)
CustomProperties Pin (PinId=E466AF904DF2C4FF3CDB3992CABF47D4,PinName="then",Direction="EGPD_Output",PinType.PinCategory="exec",PinType.PinSubCategory="",PinType.PinSubCategoryObject=None,PinType.PinSubCategoryMemberReference=(),PinType.PinValueType=(),PinType.ContainerType=None,PinType.bIsReference=False,PinType.bIsConst=False,PinType.bIsWeakPointer=False,PinType.bIsUObjectWrapper=False,PinType.bSerializeAsSinglePrecisionFloat=False,LinkedTo=(K2Node_DynamicCast_0 4D95D64DC87D46168B1BFAFE16F08DEC,),PersistentGuid=00000000000000000000000000000000,bHidden=False,bNotConnectable=False,bDefaultValueIsReadOnly=False,bDefaultValueIsIgnored=False,bAdvancedView=False,bOrphanedPin=False,)
CustomProperties Pin (PinId=9EF2C93546CE98328C485FB315D38E03,PinName="SelfActor",Direction="EGPD_Output",PinType.PinCategory="object",PinType.PinSubCategory="",PinType.PinSubCategoryObject="/Script/CoreUObject.Class'/Script/Engine.Actor'",PinType.PinSubCategoryMemberReference=(),PinType.PinValueType=(),PinType.ContainerType=None,PinType.bIsReference=False,PinType.bIsConst=False,PinType.bIsWeakPointer=False,PinType.bIsUObjectWrapper=False,PinType.bSerializeAsSinglePrecisionFloat=False,LinkedTo=(K2Node_CallDelegate_1 0B5E994F445EDFEC93AA179DBD807D91,K2Node_CallFunction_2 150C60CF4E8272378B7ED5995A124FAC,),PersistentGuid=00000000000000000000000000000000,bHidden=False,bNotConnectable=False,bDefaultValueIsReadOnly=False,bDefaultValueIsIgnored=False,bAdvancedView=False,bOrphanedPin=False,)
CustomProperties Pin (PinId=1A2749E247BF207194674099F5C6D6EC,PinName="OtherActor",Direction="EGPD_Output",PinType.PinCategory="object",PinType.PinSubCategory="",PinType.PinSubCategoryObject="/Script/CoreUObject.Class'/Script/Engine.Actor'",PinType.PinSubCategoryMemberReference=(),PinType.PinValueType=(),PinType.ContainerType=None,PinType.bIsReference=False,PinType.bIsConst=False,PinType.bIsWeakPointer=False,PinType.bIsUObjectWrapper=False,PinType.bSerializeAsSinglePrecisionFloat=False,LinkedTo=(K2Node_CallDelegate_1 D1130C5D4D2B05D5771FECA50DA6882F,K2Node_DynamicCast_0 D478AB53B37243F78431EF94F73FBE1E,),PersistentGuid=00000000000000000000000000000000,bHidden=False,bNotConnectable=False,bDefaultValueIsReadOnly=False,bDefaultValueIsIgnored=False,bAdvancedView=False,bOrphanedPin=False,)
CustomProperties Pin (PinId=D46790224AF90B9C21E525AE89147AB1,PinName="NormalImpulse",Direction="EGPD_Output",PinType.PinCategory="struct",PinType.PinSubCategory="",PinType.PinSubCategoryObject="/Script/CoreUObject.ScriptStruct'/Script/CoreUObject.Vector'",PinType.PinSubCategoryMemberReference=(),PinType.PinValueType=(),PinType.ContainerType=None,PinType.bIsReference=False,PinType.bIsConst=False,PinType.bIsWeakPointer=False,PinType.bIsUObjectWrapper=False,PinType.bSerializeAsSinglePrecisionFloat=False,LinkedTo=(K2Node_CallDelegate_1 D8B70D454BCD8FF6C87F8A913E553860,),PersistentGuid=00000000000000000000000000000000,bHidden=False,bNotConnectable=False,bDefaultValueIsReadOnly=False,bDefaultValueIsIgnored=False,bAdvancedView=False,bOrphanedPin=False,)
CustomProperties Pin (PinId=0F6572E2421F5760149CC3A4E24E3E9B,PinName="Hit",Direction="EGPD_Output",PinType.PinCategory="struct",PinType.PinSubCategory="",PinType.PinSubCategoryObject="/Script/CoreUObject.ScriptStruct'/Script/Engine.HitResult'",PinType.PinSubCategoryMemberReference=(),PinType.PinValueType=(),PinType.ContainerType=None,PinType.bIsReference=True,PinType.bIsConst=True,PinType.bIsWeakPointer=False,PinType.bIsUObjectWrapper=False,PinType.bSerializeAsSinglePrecisionFloat=False,LinkedTo=(K2Node_CallDelegate_1 EBCEDFF747DE73A3BB790AA9D3173CCD,),PersistentGuid=00000000000000000000000000000000,bHidden=False,bNotConnectable=False,bDefaultValueIsReadOnly=False,bDefaultValueIsIgnored=False,bAdvancedView=False,bOrphanedPin=False,)
CustomProperties UserDefinedPin (PinName="SelfActor",PinType=(PinCategory="object",PinSubCategoryObject="/Script/CoreUObject.Class'/Script/Engine.Actor'"),DesiredPinDirection=EGPD_Output)
CustomProperties UserDefinedPin (PinName="OtherActor",PinType=(PinCategory="object",PinSubCategoryObject="/Script/CoreUObject.Class'/Script/Engine.Actor'"),DesiredPinDirection=EGPD_Output)
CustomProperties UserDefinedPin (PinName="NormalImpulse",PinType=(PinCategory="struct",PinSubCategoryObject="/Script/CoreUObject.ScriptStruct'/Script/CoreUObject.Vector'"),DesiredPinDirection=EGPD_Output)
CustomProperties UserDefinedPin (PinName="Hit",PinType=(PinCategory="struct",PinSubCategoryObject="/Script/CoreUObject.ScriptStruct'/Script/Engine.HitResult'",bIsReference=True,bIsConst=True),DesiredPinDirection=EGPD_Output)
End Object
Begin Object Class=/Script/BlueprintGraph.K2Node_VariableGet Name="K2Node_VariableGet_4" ExportPath="/Script/BlueprintGraph.K2Node_VariableGet'/Game/Examples/BallShooter/Blueprints/BallShooterShootingActuator.BallShooterShootingActuator:EventGraph.K2Node_VariableGet_4'"
VariableReference=(MemberName="Agent",MemberGuid=B87F8FD14AA62796225E77B8B04C535F,bSelfContext=True)
NodePosX=368
NodePosY=627
NodeGuid=F5ED8AAB4344DBE887CB45AA97632E46
CustomProperties Pin (PinId=106DB725497A79BDA704D3A282535EF2,PinName="Agent",Direction="EGPD_Output",PinType.PinCategory="object",PinType.PinSubCategory="",PinType.PinSubCategoryObject="/Script/CoreUObject.Class'/Script/Engine.Actor'",PinType.PinSubCategoryMemberReference=(),PinType.PinValueType=(),PinType.ContainerType=None,PinType.bIsReference=False,PinType.bIsConst=False,PinType.bIsWeakPointer=False,PinType.bIsUObjectWrapper=False,PinType.bSerializeAsSinglePrecisionFloat=False,LinkedTo=(K2Node_CallFunction_3 730FA1F54CD0B855B60ACF9F03F7B139,),PersistentGuid=00000000000000000000000000000000,bHidden=False,bNotConnectable=False,bDefaultValueIsReadOnly=False,bDefaultValueIsIgnored=False,bAdvancedView=False,bOrphanedPin=False,)
CustomProperties Pin (PinId=D365F92A484CE4A497266798F1006276,PinName="self",PinFriendlyName=NSLOCTEXT("K2Node", "Target", "Target"),PinType.PinCategory="object",PinType.PinSubCategory="",PinType.PinSubCategoryObject="/Script/Engine.BlueprintGeneratedClass'/Game/Examples/BallShooter/Blueprints/BallShooterShootingActuator.BallShooterShootingActuator_C'",PinType.PinSubCategoryMemberReference=(),PinType.PinValueType=(),PinType.ContainerType=None,PinType.bIsReference=False,PinType.bIsConst=False,PinType.bIsWeakPointer=False,PinType.bIsUObjectWrapper=False,PinType.bSerializeAsSinglePrecisionFloat=False,PersistentGuid=00000000000000000000000000000000,bHidden=True,bNotConnectable=False,bDefaultValueIsReadOnly=False,bDefaultValueIsIgnored=False,bAdvancedView=False,bOrphanedPin=False,)
End Object
Begin Object Class=/Script/BlueprintGraph.K2Node_CallFunction Name="K2Node_CallFunction_2" ExportPath="/Script/BlueprintGraph.K2Node_CallFunction'/Game/Examples/BallShooter/Blueprints/BallShooterShootingActuator.BallShooterShootingActuator:EventGraph.K2Node_CallFunction_2'"
FunctionReference=(MemberParent="/Script/CoreUObject.Class'/Script/Engine.Actor'",MemberName="K2_DestroyActor")
NodePosX=1584
NodePosY=16
ErrorType=1
NodeGuid=BD51A9944D740A679CEE5293715CE48D
CustomProperties Pin (PinId=0C78AB97425249748608D7A6CBE33679,PinName="execute",PinType.PinCategory="exec",PinType.PinSubCategory="",PinType.PinSubCategoryObject=None,PinType.PinSubCategoryMemberReference=(),PinType.PinValueType=(),PinType.ContainerType=None,PinType.bIsReference=False,PinType.bIsConst=False,PinType.bIsWeakPointer=False,PinType.bIsUObjectWrapper=False,PinType.bSerializeAsSinglePrecisionFloat=False,LinkedTo=(K2Node_CallDelegate_1 E298186B4ECA1EFEA30618BA9F452D44,),PersistentGuid=00000000000000000000000000000000,bHidden=False,bNotConnectable=False,bDefaultValueIsReadOnly=False,bDefaultValueIsIgnored=False,bAdvancedView=False,bOrphanedPin=False,)
CustomProperties Pin (PinId=A21453C5419510FB6C2F52A2B8D9B20C,PinName="then",Direction="EGPD_Output",PinType.PinCategory="exec",PinType.PinSubCategory="",PinType.PinSubCategoryObject=None,PinType.PinSubCategoryMemberReference=(),PinType.PinValueType=(),PinType.ContainerType=None,PinType.bIsReference=False,PinType.bIsConst=False,PinType.bIsWeakPointer=False,PinType.bIsUObjectWrapper=False,PinType.bSerializeAsSinglePrecisionFloat=False,PersistentGuid=00000000000000000000000000000000,bHidden=False,bNotConnectable=False,bDefaultValueIsReadOnly=False,bDefaultValueIsIgnored=False,bAdvancedView=False,bOrphanedPin=False,)
CustomProperties Pin (PinId=150C60CF4E8272378B7ED5995A124FAC,PinName="self",PinFriendlyName=NSLOCTEXT("K2Node", "Target", "Target"),PinType.PinCategory="object",PinType.PinSubCategory="",PinType.PinSubCategoryObject="/Script/CoreUObject.Class'/Script/Engine.Actor'",PinType.PinSubCategoryMemberReference=(),PinType.PinValueType=(),PinType.ContainerType=None,PinType.bIsReference=False,PinType.bIsConst=False,PinType.bIsWeakPointer=False,PinType.bIsUObjectWrapper=False,PinType.bSerializeAsSinglePrecisionFloat=False,LinkedTo=(K2Node_CustomEvent_3 9EF2C93546CE98328C485FB315D38E03,),PersistentGuid=00000000000000000000000000000000,bHidden=False,bNotConnectable=False,bDefaultValueIsReadOnly=False,bDefaultValueIsIgnored=False,bAdvancedView=False,bOrphanedPin=False,)
End Object
Begin Object Class=/Script/BlueprintGraph.K2Node_Event Name="K2Node_Event_1" ExportPath="/Script/BlueprintGraph.K2Node_Event'/Game/Examples/BallShooter/Blueprints/BallShooterShootingActuator.BallShooterShootingActuator:EventGraph.K2Node_Event_1'"
EventReference=(MemberParent="/Script/Engine.BlueprintGeneratedClass'/Game/Examples/BallShooter/Blueprints/BallShooterShootingActuator.BallShooterShootingActuator_C'",MemberName="InitializeActuator",MemberGuid=9F2304E5498D9DDCE27817A086466966)
bOverrideFunction=True
NodePosX=-112
NodePosY=76
NodeGuid=9F2304E5498D9DDCE27817A086466966
CustomProperties Pin (PinId=54C94CC94817B6395E9256B62E1D5CC0,PinName="OutputDelegate",Direction="EGPD_Output",PinType.PinCategory="delegate",PinType.PinSubCategory="",PinType.PinSubCategoryObject=None,PinType.PinSubCategoryMemberReference=(MemberParent="/Script/Engine.BlueprintGeneratedClass'/Game/Examples/BallShooter/Blueprints/BallShooterShootingActuator.BallShooterShootingActuator_C'",MemberName="InitializeActuator",MemberGuid=9F2304E5498D9DDCE27817A086466966),PinType.PinValueType=(),PinType.ContainerType=None,PinType.bIsReference=False,PinType.bIsConst=False,PinType.bIsWeakPointer=False,PinType.bIsUObjectWrapper=False,PinType.bSerializeAsSinglePrecisionFloat=False,PersistentGuid=00000000000000000000000000000000,bHidden=False,bNotConnectable=False,bDefaultValueIsReadOnly=False,bDefaultValueIsIgnored=False,bAdvancedView=False,bOrphanedPin=False,)
CustomProperties Pin (PinId=F04C6C734295EC8A47644697DF8C5CDE,PinName="then",Direction="EGPD_Output",PinType.PinCategory="exec",PinType.PinSubCategory="",PinType.PinSubCategoryObject=None,PinType.PinSubCategoryMemberReference=(),PinType.PinValueType=(),PinType.ContainerType=None,PinType.bIsReference=False,PinType.bIsConst=False,PinType.bIsWeakPointer=False,PinType.bIsUObjectWrapper=False,PinType.bSerializeAsSinglePrecisionFloat=False,LinkedTo=(K2Node_VariableSet_1 9032069A426E564D5B204DAC5F183A5A,),PersistentGuid=00000000000000000000000000000000,bHidden=False,bNotConnectable=False,bDefaultValueIsReadOnly=False,bDefaultValueIsIgnored=False,bAdvancedView=False,bOrphanedPin=False,)
End Object
Begin Object Class=/Script/BlueprintGraph.K2Node_VariableSet Name="K2Node_VariableSet_1" ExportPath="/Script/BlueprintGraph.K2Node_VariableSet'/Game/Examples/BallShooter/Blueprints/BallShooterShootingActuator.BallShooterShootingActuator:EventGraph.K2Node_VariableSet_1'"
VariableReference=(MemberName="Agent",MemberGuid=B87F8FD14AA62796225E77B8B04C535F,bSelfContext=True)
NodePosX=416
NodePosY=96
NodeGuid=0CF913A94B6E2F42DA0BDCA83E1C7A7C
CustomProperties Pin (PinId=9032069A426E564D5B204DAC5F183A5A,PinName="execute",PinType.PinCategory="exec",PinType.PinSubCategory="",PinType.PinSubCategoryObject=None,PinType.PinSubCategoryMemberReference=(),PinType.PinValueType=(),PinType.ContainerType=None,PinType.bIsReference=False,PinType.bIsConst=False,PinType.bIsWeakPointer=False,PinType.bIsUObjectWrapper=False,PinType.bSerializeAsSinglePrecisionFloat=False,LinkedTo=(K2Node_Event_1 F04C6C734295EC8A47644697DF8C5CDE,),PersistentGuid=00000000000000000000000000000000,bHidden=False,bNotConnectable=False,bDefaultValueIsReadOnly=False,bDefaultValueIsIgnored=False,bAdvancedView=False,bOrphanedPin=False,)
CustomProperties Pin (PinId=E8ACB68A498FA697D015C3A05BFE2085,PinName="then",Direction="EGPD_Output",PinType.PinCategory="exec",PinType.PinSubCategory="",PinType.PinSubCategoryObject=None,PinType.PinSubCategoryMemberReference=(),PinType.PinValueType=(),PinType.ContainerType=None,PinType.bIsReference=False,PinType.bIsConst=False,PinType.bIsWeakPointer=False,PinType.bIsUObjectWrapper=False,PinType.bSerializeAsSinglePrecisionFloat=False,PersistentGuid=00000000000000000000000000000000,bHidden=False,bNotConnectable=False,bDefaultValueIsReadOnly=False,bDefaultValueIsIgnored=False,bAdvancedView=False,bOrphanedPin=False,)
CustomProperties Pin (PinId=5AA2FFCE4E2403BE544438A86E98511A,PinName="Agent",PinType.PinCategory="object",PinType.PinSubCategory="",PinType.PinSubCategoryObject="/Script/CoreUObject.Class'/Script/Engine.Actor'",PinType.PinSubCategoryMemberReference=(),PinType.PinValueType=(),PinType.ContainerType=None,PinType.bIsReference=False,PinType.bIsConst=False,PinType.bIsWeakPointer=False,PinType.bIsUObjectWrapper=False,PinType.bSerializeAsSinglePrecisionFloat=False,LinkedTo=(K2Node_CallFunction_5 D466A0F84DDF3479E12DFA85505F065E,),PersistentGuid=00000000000000000000000000000000,bHidden=False,bNotConnectable=False,bDefaultValueIsReadOnly=False,bDefaultValueIsIgnored=False,bAdvancedView=False,bOrphanedPin=False,)
CustomProperties Pin (PinId=1AA107394D7AD1BC38FDB4BD4AA16FFB,PinName="Output_Get",PinToolTip="Retrieves the value of the variable, can use instead of a separate Get node",Direction="EGPD_Output",PinType.PinCategory="object",PinType.PinSubCategory="",PinType.PinSubCategoryObject="/Script/CoreUObject.Class'/Script/Engine.Actor'",PinType.PinSubCategoryMemberReference=(),PinType.PinValueType=(),PinType.ContainerType=None,PinType.bIsReference=False,PinType.bIsConst=False,PinType.bIsWeakPointer=False,PinType.bIsUObjectWrapper=False,PinType.bSerializeAsSinglePrecisionFloat=False,PersistentGuid=00000000000000000000000000000000,bHidden=False,bNotConnectable=False,bDefaultValueIsReadOnly=False,bDefaultValueIsIgnored=False,bAdvancedView=False,bOrphanedPin=False,)
CustomProperties Pin (PinId=AB2B1011425484AE3CE1578E17F3A862,PinName="self",PinFriendlyName=NSLOCTEXT("K2Node", "Target", "Target"),PinType.PinCategory="object",PinType.PinSubCategory="",PinType.PinSubCategoryObject="/Script/Engine.BlueprintGeneratedClass'/Game/Examples/BallShooter/Blueprints/BallShooterShootingActuator.BallShooterShootingActuator_C'",PinType.PinSubCategoryMemberReference=(),PinType.PinValueType=(),PinType.ContainerType=None,PinType.bIsReference=False,PinType.bIsConst=False,PinType.bIsWeakPointer=False,PinType.bIsUObjectWrapper=False,PinType.bSerializeAsSinglePrecisionFloat=False,PersistentGuid=00000000000000000000000000000000,bHidden=True,bNotConnectable=False,bDefaultValueIsReadOnly=False,bDefaultValueIsIgnored=False,bAdvancedView=False,bOrphanedPin=False,)
End Object
Begin Object Class=/Script/BlueprintGraph.K2Node_CallFunction Name="K2Node_CallFunction_5" ExportPath="/Script/BlueprintGraph.K2Node_CallFunction'/Game/Examples/BallShooter/Blueprints/BallShooterShootingActuator.BallShooterShootingActuator:EventGraph.K2Node_CallFunction_5'"
bIsPureFunc=True
bIsConstFunc=True
FunctionReference=(MemberName="TryGetOwner",bSelfContext=True)
NodePosX=144
NodePosY=63
NodeGuid=33F890B64FE9A285C40096B648BBEF20
CustomProperties Pin (PinId=CED77A4142DB30ED614413A00E7E2DE9,PinName="self",PinFriendlyName=NSLOCTEXT("K2Node", "Target", "Target"),PinType.PinCategory="object",PinType.PinSubCategory="",PinType.PinSubCategoryObject="/Script/CoreUObject.Class'/Script/Schola.AbstractInteractor'",PinType.PinSubCategoryMemberReference=(),PinType.PinValueType=(),PinType.ContainerType=None,PinType.bIsReference=False,PinType.bIsConst=False,PinType.bIsWeakPointer=False,PinType.bIsUObjectWrapper=False,PinType.bSerializeAsSinglePrecisionFloat=False,PersistentGuid=00000000000000000000000000000000,bHidden=False,bNotConnectable=False,bDefaultValueIsReadOnly=False,bDefaultValueIsIgnored=False,bAdvancedView=False,bOrphanedPin=False,)
CustomProperties Pin (PinId=D466A0F84DDF3479E12DFA85505F065E,PinName="ReturnValue",Direction="EGPD_Output",PinType.PinCategory="object",PinType.PinSubCategory="",PinType.PinSubCategoryObject="/Script/CoreUObject.Class'/Script/Engine.Actor'",PinType.PinSubCategoryMemberReference=(),PinType.PinValueType=(),PinType.ContainerType=None,PinType.bIsReference=False,PinType.bIsConst=False,PinType.bIsWeakPointer=False,PinType.bIsUObjectWrapper=False,PinType.bSerializeAsSinglePrecisionFloat=False,LinkedTo=(K2Node_VariableSet_1 5AA2FFCE4E2403BE544438A86E98511A,),PersistentGuid=00000000000000000000000000000000,bHidden=False,bNotConnectable=False,bDefaultValueIsReadOnly=False,bDefaultValueIsIgnored=False,bAdvancedView=False,bOrphanedPin=False,)
End Object
Begin Object Class=/Script/BlueprintGraph.K2Node_CallFunction Name="K2Node_CallFunction_8" ExportPath="/Script/BlueprintGraph.K2Node_CallFunction'/Game/Examples/BallShooter/Blueprints/BallShooterShootingActuator.BallShooterShootingActuator:EventGraph.K2Node_CallFunction_8'"
bIsPureFunc=True
FunctionReference=(MemberName="getInitialVelocity",MemberGuid=2B5C22FF43C586FBC8676EA23A9E937A,bSelfContext=True)
NodePosX=1024
NodePosY=480
NodeGuid=98E5F9994FBB289CD45DA59A2CC8A198
CustomProperties Pin (PinId=1E2CF2404400D23FEF1BB38E0E81CC0E,PinName="self",PinFriendlyName=NSLOCTEXT("K2Node", "Target", "Target"),PinType.PinCategory="object",PinType.PinSubCategory="self",PinType.PinSubCategoryObject=None,PinType.PinSubCategoryMemberReference=(),PinType.PinValueType=(),PinType.ContainerType=None,PinType.bIsReference=False,PinType.bIsConst=False,PinType.bIsWeakPointer=False,PinType.bIsUObjectWrapper=False,PinType.bSerializeAsSinglePrecisionFloat=False,PersistentGuid=00000000000000000000000000000000,bHidden=True,bNotConnectable=False,bDefaultValueIsReadOnly=False,bDefaultValueIsIgnored=False,bAdvancedView=False,bOrphanedPin=False,)
CustomProperties Pin (PinId=DAF9703B44CDDF9126E57F8E9CE19EA1,PinName="3D Velocity",Direction="EGPD_Output",PinType.PinCategory="struct",PinType.PinSubCategory="",PinType.PinSubCategoryObject="/Script/CoreUObject.ScriptStruct'/Script/CoreUObject.Vector'",PinType.PinSubCategoryMemberReference=(),PinType.PinValueType=(),PinType.ContainerType=None,PinType.bIsReference=False,PinType.bIsConst=False,PinType.bIsWeakPointer=False,PinType.bIsUObjectWrapper=False,PinType.bSerializeAsSinglePrecisionFloat=False,DefaultValue="0, 0, 0",AutogeneratedDefaultValue="0, 0, 0",LinkedTo=(K2Node_CallFunction_1 D362A8392425461A9AF71315804DCD0C,),PersistentGuid=00000000000000000000000000000000,bHidden=False,bNotConnectable=False,bDefaultValueIsReadOnly=False,bDefaultValueIsIgnored=False,bAdvancedView=False,bOrphanedPin=False,)
End Object
Begin Object Class=/Script/BlueprintGraph.K2Node_CallFunction Name="K2Node_CallFunction_9" ExportPath="/Script/BlueprintGraph.K2Node_CallFunction'/Game/Examples/BallShooter/Blueprints/BallShooterShootingActuator.BallShooterShootingActuator:EventGraph.K2Node_CallFunction_9'"
bIsPureFunc=True
FunctionReference=(MemberName="getInitialLocation",MemberGuid=A6C6DD3B46039B94378B1384E96E10EF,bSelfContext=True)
NodePosX=304
NodePosY=480
NodeGuid=89844B804F9E8050AB82D7B05E8B8498
CustomProperties Pin (PinId=064265F644F36E01BA367D8331D6250F,PinName="self",PinFriendlyName=NSLOCTEXT("K2Node", "Target", "Target"),PinType.PinCategory="object",PinType.PinSubCategory="self",PinType.PinSubCategoryObject=None,PinType.PinSubCategoryMemberReference=(),PinType.PinValueType=(),PinType.ContainerType=None,PinType.bIsReference=False,PinType.bIsConst=False,PinType.bIsWeakPointer=False,PinType.bIsUObjectWrapper=False,PinType.bSerializeAsSinglePrecisionFloat=False,PersistentGuid=00000000000000000000000000000000,bHidden=True,bNotConnectable=False,bDefaultValueIsReadOnly=False,bDefaultValueIsIgnored=False,bAdvancedView=False,bOrphanedPin=False,)
CustomProperties Pin (PinId=D9DCF3FC417253C6B2B2CB9E826C9ABB,PinName="Initial Location",Direction="EGPD_Output",PinType.PinCategory="struct",PinType.PinSubCategory="",PinType.PinSubCategoryObject="/Script/CoreUObject.ScriptStruct'/Script/CoreUObject.Vector'",PinType.PinSubCategoryMemberReference=(),PinType.PinValueType=(),PinType.ContainerType=None,PinType.bIsReference=False,PinType.bIsConst=False,PinType.bIsWeakPointer=False,PinType.bIsUObjectWrapper=False,PinType.bSerializeAsSinglePrecisionFloat=False,DefaultValue="0, 0, 0",AutogeneratedDefaultValue="0, 0, 0",LinkedTo=(K2Node_CallFunction_3 7975A4784115A99A4FA5079EFBF05B78,),PersistentGuid=00000000000000000000000000000000,bHidden=False,bNotConnectable=False,bDefaultValueIsReadOnly=False,bDefaultValueIsIgnored=False,bAdvancedView=False,bOrphanedPin=False,)
End Object
Begin Object Class=/Script/UnrealEd.EdGraphNode_Comment Name="EdGraphNode_Comment_7" ExportPath="/Script/UnrealEd.EdGraphNode_Comment'/Game/Examples/BallShooter/Blueprints/BallShooterShootingActuator.BallShooterShootingActuator:EventGraph.EdGraphNode_Comment_7'"
bCommentBubbleVisible_InDetailsPanel=False
NodePosX=672
NodePosY=-96
NodeWidth=1072
NodeHeight=352
bCommentBubblePinned=False
bCommentBubbleVisible=False
NodeComment="We Trigger a Custom Event Here, So that Objects Can Subscribe To the Actuator, and Then Delete the Projectile"
NodeGuid=1ADD46D7486F52A8F81864BFA9989D41
End Object
Begin Object Class=/Script/BlueprintGraph.K2Node_DynamicCast Name="K2Node_DynamicCast_0" ExportPath="/Script/BlueprintGraph.K2Node_DynamicCast'/Game/Examples/BallShooter/Blueprints/BallShooterShootingActuator.BallShooterShootingActuator:EventGraph.K2Node_DynamicCast_0'"
TargetType="/Script/Engine.BlueprintGeneratedClass'/Game/Examples/BallShooter/Blueprints/BallShooterBall.BallShooterBall_C'"
NodePosX=1024
NodePosY=-32
NodeGuid=975AF76F6D35406D972097D0314292E9
CustomProperties Pin (PinId=4D95D64DC87D46168B1BFAFE16F08DEC,PinName="execute",PinType.PinCategory="exec",PinType.PinSubCategory="",PinType.PinSubCategoryObject=None,PinType.PinSubCategoryMemberReference=(),PinType.PinValueType=(),PinType.ContainerType=None,PinType.bIsReference=False,PinType.bIsConst=False,PinType.bIsWeakPointer=False,PinType.bIsUObjectWrapper=False,PinType.bSerializeAsSinglePrecisionFloat=False,LinkedTo=(K2Node_CustomEvent_3 E466AF904DF2C4FF3CDB3992CABF47D4,),PersistentGuid=00000000000000000000000000000000,bHidden=False,bNotConnectable=False,bDefaultValueIsReadOnly=False,bDefaultValueIsIgnored=False,bAdvancedView=False,bOrphanedPin=False,)
CustomProperties Pin (PinId=968023365B844943962C868C1EDABB55,PinName="then",Direction="EGPD_Output",PinType.PinCategory="exec",PinType.PinSubCategory="",PinType.PinSubCategoryObject=None,PinType.PinSubCategoryMemberReference=(),PinType.PinValueType=(),PinType.ContainerType=None,PinType.bIsReference=False,PinType.bIsConst=False,PinType.bIsWeakPointer=False,PinType.bIsUObjectWrapper=False,PinType.bSerializeAsSinglePrecisionFloat=False,PersistentGuid=00000000000000000000000000000000,bHidden=False,bNotConnectable=False,bDefaultValueIsReadOnly=False,bDefaultValueIsIgnored=False,bAdvancedView=False,bOrphanedPin=False,)
CustomProperties Pin (PinId=120C8D3D55D9457D9BA34AE929E685AB,PinName="CastFailed",Direction="EGPD_Output",PinType.PinCategory="exec",PinType.PinSubCategory="",PinType.PinSubCategoryObject=None,PinType.PinSubCategoryMemberReference=(),PinType.PinValueType=(),PinType.ContainerType=None,PinType.bIsReference=False,PinType.bIsConst=False,PinType.bIsWeakPointer=False,PinType.bIsUObjectWrapper=False,PinType.bSerializeAsSinglePrecisionFloat=False,LinkedTo=(K2Node_CallDelegate_1 9645B4514D59568C7A83A6B12291157D,),PersistentGuid=00000000000000000000000000000000,bHidden=False,bNotConnectable=False,bDefaultValueIsReadOnly=False,bDefaultValueIsIgnored=False,bAdvancedView=False,bOrphanedPin=False,)
CustomProperties Pin (PinId=D478AB53B37243F78431EF94F73FBE1E,PinName="Object",PinType.PinCategory="object",PinType.PinSubCategory="",PinType.PinSubCategoryObject="/Script/CoreUObject.Class'/Script/CoreUObject.Object'",PinType.PinSubCategoryMemberReference=(),PinType.PinValueType=(),PinType.ContainerType=None,PinType.bIsReference=False,PinType.bIsConst=False,PinType.bIsWeakPointer=False,PinType.bIsUObjectWrapper=False,PinType.bSerializeAsSinglePrecisionFloat=False,LinkedTo=(K2Node_CustomEvent_3 1A2749E247BF207194674099F5C6D6EC,),PersistentGuid=00000000000000000000000000000000,bHidden=False,bNotConnectable=False,bDefaultValueIsReadOnly=False,bDefaultValueIsIgnored=False,bAdvancedView=False,bOrphanedPin=False,)
CustomProperties Pin (PinId=7E98665DA3BF41CD86F55F6021BA2A95,PinName="AsBall Shooter Ball",Direction="EGPD_Output",PinType.PinCategory="object",PinType.PinSubCategory="",PinType.PinSubCategoryObject="/Script/Engine.BlueprintGeneratedClass'/Game/Examples/BallShooter/Blueprints/BallShooterBall.BallShooterBall_C'",PinType.PinSubCategoryMemberReference=(),PinType.PinValueType=(),PinType.ContainerType=None,PinType.bIsReference=False,PinType.bIsConst=False,PinType.bIsWeakPointer=False,PinType.bIsUObjectWrapper=False,PinType.bSerializeAsSinglePrecisionFloat=False,PersistentGuid=00000000000000000000000000000000,bHidden=False,bNotConnectable=False,bDefaultValueIsReadOnly=False,bDefaultValueIsIgnored=False,bAdvancedView=False,bOrphanedPin=False,)
CustomProperties Pin (PinId=B5D23B9783314ED6ACDA78AF339A908A,PinName="bSuccess",Direction="EGPD_Output",PinType.PinCategory="bool",PinType.PinSubCategory="",PinType.PinSubCategoryObject=None,PinType.PinSubCategoryMemberReference=(),PinType.PinValueType=(),PinType.ContainerType=None,PinType.bIsReference=False,PinType.bIsConst=False,PinType.bIsWeakPointer=False,PinType.bIsUObjectWrapper=False,PinType.bSerializeAsSinglePrecisionFloat=False,PersistentGuid=00000000000000000000000000000000,bHidden=True,bNotConnectable=False,bDefaultValueIsReadOnly=False,bDefaultValueIsIgnored=False,bAdvancedView=False,bOrphanedPin=False,)
End Object
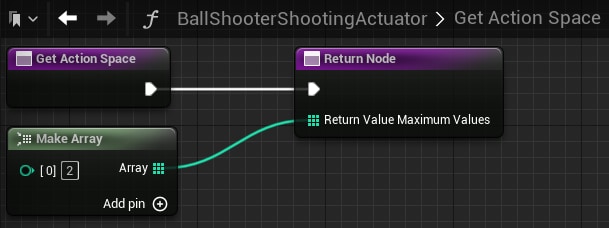
Begin Object Class=/Script/BlueprintGraph.K2Node_FunctionEntry Name="K2Node_FunctionEntry_0" ExportPath="/Script/BlueprintGraph.K2Node_FunctionEntry'/Game/Examples/BallShooter/Blueprints/BallShooterShootingActuator.BallShooterShootingActuator:GetActionSpace.K2Node_FunctionEntry_0'"
FunctionReference=(MemberParent="/Script/CoreUObject.Class'/Script/Schola.BlueprintDiscreteActuator'",MemberName="GetActionSpace")
NodePosX=64
NodePosY=48
NodeGuid=2F9AB236CBCF46BDA26FA5BC95B4556A
CustomProperties Pin (PinId=BD2D811B2148431696FE1A256B7EB281,PinName="then",Direction="EGPD_Output",PinType.PinCategory="exec",PinType.PinSubCategory="",PinType.PinSubCategoryObject=None,PinType.PinSubCategoryMemberReference=(),PinType.PinValueType=(),PinType.ContainerType=None,PinType.bIsReference=False,PinType.bIsConst=False,PinType.bIsWeakPointer=False,PinType.bIsUObjectWrapper=False,PinType.bSerializeAsSinglePrecisionFloat=False,LinkedTo=(K2Node_FunctionResult_0 D6FE8B48457A4AAE9357A112F59056E8,),PersistentGuid=00000000000000000000000000000000,bHidden=False,bNotConnectable=False,bDefaultValueIsReadOnly=False,bDefaultValueIsIgnored=False,bAdvancedView=False,bOrphanedPin=False,)
End Object
Begin Object Class=/Script/BlueprintGraph.K2Node_FunctionResult Name="K2Node_FunctionResult_0" ExportPath="/Script/BlueprintGraph.K2Node_FunctionResult'/Game/Examples/BallShooter/Blueprints/BallShooterShootingActuator.BallShooterShootingActuator:GetActionSpace.K2Node_FunctionResult_0'"
FunctionReference=(MemberParent="/Script/CoreUObject.Class'/Script/Schola.BlueprintDiscreteActuator'",MemberName="GetActionSpace")
NodePosX=352
NodePosY=48
NodeGuid=898D128430754161A1A0A4A9BF048D8D
CustomProperties Pin (PinId=D6FE8B48457A4AAE9357A112F59056E8,PinName="execute",PinType.PinCategory="exec",PinType.PinSubCategory="",PinType.PinSubCategoryObject=None,PinType.PinSubCategoryMemberReference=(),PinType.PinValueType=(),PinType.ContainerType=None,PinType.bIsReference=False,PinType.bIsConst=False,PinType.bIsWeakPointer=False,PinType.bIsUObjectWrapper=False,PinType.bSerializeAsSinglePrecisionFloat=False,LinkedTo=(K2Node_FunctionEntry_0 BD2D811B2148431696FE1A256B7EB281,),PersistentGuid=00000000000000000000000000000000,bHidden=False,bNotConnectable=False,bDefaultValueIsReadOnly=False,bDefaultValueIsIgnored=False,bAdvancedView=False,bOrphanedPin=False,)
CustomProperties Pin (PinId=AA8334421F0D4A8FA88387F99A30C2B0,PinName="ReturnValue",PinToolTip="Return Value\nDiscrete Space Structure\n\nGet Action Space",PinType.PinCategory="struct",PinType.PinSubCategory="",PinType.PinSubCategoryObject="/Script/CoreUObject.ScriptStruct'/Script/Schola.DiscreteSpace'",PinType.PinSubCategoryMemberReference=(),PinType.PinValueType=(),PinType.ContainerType=None,PinType.bIsReference=False,PinType.bIsConst=False,PinType.bIsWeakPointer=False,PinType.bIsUObjectWrapper=False,PinType.bSerializeAsSinglePrecisionFloat=False,SubPins=(K2Node_FunctionResult_0 3BAB03AC4CDA24BB59C687B7ABDF12BE,),PersistentGuid=00000000000000000000000000000000,bHidden=True,bNotConnectable=False,bDefaultValueIsReadOnly=False,bDefaultValueIsIgnored=False,bAdvancedView=False,bOrphanedPin=False,)
CustomProperties Pin (PinId=3BAB03AC4CDA24BB59C687B7ABDF12BE,PinName="ReturnValue_High",PinFriendlyName=LOCGEN_FORMAT_NAMED(NSLOCTEXT("KismetSchema", "SplitPinFriendlyNameFormat", "{PinDisplayName} {ProtoPinDisplayName}"), "PinDisplayName", "Return Value", "ProtoPinDisplayName", "Maximum Values"),PinType.PinCategory="int",PinType.PinSubCategory="",PinType.PinSubCategoryObject=None,PinType.PinSubCategoryMemberReference=(),PinType.PinValueType=(),PinType.ContainerType=Array,PinType.bIsReference=False,PinType.bIsConst=False,PinType.bIsWeakPointer=False,PinType.bIsUObjectWrapper=False,PinType.bSerializeAsSinglePrecisionFloat=False,LinkedTo=(K2Node_MakeArray_0 BDCB135EC12144BD937B0CB9B58C2EBD,),ParentPin=K2Node_FunctionResult_0 AA8334421F0D4A8FA88387F99A30C2B0,PersistentGuid=00000000000000000000000000000000,bHidden=False,bNotConnectable=False,bDefaultValueIsReadOnly=False,bDefaultValueIsIgnored=False,bAdvancedView=False,bOrphanedPin=False,)
End Object
Begin Object Class=/Script/BlueprintGraph.K2Node_MakeArray Name="K2Node_MakeArray_0" ExportPath="/Script/BlueprintGraph.K2Node_MakeArray'/Game/Examples/BallShooter/Blueprints/BallShooterShootingActuator.BallShooterShootingActuator:GetActionSpace.K2Node_MakeArray_0'"
NodePosX=64
NodePosY=128
NodeGuid=EB5B685ABFBD4923A08B38A07CE71AD7
CustomProperties Pin (PinId=BDCB135EC12144BD937B0CB9B58C2EBD,PinName="Array",Direction="EGPD_Output",PinType.PinCategory="int",PinType.PinSubCategory="",PinType.PinSubCategoryObject=None,PinType.PinSubCategoryMemberReference=(),PinType.PinValueType=(),PinType.ContainerType=Array,PinType.bIsReference=False,PinType.bIsConst=False,PinType.bIsWeakPointer=False,PinType.bIsUObjectWrapper=False,PinType.bSerializeAsSinglePrecisionFloat=False,LinkedTo=(K2Node_FunctionResult_0 3BAB03AC4CDA24BB59C687B7ABDF12BE,),PersistentGuid=00000000000000000000000000000000,bHidden=False,bNotConnectable=False,bDefaultValueIsReadOnly=False,bDefaultValueIsIgnored=False,bAdvancedView=False,bOrphanedPin=False,)
CustomProperties Pin (PinId=A0521D05CCFE48CDB4CB33C8C5F73F15,PinName="[0]",PinType.PinCategory="int",PinType.PinSubCategory="",PinType.PinSubCategoryObject=None,PinType.PinSubCategoryMemberReference=(),PinType.PinValueType=(),PinType.ContainerType=None,PinType.bIsReference=False,PinType.bIsConst=False,PinType.bIsWeakPointer=False,PinType.bIsUObjectWrapper=False,PinType.bSerializeAsSinglePrecisionFloat=False,DefaultValue="2",AutogeneratedDefaultValue="0",PersistentGuid=00000000000000000000000000000000,bHidden=False,bNotConnectable=False,bDefaultValueIsReadOnly=False,bDefaultValueIsIgnored=False,bAdvancedView=False,bOrphanedPin=False,)
End Object
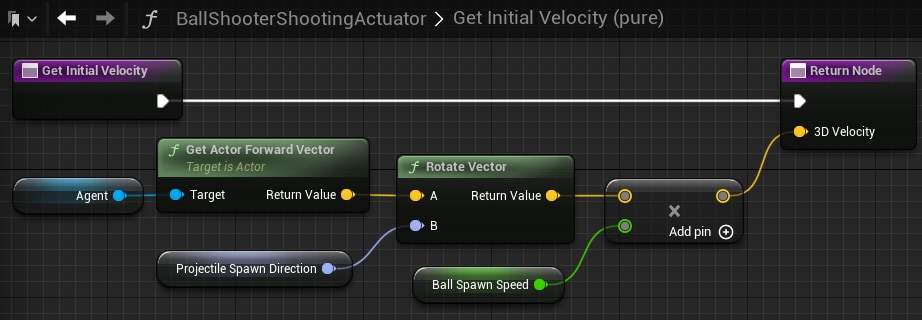
Begin Object Class=/Script/BlueprintGraph.K2Node_FunctionEntry Name="K2Node_FunctionEntry_0" ExportPath="/Script/BlueprintGraph.K2Node_FunctionEntry'/Game/Examples/BallShooter/Blueprints/BallShooterShootingActuator.BallShooterShootingActuator:getInitialVelocity.K2Node_FunctionEntry_0'"
ExtraFlags=469893120
FunctionReference=(MemberName="getInitialVelocity")
bIsEditable=True
NodePosX=672
NodePosY=-112
NodeGuid=CF0F7EF84D2FE4E0AEF580A3A7266016
CustomProperties Pin (PinId=7EE896B64766A88E9C17688D76BB5944,PinName="then",Direction="EGPD_Output",PinType.PinCategory="exec",PinType.PinSubCategory="",PinType.PinSubCategoryObject=None,PinType.PinSubCategoryMemberReference=(),PinType.PinValueType=(),PinType.ContainerType=None,PinType.bIsReference=False,PinType.bIsConst=False,PinType.bIsWeakPointer=False,PinType.bIsUObjectWrapper=False,PinType.bSerializeAsSinglePrecisionFloat=False,LinkedTo=(K2Node_FunctionResult_0 543D131E4DE3DBB48D4D7D980612E3D2,),PersistentGuid=00000000000000000000000000000000,bHidden=False,bNotConnectable=False,bDefaultValueIsReadOnly=False,bDefaultValueIsIgnored=False,bAdvancedView=False,bOrphanedPin=False,)
End Object
Begin Object Class=/Script/BlueprintGraph.K2Node_FunctionResult Name="K2Node_FunctionResult_0" ExportPath="/Script/BlueprintGraph.K2Node_FunctionResult'/Game/Examples/BallShooter/Blueprints/BallShooterShootingActuator.BallShooterShootingActuator:getInitialVelocity.K2Node_FunctionResult_0'"
FunctionReference=(MemberName="getInitialVelocity")
bIsEditable=True
NodePosX=1440
NodePosY=-112
NodeGuid=932A4894429B50B4E02587937008AA24
CustomProperties Pin (PinId=543D131E4DE3DBB48D4D7D980612E3D2,PinName="execute",PinType.PinCategory="exec",PinType.PinSubCategory="",PinType.PinSubCategoryObject=None,PinType.PinSubCategoryMemberReference=(),PinType.PinValueType=(),PinType.ContainerType=None,PinType.bIsReference=False,PinType.bIsConst=False,PinType.bIsWeakPointer=False,PinType.bIsUObjectWrapper=False,PinType.bSerializeAsSinglePrecisionFloat=False,LinkedTo=(K2Node_FunctionEntry_0 7EE896B64766A88E9C17688D76BB5944,),PersistentGuid=00000000000000000000000000000000,bHidden=False,bNotConnectable=False,bDefaultValueIsReadOnly=False,bDefaultValueIsIgnored=False,bAdvancedView=False,bOrphanedPin=False,)
CustomProperties Pin (PinId=BDE4F95F462D8E52396B3D8B7653F915,PinName="3D Velocity",PinType.PinCategory="struct",PinType.PinSubCategory="",PinType.PinSubCategoryObject="/Script/CoreUObject.ScriptStruct'/Script/CoreUObject.Vector'",PinType.PinSubCategoryMemberReference=(),PinType.PinValueType=(),PinType.ContainerType=None,PinType.bIsReference=False,PinType.bIsConst=False,PinType.bIsWeakPointer=False,PinType.bIsUObjectWrapper=False,PinType.bSerializeAsSinglePrecisionFloat=False,DefaultValue="0, 0, 0",AutogeneratedDefaultValue="0, 0, 0",LinkedTo=(K2Node_PromotableOperator_0 9AFFF65C3F274A7E80144AE98E36BCBB,),PersistentGuid=00000000000000000000000000000000,bHidden=False,bNotConnectable=False,bDefaultValueIsReadOnly=False,bDefaultValueIsIgnored=False,bAdvancedView=False,bOrphanedPin=False,)
CustomProperties UserDefinedPin (PinName="3D Velocity",PinType=(PinCategory="struct",PinSubCategoryObject="/Script/CoreUObject.ScriptStruct'/Script/CoreUObject.Vector'"),DesiredPinDirection=EGPD_Input,PinDefaultValue="0, 0, 0")
End Object
Begin Object Class=/Script/BlueprintGraph.K2Node_VariableGet Name="K2Node_VariableGet_3" ExportPath="/Script/BlueprintGraph.K2Node_VariableGet'/Game/Examples/BallShooter/Blueprints/BallShooterShootingActuator.BallShooterShootingActuator:getInitialVelocity.K2Node_VariableGet_3'"
VariableReference=(MemberName="Agent",MemberGuid=B87F8FD14AA62796225E77B8B04C535F,bSelfContext=True)
NodePosX=672
NodePosY=7
NodeGuid=4B1B1B62441F0CF035C8D19EC1FD4FB0
CustomProperties Pin (PinId=106DB725497A79BDA704D3A282535EF2,PinName="Agent",Direction="EGPD_Output",PinType.PinCategory="object",PinType.PinSubCategory="",PinType.PinSubCategoryObject="/Script/CoreUObject.Class'/Script/Engine.Actor'",PinType.PinSubCategoryMemberReference=(),PinType.PinValueType=(),PinType.ContainerType=None,PinType.bIsReference=False,PinType.bIsConst=False,PinType.bIsWeakPointer=False,PinType.bIsUObjectWrapper=False,PinType.bSerializeAsSinglePrecisionFloat=False,LinkedTo=(K2Node_CallFunction_6 556F18564EA6E4977FF4A788939BBF85,),PersistentGuid=00000000000000000000000000000000,bHidden=False,bNotConnectable=False,bDefaultValueIsReadOnly=False,bDefaultValueIsIgnored=False,bAdvancedView=False,bOrphanedPin=False,)
CustomProperties Pin (PinId=D365F92A484CE4A497266798F1006276,PinName="self",PinFriendlyName=NSLOCTEXT("K2Node", "Target", "Target"),PinType.PinCategory="object",PinType.PinSubCategory="",PinType.PinSubCategoryObject="/Script/Engine.BlueprintGeneratedClass'/Game/Examples/BallShooter/Blueprints/BallShooterShootingActuator.BallShooterShootingActuator_C'",PinType.PinSubCategoryMemberReference=(),PinType.PinValueType=(),PinType.ContainerType=None,PinType.bIsReference=False,PinType.bIsConst=False,PinType.bIsWeakPointer=False,PinType.bIsUObjectWrapper=False,PinType.bSerializeAsSinglePrecisionFloat=False,PersistentGuid=00000000000000000000000000000000,bHidden=True,bNotConnectable=False,bDefaultValueIsReadOnly=False,bDefaultValueIsIgnored=False,bAdvancedView=False,bOrphanedPin=False,)
End Object
Begin Object Class=/Script/BlueprintGraph.K2Node_CallFunction Name="K2Node_CallFunction_6" ExportPath="/Script/BlueprintGraph.K2Node_CallFunction'/Game/Examples/BallShooter/Blueprints/BallShooterShootingActuator.BallShooterShootingActuator:getInitialVelocity.K2Node_CallFunction_6'"
bIsPureFunc=True
bIsConstFunc=True
FunctionReference=(MemberParent="/Script/CoreUObject.Class'/Script/Engine.Actor'",MemberName="GetActorForwardVector")
NodePosX=816
NodePosY=-33
ErrorType=1
NodeGuid=B09C1250480F43D095CE90953DD07502
CustomProperties Pin (PinId=556F18564EA6E4977FF4A788939BBF85,PinName="self",PinFriendlyName=NSLOCTEXT("K2Node", "Target", "Target"),PinToolTip="Target\nActor Object Reference",PinType.PinCategory="object",PinType.PinSubCategory="",PinType.PinSubCategoryObject="/Script/CoreUObject.Class'/Script/Engine.Actor'",PinType.PinSubCategoryMemberReference=(),PinType.PinValueType=(),PinType.ContainerType=None,PinType.bIsReference=False,PinType.bIsConst=False,PinType.bIsWeakPointer=False,PinType.bIsUObjectWrapper=False,PinType.bSerializeAsSinglePrecisionFloat=False,LinkedTo=(K2Node_VariableGet_3 106DB725497A79BDA704D3A282535EF2,),PersistentGuid=00000000000000000000000000000000,bHidden=False,bNotConnectable=False,bDefaultValueIsReadOnly=False,bDefaultValueIsIgnored=False,bAdvancedView=False,bOrphanedPin=False,)
CustomProperties Pin (PinId=696603E347BA542F8351E8B697471086,PinName="ReturnValue",PinToolTip="Return Value\nVector\n\nGet the forward (X) vector (length 1.0) from this Actor, in world space.",Direction="EGPD_Output",PinType.PinCategory="struct",PinType.PinSubCategory="",PinType.PinSubCategoryObject="/Script/CoreUObject.ScriptStruct'/Script/CoreUObject.Vector'",PinType.PinSubCategoryMemberReference=(),PinType.PinValueType=(),PinType.ContainerType=None,PinType.bIsReference=False,PinType.bIsConst=False,PinType.bIsWeakPointer=False,PinType.bIsUObjectWrapper=False,PinType.bSerializeAsSinglePrecisionFloat=False,DefaultValue="0, 0, 0",AutogeneratedDefaultValue="0, 0, 0",LinkedTo=(K2Node_CallFunction_7 8495170C4A3042BBC461A5B18D6DA69D,),PersistentGuid=00000000000000000000000000000000,bHidden=False,bNotConnectable=False,bDefaultValueIsReadOnly=False,bDefaultValueIsIgnored=False,bAdvancedView=False,bOrphanedPin=False,)
End Object
Begin Object Class=/Script/BlueprintGraph.K2Node_CallFunction Name="K2Node_CallFunction_7" ExportPath="/Script/BlueprintGraph.K2Node_CallFunction'/Game/Examples/BallShooter/Blueprints/BallShooterShootingActuator.BallShooterShootingActuator:getInitialVelocity.K2Node_CallFunction_7'"
bIsPureFunc=True
FunctionReference=(MemberParent="/Script/CoreUObject.Class'/Script/Engine.KismetMathLibrary'",MemberName="GreaterGreater_VectorRotator")
NodePosX=1056
NodePosY=-16
NodeGuid=31D1FEB14803BCD062156BA0DFF229C3
CustomProperties Pin (PinId=584A85A840D4A3E226092E80B74A99A7,PinName="self",PinFriendlyName=NSLOCTEXT("K2Node", "Target", "Target"),PinToolTip="Target\nKismet Math Library Object Reference",PinType.PinCategory="object",PinType.PinSubCategory="",PinType.PinSubCategoryObject="/Script/CoreUObject.Class'/Script/Engine.KismetMathLibrary'",PinType.PinSubCategoryMemberReference=(),PinType.PinValueType=(),PinType.ContainerType=None,PinType.bIsReference=False,PinType.bIsConst=False,PinType.bIsWeakPointer=False,PinType.bIsUObjectWrapper=False,PinType.bSerializeAsSinglePrecisionFloat=False,DefaultObject="/Script/Engine.Default__KismetMathLibrary",PersistentGuid=00000000000000000000000000000000,bHidden=True,bNotConnectable=False,bDefaultValueIsReadOnly=False,bDefaultValueIsIgnored=False,bAdvancedView=False,bOrphanedPin=False,)
CustomProperties Pin (PinId=8495170C4A3042BBC461A5B18D6DA69D,PinName="A",PinToolTip="A\nVector",PinType.PinCategory="struct",PinType.PinSubCategory="",PinType.PinSubCategoryObject="/Script/CoreUObject.ScriptStruct'/Script/CoreUObject.Vector'",PinType.PinSubCategoryMemberReference=(),PinType.PinValueType=(),PinType.ContainerType=None,PinType.bIsReference=False,PinType.bIsConst=False,PinType.bIsWeakPointer=False,PinType.bIsUObjectWrapper=False,PinType.bSerializeAsSinglePrecisionFloat=False,DefaultValue="0, 0, 0",AutogeneratedDefaultValue="0, 0, 0",LinkedTo=(K2Node_CallFunction_6 696603E347BA542F8351E8B697471086,),PersistentGuid=00000000000000000000000000000000,bHidden=False,bNotConnectable=False,bDefaultValueIsReadOnly=False,bDefaultValueIsIgnored=False,bAdvancedView=False,bOrphanedPin=False,)
CustomProperties Pin (PinId=CA7BC85C4A5DB78B709BC49C94E64703,PinName="B",PinToolTip="B\nRotator",PinType.PinCategory="struct",PinType.PinSubCategory="",PinType.PinSubCategoryObject="/Script/CoreUObject.ScriptStruct'/Script/CoreUObject.Rotator'",PinType.PinSubCategoryMemberReference=(),PinType.PinValueType=(),PinType.ContainerType=None,PinType.bIsReference=False,PinType.bIsConst=False,PinType.bIsWeakPointer=False,PinType.bIsUObjectWrapper=False,PinType.bSerializeAsSinglePrecisionFloat=False,DefaultValue="0, 0, 0",AutogeneratedDefaultValue="0, 0, 0",LinkedTo=(K2Node_VariableGet_2 2569A2B0B4BC4FD6817944B7312042BF,),PersistentGuid=00000000000000000000000000000000,bHidden=False,bNotConnectable=False,bDefaultValueIsReadOnly=False,bDefaultValueIsIgnored=False,bAdvancedView=False,bOrphanedPin=False,)
CustomProperties Pin (PinId=71DA147543C47C91AF2B2799433149C6,PinName="ReturnValue",PinToolTip="Return Value\nVector\n\nReturns result of vector A rotated by Rotator B",Direction="EGPD_Output",PinType.PinCategory="struct",PinType.PinSubCategory="",PinType.PinSubCategoryObject="/Script/CoreUObject.ScriptStruct'/Script/CoreUObject.Vector'",PinType.PinSubCategoryMemberReference=(),PinType.PinValueType=(),PinType.ContainerType=None,PinType.bIsReference=False,PinType.bIsConst=False,PinType.bIsWeakPointer=False,PinType.bIsUObjectWrapper=False,PinType.bSerializeAsSinglePrecisionFloat=False,DefaultValue="0, 0, 0",AutogeneratedDefaultValue="0, 0, 0",LinkedTo=(K2Node_PromotableOperator_0 0F001C466B214FA1B079B149BC40B731,),PersistentGuid=00000000000000000000000000000000,bHidden=False,bNotConnectable=False,bDefaultValueIsReadOnly=False,bDefaultValueIsIgnored=False,bAdvancedView=False,bOrphanedPin=False,)
End Object
Begin Object Class=/Script/BlueprintGraph.K2Node_VariableGet Name="K2Node_VariableGet_0" ExportPath="/Script/BlueprintGraph.K2Node_VariableGet'/Game/Examples/BallShooter/Blueprints/BallShooterShootingActuator.BallShooterShootingActuator:getInitialVelocity.K2Node_VariableGet_0'"
VariableReference=(MemberName="ballSpawnSpeed",MemberGuid=14F010094EA9148AB315A5AA849B942C,bSelfContext=True)
NodePosX=1072
NodePosY=96
NodeGuid=4DCFF3D049F05A551437879F9C277D5D
CustomProperties Pin (PinId=E7AAF7504C76376E9D9FAD9423AAAA69,PinName="ballSpawnSpeed",Direction="EGPD_Output",PinType.PinCategory="real",PinType.PinSubCategory="double",PinType.PinSubCategoryObject=None,PinType.PinSubCategoryMemberReference=(),PinType.PinValueType=(),PinType.ContainerType=None,PinType.bIsReference=False,PinType.bIsConst=False,PinType.bIsWeakPointer=False,PinType.bIsUObjectWrapper=False,PinType.bSerializeAsSinglePrecisionFloat=False,DefaultValue="0.0",AutogeneratedDefaultValue="0.0",LinkedTo=(K2Node_Knot_0 1C6EBD7049E6D2E03440E2BD349E1D70,),PersistentGuid=00000000000000000000000000000000,bHidden=False,bNotConnectable=False,bDefaultValueIsReadOnly=False,bDefaultValueIsIgnored=False,bAdvancedView=False,bOrphanedPin=False,)
CustomProperties Pin (PinId=8A5B816C422E7CACFBD77B8FB8342398,PinName="self",PinFriendlyName=NSLOCTEXT("K2Node", "Target", "Target"),PinType.PinCategory="object",PinType.PinSubCategory="",PinType.PinSubCategoryObject="/Script/Engine.BlueprintGeneratedClass'/Game/Examples/BallShooter/Blueprints/BallShooterShootingActuator.BallShooterShootingActuator_C'",PinType.PinSubCategoryMemberReference=(),PinType.PinValueType=(),PinType.ContainerType=None,PinType.bIsReference=False,PinType.bIsConst=False,PinType.bIsWeakPointer=False,PinType.bIsUObjectWrapper=False,PinType.bSerializeAsSinglePrecisionFloat=False,PersistentGuid=00000000000000000000000000000000,bHidden=True,bNotConnectable=False,bDefaultValueIsReadOnly=False,bDefaultValueIsIgnored=False,bAdvancedView=False,bOrphanedPin=False,)
End Object
Begin Object Class=/Script/BlueprintGraph.K2Node_VariableGet Name="K2Node_VariableGet_2" ExportPath="/Script/BlueprintGraph.K2Node_VariableGet'/Game/Examples/BallShooter/Blueprints/BallShooterShootingActuator.BallShooterShootingActuator:getInitialVelocity.K2Node_VariableGet_2'"
VariableReference=(MemberName="projectileSpawnDirection",MemberGuid=13202EF14624B7887A4A89AAD5EC3753,bSelfContext=True)
NodePosX=816
NodePosY=80
NodeGuid=91940FE44B78C64519D75F963068ACD1
CustomProperties Pin (PinId=2569A2B0B4BC4FD6817944B7312042BF,PinName="projectileSpawnDirection",Direction="EGPD_Output",PinType.PinCategory="struct",PinType.PinSubCategory="",PinType.PinSubCategoryObject="/Script/CoreUObject.ScriptStruct'/Script/CoreUObject.Rotator'",PinType.PinSubCategoryMemberReference=(),PinType.PinValueType=(),PinType.ContainerType=None,PinType.bIsReference=False,PinType.bIsConst=False,PinType.bIsWeakPointer=False,PinType.bIsUObjectWrapper=False,PinType.bSerializeAsSinglePrecisionFloat=False,DefaultValue="0, 0, 0",AutogeneratedDefaultValue="0, 0, 0",LinkedTo=(K2Node_CallFunction_7 CA7BC85C4A5DB78B709BC49C94E64703,),PersistentGuid=00000000000000000000000000000000,bHidden=False,bNotConnectable=False,bDefaultValueIsReadOnly=False,bDefaultValueIsIgnored=False,bAdvancedView=False,bOrphanedPin=False,)
CustomProperties Pin (PinId=9EF54EB648B127BD33B22EAA40B61061,PinName="self",PinFriendlyName=NSLOCTEXT("K2Node", "Target", "Target"),PinType.PinCategory="object",PinType.PinSubCategory="",PinType.PinSubCategoryObject="/Script/Engine.BlueprintGeneratedClass'/Game/Examples/BallShooter/Blueprints/BallShooterShootingActuator.BallShooterShootingActuator_C'",PinType.PinSubCategoryMemberReference=(),PinType.PinValueType=(),PinType.ContainerType=None,PinType.bIsReference=False,PinType.bIsConst=False,PinType.bIsWeakPointer=False,PinType.bIsUObjectWrapper=False,PinType.bSerializeAsSinglePrecisionFloat=False,PersistentGuid=00000000000000000000000000000000,bHidden=True,bNotConnectable=False,bDefaultValueIsReadOnly=False,bDefaultValueIsIgnored=False,bAdvancedView=False,bOrphanedPin=False,)
End Object
Begin Object Class=/Script/BlueprintGraph.K2Node_PromotableOperator Name="K2Node_PromotableOperator_0" ExportPath="/Script/BlueprintGraph.K2Node_PromotableOperator'/Game/Examples/BallShooter/Blueprints/BallShooterShootingActuator.BallShooterShootingActuator:getInitialVelocity.K2Node_PromotableOperator_0'"
OperationName="Multiply"
bIsPureFunc=True
FunctionReference=(MemberParent="/Script/CoreUObject.Class'/Script/Engine.KismetMathLibrary'",MemberName="Multiply_VectorVector")
NodePosX=1264
NodePosY=8
NodeGuid=DEE3B88A429B6DE24EBCB8945B189035
CustomProperties Pin (PinId=0F001C466B214FA1B079B149BC40B731,PinName="A",PinToolTip="A\nVector",PinType.PinCategory="struct",PinType.PinSubCategory="",PinType.PinSubCategoryObject="/Script/CoreUObject.ScriptStruct'/Script/CoreUObject.Vector'",PinType.PinSubCategoryMemberReference=(),PinType.PinValueType=(),PinType.ContainerType=None,PinType.bIsReference=False,PinType.bIsConst=False,PinType.bIsWeakPointer=False,PinType.bIsUObjectWrapper=False,PinType.bSerializeAsSinglePrecisionFloat=False,LinkedTo=(K2Node_CallFunction_7 71DA147543C47C91AF2B2799433149C6,),PersistentGuid=00000000000000000000000000000000,bHidden=False,bNotConnectable=False,bDefaultValueIsReadOnly=False,bDefaultValueIsIgnored=False,bAdvancedView=False,bOrphanedPin=False,)
CustomProperties Pin (PinId=B4D420F8C88E4F05B733D31E32F945F2,PinName="B",PinToolTip="B\nFloat (double-precision)",PinType.PinCategory="real",PinType.PinSubCategory="double",PinType.PinSubCategoryObject=None,PinType.PinSubCategoryMemberReference=(),PinType.PinValueType=(),PinType.ContainerType=None,PinType.bIsReference=False,PinType.bIsConst=False,PinType.bIsWeakPointer=False,PinType.bIsUObjectWrapper=False,PinType.bSerializeAsSinglePrecisionFloat=False,LinkedTo=(K2Node_Knot_0 F4AE6624497C54863F02748C1B4DF83F,),PersistentGuid=00000000000000000000000000000000,bHidden=False,bNotConnectable=False,bDefaultValueIsReadOnly=False,bDefaultValueIsIgnored=False,bAdvancedView=False,bOrphanedPin=False,)
CustomProperties Pin (PinId=9AFFF65C3F274A7E80144AE98E36BCBB,PinName="ReturnValue",PinToolTip="Return Value\nVector\n\nElement-wise Vector multiplication (Result = {A.x*B.x, A.y*B.y, A.z*B.z})",Direction="EGPD_Output",PinType.PinCategory="struct",PinType.PinSubCategory="",PinType.PinSubCategoryObject="/Script/CoreUObject.ScriptStruct'/Script/CoreUObject.Vector'",PinType.PinSubCategoryMemberReference=(),PinType.PinValueType=(),PinType.ContainerType=None,PinType.bIsReference=False,PinType.bIsConst=False,PinType.bIsWeakPointer=False,PinType.bIsUObjectWrapper=False,PinType.bSerializeAsSinglePrecisionFloat=False,LinkedTo=(K2Node_FunctionResult_0 BDE4F95F462D8E52396B3D8B7653F915,),PersistentGuid=00000000000000000000000000000000,bHidden=False,bNotConnectable=False,bDefaultValueIsReadOnly=False,bDefaultValueIsIgnored=False,bAdvancedView=False,bOrphanedPin=False,)
End Object
Begin Object Class=/Script/BlueprintGraph.K2Node_Knot Name="K2Node_Knot_0" ExportPath="/Script/BlueprintGraph.K2Node_Knot'/Game/Examples/BallShooter/Blueprints/BallShooterShootingActuator.BallShooterShootingActuator:getInitialVelocity.K2Node_Knot_0'"
NodePosX=1264
NodePosY=48
NodeGuid=5F7C526C448132D7401E69B7AFB22C6B
CustomProperties Pin (PinId=1C6EBD7049E6D2E03440E2BD349E1D70,PinName="InputPin",PinType.PinCategory="real",PinType.PinSubCategory="double",PinType.PinSubCategoryObject=None,PinType.PinSubCategoryMemberReference=(),PinType.PinValueType=(),PinType.ContainerType=None,PinType.bIsReference=False,PinType.bIsConst=False,PinType.bIsWeakPointer=False,PinType.bIsUObjectWrapper=False,PinType.bSerializeAsSinglePrecisionFloat=False,LinkedTo=(K2Node_VariableGet_0 E7AAF7504C76376E9D9FAD9423AAAA69,),PersistentGuid=00000000000000000000000000000000,bHidden=False,bNotConnectable=False,bDefaultValueIsReadOnly=False,bDefaultValueIsIgnored=True,bAdvancedView=False,bOrphanedPin=False,)
CustomProperties Pin (PinId=F4AE6624497C54863F02748C1B4DF83F,PinName="OutputPin",Direction="EGPD_Output",PinType.PinCategory="real",PinType.PinSubCategory="double",PinType.PinSubCategoryObject=None,PinType.PinSubCategoryMemberReference=(),PinType.PinValueType=(),PinType.ContainerType=None,PinType.bIsReference=False,PinType.bIsConst=False,PinType.bIsWeakPointer=False,PinType.bIsUObjectWrapper=False,PinType.bSerializeAsSinglePrecisionFloat=False,LinkedTo=(K2Node_PromotableOperator_0 B4D420F8C88E4F05B733D31E32F945F2,),PersistentGuid=00000000000000000000000000000000,bHidden=False,bNotConnectable=False,bDefaultValueIsReadOnly=False,bDefaultValueIsIgnored=False,bAdvancedView=False,bOrphanedPin=False,)
End Object
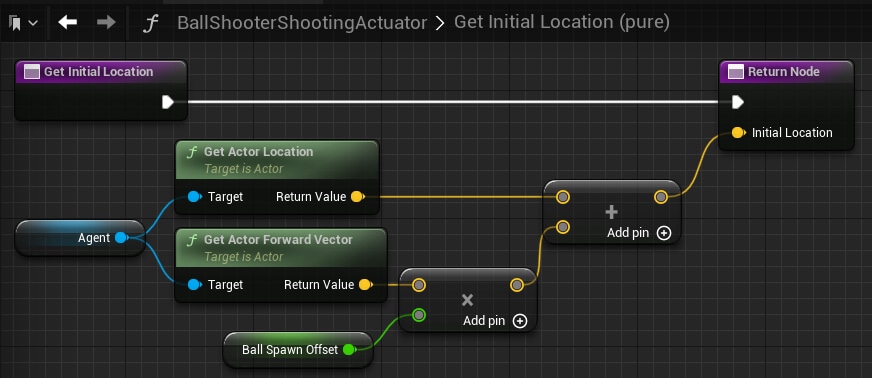
Begin Object Class=/Script/BlueprintGraph.K2Node_FunctionEntry Name="K2Node_FunctionEntry_0" ExportPath="/Script/BlueprintGraph.K2Node_FunctionEntry'/Game/Examples/BallShooter/Blueprints/BallShooterShootingActuator.BallShooterShootingActuator:getInitialLocation.K2Node_FunctionEntry_0'"
ExtraFlags=469893120
FunctionReference=(MemberName="getInitialLocation")
bIsEditable=True
NodePosX=400
NodePosY=480
NodeGuid=54297F324F5A3057E07641BFA3455C55
CustomProperties Pin (PinId=6C9B4F994D77F7BE358E239E6FD7E289,PinName="then",Direction="EGPD_Output",PinType.PinCategory="exec",PinType.PinSubCategory="",PinType.PinSubCategoryObject=None,PinType.PinSubCategoryMemberReference=(),PinType.PinValueType=(),PinType.ContainerType=None,PinType.bIsReference=False,PinType.bIsConst=False,PinType.bIsWeakPointer=False,PinType.bIsUObjectWrapper=False,PinType.bSerializeAsSinglePrecisionFloat=False,LinkedTo=(K2Node_FunctionResult_0 92B621324DE97712517852BC47DBBE18,),PersistentGuid=00000000000000000000000000000000,bHidden=False,bNotConnectable=False,bDefaultValueIsReadOnly=False,bDefaultValueIsIgnored=False,bAdvancedView=False,bOrphanedPin=False,)
End Object
Begin Object Class=/Script/BlueprintGraph.K2Node_FunctionResult Name="K2Node_FunctionResult_0" ExportPath="/Script/BlueprintGraph.K2Node_FunctionResult'/Game/Examples/BallShooter/Blueprints/BallShooterShootingActuator.BallShooterShootingActuator:getInitialLocation.K2Node_FunctionResult_0'"
FunctionReference=(MemberName="getInitialLocation")
bIsEditable=True
NodePosX=1104
NodePosY=480
NodeGuid=7F185E3743967B0B9DC0E89B753C024B
CustomProperties Pin (PinId=92B621324DE97712517852BC47DBBE18,PinName="execute",PinType.PinCategory="exec",PinType.PinSubCategory="",PinType.PinSubCategoryObject=None,PinType.PinSubCategoryMemberReference=(),PinType.PinValueType=(),PinType.ContainerType=None,PinType.bIsReference=False,PinType.bIsConst=False,PinType.bIsWeakPointer=False,PinType.bIsUObjectWrapper=False,PinType.bSerializeAsSinglePrecisionFloat=False,LinkedTo=(K2Node_FunctionEntry_0 6C9B4F994D77F7BE358E239E6FD7E289,),PersistentGuid=00000000000000000000000000000000,bHidden=False,bNotConnectable=False,bDefaultValueIsReadOnly=False,bDefaultValueIsIgnored=False,bAdvancedView=False,bOrphanedPin=False,)
CustomProperties Pin (PinId=FBFE771A426F072EDD3C989F30FDE06D,PinName="Initial Location",PinType.PinCategory="struct",PinType.PinSubCategory="",PinType.PinSubCategoryObject="/Script/CoreUObject.ScriptStruct'/Script/CoreUObject.Vector'",PinType.PinSubCategoryMemberReference=(),PinType.PinValueType=(),PinType.ContainerType=None,PinType.bIsReference=False,PinType.bIsConst=False,PinType.bIsWeakPointer=False,PinType.bIsUObjectWrapper=False,PinType.bSerializeAsSinglePrecisionFloat=False,DefaultValue="0, 0, 0",AutogeneratedDefaultValue="0, 0, 0",LinkedTo=(K2Node_PromotableOperator_2 94C4FF244E27BB0FE42BE8837F1E8337,),PersistentGuid=00000000000000000000000000000000,bHidden=False,bNotConnectable=False,bDefaultValueIsReadOnly=False,bDefaultValueIsIgnored=False,bAdvancedView=False,bOrphanedPin=False,)
CustomProperties UserDefinedPin (PinName="Initial Location",PinType=(PinCategory="struct",PinSubCategoryObject="/Script/CoreUObject.ScriptStruct'/Script/CoreUObject.Vector'"),DesiredPinDirection=EGPD_Input,PinDefaultValue="0, 0, 0")
End Object
Begin Object Class=/Script/BlueprintGraph.K2Node_CallFunction Name="K2Node_CallFunction_14" ExportPath="/Script/BlueprintGraph.K2Node_CallFunction'/Game/Examples/BallShooter/Blueprints/BallShooterShootingActuator.BallShooterShootingActuator:getInitialLocation.K2Node_CallFunction_14'"
bIsPureFunc=True
bIsConstFunc=True
FunctionReference=(MemberParent="/Script/CoreUObject.Class'/Script/Engine.Actor'",MemberName="K2_GetActorLocation")
NodePosX=560
NodePosY=560
NodeGuid=6F03095C4AAEDE8875798B985DCA2B88
CustomProperties Pin (PinId=9B0F5EEC4EBF0C1A98D5B38FCF12B9C9,PinName="self",PinFriendlyName=NSLOCTEXT("K2Node", "Target", "Target"),PinToolTip="Target\nActor Object Reference",PinType.PinCategory="object",PinType.PinSubCategory="",PinType.PinSubCategoryObject="/Script/CoreUObject.Class'/Script/Engine.Actor'",PinType.PinSubCategoryMemberReference=(),PinType.PinValueType=(),PinType.ContainerType=None,PinType.bIsReference=False,PinType.bIsConst=False,PinType.bIsWeakPointer=False,PinType.bIsUObjectWrapper=False,PinType.bSerializeAsSinglePrecisionFloat=False,LinkedTo=(K2Node_VariableGet_7 106DB725497A79BDA704D3A282535EF2,),PersistentGuid=00000000000000000000000000000000,bHidden=False,bNotConnectable=False,bDefaultValueIsReadOnly=False,bDefaultValueIsIgnored=False,bAdvancedView=False,bOrphanedPin=False,)
CustomProperties Pin (PinId=A0A5F9E64FDBE5407BB0F6ABF419A8FF,PinName="ReturnValue",PinToolTip="Return Value\nVector\n\nReturns the location of the RootComponent of this Actor",Direction="EGPD_Output",PinType.PinCategory="struct",PinType.PinSubCategory="",PinType.PinSubCategoryObject="/Script/CoreUObject.ScriptStruct'/Script/CoreUObject.Vector'",PinType.PinSubCategoryMemberReference=(),PinType.PinValueType=(),PinType.ContainerType=None,PinType.bIsReference=False,PinType.bIsConst=False,PinType.bIsWeakPointer=False,PinType.bIsUObjectWrapper=False,PinType.bSerializeAsSinglePrecisionFloat=False,DefaultValue="0, 0, 0",AutogeneratedDefaultValue="0, 0, 0",LinkedTo=(K2Node_PromotableOperator_2 2057470C457CDD43510522BD9670B449,),PersistentGuid=00000000000000000000000000000000,bHidden=False,bNotConnectable=False,bDefaultValueIsReadOnly=False,bDefaultValueIsIgnored=False,bAdvancedView=False,bOrphanedPin=False,)
End Object
Begin Object Class=/Script/BlueprintGraph.K2Node_PromotableOperator Name="K2Node_PromotableOperator_2" ExportPath="/Script/BlueprintGraph.K2Node_PromotableOperator'/Game/Examples/BallShooter/Blueprints/BallShooterShootingActuator.BallShooterShootingActuator:getInitialLocation.K2Node_PromotableOperator_2'"
OperationName="Add"
bIsPureFunc=True
FunctionReference=(MemberParent="/Script/CoreUObject.Class'/Script/Engine.KismetMathLibrary'",MemberName="Add_VectorVector")
NodePosX=928
NodePosY=600
NodeGuid=4FE42EBC4EC2D70B85074B9982234EA7
CustomProperties Pin (PinId=2057470C457CDD43510522BD9670B449,PinName="A",PinToolTip="A\nVector",PinType.PinCategory="struct",PinType.PinSubCategory="",PinType.PinSubCategoryObject="/Script/CoreUObject.ScriptStruct'/Script/CoreUObject.Vector'",PinType.PinSubCategoryMemberReference=(),PinType.PinValueType=(),PinType.ContainerType=None,PinType.bIsReference=False,PinType.bIsConst=False,PinType.bIsWeakPointer=False,PinType.bIsUObjectWrapper=False,PinType.bSerializeAsSinglePrecisionFloat=False,LinkedTo=(K2Node_CallFunction_14 A0A5F9E64FDBE5407BB0F6ABF419A8FF,),PersistentGuid=00000000000000000000000000000000,bHidden=False,bNotConnectable=False,bDefaultValueIsReadOnly=False,bDefaultValueIsIgnored=False,bAdvancedView=False,bOrphanedPin=False,)
CustomProperties Pin (PinId=378BDCFE4013B53EFFA3BD9A1F5CEAEF,PinName="B",PinToolTip="B\nVector",PinType.PinCategory="struct",PinType.PinSubCategory="",PinType.PinSubCategoryObject="/Script/CoreUObject.ScriptStruct'/Script/CoreUObject.Vector'",PinType.PinSubCategoryMemberReference=(),PinType.PinValueType=(),PinType.ContainerType=None,PinType.bIsReference=False,PinType.bIsConst=False,PinType.bIsWeakPointer=False,PinType.bIsUObjectWrapper=False,PinType.bSerializeAsSinglePrecisionFloat=False,LinkedTo=(K2Node_PromotableOperator_1 9AFFF65C3F274A7E80144AE98E36BCBB,),PersistentGuid=00000000000000000000000000000000,bHidden=False,bNotConnectable=False,bDefaultValueIsReadOnly=False,bDefaultValueIsIgnored=False,bAdvancedView=False,bOrphanedPin=False,)
CustomProperties Pin (PinId=94C4FF244E27BB0FE42BE8837F1E8337,PinName="ReturnValue",PinToolTip="Return Value\nVector\n\nVector addition",Direction="EGPD_Output",PinType.PinCategory="struct",PinType.PinSubCategory="",PinType.PinSubCategoryObject="/Script/CoreUObject.ScriptStruct'/Script/CoreUObject.Vector'",PinType.PinSubCategoryMemberReference=(),PinType.PinValueType=(),PinType.ContainerType=None,PinType.bIsReference=False,PinType.bIsConst=False,PinType.bIsWeakPointer=False,PinType.bIsUObjectWrapper=False,PinType.bSerializeAsSinglePrecisionFloat=False,LinkedTo=(K2Node_FunctionResult_0 FBFE771A426F072EDD3C989F30FDE06D,),PersistentGuid=00000000000000000000000000000000,bHidden=False,bNotConnectable=False,bDefaultValueIsReadOnly=False,bDefaultValueIsIgnored=False,bAdvancedView=False,bOrphanedPin=False,)
End Object
Begin Object Class=/Script/BlueprintGraph.K2Node_PromotableOperator Name="K2Node_PromotableOperator_1" ExportPath="/Script/BlueprintGraph.K2Node_PromotableOperator'/Game/Examples/BallShooter/Blueprints/BallShooterShootingActuator.BallShooterShootingActuator:getInitialLocation.K2Node_PromotableOperator_1'"
OperationName="Multiply"
bIsPureFunc=True
FunctionReference=(MemberParent="/Script/CoreUObject.Class'/Script/Engine.KismetMathLibrary'",MemberName="Multiply_VectorVector")
NodePosX=784
NodePosY=688
NodeGuid=BF0DCE1D44143D602255988454B1240E
CustomProperties Pin (PinId=0F001C466B214FA1B079B149BC40B731,PinName="A",PinToolTip="A\nVector",PinType.PinCategory="struct",PinType.PinSubCategory="",PinType.PinSubCategoryObject="/Script/CoreUObject.ScriptStruct'/Script/CoreUObject.Vector'",PinType.PinSubCategoryMemberReference=(),PinType.PinValueType=(),PinType.ContainerType=None,PinType.bIsReference=False,PinType.bIsConst=False,PinType.bIsWeakPointer=False,PinType.bIsUObjectWrapper=False,PinType.bSerializeAsSinglePrecisionFloat=False,LinkedTo=(K2Node_CallFunction_12 696603E347BA542F8351E8B697471086,),PersistentGuid=00000000000000000000000000000000,bHidden=False,bNotConnectable=False,bDefaultValueIsReadOnly=False,bDefaultValueIsIgnored=False,bAdvancedView=False,bOrphanedPin=False,)
CustomProperties Pin (PinId=B4D420F8C88E4F05B733D31E32F945F2,PinName="B",PinToolTip="B\nFloat (double-precision)",PinType.PinCategory="real",PinType.PinSubCategory="double",PinType.PinSubCategoryObject=None,PinType.PinSubCategoryMemberReference=(),PinType.PinValueType=(),PinType.ContainerType=None,PinType.bIsReference=False,PinType.bIsConst=False,PinType.bIsWeakPointer=False,PinType.bIsUObjectWrapper=False,PinType.bSerializeAsSinglePrecisionFloat=False,LinkedTo=(K2Node_VariableGet_5 BB723A52413D9F6EB293A180A70E51DD,),PersistentGuid=00000000000000000000000000000000,bHidden=False,bNotConnectable=False,bDefaultValueIsReadOnly=False,bDefaultValueIsIgnored=False,bAdvancedView=False,bOrphanedPin=False,)
CustomProperties Pin (PinId=9AFFF65C3F274A7E80144AE98E36BCBB,PinName="ReturnValue",PinToolTip="Return Value\nVector\n\nElement-wise Vector multiplication (Result = {A.x*B.x, A.y*B.y, A.z*B.z})",Direction="EGPD_Output",PinType.PinCategory="struct",PinType.PinSubCategory="",PinType.PinSubCategoryObject="/Script/CoreUObject.ScriptStruct'/Script/CoreUObject.Vector'",PinType.PinSubCategoryMemberReference=(),PinType.PinValueType=(),PinType.ContainerType=None,PinType.bIsReference=False,PinType.bIsConst=False,PinType.bIsWeakPointer=False,PinType.bIsUObjectWrapper=False,PinType.bSerializeAsSinglePrecisionFloat=False,LinkedTo=(K2Node_PromotableOperator_2 378BDCFE4013B53EFFA3BD9A1F5CEAEF,),PersistentGuid=00000000000000000000000000000000,bHidden=False,bNotConnectable=False,bDefaultValueIsReadOnly=False,bDefaultValueIsIgnored=False,bAdvancedView=False,bOrphanedPin=False,)
End Object
Begin Object Class=/Script/BlueprintGraph.K2Node_VariableGet Name="K2Node_VariableGet_5" ExportPath="/Script/BlueprintGraph.K2Node_VariableGet'/Game/Examples/BallShooter/Blueprints/BallShooterShootingActuator.BallShooterShootingActuator:getInitialLocation.K2Node_VariableGet_5'"
VariableReference=(MemberName="ballSpawnOffset",MemberGuid=3E7184D64587569917AF72A4F46A3255,bSelfContext=True)
NodePosX=608
NodePosY=752
NodeGuid=136318EF48DD9BD5FA671C96C842B67C
CustomProperties Pin (PinId=BB723A52413D9F6EB293A180A70E51DD,PinName="ballSpawnOffset",Direction="EGPD_Output",PinType.PinCategory="real",PinType.PinSubCategory="double",PinType.PinSubCategoryObject=None,PinType.PinSubCategoryMemberReference=(),PinType.PinValueType=(),PinType.ContainerType=None,PinType.bIsReference=False,PinType.bIsConst=False,PinType.bIsWeakPointer=False,PinType.bIsUObjectWrapper=False,PinType.bSerializeAsSinglePrecisionFloat=False,DefaultValue="0.0",AutogeneratedDefaultValue="0.0",LinkedTo=(K2Node_PromotableOperator_1 B4D420F8C88E4F05B733D31E32F945F2,),PersistentGuid=00000000000000000000000000000000,bHidden=False,bNotConnectable=False,bDefaultValueIsReadOnly=False,bDefaultValueIsIgnored=False,bAdvancedView=False,bOrphanedPin=False,)
CustomProperties Pin (PinId=2373B7F7496FA9DADA391F83E130D230,PinName="self",PinFriendlyName=NSLOCTEXT("K2Node", "Target", "Target"),PinType.PinCategory="object",PinType.PinSubCategory="",PinType.PinSubCategoryObject="/Script/Engine.BlueprintGeneratedClass'/Game/Examples/BallShooter/Blueprints/BallShooterShootingActuator.BallShooterShootingActuator_C'",PinType.PinSubCategoryMemberReference=(),PinType.PinValueType=(),PinType.ContainerType=None,PinType.bIsReference=False,PinType.bIsConst=False,PinType.bIsWeakPointer=False,PinType.bIsUObjectWrapper=False,PinType.bSerializeAsSinglePrecisionFloat=False,PersistentGuid=00000000000000000000000000000000,bHidden=True,bNotConnectable=False,bDefaultValueIsReadOnly=False,bDefaultValueIsIgnored=False,bAdvancedView=False,bOrphanedPin=False,)
End Object
Begin Object Class=/Script/BlueprintGraph.K2Node_VariableGet Name="K2Node_VariableGet_7" ExportPath="/Script/BlueprintGraph.K2Node_VariableGet'/Game/Examples/BallShooter/Blueprints/BallShooterShootingActuator.BallShooterShootingActuator:getInitialLocation.K2Node_VariableGet_7'"
VariableReference=(MemberName="Agent",MemberGuid=B87F8FD14AA62796225E77B8B04C535F,bSelfContext=True)
NodePosX=400
NodePosY=640
NodeGuid=9F0AC64646273C2D19B2E295904CF0F3
CustomProperties Pin (PinId=106DB725497A79BDA704D3A282535EF2,PinName="Agent",Direction="EGPD_Output",PinType.PinCategory="object",PinType.PinSubCategory="",PinType.PinSubCategoryObject="/Script/CoreUObject.Class'/Script/Engine.Actor'",PinType.PinSubCategoryMemberReference=(),PinType.PinValueType=(),PinType.ContainerType=None,PinType.bIsReference=False,PinType.bIsConst=False,PinType.bIsWeakPointer=False,PinType.bIsUObjectWrapper=False,PinType.bSerializeAsSinglePrecisionFloat=False,LinkedTo=(K2Node_CallFunction_12 556F18564EA6E4977FF4A788939BBF85,K2Node_CallFunction_14 9B0F5EEC4EBF0C1A98D5B38FCF12B9C9,),PersistentGuid=00000000000000000000000000000000,bHidden=False,bNotConnectable=False,bDefaultValueIsReadOnly=False,bDefaultValueIsIgnored=False,bAdvancedView=False,bOrphanedPin=False,)
CustomProperties Pin (PinId=2CD962974E0C2ECD5AFEE182007DAF9A,PinName="self",PinFriendlyName=NSLOCTEXT("K2Node", "Target", "Target"),PinType.PinCategory="object",PinType.PinSubCategory="",PinType.PinSubCategoryObject="/Script/Engine.BlueprintGeneratedClass'/Game/Examples/BallShooter/Blueprints/BallShooterShootingActuator.BallShooterShootingActuator_C'",PinType.PinSubCategoryMemberReference=(),PinType.PinValueType=(),PinType.ContainerType=None,PinType.bIsReference=False,PinType.bIsConst=False,PinType.bIsWeakPointer=False,PinType.bIsUObjectWrapper=False,PinType.bSerializeAsSinglePrecisionFloat=False,PersistentGuid=00000000000000000000000000000000,bHidden=True,bNotConnectable=False,bDefaultValueIsReadOnly=False,bDefaultValueIsIgnored=False,bAdvancedView=False,bOrphanedPin=False,)
End Object
Begin Object Class=/Script/BlueprintGraph.K2Node_CallFunction Name="K2Node_CallFunction_12" ExportPath="/Script/BlueprintGraph.K2Node_CallFunction'/Game/Examples/BallShooter/Blueprints/BallShooterShootingActuator.BallShooterShootingActuator:getInitialLocation.K2Node_CallFunction_12'"
bIsPureFunc=True
bIsConstFunc=True
FunctionReference=(MemberParent="/Script/CoreUObject.Class'/Script/Engine.Actor'",MemberName="GetActorForwardVector")
NodePosX=560
NodePosY=648
NodeGuid=DAFB10724072483BFA407A80903E4C5E
CustomProperties Pin (PinId=556F18564EA6E4977FF4A788939BBF85,PinName="self",PinFriendlyName=NSLOCTEXT("K2Node", "Target", "Target"),PinToolTip="Target\nActor Object Reference",PinType.PinCategory="object",PinType.PinSubCategory="",PinType.PinSubCategoryObject="/Script/CoreUObject.Class'/Script/Engine.Actor'",PinType.PinSubCategoryMemberReference=(),PinType.PinValueType=(),PinType.ContainerType=None,PinType.bIsReference=False,PinType.bIsConst=False,PinType.bIsWeakPointer=False,PinType.bIsUObjectWrapper=False,PinType.bSerializeAsSinglePrecisionFloat=False,LinkedTo=(K2Node_VariableGet_7 106DB725497A79BDA704D3A282535EF2,),PersistentGuid=00000000000000000000000000000000,bHidden=False,bNotConnectable=False,bDefaultValueIsReadOnly=False,bDefaultValueIsIgnored=False,bAdvancedView=False,bOrphanedPin=False,)
CustomProperties Pin (PinId=696603E347BA542F8351E8B697471086,PinName="ReturnValue",PinToolTip="Return Value\nVector\n\nGet the forward (X) vector (length 1.0) from this Actor, in world space.",Direction="EGPD_Output",PinType.PinCategory="struct",PinType.PinSubCategory="",PinType.PinSubCategoryObject="/Script/CoreUObject.ScriptStruct'/Script/CoreUObject.Vector'",PinType.PinSubCategoryMemberReference=(),PinType.PinValueType=(),PinType.ContainerType=None,PinType.bIsReference=False,PinType.bIsConst=False,PinType.bIsWeakPointer=False,PinType.bIsUObjectWrapper=False,PinType.bSerializeAsSinglePrecisionFloat=False,DefaultValue="0, 0, 0",AutogeneratedDefaultValue="0, 0, 0",LinkedTo=(K2Node_PromotableOperator_1 0F001C466B214FA1B079B149BC40B731,),PersistentGuid=00000000000000000000000000000000,bHidden=False,bNotConnectable=False,bDefaultValueIsReadOnly=False,bDefaultValueIsIgnored=False,bAdvancedView=False,bOrphanedPin=False,)
End Object
Creating the Ball Shooter Discrete Rotation Actuator
Although the RotationActuator exists in Schola and can be used to rotate agents continuously, we will create another custom BlueprintDiscreteActuator (subclass of DiscreteActuator) to rotate the agent. This actuator has three possible actions: rotate left, rotate right, or do nothing.
Note
Mixing discrete and continuous actuators in the same agent should be avoided. The stable-baseline3 library and most algorithms in general do not support mixing discrete and continuous action spaces. Although some workarounds may exist, mixing may cause bugs or reduce training performance. Conversely, mixing discrete and continuous observers is completely supported.
-
Create a new Blueprint Class with parent class
BlueprintDiscreteActuator, and name itBallShooterDiscreteRotationActuator. -
Add a new float variable. Name it
rotationMagnitude, and set the default value to 2. This stores the magnitude of the rotation when the agent rotates. -
Set the
GetActionSpace()andTakeAction()blueprints as shown below.
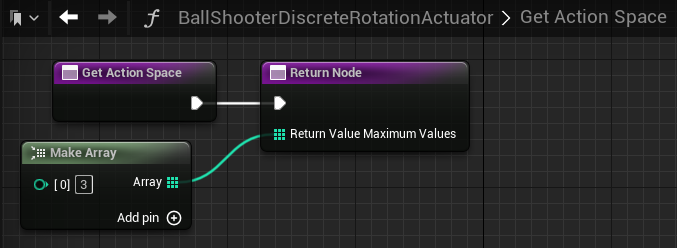
Begin Object Class=/Script/BlueprintGraph.K2Node_FunctionEntry Name="K2Node_FunctionEntry_0" ExportPath="/Script/BlueprintGraph.K2Node_FunctionEntry'/Game/Examples/BallShooter/Blueprints/BallShooterDiscreteRotationActuator.BallShooterDiscreteRotationActuator:GetActionSpace.K2Node_FunctionEntry_0'"
FunctionReference=(MemberParent="/Script/CoreUObject.Class'/Script/Schola.BlueprintDiscreteActuator'",MemberName="GetActionSpace")
NodePosX=-432
NodePosY=-256
NodeGuid=B11771787B9047F1AC489F01186A8355
CustomProperties Pin (PinId=496F4C88C3B94F659042B7B43E227860,PinName="then",Direction="EGPD_Output",PinType.PinCategory="exec",PinType.PinSubCategory="",PinType.PinSubCategoryObject=None,PinType.PinSubCategoryMemberReference=(),PinType.PinValueType=(),PinType.ContainerType=None,PinType.bIsReference=False,PinType.bIsConst=False,PinType.bIsWeakPointer=False,PinType.bIsUObjectWrapper=False,PinType.bSerializeAsSinglePrecisionFloat=False,LinkedTo=(K2Node_FunctionResult_0 5F40CE6AE47A47FEAA0F3D1D6F6EF1E4,),PersistentGuid=00000000000000000000000000000000,bHidden=False,bNotConnectable=False,bDefaultValueIsReadOnly=False,bDefaultValueIsIgnored=False,bAdvancedView=False,bOrphanedPin=False,)
End Object
Begin Object Class=/Script/BlueprintGraph.K2Node_FunctionResult Name="K2Node_FunctionResult_0" ExportPath="/Script/BlueprintGraph.K2Node_FunctionResult'/Game/Examples/BallShooter/Blueprints/BallShooterDiscreteRotationActuator.BallShooterDiscreteRotationActuator:GetActionSpace.K2Node_FunctionResult_0'"
FunctionReference=(MemberParent="/Script/CoreUObject.Class'/Script/Schola.BlueprintDiscreteActuator'",MemberName="GetActionSpace")
NodePosX=-224
NodePosY=-256
NodeGuid=BECBB070A9AB4CCCA6F2928F7F20008B
CustomProperties Pin (PinId=5F40CE6AE47A47FEAA0F3D1D6F6EF1E4,PinName="execute",PinType.PinCategory="exec",PinType.PinSubCategory="",PinType.PinSubCategoryObject=None,PinType.PinSubCategoryMemberReference=(),PinType.PinValueType=(),PinType.ContainerType=None,PinType.bIsReference=False,PinType.bIsConst=False,PinType.bIsWeakPointer=False,PinType.bIsUObjectWrapper=False,PinType.bSerializeAsSinglePrecisionFloat=False,LinkedTo=(K2Node_FunctionEntry_0 496F4C88C3B94F659042B7B43E227860,),PersistentGuid=00000000000000000000000000000000,bHidden=False,bNotConnectable=False,bDefaultValueIsReadOnly=False,bDefaultValueIsIgnored=False,bAdvancedView=False,bOrphanedPin=False,)
CustomProperties Pin (PinId=7A9266EAE0504A4E931FAAB2A6A00639,PinName="ReturnValue",PinToolTip="Return Value\nDiscrete Space Structure\n\nGet Action Space",PinType.PinCategory="struct",PinType.PinSubCategory="",PinType.PinSubCategoryObject="/Script/CoreUObject.ScriptStruct'/Script/Schola.DiscreteSpace'",PinType.PinSubCategoryMemberReference=(),PinType.PinValueType=(),PinType.ContainerType=None,PinType.bIsReference=False,PinType.bIsConst=False,PinType.bIsWeakPointer=False,PinType.bIsUObjectWrapper=False,PinType.bSerializeAsSinglePrecisionFloat=False,SubPins=(K2Node_FunctionResult_0 983823EE492999611367D5868B515E09,),PersistentGuid=00000000000000000000000000000000,bHidden=True,bNotConnectable=False,bDefaultValueIsReadOnly=False,bDefaultValueIsIgnored=False,bAdvancedView=False,bOrphanedPin=False,)
CustomProperties Pin (PinId=983823EE492999611367D5868B515E09,PinName="ReturnValue_High",PinFriendlyName=LOCGEN_FORMAT_NAMED(NSLOCTEXT("KismetSchema", "SplitPinFriendlyNameFormat", "{PinDisplayName} {ProtoPinDisplayName}"), "PinDisplayName", "Return Value", "ProtoPinDisplayName", "Maximum Values"),PinType.PinCategory="int",PinType.PinSubCategory="",PinType.PinSubCategoryObject=None,PinType.PinSubCategoryMemberReference=(),PinType.PinValueType=(),PinType.ContainerType=Array,PinType.bIsReference=False,PinType.bIsConst=False,PinType.bIsWeakPointer=False,PinType.bIsUObjectWrapper=False,PinType.bSerializeAsSinglePrecisionFloat=False,LinkedTo=(K2Node_MakeArray_0 30DF09FA056541898B628927924E45FB,),ParentPin=K2Node_FunctionResult_0 7A9266EAE0504A4E931FAAB2A6A00639,PersistentGuid=00000000000000000000000000000000,bHidden=False,bNotConnectable=False,bDefaultValueIsReadOnly=False,bDefaultValueIsIgnored=False,bAdvancedView=False,bOrphanedPin=False,)
End Object
Begin Object Class=/Script/BlueprintGraph.K2Node_MakeArray Name="K2Node_MakeArray_0" ExportPath="/Script/BlueprintGraph.K2Node_MakeArray'/Game/Examples/BallShooter/Blueprints/BallShooterDiscreteRotationActuator.BallShooterDiscreteRotationActuator:GetActionSpace.K2Node_MakeArray_0'"
NodePosX=-464
NodePosY=-176
NodeGuid=ABEB44A3A65B4E8C863B5C91B9F78917
CustomProperties Pin (PinId=30DF09FA056541898B628927924E45FB,PinName="Array",Direction="EGPD_Output",PinType.PinCategory="int",PinType.PinSubCategory="",PinType.PinSubCategoryObject=None,PinType.PinSubCategoryMemberReference=(),PinType.PinValueType=(),PinType.ContainerType=Array,PinType.bIsReference=False,PinType.bIsConst=False,PinType.bIsWeakPointer=False,PinType.bIsUObjectWrapper=False,PinType.bSerializeAsSinglePrecisionFloat=False,LinkedTo=(K2Node_FunctionResult_0 983823EE492999611367D5868B515E09,),PersistentGuid=00000000000000000000000000000000,bHidden=False,bNotConnectable=False,bDefaultValueIsReadOnly=False,bDefaultValueIsIgnored=False,bAdvancedView=False,bOrphanedPin=False,)
CustomProperties Pin (PinId=3C72DF3809D84DC8ACE1B9E0000F0F5F,PinName="[0]",PinType.PinCategory="int",PinType.PinSubCategory="",PinType.PinSubCategoryObject=None,PinType.PinSubCategoryMemberReference=(),PinType.PinValueType=(),PinType.ContainerType=None,PinType.bIsReference=False,PinType.bIsConst=False,PinType.bIsWeakPointer=False,PinType.bIsUObjectWrapper=False,PinType.bSerializeAsSinglePrecisionFloat=False,DefaultValue="3",AutogeneratedDefaultValue="0",PersistentGuid=00000000000000000000000000000000,bHidden=False,bNotConnectable=False,bDefaultValueIsReadOnly=False,bDefaultValueIsIgnored=False,bAdvancedView=False,bOrphanedPin=False,)
End Object
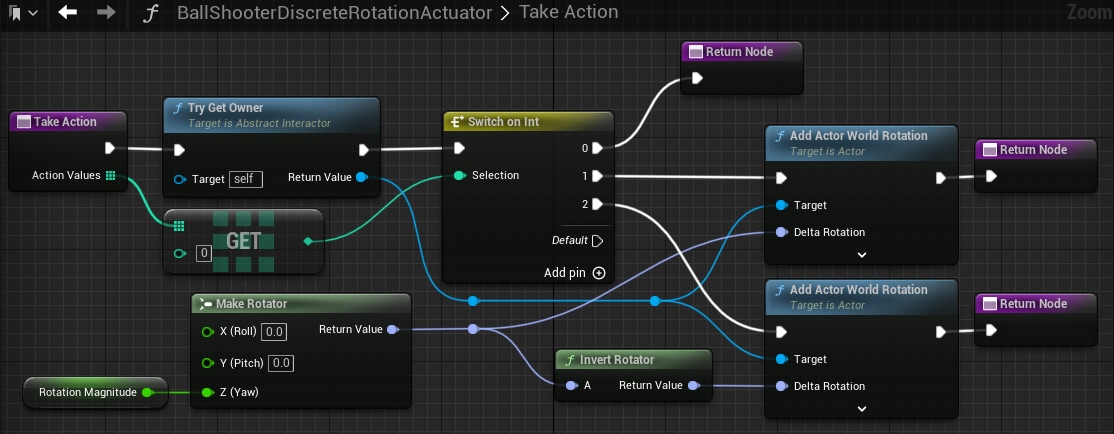
Begin Object Class=/Script/BlueprintGraph.K2Node_FunctionEntry Name="K2Node_FunctionEntry_1" ExportPath="/Script/BlueprintGraph.K2Node_FunctionEntry'/Game/Examples/BallShooter/Blueprints/BallShooterDiscreteRotationActuator.BallShooterDiscreteRotationActuator:TakeAction.K2Node_FunctionEntry_1'"
FunctionReference=(MemberParent="/Script/CoreUObject.Class'/Script/Schola.BlueprintDiscreteActuator'",MemberName="TakeAction")
NodePosX=-624
NodePosY=224
NodeGuid=888FE0CEE8DB43E29996F15D96FA9292
CustomProperties Pin (PinId=E30386582E7047F3B9CF1A1A59AEDB2C,PinName="then",Direction="EGPD_Output",PinType.PinCategory="exec",PinType.PinSubCategory="",PinType.PinSubCategoryObject=None,PinType.PinSubCategoryMemberReference=(),PinType.PinValueType=(),PinType.ContainerType=None,PinType.bIsReference=False,PinType.bIsConst=False,PinType.bIsWeakPointer=False,PinType.bIsUObjectWrapper=False,PinType.bSerializeAsSinglePrecisionFloat=False,LinkedTo=(K2Node_CallFunction_11 16B7439FB7F848D3985012CDDB9617A6,),PersistentGuid=00000000000000000000000000000000,bHidden=False,bNotConnectable=False,bDefaultValueIsReadOnly=False,bDefaultValueIsIgnored=False,bAdvancedView=False,bOrphanedPin=False,)
CustomProperties Pin (PinId=7B47DE6624724A82A4F340F76C9B2E30,PinName="Action",PinToolTip="Action\nDiscrete Point Structure (by ref)",Direction="EGPD_Output",PinType.PinCategory="struct",PinType.PinSubCategory="",PinType.PinSubCategoryObject="/Script/CoreUObject.ScriptStruct'/Script/Schola.DiscretePoint'",PinType.PinSubCategoryMemberReference=(),PinType.PinValueType=(),PinType.ContainerType=None,PinType.bIsReference=True,PinType.bIsConst=True,PinType.bIsWeakPointer=False,PinType.bIsUObjectWrapper=False,PinType.bSerializeAsSinglePrecisionFloat=False,SubPins=(K2Node_FunctionEntry_1 EA55A32D4771463E8607D28515DA5488,),PersistentGuid=00000000000000000000000000000000,bHidden=True,bNotConnectable=False,bDefaultValueIsReadOnly=False,bDefaultValueIsIgnored=False,bAdvancedView=False,bOrphanedPin=False,)
CustomProperties Pin (PinId=EA55A32D4771463E8607D28515DA5488,PinName="Action_Values",PinFriendlyName=LOCGEN_FORMAT_NAMED(NSLOCTEXT("KismetSchema", "SplitPinFriendlyNameFormat", "{PinDisplayName} {ProtoPinDisplayName}"), "PinDisplayName", "Action", "ProtoPinDisplayName", "Values"),Direction="EGPD_Output",PinType.PinCategory="int",PinType.PinSubCategory="",PinType.PinSubCategoryObject=None,PinType.PinSubCategoryMemberReference=(),PinType.PinValueType=(),PinType.ContainerType=Array,PinType.bIsReference=False,PinType.bIsConst=False,PinType.bIsWeakPointer=False,PinType.bIsUObjectWrapper=False,PinType.bSerializeAsSinglePrecisionFloat=False,LinkedTo=(K2Node_GetArrayItem_0 716DC356D2AD4408BC4F2A3D83E3E756,),ParentPin=K2Node_FunctionEntry_1 7B47DE6624724A82A4F340F76C9B2E30,PersistentGuid=00000000000000000000000000000000,bHidden=False,bNotConnectable=False,bDefaultValueIsReadOnly=False,bDefaultValueIsIgnored=False,bAdvancedView=False,bOrphanedPin=False,)
End Object
Begin Object Class=/Script/BlueprintGraph.K2Node_FunctionResult Name="K2Node_FunctionResult_1" ExportPath="/Script/BlueprintGraph.K2Node_FunctionResult'/Game/Examples/BallShooter/Blueprints/BallShooterDiscreteRotationActuator.BallShooterDiscreteRotationActuator:TakeAction.K2Node_FunctionResult_1'"
FunctionReference=(MemberParent="/Script/CoreUObject.Class'/Script/Schola.BlueprintDiscreteActuator'",MemberName="TakeAction")
NodePosX=144
NodePosY=144
NodeGuid=35CFB691B45F42F19D96BC5BE3FE43CA
CustomProperties Pin (PinId=7A635C8676B04D3BA52CCF33350C7C7B,PinName="execute",PinType.PinCategory="exec",PinType.PinSubCategory="",PinType.PinSubCategoryObject=None,PinType.PinSubCategoryMemberReference=(),PinType.PinValueType=(),PinType.ContainerType=None,PinType.bIsReference=False,PinType.bIsConst=False,PinType.bIsWeakPointer=False,PinType.bIsUObjectWrapper=False,PinType.bSerializeAsSinglePrecisionFloat=False,LinkedTo=(K2Node_SwitchInteger_0 8AC982F368F44731A26ECD12AD9DA0D9,),PersistentGuid=00000000000000000000000000000000,bHidden=False,bNotConnectable=False,bDefaultValueIsReadOnly=False,bDefaultValueIsIgnored=False,bAdvancedView=False,bOrphanedPin=False,)
End Object
Begin Object Class=/Script/BlueprintGraph.K2Node_GetArrayItem Name="K2Node_GetArrayItem_0" ExportPath="/Script/BlueprintGraph.K2Node_GetArrayItem'/Game/Examples/BallShooter/Blueprints/BallShooterDiscreteRotationActuator.BallShooterDiscreteRotationActuator:TakeAction.K2Node_GetArrayItem_0'"
NodePosX=-448
NodePosY=336
NodeGuid=51F8DBEBA63344F58925AFCE93BF3BDD
CustomProperties Pin (PinId=716DC356D2AD4408BC4F2A3D83E3E756,PinName="Array",PinType.PinCategory="int",PinType.PinSubCategory="",PinType.PinSubCategoryObject=None,PinType.PinSubCategoryMemberReference=(),PinType.PinValueType=(),PinType.ContainerType=Array,PinType.bIsReference=False,PinType.bIsConst=False,PinType.bIsWeakPointer=False,PinType.bIsUObjectWrapper=False,PinType.bSerializeAsSinglePrecisionFloat=False,LinkedTo=(K2Node_FunctionEntry_1 EA55A32D4771463E8607D28515DA5488,),PersistentGuid=00000000000000000000000000000000,bHidden=False,bNotConnectable=False,bDefaultValueIsReadOnly=False,bDefaultValueIsIgnored=False,bAdvancedView=False,bOrphanedPin=False,)
CustomProperties Pin (PinId=925D1F7C7C944810BAF14612B5CDB75F,PinName="Dimension 1",PinType.PinCategory="int",PinType.PinSubCategory="",PinType.PinSubCategoryObject=None,PinType.PinSubCategoryMemberReference=(),PinType.PinValueType=(),PinType.ContainerType=None,PinType.bIsReference=False,PinType.bIsConst=False,PinType.bIsWeakPointer=False,PinType.bIsUObjectWrapper=False,PinType.bSerializeAsSinglePrecisionFloat=False,DefaultValue="0",AutogeneratedDefaultValue="0",PersistentGuid=00000000000000000000000000000000,bHidden=False,bNotConnectable=False,bDefaultValueIsReadOnly=False,bDefaultValueIsIgnored=False,bAdvancedView=False,bOrphanedPin=False,)
CustomProperties Pin (PinId=C731AB6048524B7AA9A003ACDB3E38DE,PinName="Output",Direction="EGPD_Output",PinType.PinCategory="int",PinType.PinSubCategory="",PinType.PinSubCategoryObject=None,PinType.PinSubCategoryMemberReference=(),PinType.PinValueType=(),PinType.ContainerType=None,PinType.bIsReference=True,PinType.bIsConst=False,PinType.bIsWeakPointer=False,PinType.bIsUObjectWrapper=False,PinType.bSerializeAsSinglePrecisionFloat=False,LinkedTo=(K2Node_SwitchInteger_0 D2122F3544D14C239F9FB53950D44A84,),PersistentGuid=00000000000000000000000000000000,bHidden=False,bNotConnectable=False,bDefaultValueIsReadOnly=False,bDefaultValueIsIgnored=False,bAdvancedView=False,bOrphanedPin=False,)
End Object
Begin Object Class=/Script/BlueprintGraph.K2Node_CallFunction Name="K2Node_CallFunction_11" ExportPath="/Script/BlueprintGraph.K2Node_CallFunction'/Game/Examples/BallShooter/Blueprints/BallShooterDiscreteRotationActuator.BallShooterDiscreteRotationActuator:TakeAction.K2Node_CallFunction_11'"
FunctionReference=(MemberName="TryGetOwner",bSelfContext=True)
NodePosX=-448
NodePosY=208
NodeGuid=93D3F65A4BB04D3BB7C05F61902A7F86
CustomProperties Pin (PinId=16B7439FB7F848D3985012CDDB9617A6,PinName="execute",PinType.PinCategory="exec",PinType.PinSubCategory="",PinType.PinSubCategoryObject=None,PinType.PinSubCategoryMemberReference=(),PinType.PinValueType=(),PinType.ContainerType=None,PinType.bIsReference=False,PinType.bIsConst=False,PinType.bIsWeakPointer=False,PinType.bIsUObjectWrapper=False,PinType.bSerializeAsSinglePrecisionFloat=False,LinkedTo=(K2Node_FunctionEntry_1 E30386582E7047F3B9CF1A1A59AEDB2C,),PersistentGuid=00000000000000000000000000000000,bHidden=False,bNotConnectable=False,bDefaultValueIsReadOnly=False,bDefaultValueIsIgnored=False,bAdvancedView=False,bOrphanedPin=False,)
CustomProperties Pin (PinId=448DAD20EB4E4E71BB67DF3FD5404BE1,PinName="then",Direction="EGPD_Output",PinType.PinCategory="exec",PinType.PinSubCategory="",PinType.PinSubCategoryObject=None,PinType.PinSubCategoryMemberReference=(),PinType.PinValueType=(),PinType.ContainerType=None,PinType.bIsReference=False,PinType.bIsConst=False,PinType.bIsWeakPointer=False,PinType.bIsUObjectWrapper=False,PinType.bSerializeAsSinglePrecisionFloat=False,LinkedTo=(K2Node_SwitchInteger_0 5070D1C034634A26A765A68F7671A0EC,),PersistentGuid=00000000000000000000000000000000,bHidden=False,bNotConnectable=False,bDefaultValueIsReadOnly=False,bDefaultValueIsIgnored=False,bAdvancedView=False,bOrphanedPin=False,)
CustomProperties Pin (PinId=F379C14ADC8947CEA13B3896091EF294,PinName="self",PinFriendlyName=NSLOCTEXT("K2Node", "Target", "Target"),PinType.PinCategory="object",PinType.PinSubCategory="",PinType.PinSubCategoryObject="/Script/CoreUObject.Class'/Script/Schola.AbstractInteractor'",PinType.PinSubCategoryMemberReference=(),PinType.PinValueType=(),PinType.ContainerType=None,PinType.bIsReference=False,PinType.bIsConst=False,PinType.bIsWeakPointer=False,PinType.bIsUObjectWrapper=False,PinType.bSerializeAsSinglePrecisionFloat=False,PersistentGuid=00000000000000000000000000000000,bHidden=False,bNotConnectable=False,bDefaultValueIsReadOnly=False,bDefaultValueIsIgnored=False,bAdvancedView=False,bOrphanedPin=False,)
CustomProperties Pin (PinId=AAC6574B3B9C47BC82EA1B78FA92755C,PinName="ReturnValue",Direction="EGPD_Output",PinType.PinCategory="object",PinType.PinSubCategory="",PinType.PinSubCategoryObject="/Script/CoreUObject.Class'/Script/Engine.Actor'",PinType.PinSubCategoryMemberReference=(),PinType.PinValueType=(),PinType.ContainerType=None,PinType.bIsReference=False,PinType.bIsConst=False,PinType.bIsWeakPointer=False,PinType.bIsUObjectWrapper=False,PinType.bSerializeAsSinglePrecisionFloat=False,LinkedTo=(K2Node_Knot_4 D9EE8B8046B2C3ADDEE74CB06CE91107,),PersistentGuid=00000000000000000000000000000000,bHidden=False,bNotConnectable=False,bDefaultValueIsReadOnly=False,bDefaultValueIsIgnored=False,bAdvancedView=False,bOrphanedPin=False,)
End Object
Begin Object Class=/Script/BlueprintGraph.K2Node_SwitchInteger Name="K2Node_SwitchInteger_0" ExportPath="/Script/BlueprintGraph.K2Node_SwitchInteger'/Game/Examples/BallShooter/Blueprints/BallShooterDiscreteRotationActuator.BallShooterDiscreteRotationActuator:TakeAction.K2Node_SwitchInteger_0'"
NodePosX=-128
NodePosY=224
NodeGuid=C7DA6233787A42CD8ACBBB16390495BA
CustomProperties Pin (PinId=0C0B64CF1C9740B7AAD9EF0B7476A79C,PinName="Default",Direction="EGPD_Output",PinType.PinCategory="exec",PinType.PinSubCategory="",PinType.PinSubCategoryObject=None,PinType.PinSubCategoryMemberReference=(),PinType.PinValueType=(),PinType.ContainerType=None,PinType.bIsReference=False,PinType.bIsConst=False,PinType.bIsWeakPointer=False,PinType.bIsUObjectWrapper=False,PinType.bSerializeAsSinglePrecisionFloat=False,PersistentGuid=00000000000000000000000000000000,bHidden=False,bNotConnectable=False,bDefaultValueIsReadOnly=False,bDefaultValueIsIgnored=False,bAdvancedView=False,bOrphanedPin=False,)
CustomProperties Pin (PinId=5070D1C034634A26A765A68F7671A0EC,PinName="execute",PinType.PinCategory="exec",PinType.PinSubCategory="",PinType.PinSubCategoryObject=None,PinType.PinSubCategoryMemberReference=(),PinType.PinValueType=(),PinType.ContainerType=None,PinType.bIsReference=False,PinType.bIsConst=False,PinType.bIsWeakPointer=False,PinType.bIsUObjectWrapper=False,PinType.bSerializeAsSinglePrecisionFloat=False,LinkedTo=(K2Node_CallFunction_11 448DAD20EB4E4E71BB67DF3FD5404BE1,),PersistentGuid=00000000000000000000000000000000,bHidden=False,bNotConnectable=False,bDefaultValueIsReadOnly=False,bDefaultValueIsIgnored=False,bAdvancedView=False,bOrphanedPin=False,)
CustomProperties Pin (PinId=D2122F3544D14C239F9FB53950D44A84,PinName="Selection",PinType.PinCategory="int",PinType.PinSubCategory="",PinType.PinSubCategoryObject=None,PinType.PinSubCategoryMemberReference=(),PinType.PinValueType=(),PinType.ContainerType=None,PinType.bIsReference=False,PinType.bIsConst=False,PinType.bIsWeakPointer=False,PinType.bIsUObjectWrapper=False,PinType.bSerializeAsSinglePrecisionFloat=False,DefaultValue="0",AutogeneratedDefaultValue="0",LinkedTo=(K2Node_GetArrayItem_0 C731AB6048524B7AA9A003ACDB3E38DE,),PersistentGuid=00000000000000000000000000000000,bHidden=False,bNotConnectable=False,bDefaultValueIsReadOnly=False,bDefaultValueIsIgnored=False,bAdvancedView=False,bOrphanedPin=False,)
CustomProperties Pin (PinId=A0C3FBC56B6A4962A286E3D70297F842,PinName="NotEqual_IntInt",PinType.PinCategory="object",PinType.PinSubCategory="",PinType.PinSubCategoryObject="/Script/CoreUObject.Class'/Script/Engine.KismetMathLibrary'",PinType.PinSubCategoryMemberReference=(),PinType.PinValueType=(),PinType.ContainerType=None,PinType.bIsReference=False,PinType.bIsConst=False,PinType.bIsWeakPointer=False,PinType.bIsUObjectWrapper=False,PinType.bSerializeAsSinglePrecisionFloat=False,DefaultObject="/Script/Engine.Default__KismetMathLibrary",PersistentGuid=00000000000000000000000000000000,bHidden=True,bNotConnectable=True,bDefaultValueIsReadOnly=True,bDefaultValueIsIgnored=False,bAdvancedView=False,bOrphanedPin=False,)
CustomProperties Pin (PinId=8AC982F368F44731A26ECD12AD9DA0D9,PinName="0",Direction="EGPD_Output",PinType.PinCategory="exec",PinType.PinSubCategory="",PinType.PinSubCategoryObject=None,PinType.PinSubCategoryMemberReference=(),PinType.PinValueType=(),PinType.ContainerType=None,PinType.bIsReference=False,PinType.bIsConst=False,PinType.bIsWeakPointer=False,PinType.bIsUObjectWrapper=False,PinType.bSerializeAsSinglePrecisionFloat=False,LinkedTo=(K2Node_FunctionResult_1 7A635C8676B04D3BA52CCF33350C7C7B,),PersistentGuid=00000000000000000000000000000000,bHidden=False,bNotConnectable=False,bDefaultValueIsReadOnly=False,bDefaultValueIsIgnored=False,bAdvancedView=False,bOrphanedPin=False,)
CustomProperties Pin (PinId=AF0236CBE8834656A474DE83163D1184,PinName="1",Direction="EGPD_Output",PinType.PinCategory="exec",PinType.PinSubCategory="",PinType.PinSubCategoryObject=None,PinType.PinSubCategoryMemberReference=(),PinType.PinValueType=(),PinType.ContainerType=None,PinType.bIsReference=False,PinType.bIsConst=False,PinType.bIsWeakPointer=False,PinType.bIsUObjectWrapper=False,PinType.bSerializeAsSinglePrecisionFloat=False,LinkedTo=(K2Node_CallFunction_2 CFF7C5393438464FBFD701CB2AD8319A,),PersistentGuid=00000000000000000000000000000000,bHidden=False,bNotConnectable=False,bDefaultValueIsReadOnly=False,bDefaultValueIsIgnored=False,bAdvancedView=False,bOrphanedPin=False,)
CustomProperties Pin (PinId=A96487EE35C14BB99B7F9C12BAD38C12,PinName="2",Direction="EGPD_Output",PinType.PinCategory="exec",PinType.PinSubCategory="",PinType.PinSubCategoryObject=None,PinType.PinSubCategoryMemberReference=(),PinType.PinValueType=(),PinType.ContainerType=None,PinType.bIsReference=False,PinType.bIsConst=False,PinType.bIsWeakPointer=False,PinType.bIsUObjectWrapper=False,PinType.bSerializeAsSinglePrecisionFloat=False,LinkedTo=(K2Node_CallFunction_3 9D616BA5E5D74432A400F035C61C632A,),PersistentGuid=00000000000000000000000000000000,bHidden=False,bNotConnectable=False,bDefaultValueIsReadOnly=False,bDefaultValueIsIgnored=False,bAdvancedView=False,bOrphanedPin=False,)
End Object
Begin Object Class=/Script/BlueprintGraph.K2Node_CallFunction Name="K2Node_CallFunction_2" ExportPath="/Script/BlueprintGraph.K2Node_CallFunction'/Game/Examples/BallShooter/Blueprints/BallShooterDiscreteRotationActuator.BallShooterDiscreteRotationActuator:TakeAction.K2Node_CallFunction_2'"
FunctionReference=(MemberParent="/Script/CoreUObject.Class'/Script/Engine.Actor'",MemberName="K2_AddActorWorldRotation")
NodePosX=240
NodePosY=240
AdvancedPinDisplay=Hidden
NodeGuid=B144FB504C9EF12A19B0C88679B195D1
CustomProperties Pin (PinId=CFF7C5393438464FBFD701CB2AD8319A,PinName="execute",PinToolTip="\nExec",PinType.PinCategory="exec",PinType.PinSubCategory="",PinType.PinSubCategoryObject=None,PinType.PinSubCategoryMemberReference=(),PinType.PinValueType=(),PinType.ContainerType=None,PinType.bIsReference=False,PinType.bIsConst=False,PinType.bIsWeakPointer=False,PinType.bIsUObjectWrapper=False,PinType.bSerializeAsSinglePrecisionFloat=False,LinkedTo=(K2Node_SwitchInteger_0 AF0236CBE8834656A474DE83163D1184,),PersistentGuid=00000000000000000000000000000000,bHidden=False,bNotConnectable=False,bDefaultValueIsReadOnly=False,bDefaultValueIsIgnored=False,bAdvancedView=False,bOrphanedPin=False,)
CustomProperties Pin (PinId=31AA1ED27B7B4561942AFE2E524DE34A,PinName="then",PinToolTip="\nExec",Direction="EGPD_Output",PinType.PinCategory="exec",PinType.PinSubCategory="",PinType.PinSubCategoryObject=None,PinType.PinSubCategoryMemberReference=(),PinType.PinValueType=(),PinType.ContainerType=None,PinType.bIsReference=False,PinType.bIsConst=False,PinType.bIsWeakPointer=False,PinType.bIsUObjectWrapper=False,PinType.bSerializeAsSinglePrecisionFloat=False,LinkedTo=(K2Node_FunctionResult_2 7A635C8676B04D3BA52CCF33350C7C7B,),PersistentGuid=00000000000000000000000000000000,bHidden=False,bNotConnectable=False,bDefaultValueIsReadOnly=False,bDefaultValueIsIgnored=False,bAdvancedView=False,bOrphanedPin=False,)
CustomProperties Pin (PinId=3288FD9CA690410D86A45398AAD6882E,PinName="self",PinFriendlyName=NSLOCTEXT("K2Node", "Target", "Target"),PinToolTip="Target\nActor Object Reference",PinType.PinCategory="object",PinType.PinSubCategory="",PinType.PinSubCategoryObject="/Script/CoreUObject.Class'/Script/Engine.Actor'",PinType.PinSubCategoryMemberReference=(),PinType.PinValueType=(),PinType.ContainerType=None,PinType.bIsReference=False,PinType.bIsConst=False,PinType.bIsWeakPointer=False,PinType.bIsUObjectWrapper=False,PinType.bSerializeAsSinglePrecisionFloat=False,LinkedTo=(K2Node_Knot_2 B107F3B443267DEDE92D7695EC7BF5E7,),PersistentGuid=00000000000000000000000000000000,bHidden=False,bNotConnectable=False,bDefaultValueIsReadOnly=False,bDefaultValueIsIgnored=False,bAdvancedView=False,bOrphanedPin=False,)
CustomProperties Pin (PinId=102A434B42094911B48356CCA36E691E,PinName="DeltaRotation",PinToolTip="Delta Rotation\nRotator\n\nThe change in rotation.",PinType.PinCategory="struct",PinType.PinSubCategory="",PinType.PinSubCategoryObject="/Script/CoreUObject.ScriptStruct'/Script/CoreUObject.Rotator'",PinType.PinSubCategoryMemberReference=(),PinType.PinValueType=(),PinType.ContainerType=None,PinType.bIsReference=False,PinType.bIsConst=False,PinType.bIsWeakPointer=False,PinType.bIsUObjectWrapper=False,PinType.bSerializeAsSinglePrecisionFloat=False,DefaultValue="0, 0, 0",AutogeneratedDefaultValue="0, 0, 0",LinkedTo=(K2Node_Knot_5 D96FB7CB447C8A02DBE74280F73FC977,),PersistentGuid=00000000000000000000000000000000,bHidden=False,bNotConnectable=False,bDefaultValueIsReadOnly=False,bDefaultValueIsIgnored=False,bAdvancedView=False,bOrphanedPin=False,)
CustomProperties Pin (PinId=E7DEB37449E34730A944DCFB022A7A93,PinName="bSweep",PinToolTip="Sweep\nBoolean\n\nWhether to sweep to the target rotation (not currently supported for rotation).",PinType.PinCategory="bool",PinType.PinSubCategory="",PinType.PinSubCategoryObject=None,PinType.PinSubCategoryMemberReference=(),PinType.PinValueType=(),PinType.ContainerType=None,PinType.bIsReference=False,PinType.bIsConst=False,PinType.bIsWeakPointer=False,PinType.bIsUObjectWrapper=False,PinType.bSerializeAsSinglePrecisionFloat=False,DefaultValue="false",AutogeneratedDefaultValue="false",PersistentGuid=00000000000000000000000000000000,bHidden=False,bNotConnectable=False,bDefaultValueIsReadOnly=False,bDefaultValueIsIgnored=False,bAdvancedView=True,bOrphanedPin=False,)
CustomProperties Pin (PinId=DEBACE11DC4940B18C759E5A8B2C9B8A,PinName="SweepHitResult",PinToolTip="Sweep Hit Result\nHit Result Structure\n\nThe hit result from the move if swept.",Direction="EGPD_Output",PinType.PinCategory="struct",PinType.PinSubCategory="",PinType.PinSubCategoryObject="/Script/CoreUObject.ScriptStruct'/Script/Engine.HitResult'",PinType.PinSubCategoryMemberReference=(),PinType.PinValueType=(),PinType.ContainerType=None,PinType.bIsReference=False,PinType.bIsConst=False,PinType.bIsWeakPointer=False,PinType.bIsUObjectWrapper=False,PinType.bSerializeAsSinglePrecisionFloat=False,PersistentGuid=00000000000000000000000000000000,bHidden=False,bNotConnectable=False,bDefaultValueIsReadOnly=False,bDefaultValueIsIgnored=False,bAdvancedView=True,bOrphanedPin=False,)
CustomProperties Pin (PinId=00389DD2C6CE4BD4BFAC37B2BFFCAB15,PinName="bTeleport",PinToolTip="Teleport\nBoolean\n\nWhether we teleport the physics state (if physics collision is enabled for this object). If true, physics velocity for this object is unchanged (so ragdoll parts are not affected by change in location). If false, physics velocity is updated based on the change in position (affecting ragdoll parts). If CCD is on and not teleporting, this will affect objects along the entire swept volume. Note that when teleporting, any child/attached components will be teleported too, maintaining their current offset even if they are being simulated. Setting the rotation without teleporting will not update the rotation of simulated child/attached components.",PinType.PinCategory="bool",PinType.PinSubCategory="",PinType.PinSubCategoryObject=None,PinType.PinSubCategoryMemberReference=(),PinType.PinValueType=(),PinType.ContainerType=None,PinType.bIsReference=False,PinType.bIsConst=False,PinType.bIsWeakPointer=False,PinType.bIsUObjectWrapper=False,PinType.bSerializeAsSinglePrecisionFloat=False,DefaultValue="false",AutogeneratedDefaultValue="false",PersistentGuid=00000000000000000000000000000000,bHidden=False,bNotConnectable=False,bDefaultValueIsReadOnly=False,bDefaultValueIsIgnored=False,bAdvancedView=True,bOrphanedPin=False,)
End Object
Begin Object Class=/Script/BlueprintGraph.K2Node_CallFunction Name="K2Node_CallFunction_3" ExportPath="/Script/BlueprintGraph.K2Node_CallFunction'/Game/Examples/BallShooter/Blueprints/BallShooterDiscreteRotationActuator.BallShooterDiscreteRotationActuator:TakeAction.K2Node_CallFunction_3'"
FunctionReference=(MemberParent="/Script/CoreUObject.Class'/Script/Engine.Actor'",MemberName="K2_AddActorWorldRotation")
NodePosX=240
NodePosY=416
AdvancedPinDisplay=Hidden
NodeGuid=40463A8E48DB3E85612657B044CE76FF
CustomProperties Pin (PinId=9D616BA5E5D74432A400F035C61C632A,PinName="execute",PinToolTip="\nExec",PinType.PinCategory="exec",PinType.PinSubCategory="",PinType.PinSubCategoryObject=None,PinType.PinSubCategoryMemberReference=(),PinType.PinValueType=(),PinType.ContainerType=None,PinType.bIsReference=False,PinType.bIsConst=False,PinType.bIsWeakPointer=False,PinType.bIsUObjectWrapper=False,PinType.bSerializeAsSinglePrecisionFloat=False,LinkedTo=(K2Node_SwitchInteger_0 A96487EE35C14BB99B7F9C12BAD38C12,),PersistentGuid=00000000000000000000000000000000,bHidden=False,bNotConnectable=False,bDefaultValueIsReadOnly=False,bDefaultValueIsIgnored=False,bAdvancedView=False,bOrphanedPin=False,)
CustomProperties Pin (PinId=A1DFEF1CE3924CE0BA7BB551A6B87444,PinName="then",PinToolTip="\nExec",Direction="EGPD_Output",PinType.PinCategory="exec",PinType.PinSubCategory="",PinType.PinSubCategoryObject=None,PinType.PinSubCategoryMemberReference=(),PinType.PinValueType=(),PinType.ContainerType=None,PinType.bIsReference=False,PinType.bIsConst=False,PinType.bIsWeakPointer=False,PinType.bIsUObjectWrapper=False,PinType.bSerializeAsSinglePrecisionFloat=False,LinkedTo=(K2Node_FunctionResult_0 7A635C8676B04D3BA52CCF33350C7C7B,),PersistentGuid=00000000000000000000000000000000,bHidden=False,bNotConnectable=False,bDefaultValueIsReadOnly=False,bDefaultValueIsIgnored=False,bAdvancedView=False,bOrphanedPin=False,)
CustomProperties Pin (PinId=9A1691CB19F94D309BE37AE589D34D60,PinName="self",PinFriendlyName=NSLOCTEXT("K2Node", "Target", "Target"),PinToolTip="Target\nActor Object Reference",PinType.PinCategory="object",PinType.PinSubCategory="",PinType.PinSubCategoryObject="/Script/CoreUObject.Class'/Script/Engine.Actor'",PinType.PinSubCategoryMemberReference=(),PinType.PinValueType=(),PinType.ContainerType=None,PinType.bIsReference=False,PinType.bIsConst=False,PinType.bIsWeakPointer=False,PinType.bIsUObjectWrapper=False,PinType.bSerializeAsSinglePrecisionFloat=False,LinkedTo=(K2Node_Knot_2 B107F3B443267DEDE92D7695EC7BF5E7,),PersistentGuid=00000000000000000000000000000000,bHidden=False,bNotConnectable=False,bDefaultValueIsReadOnly=False,bDefaultValueIsIgnored=False,bAdvancedView=False,bOrphanedPin=False,)
CustomProperties Pin (PinId=E531E3C2369D4995976A5989FD95907B,PinName="DeltaRotation",PinToolTip="Delta Rotation\nRotator\n\nThe change in rotation.",PinType.PinCategory="struct",PinType.PinSubCategory="",PinType.PinSubCategoryObject="/Script/CoreUObject.ScriptStruct'/Script/CoreUObject.Rotator'",PinType.PinSubCategoryMemberReference=(),PinType.PinValueType=(),PinType.ContainerType=None,PinType.bIsReference=False,PinType.bIsConst=False,PinType.bIsWeakPointer=False,PinType.bIsUObjectWrapper=False,PinType.bSerializeAsSinglePrecisionFloat=False,DefaultValue="0, 0, 0",AutogeneratedDefaultValue="0, 0, 0",LinkedTo=(K2Node_CallFunction_7 5CC671764850B7CC5F9AEBA4B16F5DC3,),PersistentGuid=00000000000000000000000000000000,bHidden=False,bNotConnectable=False,bDefaultValueIsReadOnly=False,bDefaultValueIsIgnored=False,bAdvancedView=False,bOrphanedPin=False,)
CustomProperties Pin (PinId=785E8288E3304BE490304FAA1BDD62A2,PinName="bSweep",PinToolTip="Sweep\nBoolean\n\nWhether to sweep to the target rotation (not currently supported for rotation).",PinType.PinCategory="bool",PinType.PinSubCategory="",PinType.PinSubCategoryObject=None,PinType.PinSubCategoryMemberReference=(),PinType.PinValueType=(),PinType.ContainerType=None,PinType.bIsReference=False,PinType.bIsConst=False,PinType.bIsWeakPointer=False,PinType.bIsUObjectWrapper=False,PinType.bSerializeAsSinglePrecisionFloat=False,DefaultValue="false",AutogeneratedDefaultValue="false",PersistentGuid=00000000000000000000000000000000,bHidden=False,bNotConnectable=False,bDefaultValueIsReadOnly=False,bDefaultValueIsIgnored=False,bAdvancedView=True,bOrphanedPin=False,)
CustomProperties Pin (PinId=CA6266610FF74A2099CBE71CECFC71F4,PinName="SweepHitResult",PinToolTip="Sweep Hit Result\nHit Result Structure\n\nThe hit result from the move if swept.",Direction="EGPD_Output",PinType.PinCategory="struct",PinType.PinSubCategory="",PinType.PinSubCategoryObject="/Script/CoreUObject.ScriptStruct'/Script/Engine.HitResult'",PinType.PinSubCategoryMemberReference=(),PinType.PinValueType=(),PinType.ContainerType=None,PinType.bIsReference=False,PinType.bIsConst=False,PinType.bIsWeakPointer=False,PinType.bIsUObjectWrapper=False,PinType.bSerializeAsSinglePrecisionFloat=False,PersistentGuid=00000000000000000000000000000000,bHidden=False,bNotConnectable=False,bDefaultValueIsReadOnly=False,bDefaultValueIsIgnored=False,bAdvancedView=True,bOrphanedPin=False,)
CustomProperties Pin (PinId=38DCC87347494B9C8349FEA4123F9DC2,PinName="bTeleport",PinToolTip="Teleport\nBoolean\n\nWhether we teleport the physics state (if physics collision is enabled for this object). If true, physics velocity for this object is unchanged (so ragdoll parts are not affected by change in location). If false, physics velocity is updated based on the change in position (affecting ragdoll parts). If CCD is on and not teleporting, this will affect objects along the entire swept volume. Note that when teleporting, any child/attached components will be teleported too, maintaining their current offset even if they are being simulated. Setting the rotation without teleporting will not update the rotation of simulated child/attached components.",PinType.PinCategory="bool",PinType.PinSubCategory="",PinType.PinSubCategoryObject=None,PinType.PinSubCategoryMemberReference=(),PinType.PinValueType=(),PinType.ContainerType=None,PinType.bIsReference=False,PinType.bIsConst=False,PinType.bIsWeakPointer=False,PinType.bIsUObjectWrapper=False,PinType.bSerializeAsSinglePrecisionFloat=False,DefaultValue="false",AutogeneratedDefaultValue="false",PersistentGuid=00000000000000000000000000000000,bHidden=False,bNotConnectable=False,bDefaultValueIsReadOnly=False,bDefaultValueIsIgnored=False,bAdvancedView=True,bOrphanedPin=False,)
End Object
Begin Object Class=/Script/BlueprintGraph.K2Node_Knot Name="K2Node_Knot_2" ExportPath="/Script/BlueprintGraph.K2Node_Knot'/Game/Examples/BallShooter/Blueprints/BallShooterDiscreteRotationActuator.BallShooterDiscreteRotationActuator:TakeAction.K2Node_Knot_2'"
NodePosX=96
NodePosY=432
NodeGuid=31F6666B46E4C1BC4B7DAC8A637C078E
CustomProperties Pin (PinId=04629A0D4D229356B8E03F9A83F7F2D6,PinName="InputPin",PinType.PinCategory="object",PinType.PinSubCategory="",PinType.PinSubCategoryObject="/Script/CoreUObject.Class'/Script/Engine.Actor'",PinType.PinSubCategoryMemberReference=(),PinType.PinValueType=(),PinType.ContainerType=None,PinType.bIsReference=False,PinType.bIsConst=False,PinType.bIsWeakPointer=False,PinType.bIsUObjectWrapper=False,PinType.bSerializeAsSinglePrecisionFloat=False,LinkedTo=(K2Node_Knot_4 07D414CB481407E142AB15B4800DCA30,),PersistentGuid=00000000000000000000000000000000,bHidden=False,bNotConnectable=False,bDefaultValueIsReadOnly=False,bDefaultValueIsIgnored=True,bAdvancedView=False,bOrphanedPin=False,)
CustomProperties Pin (PinId=B107F3B443267DEDE92D7695EC7BF5E7,PinName="OutputPin",Direction="EGPD_Output",PinType.PinCategory="object",PinType.PinSubCategory="",PinType.PinSubCategoryObject="/Script/CoreUObject.Class'/Script/Engine.Actor'",PinType.PinSubCategoryMemberReference=(),PinType.PinValueType=(),PinType.ContainerType=None,PinType.bIsReference=False,PinType.bIsConst=False,PinType.bIsWeakPointer=False,PinType.bIsUObjectWrapper=False,PinType.bSerializeAsSinglePrecisionFloat=False,LinkedTo=(K2Node_CallFunction_3 9A1691CB19F94D309BE37AE589D34D60,K2Node_CallFunction_2 3288FD9CA690410D86A45398AAD6882E,),PersistentGuid=00000000000000000000000000000000,bHidden=False,bNotConnectable=False,bDefaultValueIsReadOnly=False,bDefaultValueIsIgnored=False,bAdvancedView=False,bOrphanedPin=False,)
End Object
Begin Object Class=/Script/BlueprintGraph.K2Node_FunctionResult Name="K2Node_FunctionResult_2" ExportPath="/Script/BlueprintGraph.K2Node_FunctionResult'/Game/Examples/BallShooter/Blueprints/BallShooterDiscreteRotationActuator.BallShooterDiscreteRotationActuator:TakeAction.K2Node_FunctionResult_2'"
FunctionReference=(MemberParent="/Script/CoreUObject.Class'/Script/Schola.BlueprintDiscreteActuator'",MemberName="TakeAction")
NodePosX=480
NodePosY=256
NodeGuid=6F8EF17D454D687A52224E8CF6784A89
CustomProperties Pin (PinId=7A635C8676B04D3BA52CCF33350C7C7B,PinName="execute",PinType.PinCategory="exec",PinType.PinSubCategory="",PinType.PinSubCategoryObject=None,PinType.PinSubCategoryMemberReference=(),PinType.PinValueType=(),PinType.ContainerType=None,PinType.bIsReference=False,PinType.bIsConst=False,PinType.bIsWeakPointer=False,PinType.bIsUObjectWrapper=False,PinType.bSerializeAsSinglePrecisionFloat=False,LinkedTo=(K2Node_CallFunction_2 31AA1ED27B7B4561942AFE2E524DE34A,),PersistentGuid=00000000000000000000000000000000,bHidden=False,bNotConnectable=False,bDefaultValueIsReadOnly=False,bDefaultValueIsIgnored=False,bAdvancedView=False,bOrphanedPin=False,)
End Object
Begin Object Class=/Script/BlueprintGraph.K2Node_FunctionResult Name="K2Node_FunctionResult_0" ExportPath="/Script/BlueprintGraph.K2Node_FunctionResult'/Game/Examples/BallShooter/Blueprints/BallShooterDiscreteRotationActuator.BallShooterDiscreteRotationActuator:TakeAction.K2Node_FunctionResult_0'"
FunctionReference=(MemberParent="/Script/CoreUObject.Class'/Script/Schola.BlueprintDiscreteActuator'",MemberName="TakeAction")
NodePosX=480
NodePosY=432
NodeGuid=205ACA3A42ADB0E4ED14539BA7326B1D
CustomProperties Pin (PinId=7A635C8676B04D3BA52CCF33350C7C7B,PinName="execute",PinType.PinCategory="exec",PinType.PinSubCategory="",PinType.PinSubCategoryObject=None,PinType.PinSubCategoryMemberReference=(),PinType.PinValueType=(),PinType.ContainerType=None,PinType.bIsReference=False,PinType.bIsConst=False,PinType.bIsWeakPointer=False,PinType.bIsUObjectWrapper=False,PinType.bSerializeAsSinglePrecisionFloat=False,LinkedTo=(K2Node_CallFunction_3 A1DFEF1CE3924CE0BA7BB551A6B87444,),PersistentGuid=00000000000000000000000000000000,bHidden=False,bNotConnectable=False,bDefaultValueIsReadOnly=False,bDefaultValueIsIgnored=False,bAdvancedView=False,bOrphanedPin=False,)
End Object
Begin Object Class=/Script/BlueprintGraph.K2Node_Knot Name="K2Node_Knot_4" ExportPath="/Script/BlueprintGraph.K2Node_Knot'/Game/Examples/BallShooter/Blueprints/BallShooterDiscreteRotationActuator.BallShooterDiscreteRotationActuator:TakeAction.K2Node_Knot_4'"
NodePosX=-112
NodePosY=432
NodeGuid=71E486954B0BC1A7CF8630A59E1A171A
CustomProperties Pin (PinId=D9EE8B8046B2C3ADDEE74CB06CE91107,PinName="InputPin",PinType.PinCategory="object",PinType.PinSubCategory="",PinType.PinSubCategoryObject="/Script/CoreUObject.Class'/Script/Engine.Actor'",PinType.PinSubCategoryMemberReference=(),PinType.PinValueType=(),PinType.ContainerType=None,PinType.bIsReference=False,PinType.bIsConst=False,PinType.bIsWeakPointer=False,PinType.bIsUObjectWrapper=False,PinType.bSerializeAsSinglePrecisionFloat=False,LinkedTo=(K2Node_CallFunction_11 AAC6574B3B9C47BC82EA1B78FA92755C,),PersistentGuid=00000000000000000000000000000000,bHidden=False,bNotConnectable=False,bDefaultValueIsReadOnly=False,bDefaultValueIsIgnored=True,bAdvancedView=False,bOrphanedPin=False,)
CustomProperties Pin (PinId=07D414CB481407E142AB15B4800DCA30,PinName="OutputPin",Direction="EGPD_Output",PinType.PinCategory="object",PinType.PinSubCategory="",PinType.PinSubCategoryObject="/Script/CoreUObject.Class'/Script/Engine.Actor'",PinType.PinSubCategoryMemberReference=(),PinType.PinValueType=(),PinType.ContainerType=None,PinType.bIsReference=False,PinType.bIsConst=False,PinType.bIsWeakPointer=False,PinType.bIsUObjectWrapper=False,PinType.bSerializeAsSinglePrecisionFloat=False,LinkedTo=(K2Node_Knot_2 04629A0D4D229356B8E03F9A83F7F2D6,),PersistentGuid=00000000000000000000000000000000,bHidden=False,bNotConnectable=False,bDefaultValueIsReadOnly=False,bDefaultValueIsIgnored=False,bAdvancedView=False,bOrphanedPin=False,)
End Object
Begin Object Class=/Script/BlueprintGraph.K2Node_VariableGet Name="K2Node_VariableGet_0" ExportPath="/Script/BlueprintGraph.K2Node_VariableGet'/Game/Examples/BallShooter/Blueprints/BallShooterDiscreteRotationActuator.BallShooterDiscreteRotationActuator:TakeAction.K2Node_VariableGet_0'"
VariableReference=(MemberName="Rotation Magnitude",MemberGuid=3F6B2A5044EFA198E2D678A9739A263C,bSelfContext=True)
NodePosX=-608
NodePosY=527
NodeGuid=1D5592CB434E42705E53BC81D26260D7
CustomProperties Pin (PinId=582909FF4DF0A009F0ED73930209F786,PinName="Rotation Magnitude",Direction="EGPD_Output",PinType.PinCategory="real",PinType.PinSubCategory="double",PinType.PinSubCategoryObject=None,PinType.PinSubCategoryMemberReference=(),PinType.PinValueType=(),PinType.ContainerType=None,PinType.bIsReference=False,PinType.bIsConst=False,PinType.bIsWeakPointer=False,PinType.bIsUObjectWrapper=False,PinType.bSerializeAsSinglePrecisionFloat=False,DefaultValue="0.0",AutogeneratedDefaultValue="0.0",LinkedTo=(K2Node_CallFunction_1 81663D994B2F76CF97BF87A2FD4760B4,),PersistentGuid=00000000000000000000000000000000,bHidden=False,bNotConnectable=False,bDefaultValueIsReadOnly=False,bDefaultValueIsIgnored=False,bAdvancedView=False,bOrphanedPin=False,)
CustomProperties Pin (PinId=53057EC94F5292FDF3C1948CDC7CDEBF,PinName="self",PinFriendlyName=NSLOCTEXT("K2Node", "Target", "Target"),PinType.PinCategory="object",PinType.PinSubCategory="",PinType.PinSubCategoryObject="/Script/Engine.BlueprintGeneratedClass'/Game/Examples/BallShooter/Blueprints/BallShooterDiscreteRotationActuator.BallShooterDiscreteRotationActuator_C'",PinType.PinSubCategoryMemberReference=(),PinType.PinValueType=(),PinType.ContainerType=None,PinType.bIsReference=False,PinType.bIsConst=False,PinType.bIsWeakPointer=False,PinType.bIsUObjectWrapper=False,PinType.bSerializeAsSinglePrecisionFloat=False,PersistentGuid=00000000000000000000000000000000,bHidden=True,bNotConnectable=False,bDefaultValueIsReadOnly=False,bDefaultValueIsIgnored=False,bAdvancedView=False,bOrphanedPin=False,)
End Object
Begin Object Class=/Script/BlueprintGraph.K2Node_CallFunction Name="K2Node_CallFunction_1" ExportPath="/Script/BlueprintGraph.K2Node_CallFunction'/Game/Examples/BallShooter/Blueprints/BallShooterDiscreteRotationActuator.BallShooterDiscreteRotationActuator:TakeAction.K2Node_CallFunction_1'"
bIsPureFunc=True
FunctionReference=(MemberParent="/Script/CoreUObject.Class'/Script/Engine.KismetMathLibrary'",MemberName="MakeRotator")
NodePosX=-416
NodePosY=432
NodeGuid=757B4F0A4123AF28CAE3E1918D8591D8
CustomProperties Pin (PinId=CB343FE14A33B770B47326933AC6BF45,PinName="self",PinFriendlyName=NSLOCTEXT("K2Node", "Target", "Target"),PinToolTip="Target\nKismet Math Library Object Reference",PinType.PinCategory="object",PinType.PinSubCategory="",PinType.PinSubCategoryObject="/Script/CoreUObject.Class'/Script/Engine.KismetMathLibrary'",PinType.PinSubCategoryMemberReference=(),PinType.PinValueType=(),PinType.ContainerType=None,PinType.bIsReference=False,PinType.bIsConst=False,PinType.bIsWeakPointer=False,PinType.bIsUObjectWrapper=False,PinType.bSerializeAsSinglePrecisionFloat=False,DefaultObject="/Script/Engine.Default__KismetMathLibrary",PersistentGuid=00000000000000000000000000000000,bHidden=True,bNotConnectable=False,bDefaultValueIsReadOnly=False,bDefaultValueIsIgnored=False,bAdvancedView=False,bOrphanedPin=False,)
CustomProperties Pin (PinId=B69E868043F0B6CE618FF18B7E3D9F57,PinName="Roll",PinFriendlyName="X (Roll)",PinToolTip="X (Roll)\nFloat (single-precision)",PinType.PinCategory="real",PinType.PinSubCategory="float",PinType.PinSubCategoryObject=None,PinType.PinSubCategoryMemberReference=(),PinType.PinValueType=(),PinType.ContainerType=None,PinType.bIsReference=False,PinType.bIsConst=False,PinType.bIsWeakPointer=False,PinType.bIsUObjectWrapper=False,PinType.bSerializeAsSinglePrecisionFloat=False,DefaultValue="0.0",AutogeneratedDefaultValue="0.0",PersistentGuid=00000000000000000000000000000000,bHidden=False,bNotConnectable=False,bDefaultValueIsReadOnly=False,bDefaultValueIsIgnored=False,bAdvancedView=False,bOrphanedPin=False,)
CustomProperties Pin (PinId=3FFFF31A4DAD32E4B90452BCE241BA9E,PinName="Pitch",PinFriendlyName="Y (Pitch)",PinToolTip="Y (Pitch)\nFloat (single-precision)",PinType.PinCategory="real",PinType.PinSubCategory="float",PinType.PinSubCategoryObject=None,PinType.PinSubCategoryMemberReference=(),PinType.PinValueType=(),PinType.ContainerType=None,PinType.bIsReference=False,PinType.bIsConst=False,PinType.bIsWeakPointer=False,PinType.bIsUObjectWrapper=False,PinType.bSerializeAsSinglePrecisionFloat=False,DefaultValue="0.0",AutogeneratedDefaultValue="0.0",PersistentGuid=00000000000000000000000000000000,bHidden=False,bNotConnectable=False,bDefaultValueIsReadOnly=False,bDefaultValueIsIgnored=False,bAdvancedView=False,bOrphanedPin=False,)
CustomProperties Pin (PinId=81663D994B2F76CF97BF87A2FD4760B4,PinName="Yaw",PinFriendlyName="Z (Yaw)",PinToolTip="Z (Yaw)\nFloat (single-precision)",PinType.PinCategory="real",PinType.PinSubCategory="float",PinType.PinSubCategoryObject=None,PinType.PinSubCategoryMemberReference=(),PinType.PinValueType=(),PinType.ContainerType=None,PinType.bIsReference=False,PinType.bIsConst=False,PinType.bIsWeakPointer=False,PinType.bIsUObjectWrapper=False,PinType.bSerializeAsSinglePrecisionFloat=False,DefaultValue="0.0",AutogeneratedDefaultValue="0.0",LinkedTo=(K2Node_VariableGet_0 582909FF4DF0A009F0ED73930209F786,),PersistentGuid=00000000000000000000000000000000,bHidden=False,bNotConnectable=False,bDefaultValueIsReadOnly=False,bDefaultValueIsIgnored=False,bAdvancedView=False,bOrphanedPin=False,)
CustomProperties Pin (PinId=19D8003B4A4BB89BC5E299A03FFAC2EF,PinName="ReturnValue",PinToolTip="Return Value\nRotator\n\nMakes a rotator {Roll, Pitch, Yaw} from rotation values supplied in degrees",Direction="EGPD_Output",PinType.PinCategory="struct",PinType.PinSubCategory="",PinType.PinSubCategoryObject="/Script/CoreUObject.ScriptStruct'/Script/CoreUObject.Rotator'",PinType.PinSubCategoryMemberReference=(),PinType.PinValueType=(),PinType.ContainerType=None,PinType.bIsReference=False,PinType.bIsConst=False,PinType.bIsWeakPointer=False,PinType.bIsUObjectWrapper=False,PinType.bSerializeAsSinglePrecisionFloat=False,DefaultValue="0, 0, 0",AutogeneratedDefaultValue="0, 0, 0",LinkedTo=(K2Node_Knot_5 4BE8D6D5407C09A34A33559CF2011E0D,),PersistentGuid=00000000000000000000000000000000,bHidden=False,bNotConnectable=False,bDefaultValueIsReadOnly=False,bDefaultValueIsIgnored=False,bAdvancedView=False,bOrphanedPin=False,)
End Object
Begin Object Class=/Script/BlueprintGraph.K2Node_CallFunction Name="K2Node_CallFunction_7" ExportPath="/Script/BlueprintGraph.K2Node_CallFunction'/Game/Examples/BallShooter/Blueprints/BallShooterDiscreteRotationActuator.BallShooterDiscreteRotationActuator:TakeAction.K2Node_CallFunction_7'"
bIsPureFunc=True
FunctionReference=(MemberParent="/Script/CoreUObject.Class'/Script/Engine.KismetMathLibrary'",MemberName="NegateRotator")
NodePosY=496
NodeGuid=AE204C954D52EB8F894AB38DB1DC51F0
CustomProperties Pin (PinId=8C8D21E545C5CD49E7B43EA5D00A77DD,PinName="self",PinFriendlyName=NSLOCTEXT("K2Node", "Target", "Target"),PinToolTip="Target\nKismet Math Library Object Reference",PinType.PinCategory="object",PinType.PinSubCategory="",PinType.PinSubCategoryObject="/Script/CoreUObject.Class'/Script/Engine.KismetMathLibrary'",PinType.PinSubCategoryMemberReference=(),PinType.PinValueType=(),PinType.ContainerType=None,PinType.bIsReference=False,PinType.bIsConst=False,PinType.bIsWeakPointer=False,PinType.bIsUObjectWrapper=False,PinType.bSerializeAsSinglePrecisionFloat=False,DefaultObject="/Script/Engine.Default__KismetMathLibrary",PersistentGuid=00000000000000000000000000000000,bHidden=True,bNotConnectable=False,bDefaultValueIsReadOnly=False,bDefaultValueIsIgnored=False,bAdvancedView=False,bOrphanedPin=False,)
CustomProperties Pin (PinId=F62031E648F521435914889291807EC2,PinName="A",PinToolTip="A\nRotator",PinType.PinCategory="struct",PinType.PinSubCategory="",PinType.PinSubCategoryObject="/Script/CoreUObject.ScriptStruct'/Script/CoreUObject.Rotator'",PinType.PinSubCategoryMemberReference=(),PinType.PinValueType=(),PinType.ContainerType=None,PinType.bIsReference=False,PinType.bIsConst=False,PinType.bIsWeakPointer=False,PinType.bIsUObjectWrapper=False,PinType.bSerializeAsSinglePrecisionFloat=False,DefaultValue="0, 0, 0",AutogeneratedDefaultValue="0, 0, 0",LinkedTo=(K2Node_Knot_5 D96FB7CB447C8A02DBE74280F73FC977,),PersistentGuid=00000000000000000000000000000000,bHidden=False,bNotConnectable=False,bDefaultValueIsReadOnly=False,bDefaultValueIsIgnored=False,bAdvancedView=False,bOrphanedPin=False,)
CustomProperties Pin (PinId=5CC671764850B7CC5F9AEBA4B16F5DC3,PinName="ReturnValue",PinToolTip="Return Value\nRotator\n\nNegate a rotator",Direction="EGPD_Output",PinType.PinCategory="struct",PinType.PinSubCategory="",PinType.PinSubCategoryObject="/Script/CoreUObject.ScriptStruct'/Script/CoreUObject.Rotator'",PinType.PinSubCategoryMemberReference=(),PinType.PinValueType=(),PinType.ContainerType=None,PinType.bIsReference=False,PinType.bIsConst=False,PinType.bIsWeakPointer=False,PinType.bIsUObjectWrapper=False,PinType.bSerializeAsSinglePrecisionFloat=False,DefaultValue="0, 0, 0",AutogeneratedDefaultValue="0, 0, 0",LinkedTo=(K2Node_CallFunction_3 E531E3C2369D4995976A5989FD95907B,),PersistentGuid=00000000000000000000000000000000,bHidden=False,bNotConnectable=False,bDefaultValueIsReadOnly=False,bDefaultValueIsIgnored=False,bAdvancedView=False,bOrphanedPin=False,)
End Object
Begin Object Class=/Script/BlueprintGraph.K2Node_Knot Name="K2Node_Knot_5" ExportPath="/Script/BlueprintGraph.K2Node_Knot'/Game/Examples/BallShooter/Blueprints/BallShooterDiscreteRotationActuator.BallShooterDiscreteRotationActuator:TakeAction.K2Node_Knot_5'"
NodePosX=-112
NodePosY=464
NodeGuid=6F87E55642F3CC58F3231284DC814446
CustomProperties Pin (PinId=4BE8D6D5407C09A34A33559CF2011E0D,PinName="InputPin",PinType.PinCategory="struct",PinType.PinSubCategory="",PinType.PinSubCategoryObject="/Script/CoreUObject.ScriptStruct'/Script/CoreUObject.Rotator'",PinType.PinSubCategoryMemberReference=(),PinType.PinValueType=(),PinType.ContainerType=None,PinType.bIsReference=False,PinType.bIsConst=False,PinType.bIsWeakPointer=False,PinType.bIsUObjectWrapper=False,PinType.bSerializeAsSinglePrecisionFloat=False,LinkedTo=(K2Node_CallFunction_1 19D8003B4A4BB89BC5E299A03FFAC2EF,),PersistentGuid=00000000000000000000000000000000,bHidden=False,bNotConnectable=False,bDefaultValueIsReadOnly=False,bDefaultValueIsIgnored=True,bAdvancedView=False,bOrphanedPin=False,)
CustomProperties Pin (PinId=D96FB7CB447C8A02DBE74280F73FC977,PinName="OutputPin",Direction="EGPD_Output",PinType.PinCategory="struct",PinType.PinSubCategory="",PinType.PinSubCategoryObject="/Script/CoreUObject.ScriptStruct'/Script/CoreUObject.Rotator'",PinType.PinSubCategoryMemberReference=(),PinType.PinValueType=(),PinType.ContainerType=None,PinType.bIsReference=False,PinType.bIsConst=False,PinType.bIsWeakPointer=False,PinType.bIsUObjectWrapper=False,PinType.bSerializeAsSinglePrecisionFloat=False,LinkedTo=(K2Node_CallFunction_7 F62031E648F521435914889291807EC2,K2Node_CallFunction_2 102A434B42094911B48356CCA36E691E,),PersistentGuid=00000000000000000000000000000000,bHidden=False,bNotConnectable=False,bDefaultValueIsReadOnly=False,bDefaultValueIsIgnored=False,bAdvancedView=False,bOrphanedPin=False,)
End Object
Creating the Trainer
To train an agent in Schola, the agent must be controlled by an AbstractTrainer, which defines the ComputeReward() and ComputeStatus() functions. In this tutorial, we will be creating an BlueprintTrainer (subclass of AbstractTrainer).
-
Create a new Blueprint Class with parent class
BlueprintTrainer, and name itBallShooterTrainer. -
Add a new integer variable. Name it
maxNumberOfHitsPerEpisode. It stores the maximum number of times the agent can hit the target in one episode, which is the number of targets multiplied by the number of hitpoints for each target. It is set by the Environment Definition blueprint. -
Add a new integer variable. Name it
numOfHitsThisEpisode. It stores the number of times the agent has hit the target in the current episode. It is used to determine when the episode ends. -
Add a new integer variable. Name it
numOfTargetHits. It stores the number of times the agent has hit the target in the current step. -
Add an
Actuatorcomponent, and set theDetails→Actuator Component→ActuatortoBallShooterShootingActuator -
Set the Event Graph as shown below. This binds the
On Ball Hitevent to any balls spawned by the agent’s actuator, allowing the trainer to detect when the agent hits or misses the target.

Begin Object Class=/Script/BlueprintGraph.K2Node_Event Name="K2Node_Event_0" ExportPath="/Script/BlueprintGraph.K2Node_Event'/Game/Examples/BallShooter/Blueprints/BallShooterTrainer.BallShooterTrainer:EventGraph.K2Node_Event_0'"
EventReference=(MemberParent="/Script/CoreUObject.Class'/Script/Engine.Actor'",MemberName="ReceiveBeginPlay")
bOverrideFunction=True
NodePosX=288
NodePosY=-387
bCommentBubblePinned=True
NodeGuid=48F238BE2ADD4D8EA77924086FBEC7F9
CustomProperties Pin (PinId=D8F139579C644FEAA5D9815E22567E96,PinName="OutputDelegate",Direction="EGPD_Output",PinType.PinCategory="delegate",PinType.PinSubCategory="",PinType.PinSubCategoryObject=None,PinType.PinSubCategoryMemberReference=(MemberParent="/Script/CoreUObject.Class'/Script/Engine.Actor'",MemberName="ReceiveBeginPlay"),PinType.PinValueType=(),PinType.ContainerType=None,PinType.bIsReference=False,PinType.bIsConst=False,PinType.bIsWeakPointer=False,PinType.bIsUObjectWrapper=False,PinType.bSerializeAsSinglePrecisionFloat=False,PersistentGuid=00000000000000000000000000000000,bHidden=False,bNotConnectable=False,bDefaultValueIsReadOnly=False,bDefaultValueIsIgnored=False,bAdvancedView=False,bOrphanedPin=False,)
CustomProperties Pin (PinId=F135CD17D40347269BBBD101437B6AF0,PinName="then",Direction="EGPD_Output",PinType.PinCategory="exec",PinType.PinSubCategory="",PinType.PinSubCategoryObject=None,PinType.PinSubCategoryMemberReference=(),PinType.PinValueType=(),PinType.ContainerType=None,PinType.bIsReference=False,PinType.bIsConst=False,PinType.bIsWeakPointer=False,PinType.bIsUObjectWrapper=False,PinType.bSerializeAsSinglePrecisionFloat=False,LinkedTo=(K2Node_DynamicCast_0 DF2F327A4EDAA8EC0FE14C84CEB9184A,),PersistentGuid=00000000000000000000000000000000,bHidden=False,bNotConnectable=False,bDefaultValueIsReadOnly=False,bDefaultValueIsIgnored=False,bAdvancedView=False,bOrphanedPin=False,)
End Object
Begin Object Class=/Script/BlueprintGraph.K2Node_VariableGet Name="K2Node_VariableGet_0" ExportPath="/Script/BlueprintGraph.K2Node_VariableGet'/Game/Examples/BallShooter/Blueprints/BallShooterTrainer.BallShooterTrainer:EventGraph.K2Node_VariableGet_0'"
VariableReference=(MemberName="BallShooter",bSelfContext=True)
NodePosX=128
NodePosY=-288
NodeGuid=F6BD07714B7A7F905A8E3B838DF0B2AD
CustomProperties Pin (PinId=1D4E9B4940AAAEC9945E57A0ABDB8BBC,PinName="BallShooter",Direction="EGPD_Output",PinType.PinCategory="object",PinType.PinSubCategory="",PinType.PinSubCategoryObject="/Script/CoreUObject.Class'/Script/Schola.ActuatorComponent'",PinType.PinSubCategoryMemberReference=(),PinType.PinValueType=(),PinType.ContainerType=None,PinType.bIsReference=False,PinType.bIsConst=False,PinType.bIsWeakPointer=False,PinType.bIsUObjectWrapper=False,PinType.bSerializeAsSinglePrecisionFloat=False,LinkedTo=(K2Node_VariableGet_1 9D13C0F041F97294E54E929953ABD5BF,),PersistentGuid=00000000000000000000000000000000,bHidden=False,bNotConnectable=False,bDefaultValueIsReadOnly=False,bDefaultValueIsIgnored=False,bAdvancedView=False,bOrphanedPin=False,)
CustomProperties Pin (PinId=BFE61F3E4E7E4C670AC1478C8CD34585,PinName="self",PinFriendlyName=NSLOCTEXT("K2Node", "Target", "Target"),PinType.PinCategory="object",PinType.PinSubCategory="",PinType.PinSubCategoryObject="/Script/Engine.BlueprintGeneratedClass'/Game/Examples/BallShooter/Blueprints/BallShooterTrainer.BallShooterTrainer_C'",PinType.PinSubCategoryMemberReference=(),PinType.PinValueType=(),PinType.ContainerType=None,PinType.bIsReference=False,PinType.bIsConst=False,PinType.bIsWeakPointer=False,PinType.bIsUObjectWrapper=False,PinType.bSerializeAsSinglePrecisionFloat=False,PersistentGuid=00000000000000000000000000000000,bHidden=True,bNotConnectable=False,bDefaultValueIsReadOnly=False,bDefaultValueIsIgnored=False,bAdvancedView=False,bOrphanedPin=False,)
End Object
Begin Object Class=/Script/BlueprintGraph.K2Node_VariableGet Name="K2Node_VariableGet_1" ExportPath="/Script/BlueprintGraph.K2Node_VariableGet'/Game/Examples/BallShooter/Blueprints/BallShooterTrainer.BallShooterTrainer:EventGraph.K2Node_VariableGet_1'"
VariableReference=(MemberParent="/Script/CoreUObject.Class'/Script/Schola.ActuatorComponent'",MemberName="Actuator")
SelfContextInfo=NotSelfContext
NodePosX=272
NodePosY=-288
NodeGuid=77E75DFD40B70F0E46A5BC8B6CEFCD69
CustomProperties Pin (PinId=DB927410443D79DFEA3DE6BC65ECA28C,PinName="Actuator",PinFriendlyName="Actuator",Direction="EGPD_Output",PinType.PinCategory="object",PinType.PinSubCategory="",PinType.PinSubCategoryObject="/Script/CoreUObject.Class'/Script/Schola.Actuator'",PinType.PinSubCategoryMemberReference=(),PinType.PinValueType=(),PinType.ContainerType=None,PinType.bIsReference=False,PinType.bIsConst=False,PinType.bIsWeakPointer=False,PinType.bIsUObjectWrapper=False,PinType.bSerializeAsSinglePrecisionFloat=False,LinkedTo=(K2Node_DynamicCast_0 FCFE096446CC71E188E70F931FF39F12,),PersistentGuid=00000000000000000000000000000000,bHidden=False,bNotConnectable=False,bDefaultValueIsReadOnly=False,bDefaultValueIsIgnored=False,bAdvancedView=False,bOrphanedPin=False,)
CustomProperties Pin (PinId=9D13C0F041F97294E54E929953ABD5BF,PinName="self",PinFriendlyName=NSLOCTEXT("K2Node", "Target", "Target"),PinType.PinCategory="object",PinType.PinSubCategory="",PinType.PinSubCategoryObject="/Script/CoreUObject.Class'/Script/Schola.ActuatorComponent'",PinType.PinSubCategoryMemberReference=(),PinType.PinValueType=(),PinType.ContainerType=None,PinType.bIsReference=False,PinType.bIsConst=False,PinType.bIsWeakPointer=False,PinType.bIsUObjectWrapper=False,PinType.bSerializeAsSinglePrecisionFloat=False,LinkedTo=(K2Node_VariableGet_0 1D4E9B4940AAAEC9945E57A0ABDB8BBC,),PersistentGuid=00000000000000000000000000000000,bHidden=False,bNotConnectable=False,bDefaultValueIsReadOnly=False,bDefaultValueIsIgnored=False,bAdvancedView=False,bOrphanedPin=False,)
End Object
Begin Object Class=/Script/BlueprintGraph.K2Node_DynamicCast Name="K2Node_DynamicCast_0" ExportPath="/Script/BlueprintGraph.K2Node_DynamicCast'/Game/Examples/BallShooter/Blueprints/BallShooterTrainer.BallShooterTrainer:EventGraph.K2Node_DynamicCast_0'"
TargetType="/Script/Engine.BlueprintGeneratedClass'/Game/Examples/BallShooter/Blueprints/BallShooterShootingActuator.BallShooterShootingActuator_C'"
NodePosX=480
NodePosY=-384
NodeGuid=C42288314DB544789A4BAF8537E17610
CustomProperties Pin (PinId=DF2F327A4EDAA8EC0FE14C84CEB9184A,PinName="execute",PinType.PinCategory="exec",PinType.PinSubCategory="",PinType.PinSubCategoryObject=None,PinType.PinSubCategoryMemberReference=(),PinType.PinValueType=(),PinType.ContainerType=None,PinType.bIsReference=False,PinType.bIsConst=False,PinType.bIsWeakPointer=False,PinType.bIsUObjectWrapper=False,PinType.bSerializeAsSinglePrecisionFloat=False,LinkedTo=(K2Node_Event_0 F135CD17D40347269BBBD101437B6AF0,),PersistentGuid=00000000000000000000000000000000,bHidden=False,bNotConnectable=False,bDefaultValueIsReadOnly=False,bDefaultValueIsIgnored=False,bAdvancedView=False,bOrphanedPin=False,)
CustomProperties Pin (PinId=4F53531A48C66A722E1BDB9D92E274A1,PinName="then",Direction="EGPD_Output",PinType.PinCategory="exec",PinType.PinSubCategory="",PinType.PinSubCategoryObject=None,PinType.PinSubCategoryMemberReference=(),PinType.PinValueType=(),PinType.ContainerType=None,PinType.bIsReference=False,PinType.bIsConst=False,PinType.bIsWeakPointer=False,PinType.bIsUObjectWrapper=False,PinType.bSerializeAsSinglePrecisionFloat=False,LinkedTo=(K2Node_VariableSet_0 9C2F82FC4A134E6F5FBCEFA05AC34C90,),PersistentGuid=00000000000000000000000000000000,bHidden=False,bNotConnectable=False,bDefaultValueIsReadOnly=False,bDefaultValueIsIgnored=False,bAdvancedView=False,bOrphanedPin=False,)
CustomProperties Pin (PinId=C4F791EF4D9DEC6F61A509B23F55399C,PinName="CastFailed",Direction="EGPD_Output",PinType.PinCategory="exec",PinType.PinSubCategory="",PinType.PinSubCategoryObject=None,PinType.PinSubCategoryMemberReference=(),PinType.PinValueType=(),PinType.ContainerType=None,PinType.bIsReference=False,PinType.bIsConst=False,PinType.bIsWeakPointer=False,PinType.bIsUObjectWrapper=False,PinType.bSerializeAsSinglePrecisionFloat=False,PersistentGuid=00000000000000000000000000000000,bHidden=False,bNotConnectable=False,bDefaultValueIsReadOnly=False,bDefaultValueIsIgnored=False,bAdvancedView=False,bOrphanedPin=False,)
CustomProperties Pin (PinId=FCFE096446CC71E188E70F931FF39F12,PinName="Object",PinType.PinCategory="object",PinType.PinSubCategory="",PinType.PinSubCategoryObject="/Script/CoreUObject.Class'/Script/CoreUObject.Object'",PinType.PinSubCategoryMemberReference=(),PinType.PinValueType=(),PinType.ContainerType=None,PinType.bIsReference=False,PinType.bIsConst=False,PinType.bIsWeakPointer=False,PinType.bIsUObjectWrapper=False,PinType.bSerializeAsSinglePrecisionFloat=False,LinkedTo=(K2Node_VariableGet_1 DB927410443D79DFEA3DE6BC65ECA28C,),PersistentGuid=00000000000000000000000000000000,bHidden=False,bNotConnectable=False,bDefaultValueIsReadOnly=False,bDefaultValueIsIgnored=False,bAdvancedView=False,bOrphanedPin=False,)
CustomProperties Pin (PinId=27DFA5F94039AEF1950818BEF4779AEF,PinName="AsBall Shooter Shooting Actuator",Direction="EGPD_Output",PinType.PinCategory="object",PinType.PinSubCategory="",PinType.PinSubCategoryObject="/Script/Engine.BlueprintGeneratedClass'/Game/Examples/BallShooter/Blueprints/BallShooterShootingActuator.BallShooterShootingActuator_C'",PinType.PinSubCategoryMemberReference=(),PinType.PinValueType=(),PinType.ContainerType=None,PinType.bIsReference=False,PinType.bIsConst=False,PinType.bIsWeakPointer=False,PinType.bIsUObjectWrapper=False,PinType.bSerializeAsSinglePrecisionFloat=False,LinkedTo=(K2Node_VariableSet_0 F7675B8441FAAA3FF8F086BFF17B0CA7,),PersistentGuid=00000000000000000000000000000000,bHidden=False,bNotConnectable=False,bDefaultValueIsReadOnly=False,bDefaultValueIsIgnored=False,bAdvancedView=False,bOrphanedPin=False,)
CustomProperties Pin (PinId=9892447640D902A84DADDB9D4ABE0245,PinName="bSuccess",Direction="EGPD_Output",PinType.PinCategory="bool",PinType.PinSubCategory="",PinType.PinSubCategoryObject=None,PinType.PinSubCategoryMemberReference=(),PinType.PinValueType=(),PinType.ContainerType=None,PinType.bIsReference=False,PinType.bIsConst=False,PinType.bIsWeakPointer=False,PinType.bIsUObjectWrapper=False,PinType.bSerializeAsSinglePrecisionFloat=False,PersistentGuid=00000000000000000000000000000000,bHidden=True,bNotConnectable=False,bDefaultValueIsReadOnly=False,bDefaultValueIsIgnored=False,bAdvancedView=False,bOrphanedPin=False,)
End Object
Begin Object Class=/Script/BlueprintGraph.K2Node_VariableSet Name="K2Node_VariableSet_0" ExportPath="/Script/BlueprintGraph.K2Node_VariableSet'/Game/Examples/BallShooter/Blueprints/BallShooterTrainer.BallShooterTrainer:EventGraph.K2Node_VariableSet_0'"
VariableReference=(MemberName="Ball Shooter Actuator",MemberGuid=0089BFD742737DAEE28AB2A7BADC47DC,bSelfContext=True)
NodePosX=832
NodePosY=-368
NodeGuid=6C66B6274D3DA300CDD6A5A302E51AD2
CustomProperties Pin (PinId=9C2F82FC4A134E6F5FBCEFA05AC34C90,PinName="execute",PinType.PinCategory="exec",PinType.PinSubCategory="",PinType.PinSubCategoryObject=None,PinType.PinSubCategoryMemberReference=(),PinType.PinValueType=(),PinType.ContainerType=None,PinType.bIsReference=False,PinType.bIsConst=False,PinType.bIsWeakPointer=False,PinType.bIsUObjectWrapper=False,PinType.bSerializeAsSinglePrecisionFloat=False,LinkedTo=(K2Node_DynamicCast_0 4F53531A48C66A722E1BDB9D92E274A1,),PersistentGuid=00000000000000000000000000000000,bHidden=False,bNotConnectable=False,bDefaultValueIsReadOnly=False,bDefaultValueIsIgnored=False,bAdvancedView=False,bOrphanedPin=False,)
CustomProperties Pin (PinId=2179F3DD438714AC03FA6C9EBA5E6A7A,PinName="then",Direction="EGPD_Output",PinType.PinCategory="exec",PinType.PinSubCategory="",PinType.PinSubCategoryObject=None,PinType.PinSubCategoryMemberReference=(),PinType.PinValueType=(),PinType.ContainerType=None,PinType.bIsReference=False,PinType.bIsConst=False,PinType.bIsWeakPointer=False,PinType.bIsUObjectWrapper=False,PinType.bSerializeAsSinglePrecisionFloat=False,LinkedTo=(K2Node_AddDelegate_0 174333E4427A051B7AD24EA81F8E9E62,),PersistentGuid=00000000000000000000000000000000,bHidden=False,bNotConnectable=False,bDefaultValueIsReadOnly=False,bDefaultValueIsIgnored=False,bAdvancedView=False,bOrphanedPin=False,)
CustomProperties Pin (PinId=F7675B8441FAAA3FF8F086BFF17B0CA7,PinName="Ball Shooter Actuator",PinType.PinCategory="object",PinType.PinSubCategory="",PinType.PinSubCategoryObject="/Script/Engine.BlueprintGeneratedClass'/Game/Examples/BallShooter/Blueprints/BallShooterShootingActuator.BallShooterShootingActuator_C'",PinType.PinSubCategoryMemberReference=(),PinType.PinValueType=(),PinType.ContainerType=None,PinType.bIsReference=False,PinType.bIsConst=False,PinType.bIsWeakPointer=False,PinType.bIsUObjectWrapper=False,PinType.bSerializeAsSinglePrecisionFloat=False,LinkedTo=(K2Node_DynamicCast_0 27DFA5F94039AEF1950818BEF4779AEF,),PersistentGuid=00000000000000000000000000000000,bHidden=False,bNotConnectable=False,bDefaultValueIsReadOnly=False,bDefaultValueIsIgnored=False,bAdvancedView=False,bOrphanedPin=False,)
CustomProperties Pin (PinId=9AE7F5C541310119C16DAFA754CBF35B,PinName="Output_Get",PinToolTip="Retrieves the value of the variable, can use instead of a separate Get node",Direction="EGPD_Output",PinType.PinCategory="object",PinType.PinSubCategory="",PinType.PinSubCategoryObject="/Script/Engine.BlueprintGeneratedClass'/Game/Examples/BallShooter/Blueprints/BallShooterShootingActuator.BallShooterShootingActuator_C'",PinType.PinSubCategoryMemberReference=(),PinType.PinValueType=(),PinType.ContainerType=None,PinType.bIsReference=False,PinType.bIsConst=False,PinType.bIsWeakPointer=False,PinType.bIsUObjectWrapper=False,PinType.bSerializeAsSinglePrecisionFloat=False,LinkedTo=(K2Node_AddDelegate_0 9CDE53044A905F8C49E35E8F72E110EF,),PersistentGuid=00000000000000000000000000000000,bHidden=False,bNotConnectable=False,bDefaultValueIsReadOnly=False,bDefaultValueIsIgnored=False,bAdvancedView=False,bOrphanedPin=False,)
CustomProperties Pin (PinId=0D4AA8084B20286A8CA1DBB6D4D4A839,PinName="self",PinFriendlyName=NSLOCTEXT("K2Node", "Target", "Target"),PinType.PinCategory="object",PinType.PinSubCategory="",PinType.PinSubCategoryObject="/Script/Engine.BlueprintGeneratedClass'/Game/Examples/BallShooter/Blueprints/BallShooterTrainer.BallShooterTrainer_C'",PinType.PinSubCategoryMemberReference=(),PinType.PinValueType=(),PinType.ContainerType=None,PinType.bIsReference=False,PinType.bIsConst=False,PinType.bIsWeakPointer=False,PinType.bIsUObjectWrapper=False,PinType.bSerializeAsSinglePrecisionFloat=False,PersistentGuid=00000000000000000000000000000000,bHidden=True,bNotConnectable=False,bDefaultValueIsReadOnly=False,bDefaultValueIsIgnored=False,bAdvancedView=False,bOrphanedPin=False,)
End Object
Begin Object Class=/Script/BlueprintGraph.K2Node_AddDelegate Name="K2Node_AddDelegate_0" ExportPath="/Script/BlueprintGraph.K2Node_AddDelegate'/Game/Examples/BallShooter/Blueprints/BallShooterTrainer.BallShooterTrainer:EventGraph.K2Node_AddDelegate_0'"
DelegateReference=(MemberParent="/Script/Engine.BlueprintGeneratedClass'/Game/Examples/BallShooter/Blueprints/BallShooterShootingActuator.BallShooterShootingActuator_C'",MemberName="Ball Hits Object Dispatch",MemberGuid=CC9DDE8045AECFBF95FF6DA2FFA232A3)
NodePosX=1072
NodePosY=-384
NodeGuid=7C874ECE42644B523FDC578257BC3580
CustomProperties Pin (PinId=174333E4427A051B7AD24EA81F8E9E62,PinName="execute",PinType.PinCategory="exec",PinType.PinSubCategory="",PinType.PinSubCategoryObject=None,PinType.PinSubCategoryMemberReference=(),PinType.PinValueType=(),PinType.ContainerType=None,PinType.bIsReference=False,PinType.bIsConst=False,PinType.bIsWeakPointer=False,PinType.bIsUObjectWrapper=False,PinType.bSerializeAsSinglePrecisionFloat=False,LinkedTo=(K2Node_VariableSet_0 2179F3DD438714AC03FA6C9EBA5E6A7A,),PersistentGuid=00000000000000000000000000000000,bHidden=False,bNotConnectable=False,bDefaultValueIsReadOnly=False,bDefaultValueIsIgnored=False,bAdvancedView=False,bOrphanedPin=False,)
CustomProperties Pin (PinId=6873395F4A6B8423B2D53BB60DE25CDA,PinName="then",Direction="EGPD_Output",PinType.PinCategory="exec",PinType.PinSubCategory="",PinType.PinSubCategoryObject=None,PinType.PinSubCategoryMemberReference=(),PinType.PinValueType=(),PinType.ContainerType=None,PinType.bIsReference=False,PinType.bIsConst=False,PinType.bIsWeakPointer=False,PinType.bIsUObjectWrapper=False,PinType.bSerializeAsSinglePrecisionFloat=False,PersistentGuid=00000000000000000000000000000000,bHidden=False,bNotConnectable=False,bDefaultValueIsReadOnly=False,bDefaultValueIsIgnored=False,bAdvancedView=False,bOrphanedPin=False,)
CustomProperties Pin (PinId=9CDE53044A905F8C49E35E8F72E110EF,PinName="self",PinFriendlyName=NSLOCTEXT("K2Node", "BaseMCDelegateSelfPinName", "Target"),PinType.PinCategory="object",PinType.PinSubCategory="",PinType.PinSubCategoryObject="/Script/Engine.BlueprintGeneratedClass'/Game/Examples/BallShooter/Blueprints/BallShooterShootingActuator.BallShooterShootingActuator_C'",PinType.PinSubCategoryMemberReference=(),PinType.PinValueType=(),PinType.ContainerType=None,PinType.bIsReference=False,PinType.bIsConst=False,PinType.bIsWeakPointer=False,PinType.bIsUObjectWrapper=False,PinType.bSerializeAsSinglePrecisionFloat=False,LinkedTo=(K2Node_VariableSet_0 9AE7F5C541310119C16DAFA754CBF35B,),PersistentGuid=00000000000000000000000000000000,bHidden=False,bNotConnectable=False,bDefaultValueIsReadOnly=False,bDefaultValueIsIgnored=False,bAdvancedView=False,bOrphanedPin=False,)
CustomProperties Pin (PinId=BBBAA2504357641B4241408CC021262B,PinName="Delegate",PinFriendlyName=NSLOCTEXT("K2Node", "PinFriendlyDelegatetName", "Event"),PinType.PinCategory="delegate",PinType.PinSubCategory="",PinType.PinSubCategoryObject=None,PinType.PinSubCategoryMemberReference=(MemberParent="/Script/Engine.BlueprintGeneratedClass'/Game/Examples/BallShooter/Blueprints/BallShooterShootingActuator.BallShooterShootingActuator_C'",MemberName="Ball Hits Object Dispatch__DelegateSignature",MemberGuid=8584088D41CF5C20417823828921BE22),PinType.PinValueType=(),PinType.ContainerType=None,PinType.bIsReference=True,PinType.bIsConst=True,PinType.bIsWeakPointer=False,PinType.bIsUObjectWrapper=False,PinType.bSerializeAsSinglePrecisionFloat=False,LinkedTo=(K2Node_Knot_2 339473C84DBFA087EB45B98EC0FA9DAF,),PersistentGuid=00000000000000000000000000000000,bHidden=False,bNotConnectable=False,bDefaultValueIsReadOnly=False,bDefaultValueIsIgnored=False,bAdvancedView=False,bOrphanedPin=False,)
End Object
Begin Object Class=/Script/BlueprintGraph.K2Node_CustomEvent Name="K2Node_CustomEvent_0" ExportPath="/Script/BlueprintGraph.K2Node_CustomEvent'/Game/Examples/BallShooter/Blueprints/BallShooterTrainer.BallShooterTrainer:EventGraph.K2Node_CustomEvent_0'"
CustomFunctionName="On Ball Hit"
NodePosX=160
NodePosY=-144
NodeGuid=EDBD55A846853EE87BE27CB57A5DD70D
CustomProperties Pin (PinId=DDDA5FD84306D8FDFC83E18DE3BA9AC3,PinName="OutputDelegate",Direction="EGPD_Output",PinType.PinCategory="delegate",PinType.PinSubCategory="",PinType.PinSubCategoryObject=None,PinType.PinSubCategoryMemberReference=(MemberParent="/Script/Engine.BlueprintGeneratedClass'/Game/Examples/BallShooter/Blueprints/BallShooterTrainer.BallShooterTrainer_C'",MemberName="On Ball Hit",MemberGuid=EDBD55A846853EE87BE27CB57A5DD70D),PinType.PinValueType=(),PinType.ContainerType=None,PinType.bIsReference=False,PinType.bIsConst=False,PinType.bIsWeakPointer=False,PinType.bIsUObjectWrapper=False,PinType.bSerializeAsSinglePrecisionFloat=False,LinkedTo=(K2Node_Knot_3 177B09C94885A0406D90B3AF13CFACA6,),PersistentGuid=00000000000000000000000000000000,bHidden=False,bNotConnectable=False,bDefaultValueIsReadOnly=False,bDefaultValueIsIgnored=False,bAdvancedView=False,bOrphanedPin=False,)
CustomProperties Pin (PinId=B88C038E4D74E2FAD3568A97586781DB,PinName="then",Direction="EGPD_Output",PinType.PinCategory="exec",PinType.PinSubCategory="",PinType.PinSubCategoryObject=None,PinType.PinSubCategoryMemberReference=(),PinType.PinValueType=(),PinType.ContainerType=None,PinType.bIsReference=False,PinType.bIsConst=False,PinType.bIsWeakPointer=False,PinType.bIsUObjectWrapper=False,PinType.bSerializeAsSinglePrecisionFloat=False,LinkedTo=(K2Node_DynamicCast_2 5B9E80364522FDB0F6DACD807DFECE33,),PersistentGuid=00000000000000000000000000000000,bHidden=False,bNotConnectable=False,bDefaultValueIsReadOnly=False,bDefaultValueIsIgnored=False,bAdvancedView=False,bOrphanedPin=False,)
CustomProperties Pin (PinId=0CE5F526409A9218FD8F7A872C68B7EA,PinName="SelfActor",Direction="EGPD_Output",PinType.PinCategory="object",PinType.PinSubCategory="",PinType.PinSubCategoryObject="/Script/CoreUObject.Class'/Script/Engine.Actor'",PinType.PinSubCategoryMemberReference=(),PinType.PinValueType=(),PinType.ContainerType=None,PinType.bIsReference=False,PinType.bIsConst=False,PinType.bIsWeakPointer=False,PinType.bIsUObjectWrapper=False,PinType.bSerializeAsSinglePrecisionFloat=False,PersistentGuid=00000000000000000000000000000000,bHidden=False,bNotConnectable=False,bDefaultValueIsReadOnly=False,bDefaultValueIsIgnored=False,bAdvancedView=False,bOrphanedPin=False,)
CustomProperties Pin (PinId=8ADC6C2F4B15E7CE4527E29E5913616C,PinName="OtherActor",Direction="EGPD_Output",PinType.PinCategory="object",PinType.PinSubCategory="",PinType.PinSubCategoryObject="/Script/CoreUObject.Class'/Script/Engine.Actor'",PinType.PinSubCategoryMemberReference=(),PinType.PinValueType=(),PinType.ContainerType=None,PinType.bIsReference=False,PinType.bIsConst=False,PinType.bIsWeakPointer=False,PinType.bIsUObjectWrapper=False,PinType.bSerializeAsSinglePrecisionFloat=False,LinkedTo=(K2Node_Knot_0 6B1EC82549CFFF08AC306EA142730AE3,K2Node_DynamicCast_2 3FEAB10B47C83E27F7403C999C74C93D,),PersistentGuid=00000000000000000000000000000000,bHidden=False,bNotConnectable=False,bDefaultValueIsReadOnly=False,bDefaultValueIsIgnored=False,bAdvancedView=False,bOrphanedPin=False,)
CustomProperties Pin (PinId=F9DF7F984446910F18353BA8DFFEFF8F,PinName="NormalImpulse",Direction="EGPD_Output",PinType.PinCategory="struct",PinType.PinSubCategory="",PinType.PinSubCategoryObject="/Script/CoreUObject.ScriptStruct'/Script/CoreUObject.Vector'",PinType.PinSubCategoryMemberReference=(),PinType.PinValueType=(),PinType.ContainerType=None,PinType.bIsReference=False,PinType.bIsConst=False,PinType.bIsWeakPointer=False,PinType.bIsUObjectWrapper=False,PinType.bSerializeAsSinglePrecisionFloat=False,PersistentGuid=00000000000000000000000000000000,bHidden=False,bNotConnectable=False,bDefaultValueIsReadOnly=False,bDefaultValueIsIgnored=False,bAdvancedView=False,bOrphanedPin=False,)
CustomProperties Pin (PinId=F83654D3422DA319BDE2759F6BE2B34E,PinName="Hit",Direction="EGPD_Output",PinType.PinCategory="struct",PinType.PinSubCategory="",PinType.PinSubCategoryObject="/Script/CoreUObject.ScriptStruct'/Script/Engine.HitResult'",PinType.PinSubCategoryMemberReference=(),PinType.PinValueType=(),PinType.ContainerType=None,PinType.bIsReference=True,PinType.bIsConst=True,PinType.bIsWeakPointer=False,PinType.bIsUObjectWrapper=False,PinType.bSerializeAsSinglePrecisionFloat=False,PersistentGuid=00000000000000000000000000000000,bHidden=False,bNotConnectable=False,bDefaultValueIsReadOnly=False,bDefaultValueIsIgnored=False,bAdvancedView=False,bOrphanedPin=False,)
CustomProperties UserDefinedPin (PinName="SelfActor",PinType=(PinCategory="object",PinSubCategoryObject="/Script/CoreUObject.Class'/Script/Engine.Actor'"),DesiredPinDirection=EGPD_Output)
CustomProperties UserDefinedPin (PinName="OtherActor",PinType=(PinCategory="object",PinSubCategoryObject="/Script/CoreUObject.Class'/Script/Engine.Actor'"),DesiredPinDirection=EGPD_Output)
CustomProperties UserDefinedPin (PinName="NormalImpulse",PinType=(PinCategory="struct",PinSubCategoryObject="/Script/CoreUObject.ScriptStruct'/Script/CoreUObject.Vector'"),DesiredPinDirection=EGPD_Output)
CustomProperties UserDefinedPin (PinName="Hit",PinType=(PinCategory="struct",PinSubCategoryObject="/Script/CoreUObject.ScriptStruct'/Script/Engine.HitResult'",bIsReference=True,bIsConst=True),DesiredPinDirection=EGPD_Output)
End Object
Begin Object Class=/Script/BlueprintGraph.K2Node_MacroInstance Name="K2Node_MacroInstance_1" ExportPath="/Script/BlueprintGraph.K2Node_MacroInstance'/Game/Examples/BallShooter/Blueprints/BallShooterTrainer.BallShooterTrainer:EventGraph.K2Node_MacroInstance_1'"
MacroGraphReference=(MacroGraph="/Script/Engine.EdGraph'/Engine/EditorBlueprintResources/StandardMacros.StandardMacros:IncrementInt'",GraphBlueprint="/Script/Engine.Blueprint'/Engine/EditorBlueprintResources/StandardMacros.StandardMacros'",GraphGuid=ABF609A74436C3ED7357E59E21A41B9A)
NodePosX=688
NodePosY=-112
NodeGuid=CFC419BF4A9B98BA5B2D5CB97281328D
CustomProperties Pin (PinId=C4EA1AC04C600098F0D842B1C1828A86,PinName=" ",PinType.PinCategory="exec",PinType.PinSubCategory="",PinType.PinSubCategoryObject=None,PinType.PinSubCategoryMemberReference=(),PinType.PinValueType=(),PinType.ContainerType=None,PinType.bIsReference=False,PinType.bIsConst=False,PinType.bIsWeakPointer=False,PinType.bIsUObjectWrapper=False,PinType.bSerializeAsSinglePrecisionFloat=False,LinkedTo=(K2Node_DynamicCast_2 6550F5D54591EE69BE3CE9A29D86A05E,),PersistentGuid=00000000000000000000000000000000,bHidden=False,bNotConnectable=False,bDefaultValueIsReadOnly=False,bDefaultValueIsIgnored=False,bAdvancedView=False,bOrphanedPin=False,)
CustomProperties Pin (PinId=7F3E72FE4E6C9143EE116DA04A377E6D,PinName="Value",PinType.PinCategory="int",PinType.PinSubCategory="",PinType.PinSubCategoryObject=None,PinType.PinSubCategoryMemberReference=(),PinType.PinValueType=(),PinType.ContainerType=None,PinType.bIsReference=True,PinType.bIsConst=False,PinType.bIsWeakPointer=False,PinType.bIsUObjectWrapper=False,PinType.bSerializeAsSinglePrecisionFloat=False,LinkedTo=(K2Node_VariableGet_6 38FC1B0F44417E53A2C96D8EFAF44A07,),PersistentGuid=00000000000000000000000000000000,bHidden=False,bNotConnectable=False,bDefaultValueIsReadOnly=False,bDefaultValueIsIgnored=False,bAdvancedView=False,bOrphanedPin=False,)
CustomProperties Pin (PinId=9D236ED24A18B5C6795C0785AF6E07C5,PinName=" ",Direction="EGPD_Output",PinType.PinCategory="exec",PinType.PinSubCategory="",PinType.PinSubCategoryObject=None,PinType.PinSubCategoryMemberReference=(),PinType.PinValueType=(),PinType.ContainerType=None,PinType.bIsReference=False,PinType.bIsConst=False,PinType.bIsWeakPointer=False,PinType.bIsUObjectWrapper=False,PinType.bSerializeAsSinglePrecisionFloat=False,LinkedTo=(K2Node_MacroInstance_0 C4EA1AC04C600098F0D842B1C1828A86,),PersistentGuid=00000000000000000000000000000000,bHidden=False,bNotConnectable=False,bDefaultValueIsReadOnly=False,bDefaultValueIsIgnored=False,bAdvancedView=False,bOrphanedPin=False,)
CustomProperties Pin (PinId=63E670C94555DDEFCF579295FE8FD965,PinName="Result",Direction="EGPD_Output",PinType.PinCategory="int",PinType.PinSubCategory="",PinType.PinSubCategoryObject=None,PinType.PinSubCategoryMemberReference=(),PinType.PinValueType=(),PinType.ContainerType=None,PinType.bIsReference=False,PinType.bIsConst=False,PinType.bIsWeakPointer=False,PinType.bIsUObjectWrapper=False,PinType.bSerializeAsSinglePrecisionFloat=False,PersistentGuid=00000000000000000000000000000000,bHidden=False,bNotConnectable=False,bDefaultValueIsReadOnly=False,bDefaultValueIsIgnored=False,bAdvancedView=False,bOrphanedPin=False,)
End Object
Begin Object Class=/Script/BlueprintGraph.K2Node_VariableGet Name="K2Node_VariableGet_6" ExportPath="/Script/BlueprintGraph.K2Node_VariableGet'/Game/Examples/BallShooter/Blueprints/BallShooterTrainer.BallShooterTrainer:EventGraph.K2Node_VariableGet_6'"
VariableReference=(MemberName="numOfTargetHits",MemberGuid=F47D272D415187BBDE6497A337CCEBD2,bSelfContext=True)
NodePosX=464
NodePosY=16
NodeGuid=617DE42E4D30980F33A8288C5396AE32
CustomProperties Pin (PinId=38FC1B0F44417E53A2C96D8EFAF44A07,PinName="numOfTargetHits",Direction="EGPD_Output",PinType.PinCategory="int",PinType.PinSubCategory="",PinType.PinSubCategoryObject=None,PinType.PinSubCategoryMemberReference=(),PinType.PinValueType=(),PinType.ContainerType=None,PinType.bIsReference=False,PinType.bIsConst=False,PinType.bIsWeakPointer=False,PinType.bIsUObjectWrapper=False,PinType.bSerializeAsSinglePrecisionFloat=False,DefaultValue="0",AutogeneratedDefaultValue="0",LinkedTo=(K2Node_MacroInstance_1 7F3E72FE4E6C9143EE116DA04A377E6D,),PersistentGuid=00000000000000000000000000000000,bHidden=False,bNotConnectable=False,bDefaultValueIsReadOnly=False,bDefaultValueIsIgnored=False,bAdvancedView=False,bOrphanedPin=False,)
CustomProperties Pin (PinId=F36D7DEE4350CA24830723BD89B2ACB8,PinName="self",PinFriendlyName=NSLOCTEXT("K2Node", "Target", "Target"),PinType.PinCategory="object",PinType.PinSubCategory="",PinType.PinSubCategoryObject="/Script/Engine.BlueprintGeneratedClass'/Game/Examples/BallShooter/Blueprints/BallShooterTrainer.BallShooterTrainer_C'",PinType.PinSubCategoryMemberReference=(),PinType.PinValueType=(),PinType.ContainerType=None,PinType.bIsReference=False,PinType.bIsConst=False,PinType.bIsWeakPointer=False,PinType.bIsUObjectWrapper=False,PinType.bSerializeAsSinglePrecisionFloat=False,PersistentGuid=00000000000000000000000000000000,bHidden=True,bNotConnectable=False,bDefaultValueIsReadOnly=False,bDefaultValueIsIgnored=False,bAdvancedView=False,bOrphanedPin=False,)
End Object
Begin Object Class=/Script/BlueprintGraph.K2Node_MacroInstance Name="K2Node_MacroInstance_0" ExportPath="/Script/BlueprintGraph.K2Node_MacroInstance'/Game/Examples/BallShooter/Blueprints/BallShooterTrainer.BallShooterTrainer:EventGraph.K2Node_MacroInstance_0'"
MacroGraphReference=(MacroGraph="/Script/Engine.EdGraph'/Engine/EditorBlueprintResources/StandardMacros.StandardMacros:IncrementInt'",GraphBlueprint="/Script/Engine.Blueprint'/Engine/EditorBlueprintResources/StandardMacros.StandardMacros'",GraphGuid=ABF609A74436C3ED7357E59E21A41B9A)
NodePosX=880
NodePosY=-112
NodeGuid=DC5610BD4FCE5A6FFF9F34B35F72A34B
CustomProperties Pin (PinId=C4EA1AC04C600098F0D842B1C1828A86,PinName=" ",PinType.PinCategory="exec",PinType.PinSubCategory="",PinType.PinSubCategoryObject=None,PinType.PinSubCategoryMemberReference=(),PinType.PinValueType=(),PinType.ContainerType=None,PinType.bIsReference=False,PinType.bIsConst=False,PinType.bIsWeakPointer=False,PinType.bIsUObjectWrapper=False,PinType.bSerializeAsSinglePrecisionFloat=False,LinkedTo=(K2Node_MacroInstance_1 9D236ED24A18B5C6795C0785AF6E07C5,),PersistentGuid=00000000000000000000000000000000,bHidden=False,bNotConnectable=False,bDefaultValueIsReadOnly=False,bDefaultValueIsIgnored=False,bAdvancedView=False,bOrphanedPin=False,)
CustomProperties Pin (PinId=7F3E72FE4E6C9143EE116DA04A377E6D,PinName="Value",PinType.PinCategory="int",PinType.PinSubCategory="",PinType.PinSubCategoryObject=None,PinType.PinSubCategoryMemberReference=(),PinType.PinValueType=(),PinType.ContainerType=None,PinType.bIsReference=True,PinType.bIsConst=False,PinType.bIsWeakPointer=False,PinType.bIsUObjectWrapper=False,PinType.bSerializeAsSinglePrecisionFloat=False,LinkedTo=(K2Node_VariableGet_7 A84749494A53C88D8D41079A282D37D9,),PersistentGuid=00000000000000000000000000000000,bHidden=False,bNotConnectable=False,bDefaultValueIsReadOnly=False,bDefaultValueIsIgnored=False,bAdvancedView=False,bOrphanedPin=False,)
CustomProperties Pin (PinId=9D236ED24A18B5C6795C0785AF6E07C5,PinName=" ",Direction="EGPD_Output",PinType.PinCategory="exec",PinType.PinSubCategory="",PinType.PinSubCategoryObject=None,PinType.PinSubCategoryMemberReference=(),PinType.PinValueType=(),PinType.ContainerType=None,PinType.bIsReference=False,PinType.bIsConst=False,PinType.bIsWeakPointer=False,PinType.bIsUObjectWrapper=False,PinType.bSerializeAsSinglePrecisionFloat=False,LinkedTo=(K2Node_CallFunction_1 BBFC2DF14ECE803F027C94B4B2AD936E,),PersistentGuid=00000000000000000000000000000000,bHidden=False,bNotConnectable=False,bDefaultValueIsReadOnly=False,bDefaultValueIsIgnored=False,bAdvancedView=False,bOrphanedPin=False,)
CustomProperties Pin (PinId=63E670C94555DDEFCF579295FE8FD965,PinName="Result",Direction="EGPD_Output",PinType.PinCategory="int",PinType.PinSubCategory="",PinType.PinSubCategoryObject=None,PinType.PinSubCategoryMemberReference=(),PinType.PinValueType=(),PinType.ContainerType=None,PinType.bIsReference=False,PinType.bIsConst=False,PinType.bIsWeakPointer=False,PinType.bIsUObjectWrapper=False,PinType.bSerializeAsSinglePrecisionFloat=False,PersistentGuid=00000000000000000000000000000000,bHidden=False,bNotConnectable=False,bDefaultValueIsReadOnly=False,bDefaultValueIsIgnored=False,bAdvancedView=False,bOrphanedPin=False,)
End Object
Begin Object Class=/Script/BlueprintGraph.K2Node_VariableGet Name="K2Node_VariableGet_7" ExportPath="/Script/BlueprintGraph.K2Node_VariableGet'/Game/Examples/BallShooter/Blueprints/BallShooterTrainer.BallShooterTrainer:EventGraph.K2Node_VariableGet_7'"
VariableReference=(MemberName="numOfHitsThisEpisode",MemberGuid=F0B5D04C46B3619FBA69BFB19BF4F50A,bSelfContext=True)
NodePosX=672
NodePosY=16
NodeGuid=7E6E3EFF4F426B7993AA6793284F99E4
CustomProperties Pin (PinId=A84749494A53C88D8D41079A282D37D9,PinName="numOfHitsThisEpisode",Direction="EGPD_Output",PinType.PinCategory="int",PinType.PinSubCategory="",PinType.PinSubCategoryObject=None,PinType.PinSubCategoryMemberReference=(),PinType.PinValueType=(),PinType.ContainerType=None,PinType.bIsReference=False,PinType.bIsConst=False,PinType.bIsWeakPointer=False,PinType.bIsUObjectWrapper=False,PinType.bSerializeAsSinglePrecisionFloat=False,DefaultValue="0",AutogeneratedDefaultValue="0",LinkedTo=(K2Node_MacroInstance_0 7F3E72FE4E6C9143EE116DA04A377E6D,),PersistentGuid=00000000000000000000000000000000,bHidden=False,bNotConnectable=False,bDefaultValueIsReadOnly=False,bDefaultValueIsIgnored=False,bAdvancedView=False,bOrphanedPin=False,)
CustomProperties Pin (PinId=973B3433403B98BA2FE8A7B30B77FBFC,PinName="self",PinFriendlyName=NSLOCTEXT("K2Node", "Target", "Target"),PinType.PinCategory="object",PinType.PinSubCategory="",PinType.PinSubCategoryObject="/Script/Engine.BlueprintGeneratedClass'/Game/Examples/BallShooter/Blueprints/BallShooterTrainer.BallShooterTrainer_C'",PinType.PinSubCategoryMemberReference=(),PinType.PinValueType=(),PinType.ContainerType=None,PinType.bIsReference=False,PinType.bIsConst=False,PinType.bIsWeakPointer=False,PinType.bIsUObjectWrapper=False,PinType.bSerializeAsSinglePrecisionFloat=False,PersistentGuid=00000000000000000000000000000000,bHidden=True,bNotConnectable=False,bDefaultValueIsReadOnly=False,bDefaultValueIsIgnored=False,bAdvancedView=False,bOrphanedPin=False,)
End Object
Begin Object Class=/Script/BlueprintGraph.K2Node_CallFunction Name="K2Node_CallFunction_1" ExportPath="/Script/BlueprintGraph.K2Node_CallFunction'/Game/Examples/BallShooter/Blueprints/BallShooterTrainer.BallShooterTrainer:EventGraph.K2Node_CallFunction_1'"
FunctionReference=(MemberParent="/Script/CoreUObject.Class'/Script/Engine.GameplayStatics'",MemberName="ApplyDamage")
NodePosX=1040
NodePosY=-128
NodeGuid=4DBA307D4F3733D297C58FBA21D89EFB
CustomProperties Pin (PinId=BBFC2DF14ECE803F027C94B4B2AD936E,PinName="execute",PinType.PinCategory="exec",PinType.PinSubCategory="",PinType.PinSubCategoryObject=None,PinType.PinSubCategoryMemberReference=(),PinType.PinValueType=(),PinType.ContainerType=None,PinType.bIsReference=False,PinType.bIsConst=False,PinType.bIsWeakPointer=False,PinType.bIsUObjectWrapper=False,PinType.bSerializeAsSinglePrecisionFloat=False,LinkedTo=(K2Node_MacroInstance_0 9D236ED24A18B5C6795C0785AF6E07C5,),PersistentGuid=00000000000000000000000000000000,bHidden=False,bNotConnectable=False,bDefaultValueIsReadOnly=False,bDefaultValueIsIgnored=False,bAdvancedView=False,bOrphanedPin=False,)
CustomProperties Pin (PinId=410A0ADB43DF30554DC45EBE77ADC32E,PinName="then",Direction="EGPD_Output",PinType.PinCategory="exec",PinType.PinSubCategory="",PinType.PinSubCategoryObject=None,PinType.PinSubCategoryMemberReference=(),PinType.PinValueType=(),PinType.ContainerType=None,PinType.bIsReference=False,PinType.bIsConst=False,PinType.bIsWeakPointer=False,PinType.bIsUObjectWrapper=False,PinType.bSerializeAsSinglePrecisionFloat=False,PersistentGuid=00000000000000000000000000000000,bHidden=False,bNotConnectable=False,bDefaultValueIsReadOnly=False,bDefaultValueIsIgnored=False,bAdvancedView=False,bOrphanedPin=False,)
CustomProperties Pin (PinId=684531A34D845D6986180DA7092AC3C2,PinName="self",PinFriendlyName=NSLOCTEXT("K2Node", "Target", "Target"),PinType.PinCategory="object",PinType.PinSubCategory="",PinType.PinSubCategoryObject="/Script/CoreUObject.Class'/Script/Engine.GameplayStatics'",PinType.PinSubCategoryMemberReference=(),PinType.PinValueType=(),PinType.ContainerType=None,PinType.bIsReference=False,PinType.bIsConst=False,PinType.bIsWeakPointer=False,PinType.bIsUObjectWrapper=False,PinType.bSerializeAsSinglePrecisionFloat=False,DefaultObject="/Script/Engine.Default__GameplayStatics",PersistentGuid=00000000000000000000000000000000,bHidden=True,bNotConnectable=False,bDefaultValueIsReadOnly=False,bDefaultValueIsIgnored=False,bAdvancedView=False,bOrphanedPin=False,)
CustomProperties Pin (PinId=3826950345D810DE5F3567952581F16D,PinName="DamagedActor",PinType.PinCategory="object",PinType.PinSubCategory="",PinType.PinSubCategoryObject="/Script/CoreUObject.Class'/Script/Engine.Actor'",PinType.PinSubCategoryMemberReference=(),PinType.PinValueType=(),PinType.ContainerType=None,PinType.bIsReference=False,PinType.bIsConst=False,PinType.bIsWeakPointer=False,PinType.bIsUObjectWrapper=False,PinType.bSerializeAsSinglePrecisionFloat=False,LinkedTo=(K2Node_Knot_1 9F70FF2E40B70DEEBDBF509944C9D36C,),PersistentGuid=00000000000000000000000000000000,bHidden=False,bNotConnectable=False,bDefaultValueIsReadOnly=False,bDefaultValueIsIgnored=False,bAdvancedView=False,bOrphanedPin=False,)
CustomProperties Pin (PinId=A2F991C14C49C79CCBE6218526B7EA32,PinName="BaseDamage",PinType.PinCategory="real",PinType.PinSubCategory="float",PinType.PinSubCategoryObject=None,PinType.PinSubCategoryMemberReference=(),PinType.PinValueType=(),PinType.ContainerType=None,PinType.bIsReference=False,PinType.bIsConst=False,PinType.bIsWeakPointer=False,PinType.bIsUObjectWrapper=False,PinType.bSerializeAsSinglePrecisionFloat=False,DefaultValue="1.000000",AutogeneratedDefaultValue="0.0",PersistentGuid=00000000000000000000000000000000,bHidden=False,bNotConnectable=False,bDefaultValueIsReadOnly=False,bDefaultValueIsIgnored=False,bAdvancedView=False,bOrphanedPin=False,)
CustomProperties Pin (PinId=E6E0667C49578E41D73E85AEF9F679EB,PinName="EventInstigator",PinType.PinCategory="object",PinType.PinSubCategory="",PinType.PinSubCategoryObject="/Script/CoreUObject.Class'/Script/Engine.Controller'",PinType.PinSubCategoryMemberReference=(),PinType.PinValueType=(),PinType.ContainerType=None,PinType.bIsReference=False,PinType.bIsConst=False,PinType.bIsWeakPointer=False,PinType.bIsUObjectWrapper=False,PinType.bSerializeAsSinglePrecisionFloat=False,PersistentGuid=00000000000000000000000000000000,bHidden=False,bNotConnectable=False,bDefaultValueIsReadOnly=False,bDefaultValueIsIgnored=False,bAdvancedView=False,bOrphanedPin=False,)
CustomProperties Pin (PinId=223E666A4AD6D34BC1A6D6AADD22DE4C,PinName="DamageCauser",PinType.PinCategory="object",PinType.PinSubCategory="",PinType.PinSubCategoryObject="/Script/CoreUObject.Class'/Script/Engine.Actor'",PinType.PinSubCategoryMemberReference=(),PinType.PinValueType=(),PinType.ContainerType=None,PinType.bIsReference=False,PinType.bIsConst=False,PinType.bIsWeakPointer=False,PinType.bIsUObjectWrapper=False,PinType.bSerializeAsSinglePrecisionFloat=False,PersistentGuid=00000000000000000000000000000000,bHidden=False,bNotConnectable=False,bDefaultValueIsReadOnly=False,bDefaultValueIsIgnored=False,bAdvancedView=False,bOrphanedPin=False,)
CustomProperties Pin (PinId=9E83A5E745B9F39D5DE771B055D9D09A,PinName="DamageTypeClass",PinType.PinCategory="class",PinType.PinSubCategory="",PinType.PinSubCategoryObject="/Script/CoreUObject.Class'/Script/Engine.DamageType'",PinType.PinSubCategoryMemberReference=(),PinType.PinValueType=(),PinType.ContainerType=None,PinType.bIsReference=False,PinType.bIsConst=False,PinType.bIsWeakPointer=False,PinType.bIsUObjectWrapper=True,PinType.bSerializeAsSinglePrecisionFloat=False,PersistentGuid=00000000000000000000000000000000,bHidden=False,bNotConnectable=False,bDefaultValueIsReadOnly=False,bDefaultValueIsIgnored=False,bAdvancedView=False,bOrphanedPin=False,)
CustomProperties Pin (PinId=E83C11C2459E0B5EB85D01A2405AE3ED,PinName="ReturnValue",Direction="EGPD_Output",PinType.PinCategory="real",PinType.PinSubCategory="float",PinType.PinSubCategoryObject=None,PinType.PinSubCategoryMemberReference=(),PinType.PinValueType=(),PinType.ContainerType=None,PinType.bIsReference=False,PinType.bIsConst=False,PinType.bIsWeakPointer=False,PinType.bIsUObjectWrapper=False,PinType.bSerializeAsSinglePrecisionFloat=False,DefaultValue="0.0",AutogeneratedDefaultValue="0.0",PersistentGuid=00000000000000000000000000000000,bHidden=False,bNotConnectable=False,bDefaultValueIsReadOnly=False,bDefaultValueIsIgnored=False,bAdvancedView=False,bOrphanedPin=False,)
End Object
Begin Object Class=/Script/BlueprintGraph.K2Node_Knot Name="K2Node_Knot_0" ExportPath="/Script/BlueprintGraph.K2Node_Knot'/Game/Examples/BallShooter/Blueprints/BallShooterTrainer.BallShooterTrainer:EventGraph.K2Node_Knot_0'"
NodePosX=544
NodePosY=80
NodeGuid=5F783C344AC7D21853FB098DF8B69D98
CustomProperties Pin (PinId=6B1EC82549CFFF08AC306EA142730AE3,PinName="InputPin",PinType.PinCategory="object",PinType.PinSubCategory="",PinType.PinSubCategoryObject="/Script/CoreUObject.Class'/Script/Engine.Actor'",PinType.PinSubCategoryMemberReference=(),PinType.PinValueType=(),PinType.ContainerType=None,PinType.bIsReference=False,PinType.bIsConst=False,PinType.bIsWeakPointer=False,PinType.bIsUObjectWrapper=False,PinType.bSerializeAsSinglePrecisionFloat=False,LinkedTo=(K2Node_CustomEvent_0 8ADC6C2F4B15E7CE4527E29E5913616C,),PersistentGuid=00000000000000000000000000000000,bHidden=False,bNotConnectable=False,bDefaultValueIsReadOnly=False,bDefaultValueIsIgnored=True,bAdvancedView=False,bOrphanedPin=False,)
CustomProperties Pin (PinId=E76D16B54D717F3AF435739F5C14B959,PinName="OutputPin",Direction="EGPD_Output",PinType.PinCategory="object",PinType.PinSubCategory="",PinType.PinSubCategoryObject="/Script/CoreUObject.Class'/Script/Engine.Actor'",PinType.PinSubCategoryMemberReference=(),PinType.PinValueType=(),PinType.ContainerType=None,PinType.bIsReference=False,PinType.bIsConst=False,PinType.bIsWeakPointer=False,PinType.bIsUObjectWrapper=False,PinType.bSerializeAsSinglePrecisionFloat=False,LinkedTo=(K2Node_Knot_1 EE185B3C4CB5AC171C06E0B3168B4FAD,),PersistentGuid=00000000000000000000000000000000,bHidden=False,bNotConnectable=False,bDefaultValueIsReadOnly=False,bDefaultValueIsIgnored=False,bAdvancedView=False,bOrphanedPin=False,)
End Object
Begin Object Class=/Script/BlueprintGraph.K2Node_Knot Name="K2Node_Knot_1" ExportPath="/Script/BlueprintGraph.K2Node_Knot'/Game/Examples/BallShooter/Blueprints/BallShooterTrainer.BallShooterTrainer:EventGraph.K2Node_Knot_1'"
NodePosX=880
NodePosY=80
NodeGuid=E517E86641A9A6995F7704B8E7270621
CustomProperties Pin (PinId=EE185B3C4CB5AC171C06E0B3168B4FAD,PinName="InputPin",PinType.PinCategory="object",PinType.PinSubCategory="",PinType.PinSubCategoryObject="/Script/CoreUObject.Class'/Script/Engine.Actor'",PinType.PinSubCategoryMemberReference=(),PinType.PinValueType=(),PinType.ContainerType=None,PinType.bIsReference=False,PinType.bIsConst=False,PinType.bIsWeakPointer=False,PinType.bIsUObjectWrapper=False,PinType.bSerializeAsSinglePrecisionFloat=False,LinkedTo=(K2Node_Knot_0 E76D16B54D717F3AF435739F5C14B959,),PersistentGuid=00000000000000000000000000000000,bHidden=False,bNotConnectable=False,bDefaultValueIsReadOnly=False,bDefaultValueIsIgnored=True,bAdvancedView=False,bOrphanedPin=False,)
CustomProperties Pin (PinId=9F70FF2E40B70DEEBDBF509944C9D36C,PinName="OutputPin",Direction="EGPD_Output",PinType.PinCategory="object",PinType.PinSubCategory="",PinType.PinSubCategoryObject="/Script/CoreUObject.Class'/Script/Engine.Actor'",PinType.PinSubCategoryMemberReference=(),PinType.PinValueType=(),PinType.ContainerType=None,PinType.bIsReference=False,PinType.bIsConst=False,PinType.bIsWeakPointer=False,PinType.bIsUObjectWrapper=False,PinType.bSerializeAsSinglePrecisionFloat=False,LinkedTo=(K2Node_CallFunction_1 3826950345D810DE5F3567952581F16D,),PersistentGuid=00000000000000000000000000000000,bHidden=False,bNotConnectable=False,bDefaultValueIsReadOnly=False,bDefaultValueIsIgnored=False,bAdvancedView=False,bOrphanedPin=False,)
End Object
Begin Object Class=/Script/UnrealEd.EdGraphNode_Comment Name="EdGraphNode_Comment_0" ExportPath="/Script/UnrealEd.EdGraphNode_Comment'/Game/Examples/BallShooter/Blueprints/BallShooterTrainer.BallShooterTrainer:EventGraph.EdGraphNode_Comment_0'"
bCommentBubbleVisible_InDetailsPanel=False
NodePosX=128
NodePosY=-208
NodeWidth=1232
NodeHeight=384
bCommentBubblePinned=False
bCommentBubbleVisible=False
NodeComment="We Update Training Variables Here and then Deal Damage to Update the Targets Hitpoints"
NodeGuid=96AE44C645918231ACBCB28519DBD518
End Object
Begin Object Class=/Script/BlueprintGraph.K2Node_DynamicCast Name="K2Node_DynamicCast_2" ExportPath="/Script/BlueprintGraph.K2Node_DynamicCast'/Game/Examples/BallShooter/Blueprints/BallShooterTrainer.BallShooterTrainer:EventGraph.K2Node_DynamicCast_2'"
TargetType="/Script/Engine.BlueprintGeneratedClass'/Game/Examples/BallShooter/Blueprints/BallShooterTarget.BallShooterTarget_C'"
NodePosX=384
NodePosY=-128
NodeGuid=ADA65655421ADF5828D586A34D5AA872
CustomProperties Pin (PinId=5B9E80364522FDB0F6DACD807DFECE33,PinName="execute",PinType.PinCategory="exec",PinType.PinSubCategory="",PinType.PinSubCategoryObject=None,PinType.PinSubCategoryMemberReference=(),PinType.PinValueType=(),PinType.ContainerType=None,PinType.bIsReference=False,PinType.bIsConst=False,PinType.bIsWeakPointer=False,PinType.bIsUObjectWrapper=False,PinType.bSerializeAsSinglePrecisionFloat=False,LinkedTo=(K2Node_CustomEvent_0 B88C038E4D74E2FAD3568A97586781DB,),PersistentGuid=00000000000000000000000000000000,bHidden=False,bNotConnectable=False,bDefaultValueIsReadOnly=False,bDefaultValueIsIgnored=False,bAdvancedView=False,bOrphanedPin=False,)
CustomProperties Pin (PinId=6550F5D54591EE69BE3CE9A29D86A05E,PinName="then",Direction="EGPD_Output",PinType.PinCategory="exec",PinType.PinSubCategory="",PinType.PinSubCategoryObject=None,PinType.PinSubCategoryMemberReference=(),PinType.PinValueType=(),PinType.ContainerType=None,PinType.bIsReference=False,PinType.bIsConst=False,PinType.bIsWeakPointer=False,PinType.bIsUObjectWrapper=False,PinType.bSerializeAsSinglePrecisionFloat=False,LinkedTo=(K2Node_MacroInstance_1 C4EA1AC04C600098F0D842B1C1828A86,),PersistentGuid=00000000000000000000000000000000,bHidden=False,bNotConnectable=False,bDefaultValueIsReadOnly=False,bDefaultValueIsIgnored=False,bAdvancedView=False,bOrphanedPin=False,)
CustomProperties Pin (PinId=2027E1CD4DF6CFF1EC75C5B6C6E3CF5D,PinName="CastFailed",Direction="EGPD_Output",PinType.PinCategory="exec",PinType.PinSubCategory="",PinType.PinSubCategoryObject=None,PinType.PinSubCategoryMemberReference=(),PinType.PinValueType=(),PinType.ContainerType=None,PinType.bIsReference=False,PinType.bIsConst=False,PinType.bIsWeakPointer=False,PinType.bIsUObjectWrapper=False,PinType.bSerializeAsSinglePrecisionFloat=False,PersistentGuid=00000000000000000000000000000000,bHidden=False,bNotConnectable=False,bDefaultValueIsReadOnly=False,bDefaultValueIsIgnored=False,bAdvancedView=False,bOrphanedPin=False,)
CustomProperties Pin (PinId=3FEAB10B47C83E27F7403C999C74C93D,PinName="Object",PinType.PinCategory="object",PinType.PinSubCategory="",PinType.PinSubCategoryObject="/Script/CoreUObject.Class'/Script/CoreUObject.Object'",PinType.PinSubCategoryMemberReference=(),PinType.PinValueType=(),PinType.ContainerType=None,PinType.bIsReference=False,PinType.bIsConst=False,PinType.bIsWeakPointer=False,PinType.bIsUObjectWrapper=False,PinType.bSerializeAsSinglePrecisionFloat=False,LinkedTo=(K2Node_CustomEvent_0 8ADC6C2F4B15E7CE4527E29E5913616C,),PersistentGuid=00000000000000000000000000000000,bHidden=False,bNotConnectable=False,bDefaultValueIsReadOnly=False,bDefaultValueIsIgnored=False,bAdvancedView=False,bOrphanedPin=False,)
CustomProperties Pin (PinId=466B3F664F8C2097B0F92687410D77A0,PinName="AsBall Shooter Target",Direction="EGPD_Output",PinType.PinCategory="object",PinType.PinSubCategory="",PinType.PinSubCategoryObject="/Script/Engine.BlueprintGeneratedClass'/Game/Examples/BallShooter/Blueprints/BallShooterTarget.BallShooterTarget_C'",PinType.PinSubCategoryMemberReference=(),PinType.PinValueType=(),PinType.ContainerType=None,PinType.bIsReference=False,PinType.bIsConst=False,PinType.bIsWeakPointer=False,PinType.bIsUObjectWrapper=False,PinType.bSerializeAsSinglePrecisionFloat=False,PersistentGuid=00000000000000000000000000000000,bHidden=False,bNotConnectable=False,bDefaultValueIsReadOnly=False,bDefaultValueIsIgnored=False,bAdvancedView=False,bOrphanedPin=False,)
CustomProperties Pin (PinId=F6F7E1DE4F5947B87BDBB79857B96958,PinName="bSuccess",Direction="EGPD_Output",PinType.PinCategory="bool",PinType.PinSubCategory="",PinType.PinSubCategoryObject=None,PinType.PinSubCategoryMemberReference=(),PinType.PinValueType=(),PinType.ContainerType=None,PinType.bIsReference=False,PinType.bIsConst=False,PinType.bIsWeakPointer=False,PinType.bIsUObjectWrapper=False,PinType.bSerializeAsSinglePrecisionFloat=False,PersistentGuid=00000000000000000000000000000000,bHidden=True,bNotConnectable=False,bDefaultValueIsReadOnly=False,bDefaultValueIsIgnored=False,bAdvancedView=False,bOrphanedPin=False,)
End Object
Begin Object Class=/Script/BlueprintGraph.K2Node_Knot Name="K2Node_Knot_2" ExportPath="/Script/BlueprintGraph.K2Node_Knot'/Game/Examples/BallShooter/Blueprints/BallShooterTrainer.BallShooterTrainer:EventGraph.K2Node_Knot_2'"
NodePosX=1024
NodePosY=-256
NodeGuid=BA05E74349C28DE7323FEEAF4E840CB0
CustomProperties Pin (PinId=020893A0499CA73EC85FE191C36B23E8,PinName="InputPin",PinType.PinCategory="delegate",PinType.PinSubCategory="",PinType.PinSubCategoryObject=None,PinType.PinSubCategoryMemberReference=(MemberParent="/Script/Engine.BlueprintGeneratedClass'/Game/Examples/BallShooter/Blueprints/BallShooterTrainer.BallShooterTrainer_C'",MemberName="On Ball Hit",MemberGuid=EDBD55A846853EE87BE27CB57A5DD70D),PinType.PinValueType=(),PinType.ContainerType=None,PinType.bIsReference=False,PinType.bIsConst=False,PinType.bIsWeakPointer=False,PinType.bIsUObjectWrapper=False,PinType.bSerializeAsSinglePrecisionFloat=False,LinkedTo=(K2Node_Knot_3 31FDEA7F4FE2D220A1E0FD8A9B350252,),PersistentGuid=00000000000000000000000000000000,bHidden=False,bNotConnectable=False,bDefaultValueIsReadOnly=False,bDefaultValueIsIgnored=True,bAdvancedView=False,bOrphanedPin=False,)
CustomProperties Pin (PinId=339473C84DBFA087EB45B98EC0FA9DAF,PinName="OutputPin",Direction="EGPD_Output",PinType.PinCategory="delegate",PinType.PinSubCategory="",PinType.PinSubCategoryObject=None,PinType.PinSubCategoryMemberReference=(MemberParent="/Script/Engine.BlueprintGeneratedClass'/Game/Examples/BallShooter/Blueprints/BallShooterTrainer.BallShooterTrainer_C'",MemberName="On Ball Hit",MemberGuid=EDBD55A846853EE87BE27CB57A5DD70D),PinType.PinValueType=(),PinType.ContainerType=None,PinType.bIsReference=False,PinType.bIsConst=False,PinType.bIsWeakPointer=False,PinType.bIsUObjectWrapper=False,PinType.bSerializeAsSinglePrecisionFloat=False,LinkedTo=(K2Node_AddDelegate_0 BBBAA2504357641B4241408CC021262B,),PersistentGuid=00000000000000000000000000000000,bHidden=False,bNotConnectable=False,bDefaultValueIsReadOnly=False,bDefaultValueIsIgnored=False,bAdvancedView=False,bOrphanedPin=False,)
End Object
Begin Object Class=/Script/BlueprintGraph.K2Node_Knot Name="K2Node_Knot_3" ExportPath="/Script/BlueprintGraph.K2Node_Knot'/Game/Examples/BallShooter/Blueprints/BallShooterTrainer.BallShooterTrainer:EventGraph.K2Node_Knot_3'"
NodePosX=464
NodePosY=-256
NodeGuid=7EA30348459F8E9F753A018AD405A0B6
CustomProperties Pin (PinId=177B09C94885A0406D90B3AF13CFACA6,PinName="InputPin",PinType.PinCategory="delegate",PinType.PinSubCategory="",PinType.PinSubCategoryObject=None,PinType.PinSubCategoryMemberReference=(MemberParent="/Script/Engine.BlueprintGeneratedClass'/Game/Examples/BallShooter/Blueprints/BallShooterTrainer.BallShooterTrainer_C'",MemberName="On Ball Hit",MemberGuid=EDBD55A846853EE87BE27CB57A5DD70D),PinType.PinValueType=(),PinType.ContainerType=None,PinType.bIsReference=False,PinType.bIsConst=False,PinType.bIsWeakPointer=False,PinType.bIsUObjectWrapper=False,PinType.bSerializeAsSinglePrecisionFloat=False,LinkedTo=(K2Node_CustomEvent_0 DDDA5FD84306D8FDFC83E18DE3BA9AC3,),PersistentGuid=00000000000000000000000000000000,bHidden=False,bNotConnectable=False,bDefaultValueIsReadOnly=False,bDefaultValueIsIgnored=True,bAdvancedView=False,bOrphanedPin=False,)
CustomProperties Pin (PinId=31FDEA7F4FE2D220A1E0FD8A9B350252,PinName="OutputPin",Direction="EGPD_Output",PinType.PinCategory="delegate",PinType.PinSubCategory="",PinType.PinSubCategoryObject=None,PinType.PinSubCategoryMemberReference=(MemberParent="/Script/Engine.BlueprintGeneratedClass'/Game/Examples/BallShooter/Blueprints/BallShooterTrainer.BallShooterTrainer_C'",MemberName="On Ball Hit",MemberGuid=EDBD55A846853EE87BE27CB57A5DD70D),PinType.PinValueType=(),PinType.ContainerType=None,PinType.bIsReference=False,PinType.bIsConst=False,PinType.bIsWeakPointer=False,PinType.bIsUObjectWrapper=False,PinType.bSerializeAsSinglePrecisionFloat=False,LinkedTo=(K2Node_Knot_2 020893A0499CA73EC85FE191C36B23E8,),PersistentGuid=00000000000000000000000000000000,bHidden=False,bNotConnectable=False,bDefaultValueIsReadOnly=False,bDefaultValueIsIgnored=False,bAdvancedView=False,bOrphanedPin=False,)
End Object
Attaching Actuators and Observers
Unlike the Example 1, actuators and observers will not be attached to the agent blueprint. Instead, they will be attached in the Trainer blueprint. This approach simplifies passing variables, as the Trainer's ComputeReward() and ComputeStatus() logic rely on variables from the BallShooterDiscreteRotationActuator.
Note
Actuator objects can be attached in three ways:
-
Attaching an
ActuatorComponentto the agent, which can contain anActuatorobject. -
Attaching an
ActuatorComponentcomponent to theBlueprintTrainer, which can contain anActuatorobject. -
Adding directly in the
Actuatorsarrays in theBlueprintTrainer.
Attaching the Ball Shooter Shooting Actuator
-
Add an
Actuatorcomponent. -
In
Details→Actuator Component→Actuator, selectBallShooterDiscreteRotationActuator.
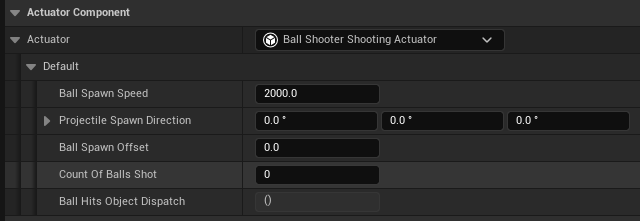
Attaching the Ball Shooter Discrete Rotation Actuator
-
Add an
Actuatorcomponent. -
In
Details→Actuator Component→Actuator, selectBallShooterDiscreteRotationActuator.
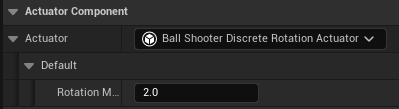
Attaching the Ray Cast Observer
-
Add a
Sensorcomponent. -
In
Details→Sensor→Observer, selectRay Cast Observer. -
In
Details→Sensor→Observer``→ ``Sensor properties→NumRays, enter 10. -
In
Details→Sensor→Observer``→ ``Sensor properties→RayDegrees, enter 120. -
In
Details→Sensor→Observer``→ ``Sensor properties, check theDrawDebugLinesbox. -
In
Details→Sensor→Observer``→ ``Sensor properties→TrackedTags, add a new element, and set the tag totarget.
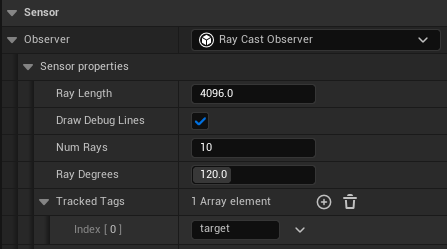
Define the Reward Function
In this tutorial, we give a reward of 1 for hitting a target and a penalty of -0.01 for missing the target. Additionally, we give a small penalty of -0.05 for each step the agent takes, to encourage the agent to destroy all targets and end the episode as quickly as possible. The per-step reward is computed as (1.01*numOfTargetHits - 0.01*countOfBallsShot) - 0.05
-
Add a new float variable. Name it
reward. It stores the reward for the current step. -
Set the
ComputeReward()function as shown below.

Begin Object Class=/Script/BlueprintGraph.K2Node_FunctionEntry Name="K2Node_FunctionEntry_1" ExportPath="/Script/BlueprintGraph.K2Node_FunctionEntry'/Game/Examples/BallShooter/Blueprints/BallShooterTrainer.BallShooterTrainer:ComputeReward.K2Node_FunctionEntry_1'"
LocalVariables(0)=(VarName="Reward",VarGuid=A569D640427C894AC412A89331607E37,VarType=(PinCategory="real",PinSubCategory="double"),FriendlyName="Reward",Category=NSLOCTEXT("KismetSchema", "Default", "Default"),PropertyFlags=5)
FunctionReference=(MemberParent="/Script/CoreUObject.Class'/Script/Schola.BlueprintTrainer'",MemberName="ComputeReward")
NodePosX=1216
NodePosY=-512
NodeGuid=095CE0A96F994139B0B56C6AC920454F
CustomProperties Pin (PinId=914DAF15B554488F89CF34F574C349DB,PinName="then",Direction="EGPD_Output",PinType.PinCategory="exec",PinType.PinSubCategory="",PinType.PinSubCategoryObject=None,PinType.PinSubCategoryMemberReference=(),PinType.PinValueType=(),PinType.ContainerType=None,PinType.bIsReference=False,PinType.bIsConst=False,PinType.bIsWeakPointer=False,PinType.bIsUObjectWrapper=False,PinType.bSerializeAsSinglePrecisionFloat=False,LinkedTo=(K2Node_VariableSet_4 E2BE15AB4D202ADB5B38FDAB9E96BE00,),PersistentGuid=00000000000000000000000000000000,bHidden=False,bNotConnectable=False,bDefaultValueIsReadOnly=False,bDefaultValueIsIgnored=False,bAdvancedView=False,bOrphanedPin=False,)
End Object
Begin Object Class=/Script/BlueprintGraph.K2Node_FunctionResult Name="K2Node_FunctionResult_1" ExportPath="/Script/BlueprintGraph.K2Node_FunctionResult'/Game/Examples/BallShooter/Blueprints/BallShooterTrainer.BallShooterTrainer:ComputeReward.K2Node_FunctionResult_1'"
FunctionReference=(MemberParent="/Script/CoreUObject.Class'/Script/Schola.BlueprintTrainer'",MemberName="ComputeReward")
NodePosX=2112
NodePosY=-512
NodeGuid=847F19488C0441B08C6A81639B92AF97
CustomProperties Pin (PinId=111FF26BB4BA4B659AC6F44E7A9E4369,PinName="execute",PinType.PinCategory="exec",PinType.PinSubCategory="",PinType.PinSubCategoryObject=None,PinType.PinSubCategoryMemberReference=(),PinType.PinValueType=(),PinType.ContainerType=None,PinType.bIsReference=False,PinType.bIsConst=False,PinType.bIsWeakPointer=False,PinType.bIsUObjectWrapper=False,PinType.bSerializeAsSinglePrecisionFloat=False,LinkedTo=(K2Node_VariableSet_2 0CEEAC584563228F035C8F9549541EFA,),PersistentGuid=00000000000000000000000000000000,bHidden=False,bNotConnectable=False,bDefaultValueIsReadOnly=False,bDefaultValueIsIgnored=False,bAdvancedView=False,bOrphanedPin=False,)
CustomProperties Pin (PinId=B4B87EBDB020470B8499FD943F49F059,PinName="ReturnValue",PinToolTip="Return Value\nFloat (single-precision)\n\nfloat representing the agents reward",PinType.PinCategory="real",PinType.PinSubCategory="float",PinType.PinSubCategoryObject=None,PinType.PinSubCategoryMemberReference=(),PinType.PinValueType=(),PinType.ContainerType=None,PinType.bIsReference=False,PinType.bIsConst=False,PinType.bIsWeakPointer=False,PinType.bIsUObjectWrapper=False,PinType.bSerializeAsSinglePrecisionFloat=False,DefaultValue="0.0",AutogeneratedDefaultValue="0.0",LinkedTo=(K2Node_VariableGet_10 8055F77A4F4AFA4FC1A365AF4C78C97E,),PersistentGuid=00000000000000000000000000000000,bHidden=False,bNotConnectable=False,bDefaultValueIsReadOnly=False,bDefaultValueIsIgnored=False,bAdvancedView=False,bOrphanedPin=False,)
End Object
Begin Object Class=/Script/BlueprintGraph.K2Node_CallFunction Name="K2Node_CallFunction_5" ExportPath="/Script/BlueprintGraph.K2Node_CallFunction'/Game/Examples/BallShooter/Blueprints/BallShooterTrainer.BallShooterTrainer:ComputeReward.K2Node_CallFunction_5'"
bIsPureFunc=True
FunctionReference=(MemberParent="/Script/CoreUObject.Class'/Script/Engine.KismetMathLibrary'",MemberName="Conv_IntToDouble")
NodePosX=880
NodePosY=-384
NodeGuid=E5BC4826E97C487ABFBA78AC85CC4EC3
CustomProperties Pin (PinId=1894DE1DF5C84EFE97DBA6F5E90D9E9D,PinName="self",PinFriendlyName=NSLOCTEXT("K2Node", "Target", "Target"),PinType.PinCategory="object",PinType.PinSubCategory="",PinType.PinSubCategoryObject="/Script/CoreUObject.Class'/Script/Engine.KismetMathLibrary'",PinType.PinSubCategoryMemberReference=(),PinType.PinValueType=(),PinType.ContainerType=None,PinType.bIsReference=False,PinType.bIsConst=False,PinType.bIsWeakPointer=False,PinType.bIsUObjectWrapper=False,PinType.bSerializeAsSinglePrecisionFloat=False,DefaultObject="/Script/Engine.Default__KismetMathLibrary",PersistentGuid=00000000000000000000000000000000,bHidden=True,bNotConnectable=False,bDefaultValueIsReadOnly=False,bDefaultValueIsIgnored=False,bAdvancedView=False,bOrphanedPin=False,)
CustomProperties Pin (PinId=93BA2F9E95A04301B356B8E10B6CE3B2,PinName="InInt",PinType.PinCategory="int",PinType.PinSubCategory="",PinType.PinSubCategoryObject=None,PinType.PinSubCategoryMemberReference=(),PinType.PinValueType=(),PinType.ContainerType=None,PinType.bIsReference=False,PinType.bIsConst=False,PinType.bIsWeakPointer=False,PinType.bIsUObjectWrapper=False,PinType.bSerializeAsSinglePrecisionFloat=False,DefaultValue="0",AutogeneratedDefaultValue="0",LinkedTo=(K2Node_VariableGet_4 35ADCAB249CE0D388DC412AF58779ADF,),PersistentGuid=00000000000000000000000000000000,bHidden=False,bNotConnectable=False,bDefaultValueIsReadOnly=False,bDefaultValueIsIgnored=False,bAdvancedView=False,bOrphanedPin=False,)
CustomProperties Pin (PinId=6D3CC78A4FD24B8B8EF44A08EAA13BD2,PinName="ReturnValue",Direction="EGPD_Output",PinType.PinCategory="real",PinType.PinSubCategory="double",PinType.PinSubCategoryObject=None,PinType.PinSubCategoryMemberReference=(),PinType.PinValueType=(),PinType.ContainerType=None,PinType.bIsReference=False,PinType.bIsConst=False,PinType.bIsWeakPointer=False,PinType.bIsUObjectWrapper=False,PinType.bSerializeAsSinglePrecisionFloat=False,DefaultValue="0.0",AutogeneratedDefaultValue="0.0",LinkedTo=(K2Node_CallFunction_0 D701294DDA7C43C88428A6D9B4BDC311,),PersistentGuid=00000000000000000000000000000000,bHidden=False,bNotConnectable=False,bDefaultValueIsReadOnly=False,bDefaultValueIsIgnored=False,bAdvancedView=False,bOrphanedPin=False,)
End Object
Begin Object Class=/Script/BlueprintGraph.K2Node_VariableGet Name="K2Node_VariableGet_3" ExportPath="/Script/BlueprintGraph.K2Node_VariableGet'/Game/Examples/BallShooter/Blueprints/BallShooterTrainer.BallShooterTrainer:ComputeReward.K2Node_VariableGet_3'"
VariableReference=(MemberName="Ball Shooter Actuator",MemberGuid=0089BFD742737DAEE28AB2A7BADC47DC,bSelfContext=True)
NodePosX=432
NodePosY=-385
NodeGuid=A1040F9D4B648E9E0A00238FEBF195F5
CustomProperties Pin (PinId=550266744B34ACD33200E6B4F4C11750,PinName="Ball Shooter Actuator",Direction="EGPD_Output",PinType.PinCategory="object",PinType.PinSubCategory="",PinType.PinSubCategoryObject="/Script/Engine.BlueprintGeneratedClass'/Game/Examples/BallShooter/Blueprints/BallShooterShootingActuator.BallShooterShootingActuator_C'",PinType.PinSubCategoryMemberReference=(),PinType.PinValueType=(),PinType.ContainerType=None,PinType.bIsReference=False,PinType.bIsConst=False,PinType.bIsWeakPointer=False,PinType.bIsUObjectWrapper=False,PinType.bSerializeAsSinglePrecisionFloat=False,LinkedTo=(K2Node_VariableGet_4 637BFF4149E82EB6C66034AC5ECF1F23,K2Node_Knot_3 0E35D8264AC05468CCF618AC8DAC86E6,),PersistentGuid=00000000000000000000000000000000,bHidden=False,bNotConnectable=False,bDefaultValueIsReadOnly=False,bDefaultValueIsIgnored=False,bAdvancedView=False,bOrphanedPin=False,)
CustomProperties Pin (PinId=28302E5E400C2C35D7B00E90202D7C57,PinName="self",PinFriendlyName=NSLOCTEXT("K2Node", "Target", "Target"),PinType.PinCategory="object",PinType.PinSubCategory="",PinType.PinSubCategoryObject="/Script/Engine.BlueprintGeneratedClass'/Game/Examples/BallShooter/Blueprints/BallShooterTrainer.BallShooterTrainer_C'",PinType.PinSubCategoryMemberReference=(),PinType.PinValueType=(),PinType.ContainerType=None,PinType.bIsReference=False,PinType.bIsConst=False,PinType.bIsWeakPointer=False,PinType.bIsUObjectWrapper=False,PinType.bSerializeAsSinglePrecisionFloat=False,PersistentGuid=00000000000000000000000000000000,bHidden=True,bNotConnectable=False,bDefaultValueIsReadOnly=False,bDefaultValueIsIgnored=False,bAdvancedView=False,bOrphanedPin=False,)
End Object
Begin Object Class=/Script/BlueprintGraph.K2Node_VariableGet Name="K2Node_VariableGet_4" ExportPath="/Script/BlueprintGraph.K2Node_VariableGet'/Game/Examples/BallShooter/Blueprints/BallShooterTrainer.BallShooterTrainer:ComputeReward.K2Node_VariableGet_4'"
VariableReference=(MemberParent="/Script/Engine.BlueprintGeneratedClass'/Game/Examples/BallShooter/Blueprints/BallShooterShootingActuator.BallShooterShootingActuator_C'",MemberName="countOfBallsShot",MemberGuid=AB55F08246C397E1FA9969966E1980C8)
SelfContextInfo=NotSelfContext
NodePosX=624
NodePosY=-385
NodeGuid=3FFD7CF44D558506870F9BA24B9C2167
CustomProperties Pin (PinId=35ADCAB249CE0D388DC412AF58779ADF,PinName="countOfBallsShot",Direction="EGPD_Output",PinType.PinCategory="int",PinType.PinSubCategory="",PinType.PinSubCategoryObject=None,PinType.PinSubCategoryMemberReference=(),PinType.PinValueType=(),PinType.ContainerType=None,PinType.bIsReference=False,PinType.bIsConst=False,PinType.bIsWeakPointer=False,PinType.bIsUObjectWrapper=False,PinType.bSerializeAsSinglePrecisionFloat=False,DefaultValue="0",AutogeneratedDefaultValue="0",LinkedTo=(K2Node_CallFunction_5 93BA2F9E95A04301B356B8E10B6CE3B2,),PersistentGuid=00000000000000000000000000000000,bHidden=False,bNotConnectable=False,bDefaultValueIsReadOnly=False,bDefaultValueIsIgnored=False,bAdvancedView=False,bOrphanedPin=False,)
CustomProperties Pin (PinId=637BFF4149E82EB6C66034AC5ECF1F23,PinName="self",PinFriendlyName=NSLOCTEXT("K2Node", "Target", "Target"),PinType.PinCategory="object",PinType.PinSubCategory="",PinType.PinSubCategoryObject="/Script/Engine.BlueprintGeneratedClass'/Game/Examples/BallShooter/Blueprints/BallShooterShootingActuator.BallShooterShootingActuator_C'",PinType.PinSubCategoryMemberReference=(),PinType.PinValueType=(),PinType.ContainerType=None,PinType.bIsReference=False,PinType.bIsConst=False,PinType.bIsWeakPointer=False,PinType.bIsUObjectWrapper=False,PinType.bSerializeAsSinglePrecisionFloat=False,LinkedTo=(K2Node_VariableGet_3 550266744B34ACD33200E6B4F4C11750,),PersistentGuid=00000000000000000000000000000000,bHidden=False,bNotConnectable=False,bDefaultValueIsReadOnly=False,bDefaultValueIsIgnored=False,bAdvancedView=False,bOrphanedPin=False,)
End Object
Begin Object Class=/Script/BlueprintGraph.K2Node_VariableSet Name="K2Node_VariableSet_1" ExportPath="/Script/BlueprintGraph.K2Node_VariableSet'/Game/Examples/BallShooter/Blueprints/BallShooterTrainer.BallShooterTrainer:ComputeReward.K2Node_VariableSet_1'"
VariableReference=(MemberName="numOfTargetHits",MemberGuid=F47D272D415187BBDE6497A337CCEBD2,bSelfContext=True)
NodePosX=1584
NodePosY=-496
NodeGuid=675EDB8F4187A915A42981BA7C1E29D0
CustomProperties Pin (PinId=CD8AD99848E2E9C10AF15BA07E764A53,PinName="execute",PinType.PinCategory="exec",PinType.PinSubCategory="",PinType.PinSubCategoryObject=None,PinType.PinSubCategoryMemberReference=(),PinType.PinValueType=(),PinType.ContainerType=None,PinType.bIsReference=False,PinType.bIsConst=False,PinType.bIsWeakPointer=False,PinType.bIsUObjectWrapper=False,PinType.bSerializeAsSinglePrecisionFloat=False,LinkedTo=(K2Node_VariableSet_4 FE61BC0745B58D24D98B22BE090AEA5A,),PersistentGuid=00000000000000000000000000000000,bHidden=False,bNotConnectable=False,bDefaultValueIsReadOnly=False,bDefaultValueIsIgnored=False,bAdvancedView=False,bOrphanedPin=False,)
CustomProperties Pin (PinId=57DDF07F416CE180DFC9338CE36A220D,PinName="then",Direction="EGPD_Output",PinType.PinCategory="exec",PinType.PinSubCategory="",PinType.PinSubCategoryObject=None,PinType.PinSubCategoryMemberReference=(),PinType.PinValueType=(),PinType.ContainerType=None,PinType.bIsReference=False,PinType.bIsConst=False,PinType.bIsWeakPointer=False,PinType.bIsUObjectWrapper=False,PinType.bSerializeAsSinglePrecisionFloat=False,LinkedTo=(K2Node_VariableSet_2 413A6A504C6E273B791CBBBAFAD797E4,),PersistentGuid=00000000000000000000000000000000,bHidden=False,bNotConnectable=False,bDefaultValueIsReadOnly=False,bDefaultValueIsIgnored=False,bAdvancedView=False,bOrphanedPin=False,)
CustomProperties Pin (PinId=4DE407DC4A53CC4EC3EE13A6AB248217,PinName="numOfTargetHits",PinType.PinCategory="int",PinType.PinSubCategory="",PinType.PinSubCategoryObject=None,PinType.PinSubCategoryMemberReference=(),PinType.PinValueType=(),PinType.ContainerType=None,PinType.bIsReference=False,PinType.bIsConst=False,PinType.bIsWeakPointer=False,PinType.bIsUObjectWrapper=False,PinType.bSerializeAsSinglePrecisionFloat=False,DefaultValue="0",AutogeneratedDefaultValue="0",PersistentGuid=00000000000000000000000000000000,bHidden=False,bNotConnectable=False,bDefaultValueIsReadOnly=False,bDefaultValueIsIgnored=False,bAdvancedView=False,bOrphanedPin=False,)
CustomProperties Pin (PinId=3128355847B32E97788563B7BA42C9CD,PinName="Output_Get",PinToolTip="Retrieves the value of the variable, can use instead of a separate Get node",Direction="EGPD_Output",PinType.PinCategory="int",PinType.PinSubCategory="",PinType.PinSubCategoryObject=None,PinType.PinSubCategoryMemberReference=(),PinType.PinValueType=(),PinType.ContainerType=None,PinType.bIsReference=False,PinType.bIsConst=False,PinType.bIsWeakPointer=False,PinType.bIsUObjectWrapper=False,PinType.bSerializeAsSinglePrecisionFloat=False,DefaultValue="0",AutogeneratedDefaultValue="0",PersistentGuid=00000000000000000000000000000000,bHidden=False,bNotConnectable=False,bDefaultValueIsReadOnly=False,bDefaultValueIsIgnored=False,bAdvancedView=False,bOrphanedPin=False,)
CustomProperties Pin (PinId=F7EC036E4955AC0E9C8C558298ED3F99,PinName="self",PinFriendlyName=NSLOCTEXT("K2Node", "Target", "Target"),PinType.PinCategory="object",PinType.PinSubCategory="",PinType.PinSubCategoryObject="/Script/Engine.BlueprintGeneratedClass'/Game/Examples/BallShooter/Blueprints/BallShooterTrainer.BallShooterTrainer_C'",PinType.PinSubCategoryMemberReference=(),PinType.PinValueType=(),PinType.ContainerType=None,PinType.bIsReference=False,PinType.bIsConst=False,PinType.bIsWeakPointer=False,PinType.bIsUObjectWrapper=False,PinType.bSerializeAsSinglePrecisionFloat=False,PersistentGuid=00000000000000000000000000000000,bHidden=True,bNotConnectable=False,bDefaultValueIsReadOnly=False,bDefaultValueIsIgnored=False,bAdvancedView=False,bOrphanedPin=False,)
End Object
Begin Object Class=/Script/BlueprintGraph.K2Node_VariableSet Name="K2Node_VariableSet_2" ExportPath="/Script/BlueprintGraph.K2Node_VariableSet'/Game/Examples/BallShooter/Blueprints/BallShooterTrainer.BallShooterTrainer:ComputeReward.K2Node_VariableSet_2'"
VariableReference=(MemberParent="/Script/Engine.BlueprintGeneratedClass'/Game/Examples/BallShooter/Blueprints/BallShooterShootingActuator.BallShooterShootingActuator_C'",MemberName="countOfBallsShot",MemberGuid=AB55F08246C397E1FA9969966E1980C8)
SelfContextInfo=NotSelfContext
NodePosX=1840
NodePosY=-496
NodeGuid=0C0E98A74942658E4A961C8EC66266A9
CustomProperties Pin (PinId=413A6A504C6E273B791CBBBAFAD797E4,PinName="execute",PinType.PinCategory="exec",PinType.PinSubCategory="",PinType.PinSubCategoryObject=None,PinType.PinSubCategoryMemberReference=(),PinType.PinValueType=(),PinType.ContainerType=None,PinType.bIsReference=False,PinType.bIsConst=False,PinType.bIsWeakPointer=False,PinType.bIsUObjectWrapper=False,PinType.bSerializeAsSinglePrecisionFloat=False,LinkedTo=(K2Node_VariableSet_1 57DDF07F416CE180DFC9338CE36A220D,),PersistentGuid=00000000000000000000000000000000,bHidden=False,bNotConnectable=False,bDefaultValueIsReadOnly=False,bDefaultValueIsIgnored=False,bAdvancedView=False,bOrphanedPin=False,)
CustomProperties Pin (PinId=0CEEAC584563228F035C8F9549541EFA,PinName="then",Direction="EGPD_Output",PinType.PinCategory="exec",PinType.PinSubCategory="",PinType.PinSubCategoryObject=None,PinType.PinSubCategoryMemberReference=(),PinType.PinValueType=(),PinType.ContainerType=None,PinType.bIsReference=False,PinType.bIsConst=False,PinType.bIsWeakPointer=False,PinType.bIsUObjectWrapper=False,PinType.bSerializeAsSinglePrecisionFloat=False,LinkedTo=(K2Node_FunctionResult_1 111FF26BB4BA4B659AC6F44E7A9E4369,),PersistentGuid=00000000000000000000000000000000,bHidden=False,bNotConnectable=False,bDefaultValueIsReadOnly=False,bDefaultValueIsIgnored=False,bAdvancedView=False,bOrphanedPin=False,)
CustomProperties Pin (PinId=845CB4E84185608C2E3A5493ACB023B1,PinName="countOfBallsShot",PinType.PinCategory="int",PinType.PinSubCategory="",PinType.PinSubCategoryObject=None,PinType.PinSubCategoryMemberReference=(),PinType.PinValueType=(),PinType.ContainerType=None,PinType.bIsReference=False,PinType.bIsConst=False,PinType.bIsWeakPointer=False,PinType.bIsUObjectWrapper=False,PinType.bSerializeAsSinglePrecisionFloat=False,DefaultValue="0",AutogeneratedDefaultValue="0",PersistentGuid=00000000000000000000000000000000,bHidden=False,bNotConnectable=False,bDefaultValueIsReadOnly=False,bDefaultValueIsIgnored=False,bAdvancedView=False,bOrphanedPin=False,)
CustomProperties Pin (PinId=BCE0B61247C4F315FA8548ABB0B39C9A,PinName="Output_Get",PinToolTip="Retrieves the value of the variable, can use instead of a separate Get node",Direction="EGPD_Output",PinType.PinCategory="int",PinType.PinSubCategory="",PinType.PinSubCategoryObject=None,PinType.PinSubCategoryMemberReference=(),PinType.PinValueType=(),PinType.ContainerType=None,PinType.bIsReference=False,PinType.bIsConst=False,PinType.bIsWeakPointer=False,PinType.bIsUObjectWrapper=False,PinType.bSerializeAsSinglePrecisionFloat=False,DefaultValue="0",AutogeneratedDefaultValue="0",PersistentGuid=00000000000000000000000000000000,bHidden=False,bNotConnectable=False,bDefaultValueIsReadOnly=False,bDefaultValueIsIgnored=False,bAdvancedView=False,bOrphanedPin=False,)
CustomProperties Pin (PinId=61FD1D324F50FC849A654B99DAAB9F1C,PinName="self",PinFriendlyName=NSLOCTEXT("K2Node", "Target", "Target"),PinType.PinCategory="object",PinType.PinSubCategory="",PinType.PinSubCategoryObject="/Script/Engine.BlueprintGeneratedClass'/Game/Examples/BallShooter/Blueprints/BallShooterShootingActuator.BallShooterShootingActuator_C'",PinType.PinSubCategoryMemberReference=(),PinType.PinValueType=(),PinType.ContainerType=None,PinType.bIsReference=False,PinType.bIsConst=False,PinType.bIsWeakPointer=False,PinType.bIsUObjectWrapper=False,PinType.bSerializeAsSinglePrecisionFloat=False,LinkedTo=(K2Node_Knot_4 102A09504715A54BC04253A321B09E7A,),PersistentGuid=00000000000000000000000000000000,bHidden=False,bNotConnectable=False,bDefaultValueIsReadOnly=False,bDefaultValueIsIgnored=False,bAdvancedView=False,bOrphanedPin=False,)
End Object
Begin Object Class=/Script/BlueprintGraph.K2Node_Knot Name="K2Node_Knot_3" ExportPath="/Script/BlueprintGraph.K2Node_Knot'/Game/Examples/BallShooter/Blueprints/BallShooterTrainer.BallShooterTrainer:ComputeReward.K2Node_Knot_3'"
NodePosX=640
NodePosY=-320
NodeGuid=64935841413891B59DBFE89DADD65F44
CustomProperties Pin (PinId=0E35D8264AC05468CCF618AC8DAC86E6,PinName="InputPin",PinType.PinCategory="object",PinType.PinSubCategory="",PinType.PinSubCategoryObject="/Script/Engine.BlueprintGeneratedClass'/Game/Examples/BallShooter/Blueprints/BallShooterShootingActuator.BallShooterShootingActuator_C'",PinType.PinSubCategoryMemberReference=(),PinType.PinValueType=(),PinType.ContainerType=None,PinType.bIsReference=False,PinType.bIsConst=False,PinType.bIsWeakPointer=False,PinType.bIsUObjectWrapper=False,PinType.bSerializeAsSinglePrecisionFloat=False,LinkedTo=(K2Node_VariableGet_3 550266744B34ACD33200E6B4F4C11750,),PersistentGuid=00000000000000000000000000000000,bHidden=False,bNotConnectable=False,bDefaultValueIsReadOnly=False,bDefaultValueIsIgnored=True,bAdvancedView=False,bOrphanedPin=False,)
CustomProperties Pin (PinId=1027EFCE4EBA661CB96CB994D99659A0,PinName="OutputPin",Direction="EGPD_Output",PinType.PinCategory="object",PinType.PinSubCategory="",PinType.PinSubCategoryObject="/Script/Engine.BlueprintGeneratedClass'/Game/Examples/BallShooter/Blueprints/BallShooterShootingActuator.BallShooterShootingActuator_C'",PinType.PinSubCategoryMemberReference=(),PinType.PinValueType=(),PinType.ContainerType=None,PinType.bIsReference=False,PinType.bIsConst=False,PinType.bIsWeakPointer=False,PinType.bIsUObjectWrapper=False,PinType.bSerializeAsSinglePrecisionFloat=False,LinkedTo=(K2Node_Knot_4 82ED78CA42C2E694898B029DE4277E9F,),PersistentGuid=00000000000000000000000000000000,bHidden=False,bNotConnectable=False,bDefaultValueIsReadOnly=False,bDefaultValueIsIgnored=False,bAdvancedView=False,bOrphanedPin=False,)
End Object
Begin Object Class=/Script/BlueprintGraph.K2Node_Knot Name="K2Node_Knot_4" ExportPath="/Script/BlueprintGraph.K2Node_Knot'/Game/Examples/BallShooter/Blueprints/BallShooterTrainer.BallShooterTrainer:ComputeReward.K2Node_Knot_4'"
NodePosX=1760
NodePosY=-320
NodeGuid=3449F46F4ACF1064EE722A8D56C4583F
CustomProperties Pin (PinId=82ED78CA42C2E694898B029DE4277E9F,PinName="InputPin",PinType.PinCategory="object",PinType.PinSubCategory="",PinType.PinSubCategoryObject="/Script/Engine.BlueprintGeneratedClass'/Game/Examples/BallShooter/Blueprints/BallShooterShootingActuator.BallShooterShootingActuator_C'",PinType.PinSubCategoryMemberReference=(),PinType.PinValueType=(),PinType.ContainerType=None,PinType.bIsReference=False,PinType.bIsConst=False,PinType.bIsWeakPointer=False,PinType.bIsUObjectWrapper=False,PinType.bSerializeAsSinglePrecisionFloat=False,LinkedTo=(K2Node_Knot_3 1027EFCE4EBA661CB96CB994D99659A0,),PersistentGuid=00000000000000000000000000000000,bHidden=False,bNotConnectable=False,bDefaultValueIsReadOnly=False,bDefaultValueIsIgnored=True,bAdvancedView=False,bOrphanedPin=False,)
CustomProperties Pin (PinId=102A09504715A54BC04253A321B09E7A,PinName="OutputPin",Direction="EGPD_Output",PinType.PinCategory="object",PinType.PinSubCategory="",PinType.PinSubCategoryObject="/Script/Engine.BlueprintGeneratedClass'/Game/Examples/BallShooter/Blueprints/BallShooterShootingActuator.BallShooterShootingActuator_C'",PinType.PinSubCategoryMemberReference=(),PinType.PinValueType=(),PinType.ContainerType=None,PinType.bIsReference=False,PinType.bIsConst=False,PinType.bIsWeakPointer=False,PinType.bIsUObjectWrapper=False,PinType.bSerializeAsSinglePrecisionFloat=False,LinkedTo=(K2Node_VariableSet_2 61FD1D324F50FC849A654B99DAAB9F1C,),PersistentGuid=00000000000000000000000000000000,bHidden=False,bNotConnectable=False,bDefaultValueIsReadOnly=False,bDefaultValueIsIgnored=False,bAdvancedView=False,bOrphanedPin=False,)
End Object
Begin Object Class=/Script/BlueprintGraph.K2Node_VariableSet Name="K2Node_VariableSet_4" ExportPath="/Script/BlueprintGraph.K2Node_VariableSet'/Game/Examples/BallShooter/Blueprints/BallShooterTrainer.BallShooterTrainer:ComputeReward.K2Node_VariableSet_4'"
VariableReference=(MemberScope="ComputeReward",MemberName="Reward",MemberGuid=A569D640427C894AC412A89331607E37)
NodePosX=1408
NodePosY=-496
NodeGuid=154C76C84E09B23CA033E789B4B4144E
CustomProperties Pin (PinId=E2BE15AB4D202ADB5B38FDAB9E96BE00,PinName="execute",PinType.PinCategory="exec",PinType.PinSubCategory="",PinType.PinSubCategoryObject=None,PinType.PinSubCategoryMemberReference=(),PinType.PinValueType=(),PinType.ContainerType=None,PinType.bIsReference=False,PinType.bIsConst=False,PinType.bIsWeakPointer=False,PinType.bIsUObjectWrapper=False,PinType.bSerializeAsSinglePrecisionFloat=False,LinkedTo=(K2Node_FunctionEntry_1 914DAF15B554488F89CF34F574C349DB,),PersistentGuid=00000000000000000000000000000000,bHidden=False,bNotConnectable=False,bDefaultValueIsReadOnly=False,bDefaultValueIsIgnored=False,bAdvancedView=False,bOrphanedPin=False,)
CustomProperties Pin (PinId=FE61BC0745B58D24D98B22BE090AEA5A,PinName="then",Direction="EGPD_Output",PinType.PinCategory="exec",PinType.PinSubCategory="",PinType.PinSubCategoryObject=None,PinType.PinSubCategoryMemberReference=(),PinType.PinValueType=(),PinType.ContainerType=None,PinType.bIsReference=False,PinType.bIsConst=False,PinType.bIsWeakPointer=False,PinType.bIsUObjectWrapper=False,PinType.bSerializeAsSinglePrecisionFloat=False,LinkedTo=(K2Node_VariableSet_1 CD8AD99848E2E9C10AF15BA07E764A53,),PersistentGuid=00000000000000000000000000000000,bHidden=False,bNotConnectable=False,bDefaultValueIsReadOnly=False,bDefaultValueIsIgnored=False,bAdvancedView=False,bOrphanedPin=False,)
CustomProperties Pin (PinId=D1C987744B366F17542684AC7BF6EB01,PinName="Reward",PinType.PinCategory="real",PinType.PinSubCategory="double",PinType.PinSubCategoryObject=None,PinType.PinSubCategoryMemberReference=(),PinType.PinValueType=(),PinType.ContainerType=None,PinType.bIsReference=False,PinType.bIsConst=False,PinType.bIsWeakPointer=False,PinType.bIsUObjectWrapper=False,PinType.bSerializeAsSinglePrecisionFloat=False,DefaultValue="0.0",AutogeneratedDefaultValue="0.0",LinkedTo=(K2Node_PromotableOperator_0 CCAFC380D20E4B27AE64D1351E19E08D,),PersistentGuid=00000000000000000000000000000000,bHidden=False,bNotConnectable=False,bDefaultValueIsReadOnly=False,bDefaultValueIsIgnored=False,bAdvancedView=False,bOrphanedPin=False,)
CustomProperties Pin (PinId=D2A1AA3045B51AEC921178BC999E33E8,PinName="Output_Get",PinToolTip="Retrieves the value of the variable, can use instead of a separate Get node",Direction="EGPD_Output",PinType.PinCategory="real",PinType.PinSubCategory="double",PinType.PinSubCategoryObject=None,PinType.PinSubCategoryMemberReference=(),PinType.PinValueType=(),PinType.ContainerType=None,PinType.bIsReference=False,PinType.bIsConst=False,PinType.bIsWeakPointer=False,PinType.bIsUObjectWrapper=False,PinType.bSerializeAsSinglePrecisionFloat=False,DefaultValue="0.0",AutogeneratedDefaultValue="0.0",PersistentGuid=00000000000000000000000000000000,bHidden=False,bNotConnectable=False,bDefaultValueIsReadOnly=False,bDefaultValueIsIgnored=False,bAdvancedView=False,bOrphanedPin=False,)
End Object
Begin Object Class=/Script/BlueprintGraph.K2Node_VariableGet Name="K2Node_VariableGet_10" ExportPath="/Script/BlueprintGraph.K2Node_VariableGet'/Game/Examples/BallShooter/Blueprints/BallShooterTrainer.BallShooterTrainer:ComputeReward.K2Node_VariableGet_10'"
VariableReference=(MemberScope="ComputeReward",MemberName="Reward",MemberGuid=A569D640427C894AC412A89331607E37)
NodePosX=1936
NodePosY=-368
NodeGuid=828D713E48252E91449B6E9792C390EB
CustomProperties Pin (PinId=8055F77A4F4AFA4FC1A365AF4C78C97E,PinName="Reward",Direction="EGPD_Output",PinType.PinCategory="real",PinType.PinSubCategory="double",PinType.PinSubCategoryObject=None,PinType.PinSubCategoryMemberReference=(),PinType.PinValueType=(),PinType.ContainerType=None,PinType.bIsReference=False,PinType.bIsConst=False,PinType.bIsWeakPointer=False,PinType.bIsUObjectWrapper=False,PinType.bSerializeAsSinglePrecisionFloat=False,DefaultValue="0.0",AutogeneratedDefaultValue="0.0",LinkedTo=(K2Node_FunctionResult_1 B4B87EBDB020470B8499FD943F49F059,),PersistentGuid=00000000000000000000000000000000,bHidden=False,bNotConnectable=False,bDefaultValueIsReadOnly=False,bDefaultValueIsIgnored=False,bAdvancedView=False,bOrphanedPin=False,)
End Object
Begin Object Class=/Script/BlueprintGraph.K2Node_VariableGet Name="K2Node_VariableGet_2" ExportPath="/Script/BlueprintGraph.K2Node_VariableGet'/Game/Examples/BallShooter/Blueprints/BallShooterTrainer.BallShooterTrainer:ComputeReward.K2Node_VariableGet_2'"
VariableReference=(MemberName="numOfTargetHits",MemberGuid=F47D272D415187BBDE6497A337CCEBD2,bSelfContext=True)
NodePosX=672
NodePosY=-481
NodeGuid=5C9D378DCB054643A938E5FB350AC386
CustomProperties Pin (PinId=9EF283A61B0648B986BEBA6C893E89BF,PinName="numOfTargetHits",Direction="EGPD_Output",PinType.PinCategory="int",PinType.PinSubCategory="",PinType.PinSubCategoryObject=None,PinType.PinSubCategoryMemberReference=(),PinType.PinValueType=(),PinType.ContainerType=None,PinType.bIsReference=False,PinType.bIsConst=False,PinType.bIsWeakPointer=False,PinType.bIsUObjectWrapper=False,PinType.bSerializeAsSinglePrecisionFloat=False,DefaultValue="0",AutogeneratedDefaultValue="0",LinkedTo=(K2Node_CallFunction_10 66942A8ABD85421C86E937C3732FE2D6,),PersistentGuid=00000000000000000000000000000000,bHidden=False,bNotConnectable=False,bDefaultValueIsReadOnly=False,bDefaultValueIsIgnored=False,bAdvancedView=False,bOrphanedPin=False,)
CustomProperties Pin (PinId=4FE24F36BA5F40AFAA6D8373BA37D405,PinName="self",PinFriendlyName=NSLOCTEXT("K2Node", "Target", "Target"),PinType.PinCategory="object",PinType.PinSubCategory="",PinType.PinSubCategoryObject="/Script/Engine.BlueprintGeneratedClass'/Game/Examples/BallShooter/Blueprints/BallShooterTrainer.BallShooterTrainer_C'",PinType.PinSubCategoryMemberReference=(),PinType.PinValueType=(),PinType.ContainerType=None,PinType.bIsReference=False,PinType.bIsConst=False,PinType.bIsWeakPointer=False,PinType.bIsUObjectWrapper=False,PinType.bSerializeAsSinglePrecisionFloat=False,PersistentGuid=00000000000000000000000000000000,bHidden=True,bNotConnectable=False,bDefaultValueIsReadOnly=False,bDefaultValueIsIgnored=False,bAdvancedView=False,bOrphanedPin=False,)
End Object
Begin Object Class=/Script/BlueprintGraph.K2Node_CallFunction Name="K2Node_CallFunction_0" ExportPath="/Script/BlueprintGraph.K2Node_CallFunction'/Game/Examples/BallShooter/Blueprints/BallShooterTrainer.BallShooterTrainer:ComputeReward.K2Node_CallFunction_0'"
bIsPureFunc=True
FunctionReference=(MemberParent="/Script/CoreUObject.Class'/Script/Engine.KismetMathLibrary'",MemberName="Multiply_DoubleDouble")
NodePosX=1024
NodePosY=-419
NodeGuid=6CB0786D36164FADBE10DAB8691D58EE
CustomProperties Pin (PinId=F86F05D9BD944670A7B8B3B2B43F4C1B,PinName="self",PinFriendlyName=NSLOCTEXT("K2Node", "Target", "Target"),PinToolTip="Target\nKismet Math Library Object Reference",PinType.PinCategory="object",PinType.PinSubCategory="",PinType.PinSubCategoryObject="/Script/CoreUObject.Class'/Script/Engine.KismetMathLibrary'",PinType.PinSubCategoryMemberReference=(),PinType.PinValueType=(),PinType.ContainerType=None,PinType.bIsReference=False,PinType.bIsConst=False,PinType.bIsWeakPointer=False,PinType.bIsUObjectWrapper=False,PinType.bSerializeAsSinglePrecisionFloat=False,DefaultObject="/Script/Engine.Default__KismetMathLibrary",PersistentGuid=00000000000000000000000000000000,bHidden=True,bNotConnectable=False,bDefaultValueIsReadOnly=False,bDefaultValueIsIgnored=False,bAdvancedView=False,bOrphanedPin=False,)
CustomProperties Pin (PinId=867EF7EBC55E4C758EA4C697650DA49D,PinName="A",PinToolTip="A\nFloat (double-precision)",PinType.PinCategory="real",PinType.PinSubCategory="double",PinType.PinSubCategoryObject=None,PinType.PinSubCategoryMemberReference=(),PinType.PinValueType=(),PinType.ContainerType=None,PinType.bIsReference=False,PinType.bIsConst=False,PinType.bIsWeakPointer=False,PinType.bIsUObjectWrapper=False,PinType.bSerializeAsSinglePrecisionFloat=False,DefaultValue="0.010000",AutogeneratedDefaultValue="0.0",PersistentGuid=00000000000000000000000000000000,bHidden=False,bNotConnectable=False,bDefaultValueIsReadOnly=False,bDefaultValueIsIgnored=False,bAdvancedView=False,bOrphanedPin=False,)
CustomProperties Pin (PinId=D701294DDA7C43C88428A6D9B4BDC311,PinName="B",PinToolTip="B\nFloat (double-precision)",PinType.PinCategory="real",PinType.PinSubCategory="double",PinType.PinSubCategoryObject=None,PinType.PinSubCategoryMemberReference=(),PinType.PinValueType=(),PinType.ContainerType=None,PinType.bIsReference=False,PinType.bIsConst=False,PinType.bIsWeakPointer=False,PinType.bIsUObjectWrapper=False,PinType.bSerializeAsSinglePrecisionFloat=False,DefaultValue="0.0",AutogeneratedDefaultValue="0.0",LinkedTo=(K2Node_CallFunction_5 6D3CC78A4FD24B8B8EF44A08EAA13BD2,),PersistentGuid=00000000000000000000000000000000,bHidden=False,bNotConnectable=False,bDefaultValueIsReadOnly=False,bDefaultValueIsIgnored=False,bAdvancedView=False,bOrphanedPin=False,)
CustomProperties Pin (PinId=558277A4A6634987AD593194A5D65955,PinName="ReturnValue",PinToolTip="Return Value\nFloat (double-precision)\n\nMultiplication (A * B)",Direction="EGPD_Output",PinType.PinCategory="real",PinType.PinSubCategory="double",PinType.PinSubCategoryObject=None,PinType.PinSubCategoryMemberReference=(),PinType.PinValueType=(),PinType.ContainerType=None,PinType.bIsReference=False,PinType.bIsConst=False,PinType.bIsWeakPointer=False,PinType.bIsUObjectWrapper=False,PinType.bSerializeAsSinglePrecisionFloat=False,DefaultValue="0.0",AutogeneratedDefaultValue="0.0",LinkedTo=(K2Node_PromotableOperator_0 572A8ED91D764D8F814EAD032FC96635,),PersistentGuid=00000000000000000000000000000000,bHidden=False,bNotConnectable=False,bDefaultValueIsReadOnly=False,bDefaultValueIsIgnored=False,bAdvancedView=False,bOrphanedPin=False,)
End Object
Begin Object Class=/Script/BlueprintGraph.K2Node_CallFunction Name="K2Node_CallFunction_10" ExportPath="/Script/BlueprintGraph.K2Node_CallFunction'/Game/Examples/BallShooter/Blueprints/BallShooterTrainer.BallShooterTrainer:ComputeReward.K2Node_CallFunction_10'"
bIsPureFunc=True
FunctionReference=(MemberParent="/Script/CoreUObject.Class'/Script/Engine.KismetMathLibrary'",MemberName="Conv_IntToDouble")
NodePosX=864
NodePosY=-480
NodeGuid=1905A7B67DAE437AA110D3339877C71D
CustomProperties Pin (PinId=1FA8F09F01A8406493D63762FE141932,PinName="self",PinFriendlyName=NSLOCTEXT("K2Node", "Target", "Target"),PinType.PinCategory="object",PinType.PinSubCategory="",PinType.PinSubCategoryObject="/Script/CoreUObject.Class'/Script/Engine.KismetMathLibrary'",PinType.PinSubCategoryMemberReference=(),PinType.PinValueType=(),PinType.ContainerType=None,PinType.bIsReference=False,PinType.bIsConst=False,PinType.bIsWeakPointer=False,PinType.bIsUObjectWrapper=False,PinType.bSerializeAsSinglePrecisionFloat=False,DefaultObject="/Script/Engine.Default__KismetMathLibrary",PersistentGuid=00000000000000000000000000000000,bHidden=True,bNotConnectable=False,bDefaultValueIsReadOnly=False,bDefaultValueIsIgnored=False,bAdvancedView=False,bOrphanedPin=False,)
CustomProperties Pin (PinId=66942A8ABD85421C86E937C3732FE2D6,PinName="InInt",PinType.PinCategory="int",PinType.PinSubCategory="",PinType.PinSubCategoryObject=None,PinType.PinSubCategoryMemberReference=(),PinType.PinValueType=(),PinType.ContainerType=None,PinType.bIsReference=False,PinType.bIsConst=False,PinType.bIsWeakPointer=False,PinType.bIsUObjectWrapper=False,PinType.bSerializeAsSinglePrecisionFloat=False,DefaultValue="0",AutogeneratedDefaultValue="0",LinkedTo=(K2Node_VariableGet_2 9EF283A61B0648B986BEBA6C893E89BF,),PersistentGuid=00000000000000000000000000000000,bHidden=False,bNotConnectable=False,bDefaultValueIsReadOnly=False,bDefaultValueIsIgnored=False,bAdvancedView=False,bOrphanedPin=False,)
CustomProperties Pin (PinId=83DD13A3E9B64C9C870E281B4348C2FE,PinName="ReturnValue",Direction="EGPD_Output",PinType.PinCategory="real",PinType.PinSubCategory="double",PinType.PinSubCategoryObject=None,PinType.PinSubCategoryMemberReference=(),PinType.PinValueType=(),PinType.ContainerType=None,PinType.bIsReference=False,PinType.bIsConst=False,PinType.bIsWeakPointer=False,PinType.bIsUObjectWrapper=False,PinType.bSerializeAsSinglePrecisionFloat=False,DefaultValue="0.0",AutogeneratedDefaultValue="0.0",LinkedTo=(K2Node_CallFunction_8 867EF7EBC55E4C758EA4C697650DA49D,),PersistentGuid=00000000000000000000000000000000,bHidden=False,bNotConnectable=False,bDefaultValueIsReadOnly=False,bDefaultValueIsIgnored=False,bAdvancedView=False,bOrphanedPin=False,)
End Object
Begin Object Class=/Script/BlueprintGraph.K2Node_PromotableOperator Name="K2Node_PromotableOperator_0" ExportPath="/Script/BlueprintGraph.K2Node_PromotableOperator'/Game/Examples/BallShooter/Blueprints/BallShooterTrainer.BallShooterTrainer:ComputeReward.K2Node_PromotableOperator_0'"
OperationName="Subtract"
NumAdditionalInputs=1
bIsPureFunc=True
FunctionReference=(MemberParent="/Script/CoreUObject.Class'/Script/Engine.KismetMathLibrary'",MemberName="Subtract_DoubleDouble")
NodePosX=1216
NodePosY=-432
NodeGuid=7502B62CC72B40FABBEDCE5EEA40E234
CustomProperties Pin (PinId=92668FDFAB084CACB8319223DC0E2BA5,PinName="A",PinType.PinCategory="real",PinType.PinSubCategory="double",PinType.PinSubCategoryObject=None,PinType.PinSubCategoryMemberReference=(),PinType.PinValueType=(),PinType.ContainerType=None,PinType.bIsReference=False,PinType.bIsConst=False,PinType.bIsWeakPointer=False,PinType.bIsUObjectWrapper=False,PinType.bSerializeAsSinglePrecisionFloat=False,LinkedTo=(K2Node_CallFunction_8 558277A4A6634987AD593194A5D65955,),PersistentGuid=00000000000000000000000000000000,bHidden=False,bNotConnectable=False,bDefaultValueIsReadOnly=False,bDefaultValueIsIgnored=False,bAdvancedView=False,bOrphanedPin=False,)
CustomProperties Pin (PinId=572A8ED91D764D8F814EAD032FC96635,PinName="B",PinType.PinCategory="real",PinType.PinSubCategory="double",PinType.PinSubCategoryObject=None,PinType.PinSubCategoryMemberReference=(),PinType.PinValueType=(),PinType.ContainerType=None,PinType.bIsReference=False,PinType.bIsConst=False,PinType.bIsWeakPointer=False,PinType.bIsUObjectWrapper=False,PinType.bSerializeAsSinglePrecisionFloat=False,LinkedTo=(K2Node_CallFunction_0 558277A4A6634987AD593194A5D65955,),PersistentGuid=00000000000000000000000000000000,bHidden=False,bNotConnectable=False,bDefaultValueIsReadOnly=False,bDefaultValueIsIgnored=False,bAdvancedView=False,bOrphanedPin=False,)
CustomProperties Pin (PinId=CCAFC380D20E4B27AE64D1351E19E08D,PinName="ReturnValue",Direction="EGPD_Output",PinType.PinCategory="real",PinType.PinSubCategory="double",PinType.PinSubCategoryObject=None,PinType.PinSubCategoryMemberReference=(),PinType.PinValueType=(),PinType.ContainerType=None,PinType.bIsReference=False,PinType.bIsConst=False,PinType.bIsWeakPointer=False,PinType.bIsUObjectWrapper=False,PinType.bSerializeAsSinglePrecisionFloat=False,LinkedTo=(K2Node_VariableSet_4 D1C987744B366F17542684AC7BF6EB01,),PersistentGuid=00000000000000000000000000000000,bHidden=False,bNotConnectable=False,bDefaultValueIsReadOnly=False,bDefaultValueIsIgnored=False,bAdvancedView=False,bOrphanedPin=False,)
CustomProperties Pin (PinId=E4AECB7267824A6EB370E64767362847,PinName="C",PinType.PinCategory="real",PinType.PinSubCategory="double",PinType.PinSubCategoryObject=None,PinType.PinSubCategoryMemberReference=(),PinType.PinValueType=(),PinType.ContainerType=None,PinType.bIsReference=False,PinType.bIsConst=False,PinType.bIsWeakPointer=False,PinType.bIsUObjectWrapper=False,PinType.bSerializeAsSinglePrecisionFloat=False,DefaultValue="0.050000",PersistentGuid=00000000000000000000000000000000,bHidden=False,bNotConnectable=False,bDefaultValueIsReadOnly=False,bDefaultValueIsIgnored=False,bAdvancedView=False,bOrphanedPin=False,)
End Object
Begin Object Class=/Script/BlueprintGraph.K2Node_CallFunction Name="K2Node_CallFunction_8" ExportPath="/Script/BlueprintGraph.K2Node_CallFunction'/Game/Examples/BallShooter/Blueprints/BallShooterTrainer.BallShooterTrainer:ComputeReward.K2Node_CallFunction_8'"
bIsPureFunc=True
FunctionReference=(MemberParent="/Script/CoreUObject.Class'/Script/Engine.KismetMathLibrary'",MemberName="Multiply_DoubleDouble")
NodePosX=1024
NodePosY=-496
NodeGuid=7786EBAA7F2A4118BB0EB98C073F7509
CustomProperties Pin (PinId=F86F05D9BD944670A7B8B3B2B43F4C1B,PinName="self",PinFriendlyName=NSLOCTEXT("K2Node", "Target", "Target"),PinToolTip="Target\nKismet Math Library Object Reference",PinType.PinCategory="object",PinType.PinSubCategory="",PinType.PinSubCategoryObject="/Script/CoreUObject.Class'/Script/Engine.KismetMathLibrary'",PinType.PinSubCategoryMemberReference=(),PinType.PinValueType=(),PinType.ContainerType=None,PinType.bIsReference=False,PinType.bIsConst=False,PinType.bIsWeakPointer=False,PinType.bIsUObjectWrapper=False,PinType.bSerializeAsSinglePrecisionFloat=False,DefaultObject="/Script/Engine.Default__KismetMathLibrary",PersistentGuid=00000000000000000000000000000000,bHidden=True,bNotConnectable=False,bDefaultValueIsReadOnly=False,bDefaultValueIsIgnored=False,bAdvancedView=False,bOrphanedPin=False,)
CustomProperties Pin (PinId=867EF7EBC55E4C758EA4C697650DA49D,PinName="A",PinToolTip="A\nFloat (double-precision)",PinType.PinCategory="real",PinType.PinSubCategory="double",PinType.PinSubCategoryObject=None,PinType.PinSubCategoryMemberReference=(),PinType.PinValueType=(),PinType.ContainerType=None,PinType.bIsReference=False,PinType.bIsConst=False,PinType.bIsWeakPointer=False,PinType.bIsUObjectWrapper=False,PinType.bSerializeAsSinglePrecisionFloat=False,DefaultValue="0.0",AutogeneratedDefaultValue="0.0",LinkedTo=(K2Node_CallFunction_10 83DD13A3E9B64C9C870E281B4348C2FE,),PersistentGuid=00000000000000000000000000000000,bHidden=False,bNotConnectable=False,bDefaultValueIsReadOnly=False,bDefaultValueIsIgnored=False,bAdvancedView=False,bOrphanedPin=False,)
CustomProperties Pin (PinId=D701294DDA7C43C88428A6D9B4BDC311,PinName="B",PinToolTip="B\nFloat (double-precision)",PinType.PinCategory="real",PinType.PinSubCategory="double",PinType.PinSubCategoryObject=None,PinType.PinSubCategoryMemberReference=(),PinType.PinValueType=(),PinType.ContainerType=None,PinType.bIsReference=False,PinType.bIsConst=False,PinType.bIsWeakPointer=False,PinType.bIsUObjectWrapper=False,PinType.bSerializeAsSinglePrecisionFloat=False,DefaultValue="1.010000",AutogeneratedDefaultValue="0.0",PersistentGuid=00000000000000000000000000000000,bHidden=False,bNotConnectable=False,bDefaultValueIsReadOnly=False,bDefaultValueIsIgnored=False,bAdvancedView=False,bOrphanedPin=False,)
CustomProperties Pin (PinId=558277A4A6634987AD593194A5D65955,PinName="ReturnValue",PinToolTip="Return Value\nFloat (double-precision)\n\nMultiplication (A * B)",Direction="EGPD_Output",PinType.PinCategory="real",PinType.PinSubCategory="double",PinType.PinSubCategoryObject=None,PinType.PinSubCategoryMemberReference=(),PinType.PinValueType=(),PinType.ContainerType=None,PinType.bIsReference=False,PinType.bIsConst=False,PinType.bIsWeakPointer=False,PinType.bIsUObjectWrapper=False,PinType.bSerializeAsSinglePrecisionFloat=False,DefaultValue="0.0",AutogeneratedDefaultValue="0.0",LinkedTo=(K2Node_PromotableOperator_0 92668FDFAB084CACB8319223DC0E2BA5,),PersistentGuid=00000000000000000000000000000000,bHidden=False,bNotConnectable=False,bDefaultValueIsReadOnly=False,bDefaultValueIsIgnored=False,bAdvancedView=False,bOrphanedPin=False,)
End Object
Define the Status Function
There are three possible statuses for each time step:
-
Running: The episode is still ongoing, and the agent continues interacting with the environment.
-
Completed: The agent has successfully reached a terminal state, completing the episode.
-
Truncated: The episode has been forcefully ended, often due to external limits like time steps or manual intervention, without reaching the terminal state.
In this tutorial, the terminal state is reached when the agent destroys all targets, which is when the numOfTargetHits is equal to the maxNumberOfHitsPerEpisode. We also set a max step to prevent an episode from running indefinitely.
-
Add a new integer variable. Name it
maxStep, and set the default value to 1000. This means an episode is truncated if it reaches 1000 time steps without completing. You may adjust this number if you want to allow longer or shorter episodes due to factors such as the size of the environment or the speed of the agent. -
Set the
ComputeStatus()as shown below.
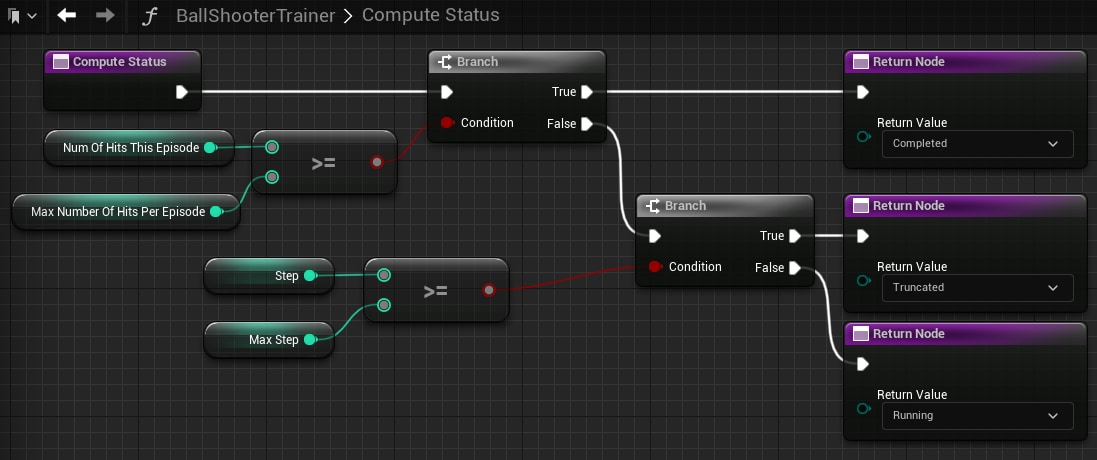
Begin Object Class=/Script/BlueprintGraph.K2Node_FunctionEntry Name="K2Node_FunctionEntry_1" ExportPath="/Script/BlueprintGraph.K2Node_FunctionEntry'/Game/Examples/BallShooter/Blueprints/BallShooterTrainer.BallShooterTrainer:ComputeStatus.K2Node_FunctionEntry_1'"
FunctionReference=(MemberParent="/Script/CoreUObject.Class'/Script/Schola.BlueprintTrainer'",MemberName="ComputeStatus")
NodePosX=544
NodePosY=-624
NodeGuid=0AAD6AA3EEC34217AB6CCD473ED3EB33
CustomProperties Pin (PinId=BCA38A376B434049BFA82E9387A4634F,PinName="then",Direction="EGPD_Output",PinType.PinCategory="exec",PinType.PinSubCategory="",PinType.PinSubCategoryObject=None,PinType.PinSubCategoryMemberReference=(),PinType.PinValueType=(),PinType.ContainerType=None,PinType.bIsReference=False,PinType.bIsConst=False,PinType.bIsWeakPointer=False,PinType.bIsUObjectWrapper=False,PinType.bSerializeAsSinglePrecisionFloat=False,LinkedTo=(K2Node_IfThenElse_0 6032800002B547789CFCABDFDA1B8836,),PersistentGuid=00000000000000000000000000000000,bHidden=False,bNotConnectable=False,bDefaultValueIsReadOnly=False,bDefaultValueIsIgnored=False,bAdvancedView=False,bOrphanedPin=False,)
End Object
Begin Object Class=/Script/BlueprintGraph.K2Node_IfThenElse Name="K2Node_IfThenElse_0" ExportPath="/Script/BlueprintGraph.K2Node_IfThenElse'/Game/Examples/BallShooter/Blueprints/BallShooterTrainer.BallShooterTrainer:ComputeStatus.K2Node_IfThenElse_0'"
NodePosX=928
NodePosY=-624
NodeGuid=9AFE329EA7AB420794D9FC20725242EE
CustomProperties Pin (PinId=6032800002B547789CFCABDFDA1B8836,PinName="execute",PinType.PinCategory="exec",PinType.PinSubCategory="",PinType.PinSubCategoryObject=None,PinType.PinSubCategoryMemberReference=(),PinType.PinValueType=(),PinType.ContainerType=None,PinType.bIsReference=False,PinType.bIsConst=False,PinType.bIsWeakPointer=False,PinType.bIsUObjectWrapper=False,PinType.bSerializeAsSinglePrecisionFloat=False,LinkedTo=(K2Node_FunctionEntry_1 BCA38A376B434049BFA82E9387A4634F,),PersistentGuid=00000000000000000000000000000000,bHidden=False,bNotConnectable=False,bDefaultValueIsReadOnly=False,bDefaultValueIsIgnored=False,bAdvancedView=False,bOrphanedPin=False,)
CustomProperties Pin (PinId=D6C267355A47488AA3BE116A379F0845,PinName="Condition",PinType.PinCategory="bool",PinType.PinSubCategory="",PinType.PinSubCategoryObject=None,PinType.PinSubCategoryMemberReference=(),PinType.PinValueType=(),PinType.ContainerType=None,PinType.bIsReference=False,PinType.bIsConst=False,PinType.bIsWeakPointer=False,PinType.bIsUObjectWrapper=False,PinType.bSerializeAsSinglePrecisionFloat=False,DefaultValue="true",AutogeneratedDefaultValue="true",LinkedTo=(K2Node_PromotableOperator_1 8ACD5BB4435D31978D472D9C6595221D,),PersistentGuid=00000000000000000000000000000000,bHidden=False,bNotConnectable=False,bDefaultValueIsReadOnly=False,bDefaultValueIsIgnored=False,bAdvancedView=False,bOrphanedPin=False,)
CustomProperties Pin (PinId=4D6803E81D454B25BA0EEAB31E1A8C6F,PinName="then",PinFriendlyName=NSLOCTEXT("K2Node", "true", "true"),Direction="EGPD_Output",PinType.PinCategory="exec",PinType.PinSubCategory="",PinType.PinSubCategoryObject=None,PinType.PinSubCategoryMemberReference=(),PinType.PinValueType=(),PinType.ContainerType=None,PinType.bIsReference=False,PinType.bIsConst=False,PinType.bIsWeakPointer=False,PinType.bIsUObjectWrapper=False,PinType.bSerializeAsSinglePrecisionFloat=False,LinkedTo=(K2Node_FunctionResult_0 7897345B802B44738C7870A7296DA48A,),PersistentGuid=00000000000000000000000000000000,bHidden=False,bNotConnectable=False,bDefaultValueIsReadOnly=False,bDefaultValueIsIgnored=False,bAdvancedView=False,bOrphanedPin=False,)
CustomProperties Pin (PinId=3C6BCEDBFCA1460AB1B7503E460132E5,PinName="else",PinFriendlyName=NSLOCTEXT("K2Node", "false", "false"),Direction="EGPD_Output",PinType.PinCategory="exec",PinType.PinSubCategory="",PinType.PinSubCategoryObject=None,PinType.PinSubCategoryMemberReference=(),PinType.PinValueType=(),PinType.ContainerType=None,PinType.bIsReference=False,PinType.bIsConst=False,PinType.bIsWeakPointer=False,PinType.bIsUObjectWrapper=False,PinType.bSerializeAsSinglePrecisionFloat=False,LinkedTo=(K2Node_IfThenElse_1 83AB719961CB407C91FEF77783733504,),PersistentGuid=00000000000000000000000000000000,bHidden=False,bNotConnectable=False,bDefaultValueIsReadOnly=False,bDefaultValueIsIgnored=False,bAdvancedView=False,bOrphanedPin=False,)
End Object
Begin Object Class=/Script/BlueprintGraph.K2Node_FunctionResult Name="K2Node_FunctionResult_5" ExportPath="/Script/BlueprintGraph.K2Node_FunctionResult'/Game/Examples/BallShooter/Blueprints/BallShooterTrainer.BallShooterTrainer:ComputeStatus.K2Node_FunctionResult_5'"
FunctionReference=(MemberParent="/Script/CoreUObject.Class'/Script/Schola.BlueprintTrainer'",MemberName="ComputeStatus")
NodePosX=1344
NodePosY=-352
NodeGuid=3A8DEAA99D4D450082A3B04E2CF1C989
CustomProperties Pin (PinId=7897345B802B44738C7870A7296DA48A,PinName="execute",PinType.PinCategory="exec",PinType.PinSubCategory="",PinType.PinSubCategoryObject=None,PinType.PinSubCategoryMemberReference=(),PinType.PinValueType=(),PinType.ContainerType=None,PinType.bIsReference=False,PinType.bIsConst=False,PinType.bIsWeakPointer=False,PinType.bIsUObjectWrapper=False,PinType.bSerializeAsSinglePrecisionFloat=False,LinkedTo=(K2Node_IfThenElse_1 4A1951187A0D4B238A12A13647D4FF27,),PersistentGuid=00000000000000000000000000000000,bHidden=False,bNotConnectable=False,bDefaultValueIsReadOnly=False,bDefaultValueIsIgnored=False,bAdvancedView=False,bOrphanedPin=False,)
CustomProperties Pin (PinId=BF633E1254B84D5D9597967FAE40D861,PinName="ReturnValue",PinToolTip="Return Value\nEAgentTrainingStatus Enum\n\nThe status of the agent which informs whether it is still running, or why it stopped.",PinType.PinCategory="byte",PinType.PinSubCategory="",PinType.PinSubCategoryObject="/Script/CoreUObject.Enum'/Script/Schola.EAgentTrainingStatus'",PinType.PinSubCategoryMemberReference=(),PinType.PinValueType=(),PinType.ContainerType=None,PinType.bIsReference=False,PinType.bIsConst=False,PinType.bIsWeakPointer=False,PinType.bIsUObjectWrapper=False,PinType.bSerializeAsSinglePrecisionFloat=False,DefaultValue="Running",PersistentGuid=00000000000000000000000000000000,bHidden=False,bNotConnectable=False,bDefaultValueIsReadOnly=False,bDefaultValueIsIgnored=False,bAdvancedView=False,bOrphanedPin=False,)
End Object
Begin Object Class=/Script/BlueprintGraph.K2Node_IfThenElse Name="K2Node_IfThenElse_1" ExportPath="/Script/BlueprintGraph.K2Node_IfThenElse'/Game/Examples/BallShooter/Blueprints/BallShooterTrainer.BallShooterTrainer:ComputeStatus.K2Node_IfThenElse_1'"
NodePosX=1136
NodePosY=-480
NodeGuid=4169B71A3C0E42CDA2CA1533D07DA38F
CustomProperties Pin (PinId=83AB719961CB407C91FEF77783733504,PinName="execute",PinType.PinCategory="exec",PinType.PinSubCategory="",PinType.PinSubCategoryObject=None,PinType.PinSubCategoryMemberReference=(),PinType.PinValueType=(),PinType.ContainerType=None,PinType.bIsReference=False,PinType.bIsConst=False,PinType.bIsWeakPointer=False,PinType.bIsUObjectWrapper=False,PinType.bSerializeAsSinglePrecisionFloat=False,LinkedTo=(K2Node_IfThenElse_0 3C6BCEDBFCA1460AB1B7503E460132E5,),PersistentGuid=00000000000000000000000000000000,bHidden=False,bNotConnectable=False,bDefaultValueIsReadOnly=False,bDefaultValueIsIgnored=False,bAdvancedView=False,bOrphanedPin=False,)
CustomProperties Pin (PinId=994BB382689946998324DE4375BDAE7A,PinName="Condition",PinType.PinCategory="bool",PinType.PinSubCategory="",PinType.PinSubCategoryObject=None,PinType.PinSubCategoryMemberReference=(),PinType.PinValueType=(),PinType.ContainerType=None,PinType.bIsReference=False,PinType.bIsConst=False,PinType.bIsWeakPointer=False,PinType.bIsUObjectWrapper=False,PinType.bSerializeAsSinglePrecisionFloat=False,DefaultValue="true",AutogeneratedDefaultValue="true",LinkedTo=(K2Node_PromotableOperator_0 32578867BD834F3BA24AA4F2B1AEB62B,),PersistentGuid=00000000000000000000000000000000,bHidden=False,bNotConnectable=False,bDefaultValueIsReadOnly=False,bDefaultValueIsIgnored=False,bAdvancedView=False,bOrphanedPin=False,)
CustomProperties Pin (PinId=AC4E2529C40A4322B26DB12320D53330,PinName="then",PinFriendlyName=NSLOCTEXT("K2Node", "true", "true"),Direction="EGPD_Output",PinType.PinCategory="exec",PinType.PinSubCategory="",PinType.PinSubCategoryObject=None,PinType.PinSubCategoryMemberReference=(),PinType.PinValueType=(),PinType.ContainerType=None,PinType.bIsReference=False,PinType.bIsConst=False,PinType.bIsWeakPointer=False,PinType.bIsUObjectWrapper=False,PinType.bSerializeAsSinglePrecisionFloat=False,LinkedTo=(K2Node_FunctionResult_6 7897345B802B44738C7870A7296DA48A,),PersistentGuid=00000000000000000000000000000000,bHidden=False,bNotConnectable=False,bDefaultValueIsReadOnly=False,bDefaultValueIsIgnored=False,bAdvancedView=False,bOrphanedPin=False,)
CustomProperties Pin (PinId=4A1951187A0D4B238A12A13647D4FF27,PinName="else",PinFriendlyName=NSLOCTEXT("K2Node", "false", "false"),Direction="EGPD_Output",PinType.PinCategory="exec",PinType.PinSubCategory="",PinType.PinSubCategoryObject=None,PinType.PinSubCategoryMemberReference=(),PinType.PinValueType=(),PinType.ContainerType=None,PinType.bIsReference=False,PinType.bIsConst=False,PinType.bIsWeakPointer=False,PinType.bIsUObjectWrapper=False,PinType.bSerializeAsSinglePrecisionFloat=False,LinkedTo=(K2Node_FunctionResult_5 7897345B802B44738C7870A7296DA48A,),PersistentGuid=00000000000000000000000000000000,bHidden=False,bNotConnectable=False,bDefaultValueIsReadOnly=False,bDefaultValueIsIgnored=False,bAdvancedView=False,bOrphanedPin=False,)
End Object
Begin Object Class=/Script/BlueprintGraph.K2Node_FunctionResult Name="K2Node_FunctionResult_0" ExportPath="/Script/BlueprintGraph.K2Node_FunctionResult'/Game/Examples/BallShooter/Blueprints/BallShooterTrainer.BallShooterTrainer:ComputeStatus.K2Node_FunctionResult_0'"
FunctionReference=(MemberParent="/Script/CoreUObject.Class'/Script/Schola.BlueprintTrainer'",MemberName="ComputeStatus")
NodePosX=1344
NodePosY=-624
NodeGuid=9A30A488FD87429B86CFD9F349351D09
CustomProperties Pin (PinId=7897345B802B44738C7870A7296DA48A,PinName="execute",PinType.PinCategory="exec",PinType.PinSubCategory="",PinType.PinSubCategoryObject=None,PinType.PinSubCategoryMemberReference=(),PinType.PinValueType=(),PinType.ContainerType=None,PinType.bIsReference=False,PinType.bIsConst=False,PinType.bIsWeakPointer=False,PinType.bIsUObjectWrapper=False,PinType.bSerializeAsSinglePrecisionFloat=False,LinkedTo=(K2Node_IfThenElse_0 4D6803E81D454B25BA0EEAB31E1A8C6F,),PersistentGuid=00000000000000000000000000000000,bHidden=False,bNotConnectable=False,bDefaultValueIsReadOnly=False,bDefaultValueIsIgnored=False,bAdvancedView=False,bOrphanedPin=False,)
CustomProperties Pin (PinId=BF633E1254B84D5D9597967FAE40D861,PinName="ReturnValue",PinToolTip="Return Value\nEAgentTrainingStatus Enum\n\nThe status of the agent which informs whether it is still running, or why it stopped.",PinType.PinCategory="byte",PinType.PinSubCategory="",PinType.PinSubCategoryObject="/Script/CoreUObject.Enum'/Script/Schola.EAgentTrainingStatus'",PinType.PinSubCategoryMemberReference=(),PinType.PinValueType=(),PinType.ContainerType=None,PinType.bIsReference=False,PinType.bIsConst=False,PinType.bIsWeakPointer=False,PinType.bIsUObjectWrapper=False,PinType.bSerializeAsSinglePrecisionFloat=False,DefaultValue="Completed",PersistentGuid=00000000000000000000000000000000,bHidden=False,bNotConnectable=False,bDefaultValueIsReadOnly=False,bDefaultValueIsIgnored=False,bAdvancedView=False,bOrphanedPin=False,)
End Object
Begin Object Class=/Script/BlueprintGraph.K2Node_PromotableOperator Name="K2Node_PromotableOperator_0" ExportPath="/Script/BlueprintGraph.K2Node_PromotableOperator'/Game/Examples/BallShooter/Blueprints/BallShooterTrainer.BallShooterTrainer:ComputeStatus.K2Node_PromotableOperator_0'"
OperationName="GreaterEqual"
bIsPureFunc=True
FunctionReference=(MemberParent="/Script/CoreUObject.Class'/Script/Engine.KismetMathLibrary'",MemberName="GreaterEqual_IntInt")
NodePosX=864
NodePosY=-416
NodeGuid=A2C8FE9AD58F456B852E054BAB8CFFE9
CustomProperties Pin (PinId=89B52D87260440BB923B9B632152130C,PinName="A",PinToolTip="A\nInteger",PinType.PinCategory="int",PinType.PinSubCategory="",PinType.PinSubCategoryObject=None,PinType.PinSubCategoryMemberReference=(),PinType.PinValueType=(),PinType.ContainerType=None,PinType.bIsReference=False,PinType.bIsConst=False,PinType.bIsWeakPointer=False,PinType.bIsUObjectWrapper=False,PinType.bSerializeAsSinglePrecisionFloat=False,LinkedTo=(K2Node_VariableGet_4 553121A041673FCE0EC282AE2C9E5FC3,),PersistentGuid=00000000000000000000000000000000,bHidden=False,bNotConnectable=False,bDefaultValueIsReadOnly=False,bDefaultValueIsIgnored=False,bAdvancedView=False,bOrphanedPin=False,)
CustomProperties Pin (PinId=8EA231F533794C21BC66D1AE8F44DCEF,PinName="B",PinToolTip="B\nInteger",PinType.PinCategory="int",PinType.PinSubCategory="",PinType.PinSubCategoryObject=None,PinType.PinSubCategoryMemberReference=(),PinType.PinValueType=(),PinType.ContainerType=None,PinType.bIsReference=False,PinType.bIsConst=False,PinType.bIsWeakPointer=False,PinType.bIsUObjectWrapper=False,PinType.bSerializeAsSinglePrecisionFloat=False,LinkedTo=(K2Node_VariableGet_0 A9DF3CAF47AD05E1D78A7EA38D096C28,),PersistentGuid=00000000000000000000000000000000,bHidden=False,bNotConnectable=False,bDefaultValueIsReadOnly=False,bDefaultValueIsIgnored=False,bAdvancedView=False,bOrphanedPin=False,)
CustomProperties Pin (PinId=32578867BD834F3BA24AA4F2B1AEB62B,PinName="ReturnValue",PinToolTip="Return Value\nBoolean\n\nReturns true if A is greater than or equal to B (A >= B)",Direction="EGPD_Output",PinType.PinCategory="bool",PinType.PinSubCategory="",PinType.PinSubCategoryObject=None,PinType.PinSubCategoryMemberReference=(),PinType.PinValueType=(),PinType.ContainerType=None,PinType.bIsReference=False,PinType.bIsConst=False,PinType.bIsWeakPointer=False,PinType.bIsUObjectWrapper=False,PinType.bSerializeAsSinglePrecisionFloat=False,LinkedTo=(K2Node_IfThenElse_1 994BB382689946998324DE4375BDAE7A,),PersistentGuid=00000000000000000000000000000000,bHidden=False,bNotConnectable=False,bDefaultValueIsReadOnly=False,bDefaultValueIsIgnored=False,bAdvancedView=False,bOrphanedPin=False,)
CustomProperties Pin (PinId=0596853743852F46D195728BDB2177CE,PinName="ErrorTolerance",PinToolTip="Error Tolerance\n",PinType.PinCategory="",PinType.PinSubCategory="",PinType.PinSubCategoryObject=None,PinType.PinSubCategoryMemberReference=(),PinType.PinValueType=(),PinType.ContainerType=None,PinType.bIsReference=False,PinType.bIsConst=False,PinType.bIsWeakPointer=False,PinType.bIsUObjectWrapper=False,PinType.bSerializeAsSinglePrecisionFloat=False,PersistentGuid=00000000000000000000000000000000,bHidden=True,bNotConnectable=False,bDefaultValueIsReadOnly=False,bDefaultValueIsIgnored=False,bAdvancedView=False,bOrphanedPin=False,)
End Object
Begin Object Class=/Script/BlueprintGraph.K2Node_FunctionResult Name="K2Node_FunctionResult_6" ExportPath="/Script/BlueprintGraph.K2Node_FunctionResult'/Game/Examples/BallShooter/Blueprints/BallShooterTrainer.BallShooterTrainer:ComputeStatus.K2Node_FunctionResult_6'"
FunctionReference=(MemberParent="/Script/CoreUObject.Class'/Script/Schola.BlueprintTrainer'",MemberName="ComputeStatus")
NodePosX=1344
NodePosY=-480
NodeGuid=C57BB65F483F8A01F60E15BCF56AD114
CustomProperties Pin (PinId=7897345B802B44738C7870A7296DA48A,PinName="execute",PinType.PinCategory="exec",PinType.PinSubCategory="",PinType.PinSubCategoryObject=None,PinType.PinSubCategoryMemberReference=(),PinType.PinValueType=(),PinType.ContainerType=None,PinType.bIsReference=False,PinType.bIsConst=False,PinType.bIsWeakPointer=False,PinType.bIsUObjectWrapper=False,PinType.bSerializeAsSinglePrecisionFloat=False,LinkedTo=(K2Node_IfThenElse_1 AC4E2529C40A4322B26DB12320D53330,),PersistentGuid=00000000000000000000000000000000,bHidden=False,bNotConnectable=False,bDefaultValueIsReadOnly=False,bDefaultValueIsIgnored=False,bAdvancedView=False,bOrphanedPin=False,)
CustomProperties Pin (PinId=BF633E1254B84D5D9597967FAE40D861,PinName="ReturnValue",PinToolTip="Return Value\nEAgentTrainingStatus Enum\n\nThe status of the agent which informs whether it is still running, or why it stopped.",PinType.PinCategory="byte",PinType.PinSubCategory="",PinType.PinSubCategoryObject="/Script/CoreUObject.Enum'/Script/Schola.EAgentTrainingStatus'",PinType.PinSubCategoryMemberReference=(),PinType.PinValueType=(),PinType.ContainerType=None,PinType.bIsReference=False,PinType.bIsConst=False,PinType.bIsWeakPointer=False,PinType.bIsUObjectWrapper=False,PinType.bSerializeAsSinglePrecisionFloat=False,DefaultValue="Truncated",PersistentGuid=00000000000000000000000000000000,bHidden=False,bNotConnectable=False,bDefaultValueIsReadOnly=False,bDefaultValueIsIgnored=False,bAdvancedView=False,bOrphanedPin=False,)
End Object
Begin Object Class=/Script/BlueprintGraph.K2Node_VariableGet Name="K2Node_VariableGet_7" ExportPath="/Script/BlueprintGraph.K2Node_VariableGet'/Game/Examples/BallShooter/Blueprints/BallShooterTrainer.BallShooterTrainer:ComputeStatus.K2Node_VariableGet_7'"
VariableReference=(MemberName="maxNumberOfHitsPerEpisode",MemberGuid=69CD135547DC773E2A3022A360EF5A57,bSelfContext=True)
NodePosX=512
NodePosY=-480
NodeGuid=6307087942A94C3DD603ED887B6AA39E
CustomProperties Pin (PinId=454989BA4CAD74C0E50161BE000EA0E9,PinName="maxNumberOfHitsPerEpisode",Direction="EGPD_Output",PinType.PinCategory="int",PinType.PinSubCategory="",PinType.PinSubCategoryObject=None,PinType.PinSubCategoryMemberReference=(),PinType.PinValueType=(),PinType.ContainerType=None,PinType.bIsReference=False,PinType.bIsConst=False,PinType.bIsWeakPointer=False,PinType.bIsUObjectWrapper=False,PinType.bSerializeAsSinglePrecisionFloat=False,DefaultValue="0",AutogeneratedDefaultValue="0",LinkedTo=(K2Node_PromotableOperator_1 6D9B75C54FC05700D0EB1A8A74424048,),PersistentGuid=00000000000000000000000000000000,bHidden=False,bNotConnectable=False,bDefaultValueIsReadOnly=False,bDefaultValueIsIgnored=False,bAdvancedView=False,bOrphanedPin=False,)
CustomProperties Pin (PinId=43471FE14242B98E1401F68894EE9243,PinName="self",PinFriendlyName=NSLOCTEXT("K2Node", "Target", "Target"),PinType.PinCategory="object",PinType.PinSubCategory="",PinType.PinSubCategoryObject="/Script/Engine.BlueprintGeneratedClass'/Game/Examples/BallShooter/Blueprints/BallShooterTrainer.BallShooterTrainer_C'",PinType.PinSubCategoryMemberReference=(),PinType.PinValueType=(),PinType.ContainerType=None,PinType.bIsReference=False,PinType.bIsConst=False,PinType.bIsWeakPointer=False,PinType.bIsUObjectWrapper=False,PinType.bSerializeAsSinglePrecisionFloat=False,PersistentGuid=00000000000000000000000000000000,bHidden=True,bNotConnectable=False,bDefaultValueIsReadOnly=False,bDefaultValueIsIgnored=False,bAdvancedView=False,bOrphanedPin=False,)
End Object
Begin Object Class=/Script/BlueprintGraph.K2Node_VariableGet Name="K2Node_VariableGet_4" ExportPath="/Script/BlueprintGraph.K2Node_VariableGet'/Game/Examples/BallShooter/Blueprints/BallShooterTrainer.BallShooterTrainer:ComputeStatus.K2Node_VariableGet_4'"
VariableReference=(MemberName="Step",bSelfContext=True)
NodePosX=704
NodePosY=-416
NodeGuid=232D121144B601D5171352909D9DC095
CustomProperties Pin (PinId=553121A041673FCE0EC282AE2C9E5FC3,PinName="Step",PinFriendlyName="Step",Direction="EGPD_Output",PinType.PinCategory="int",PinType.PinSubCategory="",PinType.PinSubCategoryObject=None,PinType.PinSubCategoryMemberReference=(),PinType.PinValueType=(),PinType.ContainerType=None,PinType.bIsReference=False,PinType.bIsConst=False,PinType.bIsWeakPointer=False,PinType.bIsUObjectWrapper=False,PinType.bSerializeAsSinglePrecisionFloat=False,DefaultValue="0",AutogeneratedDefaultValue="0",LinkedTo=(K2Node_PromotableOperator_0 89B52D87260440BB923B9B632152130C,),PersistentGuid=00000000000000000000000000000000,bHidden=False,bNotConnectable=False,bDefaultValueIsReadOnly=False,bDefaultValueIsIgnored=False,bAdvancedView=False,bOrphanedPin=False,)
CustomProperties Pin (PinId=5EB84B4641120F4ED6B9B39715928AC1,PinName="self",PinFriendlyName=NSLOCTEXT("K2Node", "Target", "Target"),PinType.PinCategory="object",PinType.PinSubCategory="",PinType.PinSubCategoryObject="/Script/CoreUObject.Class'/Script/Schola.AbstractTrainer'",PinType.PinSubCategoryMemberReference=(),PinType.PinValueType=(),PinType.ContainerType=None,PinType.bIsReference=False,PinType.bIsConst=False,PinType.bIsWeakPointer=False,PinType.bIsUObjectWrapper=False,PinType.bSerializeAsSinglePrecisionFloat=False,PersistentGuid=00000000000000000000000000000000,bHidden=True,bNotConnectable=False,bDefaultValueIsReadOnly=False,bDefaultValueIsIgnored=False,bAdvancedView=False,bOrphanedPin=False,)
End Object
Begin Object Class=/Script/BlueprintGraph.K2Node_VariableGet Name="K2Node_VariableGet_6" ExportPath="/Script/BlueprintGraph.K2Node_VariableGet'/Game/Examples/BallShooter/Blueprints/BallShooterTrainer.BallShooterTrainer:ComputeStatus.K2Node_VariableGet_6'"
VariableReference=(MemberName="numOfHitsThisEpisode",MemberGuid=F0B5D04C46B3619FBA69BFB19BF4F50A,bSelfContext=True)
NodePosX=544
NodePosY=-544
NodeGuid=BE6EA7BD4A7FD565B9B3A6BBB7A00824
CustomProperties Pin (PinId=C617EE404F4E105A4C43D9AE9710A614,PinName="numOfHitsThisEpisode",Direction="EGPD_Output",PinType.PinCategory="int",PinType.PinSubCategory="",PinType.PinSubCategoryObject=None,PinType.PinSubCategoryMemberReference=(),PinType.PinValueType=(),PinType.ContainerType=None,PinType.bIsReference=False,PinType.bIsConst=False,PinType.bIsWeakPointer=False,PinType.bIsUObjectWrapper=False,PinType.bSerializeAsSinglePrecisionFloat=False,DefaultValue="0",AutogeneratedDefaultValue="0",LinkedTo=(K2Node_PromotableOperator_1 DAA19FC240E5F53CB53498898DC858EE,),PersistentGuid=00000000000000000000000000000000,bHidden=False,bNotConnectable=False,bDefaultValueIsReadOnly=False,bDefaultValueIsIgnored=False,bAdvancedView=False,bOrphanedPin=False,)
CustomProperties Pin (PinId=3657861C46720EB398DD18A5631806A7,PinName="self",PinFriendlyName=NSLOCTEXT("K2Node", "Target", "Target"),PinType.PinCategory="object",PinType.PinSubCategory="",PinType.PinSubCategoryObject="/Script/Engine.BlueprintGeneratedClass'/Game/Examples/BallShooter/Blueprints/BallShooterTrainer.BallShooterTrainer_C'",PinType.PinSubCategoryMemberReference=(),PinType.PinValueType=(),PinType.ContainerType=None,PinType.bIsReference=False,PinType.bIsConst=False,PinType.bIsWeakPointer=False,PinType.bIsUObjectWrapper=False,PinType.bSerializeAsSinglePrecisionFloat=False,PersistentGuid=00000000000000000000000000000000,bHidden=True,bNotConnectable=False,bDefaultValueIsReadOnly=False,bDefaultValueIsIgnored=False,bAdvancedView=False,bOrphanedPin=False,)
End Object
Begin Object Class=/Script/BlueprintGraph.K2Node_PromotableOperator Name="K2Node_PromotableOperator_1" ExportPath="/Script/BlueprintGraph.K2Node_PromotableOperator'/Game/Examples/BallShooter/Blueprints/BallShooterTrainer.BallShooterTrainer:ComputeStatus.K2Node_PromotableOperator_1'"
OperationName="GreaterEqual"
bIsPureFunc=True
FunctionReference=(MemberParent="/Script/CoreUObject.Class'/Script/Engine.KismetMathLibrary'",MemberName="GreaterEqual_IntInt")
NodePosX=752
NodePosY=-544
NodeGuid=0DCB6F154FE04AAA5F0EE181F41F107A
CustomProperties Pin (PinId=DAA19FC240E5F53CB53498898DC858EE,PinName="A",PinType.PinCategory="int",PinType.PinSubCategory="",PinType.PinSubCategoryObject=None,PinType.PinSubCategoryMemberReference=(),PinType.PinValueType=(),PinType.ContainerType=None,PinType.bIsReference=False,PinType.bIsConst=False,PinType.bIsWeakPointer=False,PinType.bIsUObjectWrapper=False,PinType.bSerializeAsSinglePrecisionFloat=False,LinkedTo=(K2Node_VariableGet_6 C617EE404F4E105A4C43D9AE9710A614,),PersistentGuid=00000000000000000000000000000000,bHidden=False,bNotConnectable=False,bDefaultValueIsReadOnly=False,bDefaultValueIsIgnored=False,bAdvancedView=False,bOrphanedPin=False,)
CustomProperties Pin (PinId=6D9B75C54FC05700D0EB1A8A74424048,PinName="B",PinType.PinCategory="int",PinType.PinSubCategory="",PinType.PinSubCategoryObject=None,PinType.PinSubCategoryMemberReference=(),PinType.PinValueType=(),PinType.ContainerType=None,PinType.bIsReference=False,PinType.bIsConst=False,PinType.bIsWeakPointer=False,PinType.bIsUObjectWrapper=False,PinType.bSerializeAsSinglePrecisionFloat=False,LinkedTo=(K2Node_VariableGet_7 454989BA4CAD74C0E50161BE000EA0E9,),PersistentGuid=00000000000000000000000000000000,bHidden=False,bNotConnectable=False,bDefaultValueIsReadOnly=False,bDefaultValueIsIgnored=False,bAdvancedView=False,bOrphanedPin=False,)
CustomProperties Pin (PinId=8ACD5BB4435D31978D472D9C6595221D,PinName="ReturnValue",Direction="EGPD_Output",PinType.PinCategory="bool",PinType.PinSubCategory="",PinType.PinSubCategoryObject=None,PinType.PinSubCategoryMemberReference=(),PinType.PinValueType=(),PinType.ContainerType=None,PinType.bIsReference=False,PinType.bIsConst=False,PinType.bIsWeakPointer=False,PinType.bIsUObjectWrapper=False,PinType.bSerializeAsSinglePrecisionFloat=False,LinkedTo=(K2Node_IfThenElse_0 D6C267355A47488AA3BE116A379F0845,),PersistentGuid=00000000000000000000000000000000,bHidden=False,bNotConnectable=False,bDefaultValueIsReadOnly=False,bDefaultValueIsIgnored=False,bAdvancedView=False,bOrphanedPin=False,)
CustomProperties Pin (PinId=29D39FD8449A58961F2EFB9DFD7DB184,PinName="ErrorTolerance",PinType.PinCategory="",PinType.PinSubCategory="",PinType.PinSubCategoryObject=None,PinType.PinSubCategoryMemberReference=(),PinType.PinValueType=(),PinType.ContainerType=None,PinType.bIsReference=False,PinType.bIsConst=False,PinType.bIsWeakPointer=False,PinType.bIsUObjectWrapper=False,PinType.bSerializeAsSinglePrecisionFloat=False,PersistentGuid=00000000000000000000000000000000,bHidden=True,bNotConnectable=False,bDefaultValueIsReadOnly=False,bDefaultValueIsIgnored=False,bAdvancedView=False,bOrphanedPin=False,)
End Object
Begin Object Class=/Script/BlueprintGraph.K2Node_VariableGet Name="K2Node_VariableGet_0" ExportPath="/Script/BlueprintGraph.K2Node_VariableGet'/Game/Examples/BallShooter/Blueprints/BallShooterTrainer.BallShooterTrainer:ComputeStatus.K2Node_VariableGet_0'"
VariableReference=(MemberName="maxStep",MemberGuid=5FF678B54F24956CD2E26696E61F891D,bSelfContext=True)
NodePosX=704
NodePosY=-352
NodeGuid=F0B82E284B687AECE068A2BE10818B8A
CustomProperties Pin (PinId=A9DF3CAF47AD05E1D78A7EA38D096C28,PinName="maxStep",Direction="EGPD_Output",PinType.PinCategory="int",PinType.PinSubCategory="",PinType.PinSubCategoryObject=None,PinType.PinSubCategoryMemberReference=(),PinType.PinValueType=(),PinType.ContainerType=None,PinType.bIsReference=False,PinType.bIsConst=False,PinType.bIsWeakPointer=False,PinType.bIsUObjectWrapper=False,PinType.bSerializeAsSinglePrecisionFloat=False,DefaultValue="0",AutogeneratedDefaultValue="0",LinkedTo=(K2Node_PromotableOperator_0 8EA231F533794C21BC66D1AE8F44DCEF,),PersistentGuid=00000000000000000000000000000000,bHidden=False,bNotConnectable=False,bDefaultValueIsReadOnly=False,bDefaultValueIsIgnored=False,bAdvancedView=False,bOrphanedPin=False,)
CustomProperties Pin (PinId=9D0F625745AA93CC8182F595C0E08F19,PinName="self",PinFriendlyName=NSLOCTEXT("K2Node", "Target", "Target"),PinType.PinCategory="object",PinType.PinSubCategory="",PinType.PinSubCategoryObject="/Script/Engine.BlueprintGeneratedClass'/Game/Examples/BallShooter/Blueprints/BallShooterTrainer.BallShooterTrainer_C'",PinType.PinSubCategoryMemberReference=(),PinType.PinValueType=(),PinType.ContainerType=None,PinType.bIsReference=False,PinType.bIsConst=False,PinType.bIsWeakPointer=False,PinType.bIsUObjectWrapper=False,PinType.bSerializeAsSinglePrecisionFloat=False,PersistentGuid=00000000000000000000000000000000,bHidden=True,bNotConnectable=False,bDefaultValueIsReadOnly=False,bDefaultValueIsIgnored=False,bAdvancedView=False,bOrphanedPin=False,)
End Object
Note
The Step variable is a part of the BlueprintTrainer and it tracks the current number of steps since the last ResetEnvironment() call.
Creating the Environment Definition
To train an agent in Schola, the game must have an AbstractScholaEnvironment Unreal object, which contains the agent and logic for initializing or resetting the game environment. In this tutorial, we will be creating an Blueprint Environment (subclass of AbstractScholaEnvironment) as the Environment. The InitializeEnvironment() function is called at the start of the game, and sets the initial state of the environment. In this tutorial, we save the initial transform (position and rotation) of the agent. The ResetEnvironment() function is called before every new episode. In this tutorial, we reset the agent to its initial transform, clean up any leftover balls and targets, spawn three new targets, calculate the TotalHitPoints for the episode, and reset the variables in the trainer.
-
Create a new Blueprint Class with parent class
BlueprintScholaEnvironment, and name itBallShooterEnvironment. -
Add a new variable named
agentArrayof type Pawn (Object Reference) array. This keeps track of registered agents belonging to this environment definition.-
Make this variable publicly editable (by clicking on the eye icon to toggle the visibility).
-
-
Add a new Transform variable named
agentInitialLocation. This is for storing the initial position and rotation of the agent, so it can be restored upon reset. -
Add a new integer variable named
numberOfTargets, and set the default value to 3. This stores the number of targets to spawn in the environment. -
Add a new integer variable named
totalHitPoints. This stores the total number of hit points for the episode, which is the number of targets multiplied by the number of hitpoints for each target. -
Add a new variable named
Targetsof typeBall Shooter Target (Object Reference)array. This stores the spawned targets in the environment. -
Create functions
saveAgentInitialTransformandplaceAgentToInitialTransformas shown below. This saves the initial transform of the agent and places the agent to its initial transform when the episode starts. -
Set the Event Graph and
RegisterAgents()function as shown below. -
Save and close the blueprint, and place a
BallShooterEnvironmentanywhere in the map. The location does not matter.
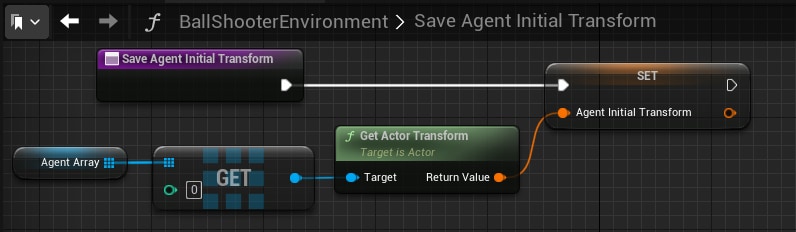
Begin Object Class=/Script/BlueprintGraph.K2Node_FunctionEntry Name="K2Node_FunctionEntry_0" ExportPath="/Script/BlueprintGraph.K2Node_FunctionEntry'/Game/Examples/BallShooter/Blueprints/BallShooterEnvironment.BallShooterEnvironment:saveAgentInitialTransform.K2Node_FunctionEntry_0'"
ExtraFlags=201457664
FunctionReference=(MemberName="saveAgentInitialTransform")
bIsEditable=True
NodePosX=-576
NodePosY=432
NodeGuid=7E367CAB4CD12294A5F905A9418C2FBA
CustomProperties Pin (PinId=0128E7824BD31E50F92ECFA52ED0A45C,PinName="then",Direction="EGPD_Output",PinType.PinCategory="exec",PinType.PinSubCategory="",PinType.PinSubCategoryObject=None,PinType.PinSubCategoryMemberReference=(),PinType.PinValueType=(),PinType.ContainerType=None,PinType.bIsReference=False,PinType.bIsConst=False,PinType.bIsWeakPointer=False,PinType.bIsUObjectWrapper=False,PinType.bSerializeAsSinglePrecisionFloat=False,LinkedTo=(K2Node_VariableSet_0 47E332279032410A815604B7708509C6,),PersistentGuid=00000000000000000000000000000000,bHidden=False,bNotConnectable=False,bDefaultValueIsReadOnly=False,bDefaultValueIsIgnored=False,bAdvancedView=False,bOrphanedPin=False,)
End Object
Begin Object Class=/Script/BlueprintGraph.K2Node_VariableSet Name="K2Node_VariableSet_0" ExportPath="/Script/BlueprintGraph.K2Node_VariableSet'/Game/Examples/BallShooter/Blueprints/BallShooterEnvironment.BallShooterEnvironment:saveAgentInitialTransform.K2Node_VariableSet_0'"
VariableReference=(MemberName="agentInitialTransform",MemberGuid=23EBF7460293491F8BB9C6C41A73BF84,bSelfContext=True)
NodePosX=-64
NodePosY=448
NodeGuid=2B09EEF1C18A4B5BB9B82973C83164B8
CustomProperties Pin (PinId=47E332279032410A815604B7708509C6,PinName="execute",PinType.PinCategory="exec",PinType.PinSubCategory="",PinType.PinSubCategoryObject=None,PinType.PinSubCategoryMemberReference=(),PinType.PinValueType=(),PinType.ContainerType=None,PinType.bIsReference=False,PinType.bIsConst=False,PinType.bIsWeakPointer=False,PinType.bIsUObjectWrapper=False,PinType.bSerializeAsSinglePrecisionFloat=False,LinkedTo=(K2Node_FunctionEntry_0 0128E7824BD31E50F92ECFA52ED0A45C,),PersistentGuid=00000000000000000000000000000000,bHidden=False,bNotConnectable=False,bDefaultValueIsReadOnly=False,bDefaultValueIsIgnored=False,bAdvancedView=False,bOrphanedPin=False,)
CustomProperties Pin (PinId=6E9EC8B2628A463B995E6F294A01CBFF,PinName="then",Direction="EGPD_Output",PinType.PinCategory="exec",PinType.PinSubCategory="",PinType.PinSubCategoryObject=None,PinType.PinSubCategoryMemberReference=(),PinType.PinValueType=(),PinType.ContainerType=None,PinType.bIsReference=False,PinType.bIsConst=False,PinType.bIsWeakPointer=False,PinType.bIsUObjectWrapper=False,PinType.bSerializeAsSinglePrecisionFloat=False,PersistentGuid=00000000000000000000000000000000,bHidden=False,bNotConnectable=False,bDefaultValueIsReadOnly=False,bDefaultValueIsIgnored=False,bAdvancedView=False,bOrphanedPin=False,)
CustomProperties Pin (PinId=57535F54E9F54B3FB3C38820635E333D,PinName="agentInitialTransform",PinType.PinCategory="struct",PinType.PinSubCategory="",PinType.PinSubCategoryObject="/Script/CoreUObject.ScriptStruct'/Script/CoreUObject.Transform'",PinType.PinSubCategoryMemberReference=(),PinType.PinValueType=(),PinType.ContainerType=None,PinType.bIsReference=False,PinType.bIsConst=False,PinType.bIsWeakPointer=False,PinType.bIsUObjectWrapper=False,PinType.bSerializeAsSinglePrecisionFloat=False,LinkedTo=(K2Node_CallFunction_4 2C443DEB710B46508DDB4C10FA84F995,),PersistentGuid=00000000000000000000000000000000,bHidden=False,bNotConnectable=False,bDefaultValueIsReadOnly=False,bDefaultValueIsIgnored=False,bAdvancedView=False,bOrphanedPin=False,)
CustomProperties Pin (PinId=FA3E2717AC8B47F8B7CA4466423E2C7B,PinName="Output_Get",PinToolTip="Retrieves the value of the variable, can use instead of a separate Get node",Direction="EGPD_Output",PinType.PinCategory="struct",PinType.PinSubCategory="",PinType.PinSubCategoryObject="/Script/CoreUObject.ScriptStruct'/Script/CoreUObject.Transform'",PinType.PinSubCategoryMemberReference=(),PinType.PinValueType=(),PinType.ContainerType=None,PinType.bIsReference=False,PinType.bIsConst=False,PinType.bIsWeakPointer=False,PinType.bIsUObjectWrapper=False,PinType.bSerializeAsSinglePrecisionFloat=False,PersistentGuid=00000000000000000000000000000000,bHidden=False,bNotConnectable=False,bDefaultValueIsReadOnly=False,bDefaultValueIsIgnored=False,bAdvancedView=False,bOrphanedPin=False,)
CustomProperties Pin (PinId=303470E992E04E0E846A65A66C0DB26E,PinName="self",PinFriendlyName=NSLOCTEXT("K2Node", "Target", "Target"),PinType.PinCategory="object",PinType.PinSubCategory="",PinType.PinSubCategoryObject="/Script/Engine.BlueprintGeneratedClass'/Game/Examples/BallShooter/Blueprints/BallShooterEnvironment.BallShooterEnvironment_C'",PinType.PinSubCategoryMemberReference=(),PinType.PinValueType=(),PinType.ContainerType=None,PinType.bIsReference=False,PinType.bIsConst=False,PinType.bIsWeakPointer=False,PinType.bIsUObjectWrapper=False,PinType.bSerializeAsSinglePrecisionFloat=False,PersistentGuid=00000000000000000000000000000000,bHidden=True,bNotConnectable=False,bDefaultValueIsReadOnly=False,bDefaultValueIsIgnored=False,bAdvancedView=False,bOrphanedPin=False,)
End Object
Begin Object Class=/Script/BlueprintGraph.K2Node_CallFunction Name="K2Node_CallFunction_4" ExportPath="/Script/BlueprintGraph.K2Node_CallFunction'/Game/Examples/BallShooter/Blueprints/BallShooterEnvironment.BallShooterEnvironment:saveAgentInitialTransform.K2Node_CallFunction_4'"
bIsPureFunc=True
bIsConstFunc=True
FunctionReference=(MemberName="GetTransform",bSelfContext=True)
NodePosX=-304
NodePosY=520
NodeGuid=96DBC9E85DF24A298A90B39BEA23D55C
CustomProperties Pin (PinId=69AD2F9C7E1B4FE68D14A52322459DD6,PinName="self",PinFriendlyName=NSLOCTEXT("K2Node", "Target", "Target"),PinToolTip="Target\nActor Object Reference",PinType.PinCategory="object",PinType.PinSubCategory="",PinType.PinSubCategoryObject="/Script/CoreUObject.Class'/Script/Engine.Actor'",PinType.PinSubCategoryMemberReference=(),PinType.PinValueType=(),PinType.ContainerType=None,PinType.bIsReference=False,PinType.bIsConst=False,PinType.bIsWeakPointer=False,PinType.bIsUObjectWrapper=False,PinType.bSerializeAsSinglePrecisionFloat=False,LinkedTo=(K2Node_GetArrayItem_1 7CBD4EC04C099D1002EFF1826A9FB553,),PersistentGuid=00000000000000000000000000000000,bHidden=False,bNotConnectable=False,bDefaultValueIsReadOnly=False,bDefaultValueIsIgnored=False,bAdvancedView=False,bOrphanedPin=False,)
CustomProperties Pin (PinId=2C443DEB710B46508DDB4C10FA84F995,PinName="ReturnValue",PinToolTip="Return Value\nTransform (by ref)\n\nThe transform that transforms from actor space to world space.",Direction="EGPD_Output",PinType.PinCategory="struct",PinType.PinSubCategory="",PinType.PinSubCategoryObject="/Script/CoreUObject.ScriptStruct'/Script/CoreUObject.Transform'",PinType.PinSubCategoryMemberReference=(),PinType.PinValueType=(),PinType.ContainerType=None,PinType.bIsReference=True,PinType.bIsConst=True,PinType.bIsWeakPointer=False,PinType.bIsUObjectWrapper=False,PinType.bSerializeAsSinglePrecisionFloat=False,LinkedTo=(K2Node_VariableSet_0 57535F54E9F54B3FB3C38820635E333D,),PersistentGuid=00000000000000000000000000000000,bHidden=False,bNotConnectable=False,bDefaultValueIsReadOnly=False,bDefaultValueIsIgnored=True,bAdvancedView=False,bOrphanedPin=False,)
End Object
Begin Object Class=/Script/BlueprintGraph.K2Node_VariableGet Name="K2Node_VariableGet_0" ExportPath="/Script/BlueprintGraph.K2Node_VariableGet'/Game/Examples/BallShooter/Blueprints/BallShooterEnvironment.BallShooterEnvironment:saveAgentInitialTransform.K2Node_VariableGet_0'"
VariableReference=(MemberName="agentArray",MemberGuid=E6989E75FAB34F6697727E1D1E4DBD5A,bSelfContext=True)
NodePosX=-672
NodePosY=544
NodeGuid=7C8661E74AD499BBF8AC85A8C2A30F1C
CustomProperties Pin (PinId=03E3A94040FB17CDE9E9D4BE4307B4AA,PinName="agentArray",Direction="EGPD_Output",PinType.PinCategory="object",PinType.PinSubCategory="",PinType.PinSubCategoryObject="/Script/CoreUObject.Class'/Script/Engine.Pawn'",PinType.PinSubCategoryMemberReference=(),PinType.PinValueType=(),PinType.ContainerType=Array,PinType.bIsReference=False,PinType.bIsConst=False,PinType.bIsWeakPointer=False,PinType.bIsUObjectWrapper=False,PinType.bSerializeAsSinglePrecisionFloat=False,LinkedTo=(K2Node_GetArrayItem_1 E5128A81487ECC91CFC4C0B101E699DC,),PersistentGuid=00000000000000000000000000000000,bHidden=False,bNotConnectable=False,bDefaultValueIsReadOnly=False,bDefaultValueIsIgnored=False,bAdvancedView=False,bOrphanedPin=False,)
CustomProperties Pin (PinId=FC1EA993473B9FE26BCC8C9AED0F58F4,PinName="self",PinFriendlyName=NSLOCTEXT("K2Node", "Target", "Target"),PinType.PinCategory="object",PinType.PinSubCategory="",PinType.PinSubCategoryObject="/Script/Engine.BlueprintGeneratedClass'/Game/Examples/BallShooter/Blueprints/BallShooterEnvironment.BallShooterEnvironment_C'",PinType.PinSubCategoryMemberReference=(),PinType.PinValueType=(),PinType.ContainerType=None,PinType.bIsReference=False,PinType.bIsConst=False,PinType.bIsWeakPointer=False,PinType.bIsUObjectWrapper=False,PinType.bSerializeAsSinglePrecisionFloat=False,PersistentGuid=00000000000000000000000000000000,bHidden=True,bNotConnectable=False,bDefaultValueIsReadOnly=False,bDefaultValueIsIgnored=False,bAdvancedView=False,bOrphanedPin=False,)
End Object
Begin Object Class=/Script/BlueprintGraph.K2Node_GetArrayItem Name="K2Node_GetArrayItem_1" ExportPath="/Script/BlueprintGraph.K2Node_GetArrayItem'/Game/Examples/BallShooter/Blueprints/BallShooterEnvironment.BallShooterEnvironment:saveAgentInitialTransform.K2Node_GetArrayItem_1'"
bReturnByRefDesired=False
NodePosX=-512
NodePosY=543
NodeGuid=6209B5884DBB0AB5DC72B2B10F2C499B
CustomProperties Pin (PinId=E5128A81487ECC91CFC4C0B101E699DC,PinName="Array",PinType.PinCategory="object",PinType.PinSubCategory="",PinType.PinSubCategoryObject="/Script/CoreUObject.Class'/Script/Engine.Pawn'",PinType.PinSubCategoryMemberReference=(),PinType.PinValueType=(),PinType.ContainerType=Array,PinType.bIsReference=False,PinType.bIsConst=False,PinType.bIsWeakPointer=False,PinType.bIsUObjectWrapper=False,PinType.bSerializeAsSinglePrecisionFloat=False,LinkedTo=(K2Node_VariableGet_0 03E3A94040FB17CDE9E9D4BE4307B4AA,),PersistentGuid=00000000000000000000000000000000,bHidden=False,bNotConnectable=False,bDefaultValueIsReadOnly=False,bDefaultValueIsIgnored=False,bAdvancedView=False,bOrphanedPin=False,)
CustomProperties Pin (PinId=5A421A484199E4C2E3BB5CB26E670BA8,PinName="Dimension 1",PinType.PinCategory="int",PinType.PinSubCategory="",PinType.PinSubCategoryObject=None,PinType.PinSubCategoryMemberReference=(),PinType.PinValueType=(),PinType.ContainerType=None,PinType.bIsReference=False,PinType.bIsConst=False,PinType.bIsWeakPointer=False,PinType.bIsUObjectWrapper=False,PinType.bSerializeAsSinglePrecisionFloat=False,DefaultValue="0",AutogeneratedDefaultValue="0",PersistentGuid=00000000000000000000000000000000,bHidden=False,bNotConnectable=False,bDefaultValueIsReadOnly=False,bDefaultValueIsIgnored=False,bAdvancedView=False,bOrphanedPin=False,)
CustomProperties Pin (PinId=7CBD4EC04C099D1002EFF1826A9FB553,PinName="Output",Direction="EGPD_Output",PinType.PinCategory="object",PinType.PinSubCategory="",PinType.PinSubCategoryObject="/Script/CoreUObject.Class'/Script/Engine.Pawn'",PinType.PinSubCategoryMemberReference=(),PinType.PinValueType=(),PinType.ContainerType=None,PinType.bIsReference=False,PinType.bIsConst=False,PinType.bIsWeakPointer=False,PinType.bIsUObjectWrapper=False,PinType.bSerializeAsSinglePrecisionFloat=False,LinkedTo=(K2Node_CallFunction_4 69AD2F9C7E1B4FE68D14A52322459DD6,),PersistentGuid=00000000000000000000000000000000,bHidden=False,bNotConnectable=False,bDefaultValueIsReadOnly=False,bDefaultValueIsIgnored=False,bAdvancedView=False,bOrphanedPin=False,)
End Object
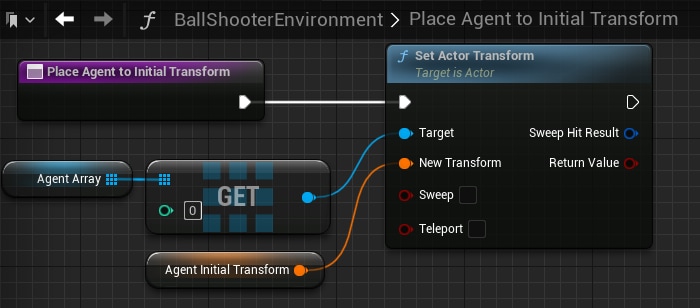
Begin Object Class=/Script/BlueprintGraph.K2Node_FunctionEntry Name="K2Node_FunctionEntry_0" ExportPath="/Script/BlueprintGraph.K2Node_FunctionEntry'/Game/Examples/BallShooter/Blueprints/BallShooterEnvironment.BallShooterEnvironment:placeAgentToInitialTransform.K2Node_FunctionEntry_0'"
ExtraFlags=201457664
FunctionReference=(MemberName="placeAgentToInitialTransform")
bIsEditable=True
NodePosX=320
NodePosY=560
ErrorType=1
NodeGuid=5953F6154DA1EC5107BFB88873F64A37
CustomProperties Pin (PinId=887B06AB40BADA93ED63DAB367CB5769,PinName="then",Direction="EGPD_Output",PinType.PinCategory="exec",PinType.PinSubCategory="",PinType.PinSubCategoryObject=None,PinType.PinSubCategoryMemberReference=(),PinType.PinValueType=(),PinType.ContainerType=None,PinType.bIsReference=False,PinType.bIsConst=False,PinType.bIsWeakPointer=False,PinType.bIsUObjectWrapper=False,PinType.bSerializeAsSinglePrecisionFloat=False,LinkedTo=(K2Node_CallFunction_6 F9B65817337F4273868DF68D241B16F9,),PersistentGuid=00000000000000000000000000000000,bHidden=False,bNotConnectable=False,bDefaultValueIsReadOnly=False,bDefaultValueIsIgnored=False,bAdvancedView=False,bOrphanedPin=False,)
End Object
Begin Object Class=/Script/BlueprintGraph.K2Node_VariableGet Name="K2Node_VariableGet_0" ExportPath="/Script/BlueprintGraph.K2Node_VariableGet'/Game/Examples/BallShooter/Blueprints/BallShooterEnvironment.BallShooterEnvironment:placeAgentToInitialTransform.K2Node_VariableGet_0'"
VariableReference=(MemberName="agentArray",MemberGuid=E6989E75FAB34F6697727E1D1E4DBD5A,bSelfContext=True)
NodePosX=304
NodePosY=661
NodeGuid=B97D0CC13AD84B0CBFF1850197AAFCA4
CustomProperties Pin (PinId=4B382877A870416FB58139762D8401BA,PinName="agentArray",Direction="EGPD_Output",PinType.PinCategory="object",PinType.PinSubCategory="",PinType.PinSubCategoryObject="/Script/CoreUObject.Class'/Script/Engine.Pawn'",PinType.PinSubCategoryMemberReference=(),PinType.PinValueType=(),PinType.ContainerType=Array,PinType.bIsReference=False,PinType.bIsConst=False,PinType.bIsWeakPointer=False,PinType.bIsUObjectWrapper=False,PinType.bSerializeAsSinglePrecisionFloat=False,LinkedTo=(K2Node_GetArrayItem_0 E9F641B114DB4BDB9B8CF3642D9B1204,),PersistentGuid=00000000000000000000000000000000,bHidden=False,bNotConnectable=False,bDefaultValueIsReadOnly=False,bDefaultValueIsIgnored=False,bAdvancedView=False,bOrphanedPin=False,)
CustomProperties Pin (PinId=C7BDA70AA26048908907638CBC4C36F6,PinName="self",PinFriendlyName=NSLOCTEXT("K2Node", "Target", "Target"),PinType.PinCategory="object",PinType.PinSubCategory="",PinType.PinSubCategoryObject="/Script/Engine.BlueprintGeneratedClass'/Game/Examples/BallShooter/Blueprints/BallShooterEnvironment.BallShooterEnvironment_C'",PinType.PinSubCategoryMemberReference=(),PinType.PinValueType=(),PinType.ContainerType=None,PinType.bIsReference=False,PinType.bIsConst=False,PinType.bIsWeakPointer=False,PinType.bIsUObjectWrapper=False,PinType.bSerializeAsSinglePrecisionFloat=False,PersistentGuid=00000000000000000000000000000000,bHidden=True,bNotConnectable=False,bDefaultValueIsReadOnly=False,bDefaultValueIsIgnored=False,bAdvancedView=False,bOrphanedPin=False,)
End Object
Begin Object Class=/Script/BlueprintGraph.K2Node_GetArrayItem Name="K2Node_GetArrayItem_0" ExportPath="/Script/BlueprintGraph.K2Node_GetArrayItem'/Game/Examples/BallShooter/Blueprints/BallShooterEnvironment.BallShooterEnvironment:placeAgentToInitialTransform.K2Node_GetArrayItem_0'"
bReturnByRefDesired=False
NodePosX=448
NodePosY=660
NodeGuid=0450833E8C874C548377B6BE8FCC5662
CustomProperties Pin (PinId=E9F641B114DB4BDB9B8CF3642D9B1204,PinName="Array",PinType.PinCategory="object",PinType.PinSubCategory="",PinType.PinSubCategoryObject="/Script/CoreUObject.Class'/Script/Engine.Pawn'",PinType.PinSubCategoryMemberReference=(),PinType.PinValueType=(),PinType.ContainerType=Array,PinType.bIsReference=False,PinType.bIsConst=False,PinType.bIsWeakPointer=False,PinType.bIsUObjectWrapper=False,PinType.bSerializeAsSinglePrecisionFloat=False,LinkedTo=(K2Node_VariableGet_0 4B382877A870416FB58139762D8401BA,),PersistentGuid=00000000000000000000000000000000,bHidden=False,bNotConnectable=False,bDefaultValueIsReadOnly=False,bDefaultValueIsIgnored=False,bAdvancedView=False,bOrphanedPin=False,)
CustomProperties Pin (PinId=34EA734D6D3E41998E332CF115B681BC,PinName="Dimension 1",PinType.PinCategory="int",PinType.PinSubCategory="",PinType.PinSubCategoryObject=None,PinType.PinSubCategoryMemberReference=(),PinType.PinValueType=(),PinType.ContainerType=None,PinType.bIsReference=False,PinType.bIsConst=False,PinType.bIsWeakPointer=False,PinType.bIsUObjectWrapper=False,PinType.bSerializeAsSinglePrecisionFloat=False,DefaultValue="0",AutogeneratedDefaultValue="0",PersistentGuid=00000000000000000000000000000000,bHidden=False,bNotConnectable=False,bDefaultValueIsReadOnly=False,bDefaultValueIsIgnored=False,bAdvancedView=False,bOrphanedPin=False,)
CustomProperties Pin (PinId=B954D53C508A4D2B9E0ED83924ACD537,PinName="Output",Direction="EGPD_Output",PinType.PinCategory="object",PinType.PinSubCategory="",PinType.PinSubCategoryObject="/Script/CoreUObject.Class'/Script/Engine.Pawn'",PinType.PinSubCategoryMemberReference=(),PinType.PinValueType=(),PinType.ContainerType=None,PinType.bIsReference=False,PinType.bIsConst=False,PinType.bIsWeakPointer=False,PinType.bIsUObjectWrapper=False,PinType.bSerializeAsSinglePrecisionFloat=False,LinkedTo=(K2Node_CallFunction_6 44345B2AD06C4DAD89D8365DAD1A81F6,),PersistentGuid=00000000000000000000000000000000,bHidden=False,bNotConnectable=False,bDefaultValueIsReadOnly=False,bDefaultValueIsIgnored=False,bAdvancedView=False,bOrphanedPin=False,)
End Object
Begin Object Class=/Script/BlueprintGraph.K2Node_CallFunction Name="K2Node_CallFunction_6" ExportPath="/Script/BlueprintGraph.K2Node_CallFunction'/Game/Examples/BallShooter/Blueprints/BallShooterEnvironment.BallShooterEnvironment:placeAgentToInitialTransform.K2Node_CallFunction_6'"
FunctionReference=(MemberName="K2_SetActorTransform",bSelfContext=True)
NodePosX=688
NodePosY=544
NodeGuid=5872591E29C9498EBBFDEFFC8C151AAD
CustomProperties Pin (PinId=F9B65817337F4273868DF68D241B16F9,PinName="execute",PinToolTip="\nExec",PinType.PinCategory="exec",PinType.PinSubCategory="",PinType.PinSubCategoryObject=None,PinType.PinSubCategoryMemberReference=(),PinType.PinValueType=(),PinType.ContainerType=None,PinType.bIsReference=False,PinType.bIsConst=False,PinType.bIsWeakPointer=False,PinType.bIsUObjectWrapper=False,PinType.bSerializeAsSinglePrecisionFloat=False,LinkedTo=(K2Node_FunctionEntry_0 887B06AB40BADA93ED63DAB367CB5769,),PersistentGuid=00000000000000000000000000000000,bHidden=False,bNotConnectable=False,bDefaultValueIsReadOnly=False,bDefaultValueIsIgnored=False,bAdvancedView=False,bOrphanedPin=False,)
CustomProperties Pin (PinId=14B5362753ED4755BC8C69160804AE87,PinName="then",PinToolTip="\nExec",Direction="EGPD_Output",PinType.PinCategory="exec",PinType.PinSubCategory="",PinType.PinSubCategoryObject=None,PinType.PinSubCategoryMemberReference=(),PinType.PinValueType=(),PinType.ContainerType=None,PinType.bIsReference=False,PinType.bIsConst=False,PinType.bIsWeakPointer=False,PinType.bIsUObjectWrapper=False,PinType.bSerializeAsSinglePrecisionFloat=False,PersistentGuid=00000000000000000000000000000000,bHidden=False,bNotConnectable=False,bDefaultValueIsReadOnly=False,bDefaultValueIsIgnored=False,bAdvancedView=False,bOrphanedPin=False,)
CustomProperties Pin (PinId=44345B2AD06C4DAD89D8365DAD1A81F6,PinName="self",PinFriendlyName=NSLOCTEXT("K2Node", "Target", "Target"),PinToolTip="Target\nActor Object Reference",PinType.PinCategory="object",PinType.PinSubCategory="",PinType.PinSubCategoryObject="/Script/CoreUObject.Class'/Script/Engine.Actor'",PinType.PinSubCategoryMemberReference=(),PinType.PinValueType=(),PinType.ContainerType=None,PinType.bIsReference=False,PinType.bIsConst=False,PinType.bIsWeakPointer=False,PinType.bIsUObjectWrapper=False,PinType.bSerializeAsSinglePrecisionFloat=False,LinkedTo=(K2Node_GetArrayItem_0 B954D53C508A4D2B9E0ED83924ACD537,),PersistentGuid=00000000000000000000000000000000,bHidden=False,bNotConnectable=False,bDefaultValueIsReadOnly=False,bDefaultValueIsIgnored=False,bAdvancedView=False,bOrphanedPin=False,)
CustomProperties Pin (PinId=34C73A33EBF5426384A50B6DB9379D38,PinName="NewTransform",PinToolTip="New Transform\nTransform (by ref)\n\nThe new transform.",PinType.PinCategory="struct",PinType.PinSubCategory="",PinType.PinSubCategoryObject="/Script/CoreUObject.ScriptStruct'/Script/CoreUObject.Transform'",PinType.PinSubCategoryMemberReference=(),PinType.PinValueType=(),PinType.ContainerType=None,PinType.bIsReference=True,PinType.bIsConst=True,PinType.bIsWeakPointer=False,PinType.bIsUObjectWrapper=False,PinType.bSerializeAsSinglePrecisionFloat=False,LinkedTo=(K2Node_VariableGet_2 A73EDE984D524CA6B1A2EC5AE3016E1B,),PersistentGuid=00000000000000000000000000000000,bHidden=False,bNotConnectable=False,bDefaultValueIsReadOnly=False,bDefaultValueIsIgnored=True,bAdvancedView=False,bOrphanedPin=False,)
CustomProperties Pin (PinId=53D87A03D38143E689BE7EC54756D849,PinName="bSweep",PinToolTip="Sweep\nBoolean\n\nWhether we sweep to the destination location, triggering overlaps along the way and stopping short of the target if blocked by something. Only the root component is swept and checked for blocking collision, child components move without sweeping. If collision is off, this has no effect.",PinType.PinCategory="bool",PinType.PinSubCategory="",PinType.PinSubCategoryObject=None,PinType.PinSubCategoryMemberReference=(),PinType.PinValueType=(),PinType.ContainerType=None,PinType.bIsReference=False,PinType.bIsConst=False,PinType.bIsWeakPointer=False,PinType.bIsUObjectWrapper=False,PinType.bSerializeAsSinglePrecisionFloat=False,DefaultValue="false",AutogeneratedDefaultValue="false",PersistentGuid=00000000000000000000000000000000,bHidden=False,bNotConnectable=False,bDefaultValueIsReadOnly=False,bDefaultValueIsIgnored=False,bAdvancedView=False,bOrphanedPin=False,)
CustomProperties Pin (PinId=1B1F4E74ACC841029429EE8096D927E7,PinName="SweepHitResult",PinToolTip="Sweep Hit Result\nHit Result Structure",Direction="EGPD_Output",PinType.PinCategory="struct",PinType.PinSubCategory="",PinType.PinSubCategoryObject="/Script/CoreUObject.ScriptStruct'/Script/Engine.HitResult'",PinType.PinSubCategoryMemberReference=(),PinType.PinValueType=(),PinType.ContainerType=None,PinType.bIsReference=False,PinType.bIsConst=False,PinType.bIsWeakPointer=False,PinType.bIsUObjectWrapper=False,PinType.bSerializeAsSinglePrecisionFloat=False,PersistentGuid=00000000000000000000000000000000,bHidden=False,bNotConnectable=False,bDefaultValueIsReadOnly=False,bDefaultValueIsIgnored=False,bAdvancedView=False,bOrphanedPin=False,)
CustomProperties Pin (PinId=44CB2606ADEC40D7A851514BDDAA3535,PinName="bTeleport",PinToolTip="Teleport\nBoolean\n\nWhether we teleport the physics state (if physics collision is enabled for this object). If true, physics velocity for this object is unchanged (so ragdoll parts are not affected by change in location). If false, physics velocity is updated based on the change in position (affecting ragdoll parts). If CCD is on and not teleporting, this will affect objects along the entire swept volume. Note that when teleporting, any child/attached components will be teleported too, maintaining their current offset even if they are being simulated. Setting the transform without teleporting will not update the transform of simulated child/attached components.",PinType.PinCategory="bool",PinType.PinSubCategory="",PinType.PinSubCategoryObject=None,PinType.PinSubCategoryMemberReference=(),PinType.PinValueType=(),PinType.ContainerType=None,PinType.bIsReference=False,PinType.bIsConst=False,PinType.bIsWeakPointer=False,PinType.bIsUObjectWrapper=False,PinType.bSerializeAsSinglePrecisionFloat=False,DefaultValue="false",AutogeneratedDefaultValue="false",PersistentGuid=00000000000000000000000000000000,bHidden=False,bNotConnectable=False,bDefaultValueIsReadOnly=False,bDefaultValueIsIgnored=False,bAdvancedView=False,bOrphanedPin=False,)
CustomProperties Pin (PinId=0D593FAEABE348BE98B7B9F9C84C44AC,PinName="ReturnValue",PinToolTip="Return Value\nBoolean",Direction="EGPD_Output",PinType.PinCategory="bool",PinType.PinSubCategory="",PinType.PinSubCategoryObject=None,PinType.PinSubCategoryMemberReference=(),PinType.PinValueType=(),PinType.ContainerType=None,PinType.bIsReference=False,PinType.bIsConst=False,PinType.bIsWeakPointer=False,PinType.bIsUObjectWrapper=False,PinType.bSerializeAsSinglePrecisionFloat=False,DefaultValue="false",AutogeneratedDefaultValue="false",PersistentGuid=00000000000000000000000000000000,bHidden=False,bNotConnectable=False,bDefaultValueIsReadOnly=False,bDefaultValueIsIgnored=False,bAdvancedView=False,bOrphanedPin=False,)
End Object
Begin Object Class=/Script/BlueprintGraph.K2Node_VariableGet Name="K2Node_VariableGet_2" ExportPath="/Script/BlueprintGraph.K2Node_VariableGet'/Game/Examples/BallShooter/Blueprints/BallShooterEnvironment.BallShooterEnvironment:placeAgentToInitialTransform.K2Node_VariableGet_2'"
VariableReference=(MemberName="agentInitialTransform",MemberGuid=23EBF7460293491F8BB9C6C41A73BF84,bSelfContext=True)
NodePosX=448
NodePosY=752
NodeGuid=709DD89F965341B3A9F7CBB610EE6979
CustomProperties Pin (PinId=A73EDE984D524CA6B1A2EC5AE3016E1B,PinName="agentInitialTransform",Direction="EGPD_Output",PinType.PinCategory="struct",PinType.PinSubCategory="",PinType.PinSubCategoryObject="/Script/CoreUObject.ScriptStruct'/Script/CoreUObject.Transform'",PinType.PinSubCategoryMemberReference=(),PinType.PinValueType=(),PinType.ContainerType=None,PinType.bIsReference=False,PinType.bIsConst=False,PinType.bIsWeakPointer=False,PinType.bIsUObjectWrapper=False,PinType.bSerializeAsSinglePrecisionFloat=False,LinkedTo=(K2Node_CallFunction_6 34C73A33EBF5426384A50B6DB9379D38,),PersistentGuid=00000000000000000000000000000000,bHidden=False,bNotConnectable=False,bDefaultValueIsReadOnly=False,bDefaultValueIsIgnored=False,bAdvancedView=False,bOrphanedPin=False,)
CustomProperties Pin (PinId=1DEE6624ABAC46628A90B1C73CBF0BCA,PinName="self",PinFriendlyName=NSLOCTEXT("K2Node", "Target", "Target"),PinType.PinCategory="object",PinType.PinSubCategory="",PinType.PinSubCategoryObject="/Script/Engine.BlueprintGeneratedClass'/Game/Examples/BallShooter/Blueprints/BallShooterEnvironment.BallShooterEnvironment_C'",PinType.PinSubCategoryMemberReference=(),PinType.PinValueType=(),PinType.ContainerType=None,PinType.bIsReference=False,PinType.bIsConst=False,PinType.bIsWeakPointer=False,PinType.bIsUObjectWrapper=False,PinType.bSerializeAsSinglePrecisionFloat=False,PersistentGuid=00000000000000000000000000000000,bHidden=True,bNotConnectable=False,bDefaultValueIsReadOnly=False,bDefaultValueIsIgnored=False,bAdvancedView=False,bOrphanedPin=False,)
End Object
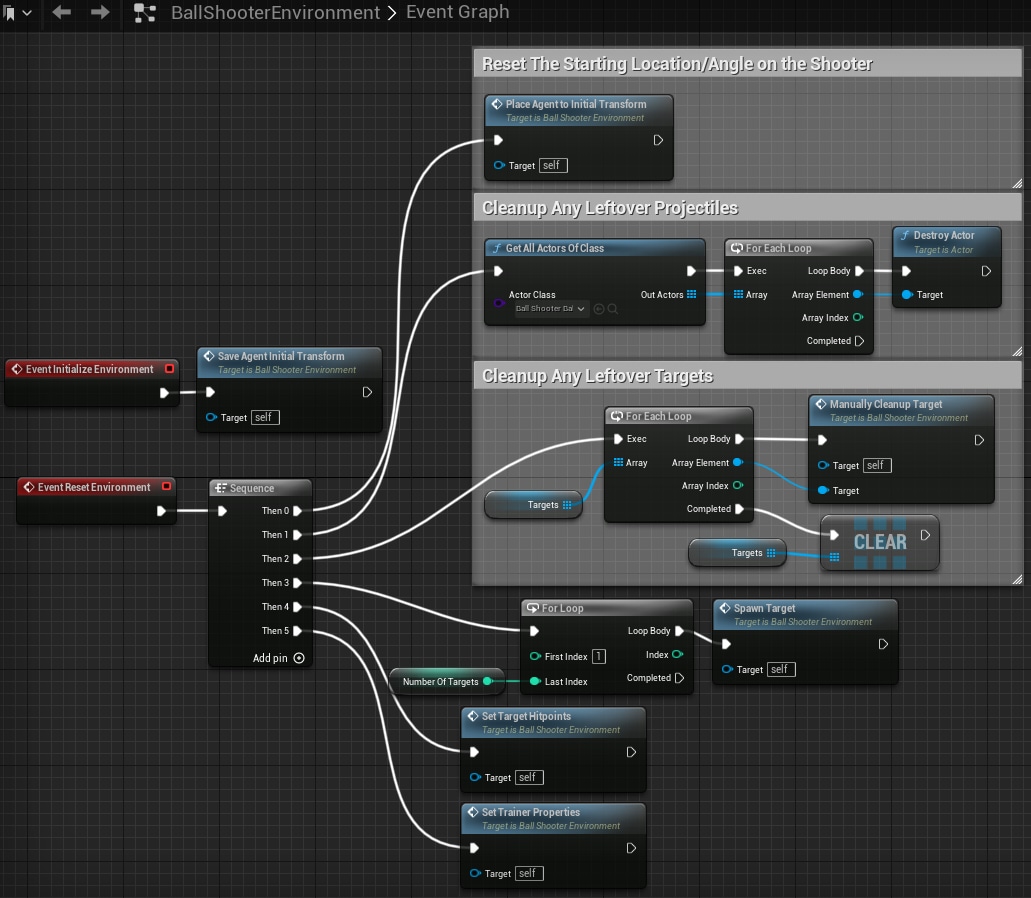
Begin Object Class=/Script/BlueprintGraph.K2Node_Event Name="K2Node_Event_0" ExportPath="/Script/BlueprintGraph.K2Node_Event'/Game/Examples/BallShooter/Blueprints/BallShooterEnvironment.BallShooterEnvironment:EventGraph.K2Node_Event_0'"
EventReference=(MemberParent="/Script/CoreUObject.Class'/Script/Schola.BlueprintScholaEnvironment'",MemberName="ResetEnvironment")
bOverrideFunction=True
NodePosX=-64
NodePosY=-83
bCommentBubblePinned=True
NodeGuid=B8829FE3B6F846AFBE629FB91692BCDF
CustomProperties Pin (PinId=90501B4A39064F988061622A410897C6,PinName="OutputDelegate",Direction="EGPD_Output",PinType.PinCategory="delegate",PinType.PinSubCategory="",PinType.PinSubCategoryObject=None,PinType.PinSubCategoryMemberReference=(MemberParent="/Script/CoreUObject.Class'/Script/Schola.BlueprintScholaEnvironment'",MemberName="ResetEnvironment"),PinType.PinValueType=(),PinType.ContainerType=None,PinType.bIsReference=False,PinType.bIsConst=False,PinType.bIsWeakPointer=False,PinType.bIsUObjectWrapper=False,PinType.bSerializeAsSinglePrecisionFloat=False,PersistentGuid=00000000000000000000000000000000,bHidden=False,bNotConnectable=False,bDefaultValueIsReadOnly=False,bDefaultValueIsIgnored=False,bAdvancedView=False,bOrphanedPin=False,)
CustomProperties Pin (PinId=1EA7B8E69AFE40E8822017457D5CC944,PinName="then",Direction="EGPD_Output",PinType.PinCategory="exec",PinType.PinSubCategory="",PinType.PinSubCategoryObject=None,PinType.PinSubCategoryMemberReference=(),PinType.PinValueType=(),PinType.ContainerType=None,PinType.bIsReference=False,PinType.bIsConst=False,PinType.bIsWeakPointer=False,PinType.bIsUObjectWrapper=False,PinType.bSerializeAsSinglePrecisionFloat=False,LinkedTo=(K2Node_ExecutionSequence_0 C7501A7B411B09CC9D8DADB90B3F4427,),PersistentGuid=00000000000000000000000000000000,bHidden=False,bNotConnectable=False,bDefaultValueIsReadOnly=False,bDefaultValueIsIgnored=False,bAdvancedView=False,bOrphanedPin=False,)
End Object
Begin Object Class=/Script/BlueprintGraph.K2Node_Event Name="K2Node_Event_1" ExportPath="/Script/BlueprintGraph.K2Node_Event'/Game/Examples/BallShooter/Blueprints/BallShooterEnvironment.BallShooterEnvironment:EventGraph.K2Node_Event_1'"
EventReference=(MemberParent="/Script/CoreUObject.Class'/Script/Schola.BlueprintScholaEnvironment'",MemberName="InitializeEnvironment")
bOverrideFunction=True
NodePosX=-80
NodePosY=-240
bCommentBubblePinned=True
NodeGuid=8E42BE3598AC4E4FAAECBAA76A41DE27
CustomProperties Pin (PinId=4194D76F4939472AA76EF5F967284E2B,PinName="OutputDelegate",Direction="EGPD_Output",PinType.PinCategory="delegate",PinType.PinSubCategory="",PinType.PinSubCategoryObject=None,PinType.PinSubCategoryMemberReference=(MemberParent="/Script/CoreUObject.Class'/Script/Schola.BlueprintScholaEnvironment'",MemberName="InitializeEnvironment"),PinType.PinValueType=(),PinType.ContainerType=None,PinType.bIsReference=False,PinType.bIsConst=False,PinType.bIsWeakPointer=False,PinType.bIsUObjectWrapper=False,PinType.bSerializeAsSinglePrecisionFloat=False,PersistentGuid=00000000000000000000000000000000,bHidden=False,bNotConnectable=False,bDefaultValueIsReadOnly=False,bDefaultValueIsIgnored=False,bAdvancedView=False,bOrphanedPin=False,)
CustomProperties Pin (PinId=93FCBB848B32403F8C5470369AB70AE8,PinName="then",Direction="EGPD_Output",PinType.PinCategory="exec",PinType.PinSubCategory="",PinType.PinSubCategoryObject=None,PinType.PinSubCategoryMemberReference=(),PinType.PinValueType=(),PinType.ContainerType=None,PinType.bIsReference=False,PinType.bIsConst=False,PinType.bIsWeakPointer=False,PinType.bIsUObjectWrapper=False,PinType.bSerializeAsSinglePrecisionFloat=False,LinkedTo=(K2Node_CallFunction_2 C557D6564C2379FD9ACCB3B196D5D0D1,),PersistentGuid=00000000000000000000000000000000,bHidden=False,bNotConnectable=False,bDefaultValueIsReadOnly=False,bDefaultValueIsIgnored=False,bAdvancedView=False,bOrphanedPin=False,)
End Object
Begin Object Class=/Script/BlueprintGraph.K2Node_CallFunction Name="K2Node_CallFunction_0" ExportPath="/Script/BlueprintGraph.K2Node_CallFunction'/Game/Examples/BallShooter/Blueprints/BallShooterEnvironment.BallShooterEnvironment:EventGraph.K2Node_CallFunction_0'"
FunctionReference=(MemberParent="/Script/CoreUObject.Class'/Script/Engine.GameplayStatics'",MemberName="GetAllActorsOfClass")
NodePosX=560
NodePosY=-400
NodeGuid=A7661998D89D479084306CA6228340D1
CustomProperties Pin (PinId=4AFF807B60D444378311851682FD58B4,PinName="execute",PinToolTip="\nExec",PinType.PinCategory="exec",PinType.PinSubCategory="",PinType.PinSubCategoryObject=None,PinType.PinSubCategoryMemberReference=(),PinType.PinValueType=(),PinType.ContainerType=None,PinType.bIsReference=False,PinType.bIsConst=False,PinType.bIsWeakPointer=False,PinType.bIsUObjectWrapper=False,PinType.bSerializeAsSinglePrecisionFloat=False,LinkedTo=(K2Node_ExecutionSequence_0 92EC79C340C8976E0FA2699CA9F3E1BA,),PersistentGuid=00000000000000000000000000000000,bHidden=False,bNotConnectable=False,bDefaultValueIsReadOnly=False,bDefaultValueIsIgnored=False,bAdvancedView=False,bOrphanedPin=False,)
CustomProperties Pin (PinId=307360F122FE4F3C9DED7247ADED69B9,PinName="then",PinToolTip="\nExec",Direction="EGPD_Output",PinType.PinCategory="exec",PinType.PinSubCategory="",PinType.PinSubCategoryObject=None,PinType.PinSubCategoryMemberReference=(),PinType.PinValueType=(),PinType.ContainerType=None,PinType.bIsReference=False,PinType.bIsConst=False,PinType.bIsWeakPointer=False,PinType.bIsUObjectWrapper=False,PinType.bSerializeAsSinglePrecisionFloat=False,LinkedTo=(K2Node_MacroInstance_0 DDEFEECBAAAF4E658986FEAE708E4CA9,),PersistentGuid=00000000000000000000000000000000,bHidden=False,bNotConnectable=False,bDefaultValueIsReadOnly=False,bDefaultValueIsIgnored=False,bAdvancedView=False,bOrphanedPin=False,)
CustomProperties Pin (PinId=774FCFC7A47848AA8C55ADEA31244489,PinName="self",PinFriendlyName=NSLOCTEXT("K2Node", "Target", "Target"),PinToolTip="Target\nGameplay Statics Object Reference",PinType.PinCategory="object",PinType.PinSubCategory="",PinType.PinSubCategoryObject="/Script/CoreUObject.Class'/Script/Engine.GameplayStatics'",PinType.PinSubCategoryMemberReference=(),PinType.PinValueType=(),PinType.ContainerType=None,PinType.bIsReference=False,PinType.bIsConst=False,PinType.bIsWeakPointer=False,PinType.bIsUObjectWrapper=False,PinType.bSerializeAsSinglePrecisionFloat=False,DefaultObject="/Script/Engine.Default__GameplayStatics",PersistentGuid=00000000000000000000000000000000,bHidden=True,bNotConnectable=False,bDefaultValueIsReadOnly=False,bDefaultValueIsIgnored=False,bAdvancedView=False,bOrphanedPin=False,)
CustomProperties Pin (PinId=12C398FE8F4C49CAB89176EEB3503F99,PinName="WorldContextObject",PinToolTip="World Context Object\nObject Reference",PinType.PinCategory="object",PinType.PinSubCategory="",PinType.PinSubCategoryObject="/Script/CoreUObject.Class'/Script/CoreUObject.Object'",PinType.PinSubCategoryMemberReference=(),PinType.PinValueType=(),PinType.ContainerType=None,PinType.bIsReference=False,PinType.bIsConst=True,PinType.bIsWeakPointer=False,PinType.bIsUObjectWrapper=False,PinType.bSerializeAsSinglePrecisionFloat=False,PersistentGuid=00000000000000000000000000000000,bHidden=True,bNotConnectable=False,bDefaultValueIsReadOnly=False,bDefaultValueIsIgnored=False,bAdvancedView=False,bOrphanedPin=False,)
CustomProperties Pin (PinId=A340D8430148435E9710B1787E8FDABC,PinName="ActorClass",PinToolTip="Actor Class\nActor Class Reference\n\nClass of Actor to find. Must be specified or result array will be empty.",PinType.PinCategory="class",PinType.PinSubCategory="",PinType.PinSubCategoryObject="/Script/CoreUObject.Class'/Script/Engine.Actor'",PinType.PinSubCategoryMemberReference=(),PinType.PinValueType=(),PinType.ContainerType=None,PinType.bIsReference=False,PinType.bIsConst=False,PinType.bIsWeakPointer=False,PinType.bIsUObjectWrapper=True,PinType.bSerializeAsSinglePrecisionFloat=False,DefaultObject="/Game/Examples/BallShooter/Blueprints/BallShooterBall.BallShooterBall_C",PersistentGuid=00000000000000000000000000000000,bHidden=False,bNotConnectable=False,bDefaultValueIsReadOnly=False,bDefaultValueIsIgnored=False,bAdvancedView=False,bOrphanedPin=False,)
CustomProperties Pin (PinId=D9E438FD772D4950ADDB5430C0755550,PinName="OutActors",PinToolTip="Out Actors\nArray of Ball Shooter Ball Object References\n\nOutput array of Actors of the specified class.",Direction="EGPD_Output",PinType.PinCategory="object",PinType.PinSubCategory="",PinType.PinSubCategoryObject="/Script/Engine.BlueprintGeneratedClass'/Game/Examples/BallShooter/Blueprints/BallShooterBall.BallShooterBall_C'",PinType.PinSubCategoryMemberReference=(),PinType.PinValueType=(),PinType.ContainerType=Array,PinType.bIsReference=False,PinType.bIsConst=False,PinType.bIsWeakPointer=False,PinType.bIsUObjectWrapper=False,PinType.bSerializeAsSinglePrecisionFloat=False,LinkedTo=(K2Node_MacroInstance_0 3AE29B42BABB479A8D8093B993B24CFB,),PersistentGuid=00000000000000000000000000000000,bHidden=False,bNotConnectable=False,bDefaultValueIsReadOnly=False,bDefaultValueIsIgnored=False,bAdvancedView=False,bOrphanedPin=False,)
End Object
Begin Object Class=/Script/BlueprintGraph.K2Node_MacroInstance Name="K2Node_MacroInstance_0" ExportPath="/Script/BlueprintGraph.K2Node_MacroInstance'/Game/Examples/BallShooter/Blueprints/BallShooterEnvironment.BallShooterEnvironment:EventGraph.K2Node_MacroInstance_0'"
MacroGraphReference=(MacroGraph="/Script/Engine.EdGraph'/Engine/EditorBlueprintResources/StandardMacros.StandardMacros:ForEachLoop'",GraphBlueprint="/Script/Engine.Blueprint'/Engine/EditorBlueprintResources/StandardMacros.StandardMacros'",GraphGuid=99DBFD5540A796041F72A5A9DA655026)
ResolvedWildcardType=(PinCategory="object",PinSubCategoryObject="/Script/Engine.BlueprintGeneratedClass'/Game/Examples/BallShooter/Blueprints/BallShooterBall.BallShooterBall_C'",ContainerType=Array)
NodePosX=880
NodePosY=-400
NodeGuid=D0F8DBB8A33448D1B721464E5DC4CF64
CustomProperties Pin (PinId=DDEFEECBAAAF4E658986FEAE708E4CA9,PinName="Exec",PinType.PinCategory="exec",PinType.PinSubCategory="",PinType.PinSubCategoryObject=None,PinType.PinSubCategoryMemberReference=(),PinType.PinValueType=(),PinType.ContainerType=None,PinType.bIsReference=False,PinType.bIsConst=False,PinType.bIsWeakPointer=False,PinType.bIsUObjectWrapper=False,PinType.bSerializeAsSinglePrecisionFloat=False,LinkedTo=(K2Node_CallFunction_0 307360F122FE4F3C9DED7247ADED69B9,),PersistentGuid=00000000000000000000000000000000,bHidden=False,bNotConnectable=False,bDefaultValueIsReadOnly=False,bDefaultValueIsIgnored=False,bAdvancedView=False,bOrphanedPin=False,)
CustomProperties Pin (PinId=3AE29B42BABB479A8D8093B993B24CFB,PinName="Array",PinType.PinCategory="object",PinType.PinSubCategory="",PinType.PinSubCategoryObject="/Script/Engine.BlueprintGeneratedClass'/Game/Examples/BallShooter/Blueprints/BallShooterBall.BallShooterBall_C'",PinType.PinSubCategoryMemberReference=(),PinType.PinValueType=(),PinType.ContainerType=Array,PinType.bIsReference=False,PinType.bIsConst=False,PinType.bIsWeakPointer=False,PinType.bIsUObjectWrapper=False,PinType.bSerializeAsSinglePrecisionFloat=False,LinkedTo=(K2Node_CallFunction_0 D9E438FD772D4950ADDB5430C0755550,),PersistentGuid=00000000000000000000000000000000,bHidden=False,bNotConnectable=False,bDefaultValueIsReadOnly=False,bDefaultValueIsIgnored=False,bAdvancedView=False,bOrphanedPin=False,)
CustomProperties Pin (PinId=C1CBC02A00214896ADF3BBC91E85A7FB,PinName="LoopBody",Direction="EGPD_Output",PinType.PinCategory="exec",PinType.PinSubCategory="",PinType.PinSubCategoryObject=None,PinType.PinSubCategoryMemberReference=(),PinType.PinValueType=(),PinType.ContainerType=None,PinType.bIsReference=False,PinType.bIsConst=False,PinType.bIsWeakPointer=False,PinType.bIsUObjectWrapper=False,PinType.bSerializeAsSinglePrecisionFloat=False,LinkedTo=(K2Node_CallFunction_6 B1DCC855266643A3907D7AE3E413712F,),PersistentGuid=00000000000000000000000000000000,bHidden=False,bNotConnectable=False,bDefaultValueIsReadOnly=False,bDefaultValueIsIgnored=False,bAdvancedView=False,bOrphanedPin=False,)
CustomProperties Pin (PinId=35E6AE2B06B74CFFA7B99E11A5879A65,PinName="Array Element",Direction="EGPD_Output",PinType.PinCategory="object",PinType.PinSubCategory="",PinType.PinSubCategoryObject="/Script/Engine.BlueprintGeneratedClass'/Game/Examples/BallShooter/Blueprints/BallShooterBall.BallShooterBall_C'",PinType.PinSubCategoryMemberReference=(),PinType.PinValueType=(),PinType.ContainerType=None,PinType.bIsReference=False,PinType.bIsConst=False,PinType.bIsWeakPointer=False,PinType.bIsUObjectWrapper=False,PinType.bSerializeAsSinglePrecisionFloat=False,LinkedTo=(K2Node_CallFunction_6 426A9A22169A43128352490FED2213DD,),PersistentGuid=00000000000000000000000000000000,bHidden=False,bNotConnectable=False,bDefaultValueIsReadOnly=False,bDefaultValueIsIgnored=False,bAdvancedView=False,bOrphanedPin=False,)
CustomProperties Pin (PinId=E4CBB6FB152F4C3E996ACBC060F6C41F,PinName="Array Index",Direction="EGPD_Output",PinType.PinCategory="int",PinType.PinSubCategory="",PinType.PinSubCategoryObject=None,PinType.PinSubCategoryMemberReference=(),PinType.PinValueType=(),PinType.ContainerType=None,PinType.bIsReference=False,PinType.bIsConst=False,PinType.bIsWeakPointer=False,PinType.bIsUObjectWrapper=False,PinType.bSerializeAsSinglePrecisionFloat=False,PersistentGuid=00000000000000000000000000000000,bHidden=False,bNotConnectable=False,bDefaultValueIsReadOnly=False,bDefaultValueIsIgnored=False,bAdvancedView=False,bOrphanedPin=False,)
CustomProperties Pin (PinId=CE3DDF8A77F84FA2AF31E48CD8D29017,PinName="Completed",Direction="EGPD_Output",PinType.PinCategory="exec",PinType.PinSubCategory="",PinType.PinSubCategoryObject=None,PinType.PinSubCategoryMemberReference=(),PinType.PinValueType=(),PinType.ContainerType=None,PinType.bIsReference=False,PinType.bIsConst=False,PinType.bIsWeakPointer=False,PinType.bIsUObjectWrapper=False,PinType.bSerializeAsSinglePrecisionFloat=False,PersistentGuid=00000000000000000000000000000000,bHidden=False,bNotConnectable=False,bDefaultValueIsReadOnly=False,bDefaultValueIsIgnored=False,bAdvancedView=False,bOrphanedPin=False,)
End Object
Begin Object Class=/Script/BlueprintGraph.K2Node_CallFunction Name="K2Node_CallFunction_6" ExportPath="/Script/BlueprintGraph.K2Node_CallFunction'/Game/Examples/BallShooter/Blueprints/BallShooterEnvironment.BallShooterEnvironment:EventGraph.K2Node_CallFunction_6'"
FunctionReference=(MemberName="K2_DestroyActor",bSelfContext=True)
NodePosX=1104
NodePosY=-417
NodeGuid=D8F8A1CB094F4BC58CF0EBDEB4778BA9
CustomProperties Pin (PinId=B1DCC855266643A3907D7AE3E413712F,PinName="execute",PinToolTip="\nExec",PinType.PinCategory="exec",PinType.PinSubCategory="",PinType.PinSubCategoryObject=None,PinType.PinSubCategoryMemberReference=(),PinType.PinValueType=(),PinType.ContainerType=None,PinType.bIsReference=False,PinType.bIsConst=False,PinType.bIsWeakPointer=False,PinType.bIsUObjectWrapper=False,PinType.bSerializeAsSinglePrecisionFloat=False,LinkedTo=(K2Node_MacroInstance_0 C1CBC02A00214896ADF3BBC91E85A7FB,),PersistentGuid=00000000000000000000000000000000,bHidden=False,bNotConnectable=False,bDefaultValueIsReadOnly=False,bDefaultValueIsIgnored=False,bAdvancedView=False,bOrphanedPin=False,)
CustomProperties Pin (PinId=EDE2720873F64D05AE86117262E1A031,PinName="then",PinToolTip="\nExec",Direction="EGPD_Output",PinType.PinCategory="exec",PinType.PinSubCategory="",PinType.PinSubCategoryObject=None,PinType.PinSubCategoryMemberReference=(),PinType.PinValueType=(),PinType.ContainerType=None,PinType.bIsReference=False,PinType.bIsConst=False,PinType.bIsWeakPointer=False,PinType.bIsUObjectWrapper=False,PinType.bSerializeAsSinglePrecisionFloat=False,PersistentGuid=00000000000000000000000000000000,bHidden=False,bNotConnectable=False,bDefaultValueIsReadOnly=False,bDefaultValueIsIgnored=False,bAdvancedView=False,bOrphanedPin=False,)
CustomProperties Pin (PinId=426A9A22169A43128352490FED2213DD,PinName="self",PinFriendlyName=NSLOCTEXT("K2Node", "Target", "Target"),PinToolTip="Target\nActor Object Reference",PinType.PinCategory="object",PinType.PinSubCategory="",PinType.PinSubCategoryObject="/Script/CoreUObject.Class'/Script/Engine.Actor'",PinType.PinSubCategoryMemberReference=(),PinType.PinValueType=(),PinType.ContainerType=None,PinType.bIsReference=False,PinType.bIsConst=False,PinType.bIsWeakPointer=False,PinType.bIsUObjectWrapper=False,PinType.bSerializeAsSinglePrecisionFloat=False,LinkedTo=(K2Node_MacroInstance_0 35E6AE2B06B74CFFA7B99E11A5879A65,),PersistentGuid=00000000000000000000000000000000,bHidden=False,bNotConnectable=False,bDefaultValueIsReadOnly=False,bDefaultValueIsIgnored=False,bAdvancedView=False,bOrphanedPin=False,)
End Object
Begin Object Class=/Script/BlueprintGraph.K2Node_CallFunction Name="K2Node_CallFunction_8" ExportPath="/Script/BlueprintGraph.K2Node_CallFunction'/Game/Examples/BallShooter/Blueprints/BallShooterEnvironment.BallShooterEnvironment:EventGraph.K2Node_CallFunction_8'"
FunctionReference=(MemberName="placeAgentToInitialTransform",MemberGuid=1A972A8F4FD9FD0D8CEE7B97BED860AF,bSelfContext=True)
NodePosX=560
NodePosY=-592
NodeGuid=91C593054C930CD5D59BB195D8769AA9
CustomProperties Pin (PinId=50692E5C4CCF4C8C74C6CD8FAA89B469,PinName="execute",PinType.PinCategory="exec",PinType.PinSubCategory="",PinType.PinSubCategoryObject=None,PinType.PinSubCategoryMemberReference=(),PinType.PinValueType=(),PinType.ContainerType=None,PinType.bIsReference=False,PinType.bIsConst=False,PinType.bIsWeakPointer=False,PinType.bIsUObjectWrapper=False,PinType.bSerializeAsSinglePrecisionFloat=False,LinkedTo=(K2Node_ExecutionSequence_0 77AE56844F3CC42F69C2448F892E5A59,),PersistentGuid=00000000000000000000000000000000,bHidden=False,bNotConnectable=False,bDefaultValueIsReadOnly=False,bDefaultValueIsIgnored=False,bAdvancedView=False,bOrphanedPin=False,)
CustomProperties Pin (PinId=0A6DDDA4450A3F9795640097F200CEFE,PinName="then",Direction="EGPD_Output",PinType.PinCategory="exec",PinType.PinSubCategory="",PinType.PinSubCategoryObject=None,PinType.PinSubCategoryMemberReference=(),PinType.PinValueType=(),PinType.ContainerType=None,PinType.bIsReference=False,PinType.bIsConst=False,PinType.bIsWeakPointer=False,PinType.bIsUObjectWrapper=False,PinType.bSerializeAsSinglePrecisionFloat=False,PersistentGuid=00000000000000000000000000000000,bHidden=False,bNotConnectable=False,bDefaultValueIsReadOnly=False,bDefaultValueIsIgnored=False,bAdvancedView=False,bOrphanedPin=False,)
CustomProperties Pin (PinId=BBE701DB436DE6E6389297A9AFFB5619,PinName="self",PinFriendlyName=NSLOCTEXT("K2Node", "Target", "Target"),PinType.PinCategory="object",PinType.PinSubCategory="self",PinType.PinSubCategoryObject=None,PinType.PinSubCategoryMemberReference=(),PinType.PinValueType=(),PinType.ContainerType=None,PinType.bIsReference=False,PinType.bIsConst=False,PinType.bIsWeakPointer=False,PinType.bIsUObjectWrapper=False,PinType.bSerializeAsSinglePrecisionFloat=False,PersistentGuid=00000000000000000000000000000000,bHidden=False,bNotConnectable=False,bDefaultValueIsReadOnly=False,bDefaultValueIsIgnored=False,bAdvancedView=False,bOrphanedPin=False,)
End Object
Begin Object Class=/Script/BlueprintGraph.K2Node_VariableGet Name="K2Node_VariableGet_14" ExportPath="/Script/BlueprintGraph.K2Node_VariableGet'/Game/Examples/BallShooter/Blueprints/BallShooterEnvironment.BallShooterEnvironment:EventGraph.K2Node_VariableGet_14'"
VariableReference=(MemberName="Targets",MemberGuid=773BA7DA44BC6F425C0CD1890FAE1D77,bSelfContext=True)
NodePosX=560
NodePosY=-64
NodeGuid=2367F58F4BB72410115892A1FFE70EAF
CustomProperties Pin (PinId=51028C9E40D1EE803F062582BDB6B546,PinName="Targets",Direction="EGPD_Output",PinType.PinCategory="object",PinType.PinSubCategory="",PinType.PinSubCategoryObject="/Script/Engine.BlueprintGeneratedClass'/Game/Examples/BallShooter/Blueprints/BallShooterTarget.BallShooterTarget_C'",PinType.PinSubCategoryMemberReference=(),PinType.PinValueType=(),PinType.ContainerType=Array,PinType.bIsReference=False,PinType.bIsConst=False,PinType.bIsWeakPointer=False,PinType.bIsUObjectWrapper=False,PinType.bSerializeAsSinglePrecisionFloat=False,LinkedTo=(K2Node_MacroInstance_7 082677BC4DDCEE620059B1838AE03D7D,),PersistentGuid=00000000000000000000000000000000,bHidden=False,bNotConnectable=False,bDefaultValueIsReadOnly=False,bDefaultValueIsIgnored=False,bAdvancedView=False,bOrphanedPin=False,)
CustomProperties Pin (PinId=8D47761242F930273CF7D9AAB0586F70,PinName="self",PinFriendlyName=NSLOCTEXT("K2Node", "Target", "Target"),PinType.PinCategory="object",PinType.PinSubCategory="",PinType.PinSubCategoryObject="/Script/Engine.BlueprintGeneratedClass'/Game/Examples/BallShooter/Blueprints/BallShooterEnvironment.BallShooterEnvironment_C'",PinType.PinSubCategoryMemberReference=(),PinType.PinValueType=(),PinType.ContainerType=None,PinType.bIsReference=False,PinType.bIsConst=False,PinType.bIsWeakPointer=False,PinType.bIsUObjectWrapper=False,PinType.bSerializeAsSinglePrecisionFloat=False,PersistentGuid=00000000000000000000000000000000,bHidden=True,bNotConnectable=False,bDefaultValueIsReadOnly=False,bDefaultValueIsIgnored=False,bAdvancedView=False,bOrphanedPin=False,)
End Object
Begin Object Class=/Script/BlueprintGraph.K2Node_VariableGet Name="K2Node_VariableGet_15" ExportPath="/Script/BlueprintGraph.K2Node_VariableGet'/Game/Examples/BallShooter/Blueprints/BallShooterEnvironment.BallShooterEnvironment:EventGraph.K2Node_VariableGet_15'"
VariableReference=(MemberName="Targets",MemberGuid=773BA7DA44BC6F425C0CD1890FAE1D77,bSelfContext=True)
NodePosX=832
NodeGuid=16C08BCB41A8B471A58A47B0892A25B8
CustomProperties Pin (PinId=B1EB1AC343198D4592DC08B9E5AA62D6,PinName="Targets",Direction="EGPD_Output",PinType.PinCategory="object",PinType.PinSubCategory="",PinType.PinSubCategoryObject="/Script/Engine.BlueprintGeneratedClass'/Game/Examples/BallShooter/Blueprints/BallShooterTarget.BallShooterTarget_C'",PinType.PinSubCategoryMemberReference=(),PinType.PinValueType=(),PinType.ContainerType=Array,PinType.bIsReference=False,PinType.bIsConst=False,PinType.bIsWeakPointer=False,PinType.bIsUObjectWrapper=False,PinType.bSerializeAsSinglePrecisionFloat=False,LinkedTo=(K2Node_CallArrayFunction_2 1403E74B48BF951695F0909D9DAB18D5,),PersistentGuid=00000000000000000000000000000000,bHidden=False,bNotConnectable=False,bDefaultValueIsReadOnly=False,bDefaultValueIsIgnored=False,bAdvancedView=False,bOrphanedPin=False,)
CustomProperties Pin (PinId=6CC68A964096849A31B503B70A3FAC7F,PinName="self",PinFriendlyName=NSLOCTEXT("K2Node", "Target", "Target"),PinType.PinCategory="object",PinType.PinSubCategory="",PinType.PinSubCategoryObject="/Script/Engine.BlueprintGeneratedClass'/Game/Examples/BallShooter/Blueprints/BallShooterEnvironment.BallShooterEnvironment_C'",PinType.PinSubCategoryMemberReference=(),PinType.PinValueType=(),PinType.ContainerType=None,PinType.bIsReference=False,PinType.bIsConst=False,PinType.bIsWeakPointer=False,PinType.bIsUObjectWrapper=False,PinType.bSerializeAsSinglePrecisionFloat=False,PersistentGuid=00000000000000000000000000000000,bHidden=True,bNotConnectable=False,bDefaultValueIsReadOnly=False,bDefaultValueIsIgnored=False,bAdvancedView=False,bOrphanedPin=False,)
End Object
Begin Object Class=/Script/BlueprintGraph.K2Node_CallArrayFunction Name="K2Node_CallArrayFunction_2" ExportPath="/Script/BlueprintGraph.K2Node_CallArrayFunction'/Game/Examples/BallShooter/Blueprints/BallShooterEnvironment.BallShooterEnvironment:EventGraph.K2Node_CallArrayFunction_2'"
FunctionReference=(MemberParent="/Script/CoreUObject.Class'/Script/Engine.KismetArrayLibrary'",MemberName="Array_Clear")
NodePosX=1008
NodePosY=-32
NodeGuid=9D633F144EF3A1EE2C447EB3C19A0EDB
CustomProperties Pin (PinId=BCAB10454C12080B87E2DDBE9C85A6CA,PinName="execute",PinType.PinCategory="exec",PinType.PinSubCategory="",PinType.PinSubCategoryObject=None,PinType.PinSubCategoryMemberReference=(),PinType.PinValueType=(),PinType.ContainerType=None,PinType.bIsReference=False,PinType.bIsConst=False,PinType.bIsWeakPointer=False,PinType.bIsUObjectWrapper=False,PinType.bSerializeAsSinglePrecisionFloat=False,LinkedTo=(K2Node_MacroInstance_7 7214AB94455FE4A30BA3648CB7AE0008,),PersistentGuid=00000000000000000000000000000000,bHidden=False,bNotConnectable=False,bDefaultValueIsReadOnly=False,bDefaultValueIsIgnored=False,bAdvancedView=False,bOrphanedPin=False,)
CustomProperties Pin (PinId=382D9409489DED45B828499BB48774F7,PinName="then",Direction="EGPD_Output",PinType.PinCategory="exec",PinType.PinSubCategory="",PinType.PinSubCategoryObject=None,PinType.PinSubCategoryMemberReference=(),PinType.PinValueType=(),PinType.ContainerType=None,PinType.bIsReference=False,PinType.bIsConst=False,PinType.bIsWeakPointer=False,PinType.bIsUObjectWrapper=False,PinType.bSerializeAsSinglePrecisionFloat=False,PersistentGuid=00000000000000000000000000000000,bHidden=False,bNotConnectable=False,bDefaultValueIsReadOnly=False,bDefaultValueIsIgnored=False,bAdvancedView=False,bOrphanedPin=False,)
CustomProperties Pin (PinId=3FC2EC9E48B8BE180B0C49A5EDDD1FBE,PinName="self",PinFriendlyName=NSLOCTEXT("K2Node", "Target", "Target"),PinType.PinCategory="object",PinType.PinSubCategory="",PinType.PinSubCategoryObject="/Script/CoreUObject.Class'/Script/Engine.KismetArrayLibrary'",PinType.PinSubCategoryMemberReference=(),PinType.PinValueType=(),PinType.ContainerType=None,PinType.bIsReference=False,PinType.bIsConst=False,PinType.bIsWeakPointer=False,PinType.bIsUObjectWrapper=False,PinType.bSerializeAsSinglePrecisionFloat=False,DefaultObject="/Script/Engine.Default__KismetArrayLibrary",PersistentGuid=00000000000000000000000000000000,bHidden=True,bNotConnectable=False,bDefaultValueIsReadOnly=False,bDefaultValueIsIgnored=False,bAdvancedView=False,bOrphanedPin=False,)
CustomProperties Pin (PinId=1403E74B48BF951695F0909D9DAB18D5,PinName="TargetArray",PinType.PinCategory="object",PinType.PinSubCategory="",PinType.PinSubCategoryObject="/Script/Engine.BlueprintGeneratedClass'/Game/Examples/BallShooter/Blueprints/BallShooterTarget.BallShooterTarget_C'",PinType.PinSubCategoryMemberReference=(),PinType.PinValueType=(),PinType.ContainerType=Array,PinType.bIsReference=True,PinType.bIsConst=True,PinType.bIsWeakPointer=False,PinType.bIsUObjectWrapper=False,PinType.bSerializeAsSinglePrecisionFloat=False,LinkedTo=(K2Node_VariableGet_15 B1EB1AC343198D4592DC08B9E5AA62D6,),PersistentGuid=00000000000000000000000000000000,bHidden=False,bNotConnectable=False,bDefaultValueIsReadOnly=False,bDefaultValueIsIgnored=True,bAdvancedView=False,bOrphanedPin=False,)
End Object
Begin Object Class=/Script/BlueprintGraph.K2Node_CallFunction Name="K2Node_CallFunction_2" ExportPath="/Script/BlueprintGraph.K2Node_CallFunction'/Game/Examples/BallShooter/Blueprints/BallShooterEnvironment.BallShooterEnvironment:EventGraph.K2Node_CallFunction_2'"
FunctionReference=(MemberName="saveAgentInitialTransform",MemberGuid=CE89823C443BD4C08282F2A2F1B489CF,bSelfContext=True)
NodePosX=176
NodePosY=-256
NodeGuid=64ADB5554AEE0419CFEA9D9134BFC804
CustomProperties Pin (PinId=C557D6564C2379FD9ACCB3B196D5D0D1,PinName="execute",PinType.PinCategory="exec",PinType.PinSubCategory="",PinType.PinSubCategoryObject=None,PinType.PinSubCategoryMemberReference=(),PinType.PinValueType=(),PinType.ContainerType=None,PinType.bIsReference=False,PinType.bIsConst=False,PinType.bIsWeakPointer=False,PinType.bIsUObjectWrapper=False,PinType.bSerializeAsSinglePrecisionFloat=False,LinkedTo=(K2Node_Event_1 93FCBB848B32403F8C5470369AB70AE8,),PersistentGuid=00000000000000000000000000000000,bHidden=False,bNotConnectable=False,bDefaultValueIsReadOnly=False,bDefaultValueIsIgnored=False,bAdvancedView=False,bOrphanedPin=False,)
CustomProperties Pin (PinId=331664DA4D97758A558053ADB68CFD81,PinName="then",Direction="EGPD_Output",PinType.PinCategory="exec",PinType.PinSubCategory="",PinType.PinSubCategoryObject=None,PinType.PinSubCategoryMemberReference=(),PinType.PinValueType=(),PinType.ContainerType=None,PinType.bIsReference=False,PinType.bIsConst=False,PinType.bIsWeakPointer=False,PinType.bIsUObjectWrapper=False,PinType.bSerializeAsSinglePrecisionFloat=False,PersistentGuid=00000000000000000000000000000000,bHidden=False,bNotConnectable=False,bDefaultValueIsReadOnly=False,bDefaultValueIsIgnored=False,bAdvancedView=False,bOrphanedPin=False,)
CustomProperties Pin (PinId=5985B78F45C362DD688FAD96CF4CC071,PinName="self",PinFriendlyName=NSLOCTEXT("K2Node", "Target", "Target"),PinType.PinCategory="object",PinType.PinSubCategory="self",PinType.PinSubCategoryObject=None,PinType.PinSubCategoryMemberReference=(),PinType.PinValueType=(),PinType.ContainerType=None,PinType.bIsReference=False,PinType.bIsConst=False,PinType.bIsWeakPointer=False,PinType.bIsUObjectWrapper=False,PinType.bSerializeAsSinglePrecisionFloat=False,PersistentGuid=00000000000000000000000000000000,bHidden=False,bNotConnectable=False,bDefaultValueIsReadOnly=False,bDefaultValueIsIgnored=False,bAdvancedView=False,bOrphanedPin=False,)
End Object
Begin Object Class=/Script/BlueprintGraph.K2Node_ExecutionSequence Name="K2Node_ExecutionSequence_0" ExportPath="/Script/BlueprintGraph.K2Node_ExecutionSequence'/Game/Examples/BallShooter/Blueprints/BallShooterEnvironment.BallShooterEnvironment:EventGraph.K2Node_ExecutionSequence_0'"
NodePosX=192
NodePosY=-80
NodeGuid=03EC4BB04EA5CE178A5BC590EB10CFB2
CustomProperties Pin (PinId=C7501A7B411B09CC9D8DADB90B3F4427,PinName="execute",PinType.PinCategory="exec",PinType.PinSubCategory="",PinType.PinSubCategoryObject=None,PinType.PinSubCategoryMemberReference=(),PinType.PinValueType=(),PinType.ContainerType=None,PinType.bIsReference=False,PinType.bIsConst=False,PinType.bIsWeakPointer=False,PinType.bIsUObjectWrapper=False,PinType.bSerializeAsSinglePrecisionFloat=False,LinkedTo=(K2Node_Event_0 1EA7B8E69AFE40E8822017457D5CC944,),PersistentGuid=00000000000000000000000000000000,bHidden=False,bNotConnectable=False,bDefaultValueIsReadOnly=False,bDefaultValueIsIgnored=False,bAdvancedView=False,bOrphanedPin=False,)
CustomProperties Pin (PinId=77AE56844F3CC42F69C2448F892E5A59,PinName="then_0",Direction="EGPD_Output",PinType.PinCategory="exec",PinType.PinSubCategory="",PinType.PinSubCategoryObject=None,PinType.PinSubCategoryMemberReference=(),PinType.PinValueType=(),PinType.ContainerType=None,PinType.bIsReference=False,PinType.bIsConst=False,PinType.bIsWeakPointer=False,PinType.bIsUObjectWrapper=False,PinType.bSerializeAsSinglePrecisionFloat=False,LinkedTo=(K2Node_CallFunction_8 50692E5C4CCF4C8C74C6CD8FAA89B469,),PersistentGuid=00000000000000000000000000000000,bHidden=False,bNotConnectable=False,bDefaultValueIsReadOnly=False,bDefaultValueIsIgnored=False,bAdvancedView=False,bOrphanedPin=False,)
CustomProperties Pin (PinId=92EC79C340C8976E0FA2699CA9F3E1BA,PinName="then_1",Direction="EGPD_Output",PinType.PinCategory="exec",PinType.PinSubCategory="",PinType.PinSubCategoryObject=None,PinType.PinSubCategoryMemberReference=(),PinType.PinValueType=(),PinType.ContainerType=None,PinType.bIsReference=False,PinType.bIsConst=False,PinType.bIsWeakPointer=False,PinType.bIsUObjectWrapper=False,PinType.bSerializeAsSinglePrecisionFloat=False,LinkedTo=(K2Node_CallFunction_0 4AFF807B60D444378311851682FD58B4,),PersistentGuid=00000000000000000000000000000000,bHidden=False,bNotConnectable=False,bDefaultValueIsReadOnly=False,bDefaultValueIsIgnored=False,bAdvancedView=False,bOrphanedPin=False,)
CustomProperties Pin (PinId=A6033DBF4B0DA6360A4B929C86D2CBDA,PinName="then_2",Direction="EGPD_Output",PinType.PinCategory="exec",PinType.PinSubCategory="",PinType.PinSubCategoryObject=None,PinType.PinSubCategoryMemberReference=(),PinType.PinValueType=(),PinType.ContainerType=None,PinType.bIsReference=False,PinType.bIsConst=False,PinType.bIsWeakPointer=False,PinType.bIsUObjectWrapper=False,PinType.bSerializeAsSinglePrecisionFloat=False,LinkedTo=(K2Node_MacroInstance_7 5536843E4753EE6FD85593B0BD3A76E0,),PersistentGuid=00000000000000000000000000000000,bHidden=False,bNotConnectable=False,bDefaultValueIsReadOnly=False,bDefaultValueIsIgnored=False,bAdvancedView=False,bOrphanedPin=False,)
CustomProperties Pin (PinId=586D82B14FBBEABBFE46FA8BD8E941E1,PinName="then_3",Direction="EGPD_Output",PinType.PinCategory="exec",PinType.PinSubCategory="",PinType.PinSubCategoryObject=None,PinType.PinSubCategoryMemberReference=(),PinType.PinValueType=(),PinType.ContainerType=None,PinType.bIsReference=False,PinType.bIsConst=False,PinType.bIsWeakPointer=False,PinType.bIsUObjectWrapper=False,PinType.bSerializeAsSinglePrecisionFloat=False,LinkedTo=(K2Node_MacroInstance_3 8C76343F6FD545A282F3C5F1514570E6,),PersistentGuid=00000000000000000000000000000000,bHidden=False,bNotConnectable=False,bDefaultValueIsReadOnly=False,bDefaultValueIsIgnored=False,bAdvancedView=False,bOrphanedPin=False,)
CustomProperties Pin (PinId=368B98FC4DBCA8C289D0C4BAE3E75FA2,PinName="then_4",Direction="EGPD_Output",PinType.PinCategory="exec",PinType.PinSubCategory="",PinType.PinSubCategoryObject=None,PinType.PinSubCategoryMemberReference=(),PinType.PinValueType=(),PinType.ContainerType=None,PinType.bIsReference=False,PinType.bIsConst=False,PinType.bIsWeakPointer=False,PinType.bIsUObjectWrapper=False,PinType.bSerializeAsSinglePrecisionFloat=False,LinkedTo=(K2Node_CallFunction_9 C9F491DD45ABB93A6A9080A8AD6B0F27,),PersistentGuid=00000000000000000000000000000000,bHidden=False,bNotConnectable=False,bDefaultValueIsReadOnly=False,bDefaultValueIsIgnored=False,bAdvancedView=False,bOrphanedPin=False,)
CustomProperties Pin (PinId=D9E54B3046EE4AD1E1121F87A617686B,PinName="then_5",Direction="EGPD_Output",PinType.PinCategory="exec",PinType.PinSubCategory="",PinType.PinSubCategoryObject=None,PinType.PinSubCategoryMemberReference=(),PinType.PinValueType=(),PinType.ContainerType=None,PinType.bIsReference=False,PinType.bIsConst=False,PinType.bIsWeakPointer=False,PinType.bIsUObjectWrapper=False,PinType.bSerializeAsSinglePrecisionFloat=False,LinkedTo=(K2Node_CallFunction_18 B50535404457332BA3E50BA242B097FF,),PersistentGuid=00000000000000000000000000000000,bHidden=False,bNotConnectable=False,bDefaultValueIsReadOnly=False,bDefaultValueIsIgnored=False,bAdvancedView=False,bOrphanedPin=False,)
End Object
Begin Object Class=/Script/UnrealEd.EdGraphNode_Comment Name="EdGraphNode_Comment_0" ExportPath="/Script/UnrealEd.EdGraphNode_Comment'/Game/Examples/BallShooter/Blueprints/BallShooterEnvironment.BallShooterEnvironment:EventGraph.EdGraphNode_Comment_0'"
bCommentBubbleVisible_InDetailsPanel=False
NodePosX=544
NodePosY=-464
NodeWidth=736
NodeHeight=224
bCommentBubblePinned=False
bCommentBubbleVisible=False
NodeComment="Cleanup Any Leftover Projectiles"
NodeGuid=0F463C17467EB71E0BF6ED986CEE22CA
End Object
Begin Object Class=/Script/UnrealEd.EdGraphNode_Comment Name="EdGraphNode_Comment_1" ExportPath="/Script/UnrealEd.EdGraphNode_Comment'/Game/Examples/BallShooter/Blueprints/BallShooterEnvironment.BallShooterEnvironment:EventGraph.EdGraphNode_Comment_1'"
bCommentBubbleVisible_InDetailsPanel=False
NodePosX=544
NodePosY=-240
NodeWidth=736
NodeHeight=304
bCommentBubblePinned=False
bCommentBubbleVisible=False
NodeComment="Cleanup Any Leftover Targets"
NodeGuid=641C11BA477376101C87FDB654F42BBA
End Object
Begin Object Class=/Script/UnrealEd.EdGraphNode_Comment Name="EdGraphNode_Comment_2" ExportPath="/Script/UnrealEd.EdGraphNode_Comment'/Game/Examples/BallShooter/Blueprints/BallShooterEnvironment.BallShooterEnvironment:EventGraph.EdGraphNode_Comment_2'"
bCommentBubbleVisible_InDetailsPanel=False
NodePosX=544
NodePosY=-656
NodeWidth=736
NodeHeight=192
bCommentBubblePinned=False
bCommentBubbleVisible=False
NodeComment="Reset The Starting Location/Angle on the Shooter"
NodeGuid=B7E0D26C48E63CE6910F1FA27F1365FE
End Object
Begin Object Class=/Script/BlueprintGraph.K2Node_CallFunction Name="K2Node_CallFunction_9" ExportPath="/Script/BlueprintGraph.K2Node_CallFunction'/Game/Examples/BallShooter/Blueprints/BallShooterEnvironment.BallShooterEnvironment:EventGraph.K2Node_CallFunction_9'"
FunctionReference=(MemberName="Set Target Hitpoints",MemberGuid=7297BF074D3EBCB5F14EF3994B2F9D03,bSelfContext=True)
NodePosX=528
NodePosY=224
NodeGuid=032DE522401ACDCE100696A684D94D06
CustomProperties Pin (PinId=C9F491DD45ABB93A6A9080A8AD6B0F27,PinName="execute",PinType.PinCategory="exec",PinType.PinSubCategory="",PinType.PinSubCategoryObject=None,PinType.PinSubCategoryMemberReference=(),PinType.PinValueType=(),PinType.ContainerType=None,PinType.bIsReference=False,PinType.bIsConst=False,PinType.bIsWeakPointer=False,PinType.bIsUObjectWrapper=False,PinType.bSerializeAsSinglePrecisionFloat=False,LinkedTo=(K2Node_ExecutionSequence_0 368B98FC4DBCA8C289D0C4BAE3E75FA2,),PersistentGuid=00000000000000000000000000000000,bHidden=False,bNotConnectable=False,bDefaultValueIsReadOnly=False,bDefaultValueIsIgnored=False,bAdvancedView=False,bOrphanedPin=False,)
CustomProperties Pin (PinId=65320F754B430969AE740AA2847ED211,PinName="then",Direction="EGPD_Output",PinType.PinCategory="exec",PinType.PinSubCategory="",PinType.PinSubCategoryObject=None,PinType.PinSubCategoryMemberReference=(),PinType.PinValueType=(),PinType.ContainerType=None,PinType.bIsReference=False,PinType.bIsConst=False,PinType.bIsWeakPointer=False,PinType.bIsUObjectWrapper=False,PinType.bSerializeAsSinglePrecisionFloat=False,PersistentGuid=00000000000000000000000000000000,bHidden=False,bNotConnectable=False,bDefaultValueIsReadOnly=False,bDefaultValueIsIgnored=False,bAdvancedView=False,bOrphanedPin=False,)
CustomProperties Pin (PinId=B935A9A94125558D62E674AC759473A6,PinName="self",PinFriendlyName=NSLOCTEXT("K2Node", "Target", "Target"),PinType.PinCategory="object",PinType.PinSubCategory="self",PinType.PinSubCategoryObject=None,PinType.PinSubCategoryMemberReference=(),PinType.PinValueType=(),PinType.ContainerType=None,PinType.bIsReference=False,PinType.bIsConst=False,PinType.bIsWeakPointer=False,PinType.bIsUObjectWrapper=False,PinType.bSerializeAsSinglePrecisionFloat=False,PersistentGuid=00000000000000000000000000000000,bHidden=False,bNotConnectable=False,bDefaultValueIsReadOnly=False,bDefaultValueIsIgnored=False,bAdvancedView=False,bOrphanedPin=False,)
End Object
Begin Object Class=/Script/BlueprintGraph.K2Node_VariableGet Name="K2Node_VariableGet_6" ExportPath="/Script/BlueprintGraph.K2Node_VariableGet'/Game/Examples/BallShooter/Blueprints/BallShooterEnvironment.BallShooterEnvironment:EventGraph.K2Node_VariableGet_6'"
VariableReference=(MemberName="numberOfTargets",MemberGuid=C389B10A87C14C3E88F55C981AAB636D,bSelfContext=True)
NodePosX=432
NodePosY=171
NodeGuid=E0B0632F49E03EFE47A92ABF6F9D8904
CustomProperties Pin (PinId=DE0A1CDDE641413FB9C82164198CB1EB,PinName="numberOfTargets",Direction="EGPD_Output",PinType.PinCategory="int",PinType.PinSubCategory="",PinType.PinSubCategoryObject=None,PinType.PinSubCategoryMemberReference=(),PinType.PinValueType=(),PinType.ContainerType=None,PinType.bIsReference=False,PinType.bIsConst=False,PinType.bIsWeakPointer=False,PinType.bIsUObjectWrapper=False,PinType.bSerializeAsSinglePrecisionFloat=False,DefaultValue="0",AutogeneratedDefaultValue="0",LinkedTo=(K2Node_MacroInstance_3 518350C30BD244AEA70C176DA6CB96C3,),PersistentGuid=00000000000000000000000000000000,bHidden=False,bNotConnectable=False,bDefaultValueIsReadOnly=False,bDefaultValueIsIgnored=False,bAdvancedView=False,bOrphanedPin=False,)
CustomProperties Pin (PinId=DA7187297F744B51A27D6AF22DF35F2E,PinName="self",PinFriendlyName=NSLOCTEXT("K2Node", "Target", "Target"),PinType.PinCategory="object",PinType.PinSubCategory="",PinType.PinSubCategoryObject="/Script/Engine.BlueprintGeneratedClass'/Game/Examples/BallShooter/Blueprints/BallShooterEnvironment.BallShooterEnvironment_C'",PinType.PinSubCategoryMemberReference=(),PinType.PinValueType=(),PinType.ContainerType=None,PinType.bIsReference=False,PinType.bIsConst=False,PinType.bIsWeakPointer=False,PinType.bIsUObjectWrapper=False,PinType.bSerializeAsSinglePrecisionFloat=False,PersistentGuid=00000000000000000000000000000000,bHidden=True,bNotConnectable=False,bDefaultValueIsReadOnly=False,bDefaultValueIsIgnored=False,bAdvancedView=False,bOrphanedPin=False,)
End Object
Begin Object Class=/Script/BlueprintGraph.K2Node_MacroInstance Name="K2Node_MacroInstance_3" ExportPath="/Script/BlueprintGraph.K2Node_MacroInstance'/Game/Examples/BallShooter/Blueprints/BallShooterEnvironment.BallShooterEnvironment:EventGraph.K2Node_MacroInstance_3'"
MacroGraphReference=(MacroGraph="/Script/Engine.EdGraph'/Engine/EditorBlueprintResources/StandardMacros.StandardMacros:ForLoop'",GraphBlueprint="/Script/Engine.Blueprint'/Engine/EditorBlueprintResources/StandardMacros.StandardMacros'",GraphGuid=55C904AF4B45FE1761FB55A8DB9FB801)
NodePosX=608
NodePosY=80
NodeGuid=3BA92F96409C3CE05D86059F9CC4EAE4
CustomProperties Pin (PinId=8C76343F6FD545A282F3C5F1514570E6,PinName="execute",PinType.PinCategory="exec",PinType.PinSubCategory="",PinType.PinSubCategoryObject=None,PinType.PinSubCategoryMemberReference=(),PinType.PinValueType=(),PinType.ContainerType=None,PinType.bIsReference=False,PinType.bIsConst=False,PinType.bIsWeakPointer=False,PinType.bIsUObjectWrapper=False,PinType.bSerializeAsSinglePrecisionFloat=False,LinkedTo=(K2Node_ExecutionSequence_0 586D82B14FBBEABBFE46FA8BD8E941E1,),PersistentGuid=00000000000000000000000000000000,bHidden=False,bNotConnectable=False,bDefaultValueIsReadOnly=False,bDefaultValueIsIgnored=False,bAdvancedView=False,bOrphanedPin=False,)
CustomProperties Pin (PinId=A32FDD9829264848B66AF3611F65616B,PinName="FirstIndex",PinType.PinCategory="int",PinType.PinSubCategory="",PinType.PinSubCategoryObject=None,PinType.PinSubCategoryMemberReference=(),PinType.PinValueType=(),PinType.ContainerType=None,PinType.bIsReference=False,PinType.bIsConst=False,PinType.bIsWeakPointer=False,PinType.bIsUObjectWrapper=False,PinType.bSerializeAsSinglePrecisionFloat=False,DefaultValue="1",PersistentGuid=00000000000000000000000000000000,bHidden=False,bNotConnectable=False,bDefaultValueIsReadOnly=False,bDefaultValueIsIgnored=False,bAdvancedView=False,bOrphanedPin=False,)
CustomProperties Pin (PinId=518350C30BD244AEA70C176DA6CB96C3,PinName="LastIndex",PinType.PinCategory="int",PinType.PinSubCategory="",PinType.PinSubCategoryObject=None,PinType.PinSubCategoryMemberReference=(),PinType.PinValueType=(),PinType.ContainerType=None,PinType.bIsReference=False,PinType.bIsConst=False,PinType.bIsWeakPointer=False,PinType.bIsUObjectWrapper=False,PinType.bSerializeAsSinglePrecisionFloat=False,LinkedTo=(K2Node_VariableGet_6 DE0A1CDDE641413FB9C82164198CB1EB,),PersistentGuid=00000000000000000000000000000000,bHidden=False,bNotConnectable=False,bDefaultValueIsReadOnly=False,bDefaultValueIsIgnored=False,bAdvancedView=False,bOrphanedPin=False,)
CustomProperties Pin (PinId=85DDCD0D6F44413AAD03AA55D2C5CA0D,PinName="LoopBody",Direction="EGPD_Output",PinType.PinCategory="exec",PinType.PinSubCategory="",PinType.PinSubCategoryObject=None,PinType.PinSubCategoryMemberReference=(),PinType.PinValueType=(),PinType.ContainerType=None,PinType.bIsReference=False,PinType.bIsConst=False,PinType.bIsWeakPointer=False,PinType.bIsUObjectWrapper=False,PinType.bSerializeAsSinglePrecisionFloat=False,LinkedTo=(K2Node_CallFunction_29 7DCC2B70406E559872F2F1B8A69F1F82,),PersistentGuid=00000000000000000000000000000000,bHidden=False,bNotConnectable=False,bDefaultValueIsReadOnly=False,bDefaultValueIsIgnored=False,bAdvancedView=False,bOrphanedPin=False,)
CustomProperties Pin (PinId=F70FCDD2F0ED4CBDB8099220862590E0,PinName="Index",Direction="EGPD_Output",PinType.PinCategory="int",PinType.PinSubCategory="",PinType.PinSubCategoryObject=None,PinType.PinSubCategoryMemberReference=(),PinType.PinValueType=(),PinType.ContainerType=None,PinType.bIsReference=False,PinType.bIsConst=False,PinType.bIsWeakPointer=False,PinType.bIsUObjectWrapper=False,PinType.bSerializeAsSinglePrecisionFloat=False,PersistentGuid=00000000000000000000000000000000,bHidden=False,bNotConnectable=False,bDefaultValueIsReadOnly=False,bDefaultValueIsIgnored=False,bAdvancedView=False,bOrphanedPin=False,)
CustomProperties Pin (PinId=574C539F691A4D80BF034A8673C789F6,PinName="Completed",Direction="EGPD_Output",PinType.PinCategory="exec",PinType.PinSubCategory="",PinType.PinSubCategoryObject=None,PinType.PinSubCategoryMemberReference=(),PinType.PinValueType=(),PinType.ContainerType=None,PinType.bIsReference=False,PinType.bIsConst=False,PinType.bIsWeakPointer=False,PinType.bIsUObjectWrapper=False,PinType.bSerializeAsSinglePrecisionFloat=False,PersistentGuid=00000000000000000000000000000000,bHidden=False,bNotConnectable=False,bDefaultValueIsReadOnly=False,bDefaultValueIsIgnored=False,bAdvancedView=False,bOrphanedPin=False,)
End Object
Begin Object Class=/Script/BlueprintGraph.K2Node_CallFunction Name="K2Node_CallFunction_18" ExportPath="/Script/BlueprintGraph.K2Node_CallFunction'/Game/Examples/BallShooter/Blueprints/BallShooterEnvironment.BallShooterEnvironment:EventGraph.K2Node_CallFunction_18'"
FunctionReference=(MemberName="Set Trainer Properties",MemberGuid=2DED793D4D1832E32B73BC8C1ED00998,bSelfContext=True)
NodePosX=528
NodePosY=352
NodeGuid=5F4BF3074A726D74040671B02553FF32
CustomProperties Pin (PinId=B50535404457332BA3E50BA242B097FF,PinName="execute",PinToolTip="\nExec",PinType.PinCategory="exec",PinType.PinSubCategory="",PinType.PinSubCategoryObject=None,PinType.PinSubCategoryMemberReference=(),PinType.PinValueType=(),PinType.ContainerType=None,PinType.bIsReference=False,PinType.bIsConst=False,PinType.bIsWeakPointer=False,PinType.bIsUObjectWrapper=False,PinType.bSerializeAsSinglePrecisionFloat=False,LinkedTo=(K2Node_ExecutionSequence_0 D9E54B3046EE4AD1E1121F87A617686B,),PersistentGuid=00000000000000000000000000000000,bHidden=False,bNotConnectable=False,bDefaultValueIsReadOnly=False,bDefaultValueIsIgnored=False,bAdvancedView=False,bOrphanedPin=False,)
CustomProperties Pin (PinId=DCE188C4496D96FEDB45209F6B06E0AD,PinName="then",PinToolTip="\nExec",Direction="EGPD_Output",PinType.PinCategory="exec",PinType.PinSubCategory="",PinType.PinSubCategoryObject=None,PinType.PinSubCategoryMemberReference=(),PinType.PinValueType=(),PinType.ContainerType=None,PinType.bIsReference=False,PinType.bIsConst=False,PinType.bIsWeakPointer=False,PinType.bIsUObjectWrapper=False,PinType.bSerializeAsSinglePrecisionFloat=False,PersistentGuid=00000000000000000000000000000000,bHidden=False,bNotConnectable=False,bDefaultValueIsReadOnly=False,bDefaultValueIsIgnored=False,bAdvancedView=False,bOrphanedPin=False,)
CustomProperties Pin (PinId=7D37D52445C59226691420870994B166,PinName="self",PinFriendlyName=NSLOCTEXT("K2Node", "Target", "Target"),PinToolTip="Target\nSelf Object Reference",PinType.PinCategory="object",PinType.PinSubCategory="self",PinType.PinSubCategoryObject=None,PinType.PinSubCategoryMemberReference=(),PinType.PinValueType=(),PinType.ContainerType=None,PinType.bIsReference=False,PinType.bIsConst=False,PinType.bIsWeakPointer=False,PinType.bIsUObjectWrapper=False,PinType.bSerializeAsSinglePrecisionFloat=False,PersistentGuid=00000000000000000000000000000000,bHidden=False,bNotConnectable=False,bDefaultValueIsReadOnly=False,bDefaultValueIsIgnored=False,bAdvancedView=False,bOrphanedPin=False,)
End Object
Begin Object Class=/Script/BlueprintGraph.K2Node_CallFunction Name="K2Node_CallFunction_29" ExportPath="/Script/BlueprintGraph.K2Node_CallFunction'/Game/Examples/BallShooter/Blueprints/BallShooterEnvironment.BallShooterEnvironment:EventGraph.K2Node_CallFunction_29'"
FunctionReference=(MemberName="Spawn Target",MemberGuid=1C43556E4D9D775530F1C3A68D03054D,bSelfContext=True)
NodePosX=864
NodePosY=80
NodeGuid=E5FF5BCD45645F5E54BF81A142BEC7C6
CustomProperties Pin (PinId=7DCC2B70406E559872F2F1B8A69F1F82,PinName="execute",PinType.PinCategory="exec",PinType.PinSubCategory="",PinType.PinSubCategoryObject=None,PinType.PinSubCategoryMemberReference=(),PinType.PinValueType=(),PinType.ContainerType=None,PinType.bIsReference=False,PinType.bIsConst=False,PinType.bIsWeakPointer=False,PinType.bIsUObjectWrapper=False,PinType.bSerializeAsSinglePrecisionFloat=False,LinkedTo=(K2Node_MacroInstance_3 85DDCD0D6F44413AAD03AA55D2C5CA0D,),PersistentGuid=00000000000000000000000000000000,bHidden=False,bNotConnectable=False,bDefaultValueIsReadOnly=False,bDefaultValueIsIgnored=False,bAdvancedView=False,bOrphanedPin=False,)
CustomProperties Pin (PinId=AB7711C6470682E58513729E280C1C31,PinName="then",Direction="EGPD_Output",PinType.PinCategory="exec",PinType.PinSubCategory="",PinType.PinSubCategoryObject=None,PinType.PinSubCategoryMemberReference=(),PinType.PinValueType=(),PinType.ContainerType=None,PinType.bIsReference=False,PinType.bIsConst=False,PinType.bIsWeakPointer=False,PinType.bIsUObjectWrapper=False,PinType.bSerializeAsSinglePrecisionFloat=False,PersistentGuid=00000000000000000000000000000000,bHidden=False,bNotConnectable=False,bDefaultValueIsReadOnly=False,bDefaultValueIsIgnored=False,bAdvancedView=False,bOrphanedPin=False,)
CustomProperties Pin (PinId=32A35ED04B81C14F7485B4B46A7A9EF5,PinName="self",PinFriendlyName=NSLOCTEXT("K2Node", "Target", "Target"),PinType.PinCategory="object",PinType.PinSubCategory="self",PinType.PinSubCategoryObject=None,PinType.PinSubCategoryMemberReference=(),PinType.PinValueType=(),PinType.ContainerType=None,PinType.bIsReference=False,PinType.bIsConst=False,PinType.bIsWeakPointer=False,PinType.bIsUObjectWrapper=False,PinType.bSerializeAsSinglePrecisionFloat=False,PersistentGuid=00000000000000000000000000000000,bHidden=False,bNotConnectable=False,bDefaultValueIsReadOnly=False,bDefaultValueIsIgnored=False,bAdvancedView=False,bOrphanedPin=False,)
End Object
Begin Object Class=/Script/BlueprintGraph.K2Node_CallFunction Name="K2Node_CallFunction_31" ExportPath="/Script/BlueprintGraph.K2Node_CallFunction'/Game/Examples/BallShooter/Blueprints/BallShooterEnvironment.BallShooterEnvironment:EventGraph.K2Node_CallFunction_31'"
FunctionReference=(MemberName="Manually Cleanup Target",MemberGuid=45FAB2D442008EAD87BCE98977451CF0,bSelfContext=True)
NodePosX=992
NodePosY=-192
NodeGuid=42404CA74BDF9B77DF3BD59827731B09
CustomProperties Pin (PinId=4BE864D347EC5FD0AC1D37B3C8994BC7,PinName="execute",PinType.PinCategory="exec",PinType.PinSubCategory="",PinType.PinSubCategoryObject=None,PinType.PinSubCategoryMemberReference=(),PinType.PinValueType=(),PinType.ContainerType=None,PinType.bIsReference=False,PinType.bIsConst=False,PinType.bIsWeakPointer=False,PinType.bIsUObjectWrapper=False,PinType.bSerializeAsSinglePrecisionFloat=False,LinkedTo=(K2Node_MacroInstance_7 48717B0F49DAAF4A1256E7820DE20DCF,),PersistentGuid=00000000000000000000000000000000,bHidden=False,bNotConnectable=False,bDefaultValueIsReadOnly=False,bDefaultValueIsIgnored=False,bAdvancedView=False,bOrphanedPin=False,)
CustomProperties Pin (PinId=34469B954DB1B452F4E7D59662076701,PinName="then",Direction="EGPD_Output",PinType.PinCategory="exec",PinType.PinSubCategory="",PinType.PinSubCategoryObject=None,PinType.PinSubCategoryMemberReference=(),PinType.PinValueType=(),PinType.ContainerType=None,PinType.bIsReference=False,PinType.bIsConst=False,PinType.bIsWeakPointer=False,PinType.bIsUObjectWrapper=False,PinType.bSerializeAsSinglePrecisionFloat=False,PersistentGuid=00000000000000000000000000000000,bHidden=False,bNotConnectable=False,bDefaultValueIsReadOnly=False,bDefaultValueIsIgnored=False,bAdvancedView=False,bOrphanedPin=False,)
CustomProperties Pin (PinId=C87D0A9D410E433CA0F7118F96DA6E30,PinName="self",PinFriendlyName=NSLOCTEXT("K2Node", "Target", "Target"),PinType.PinCategory="object",PinType.PinSubCategory="self",PinType.PinSubCategoryObject=None,PinType.PinSubCategoryMemberReference=(),PinType.PinValueType=(),PinType.ContainerType=None,PinType.bIsReference=False,PinType.bIsConst=False,PinType.bIsWeakPointer=False,PinType.bIsUObjectWrapper=False,PinType.bSerializeAsSinglePrecisionFloat=False,PersistentGuid=00000000000000000000000000000000,bHidden=False,bNotConnectable=False,bDefaultValueIsReadOnly=False,bDefaultValueIsIgnored=False,bAdvancedView=False,bOrphanedPin=False,)
CustomProperties Pin (PinId=A1DB7CE1460EFF536070A8A67A29D614,PinName="Target",PinType.PinCategory="object",PinType.PinSubCategory="",PinType.PinSubCategoryObject="/Script/CoreUObject.Class'/Script/Engine.Actor'",PinType.PinSubCategoryMemberReference=(),PinType.PinValueType=(),PinType.ContainerType=None,PinType.bIsReference=False,PinType.bIsConst=False,PinType.bIsWeakPointer=False,PinType.bIsUObjectWrapper=False,PinType.bSerializeAsSinglePrecisionFloat=False,LinkedTo=(K2Node_MacroInstance_7 9D6FD4DC41B83D3447A291A0563B0645,),PersistentGuid=00000000000000000000000000000000,bHidden=False,bNotConnectable=False,bDefaultValueIsReadOnly=False,bDefaultValueIsIgnored=False,bAdvancedView=False,bOrphanedPin=False,)
End Object
Begin Object Class=/Script/BlueprintGraph.K2Node_MacroInstance Name="K2Node_MacroInstance_7" ExportPath="/Script/BlueprintGraph.K2Node_MacroInstance'/Game/Examples/BallShooter/Blueprints/BallShooterEnvironment.BallShooterEnvironment:EventGraph.K2Node_MacroInstance_7'"
MacroGraphReference=(MacroGraph="/Script/Engine.EdGraph'/Engine/EditorBlueprintResources/StandardMacros.StandardMacros:ForEachLoop'",GraphBlueprint="/Script/Engine.Blueprint'/Engine/EditorBlueprintResources/StandardMacros.StandardMacros'",GraphGuid=99DBFD5540A796041F72A5A9DA655026)
ResolvedWildcardType=(PinCategory="object",PinSubCategoryObject="/Script/Engine.BlueprintGeneratedClass'/Game/Examples/BallShooter/Blueprints/BallShooterTarget.BallShooterTarget_C'",ContainerType=Array)
NodePosX=720
NodePosY=-176
NodeGuid=7F6DFBAB411534988A085D965D2BF0D8
CustomProperties Pin (PinId=5536843E4753EE6FD85593B0BD3A76E0,PinName="Exec",PinType.PinCategory="exec",PinType.PinSubCategory="",PinType.PinSubCategoryObject=None,PinType.PinSubCategoryMemberReference=(),PinType.PinValueType=(),PinType.ContainerType=None,PinType.bIsReference=False,PinType.bIsConst=False,PinType.bIsWeakPointer=False,PinType.bIsUObjectWrapper=False,PinType.bSerializeAsSinglePrecisionFloat=False,LinkedTo=(K2Node_ExecutionSequence_0 A6033DBF4B0DA6360A4B929C86D2CBDA,),PersistentGuid=00000000000000000000000000000000,bHidden=False,bNotConnectable=False,bDefaultValueIsReadOnly=False,bDefaultValueIsIgnored=False,bAdvancedView=False,bOrphanedPin=False,)
CustomProperties Pin (PinId=082677BC4DDCEE620059B1838AE03D7D,PinName="Array",PinType.PinCategory="object",PinType.PinSubCategory="",PinType.PinSubCategoryObject="/Script/Engine.BlueprintGeneratedClass'/Game/Examples/BallShooter/Blueprints/BallShooterTarget.BallShooterTarget_C'",PinType.PinSubCategoryMemberReference=(),PinType.PinValueType=(),PinType.ContainerType=Array,PinType.bIsReference=False,PinType.bIsConst=False,PinType.bIsWeakPointer=False,PinType.bIsUObjectWrapper=False,PinType.bSerializeAsSinglePrecisionFloat=False,LinkedTo=(K2Node_VariableGet_14 51028C9E40D1EE803F062582BDB6B546,),PersistentGuid=00000000000000000000000000000000,bHidden=False,bNotConnectable=False,bDefaultValueIsReadOnly=False,bDefaultValueIsIgnored=False,bAdvancedView=False,bOrphanedPin=False,)
CustomProperties Pin (PinId=48717B0F49DAAF4A1256E7820DE20DCF,PinName="LoopBody",Direction="EGPD_Output",PinType.PinCategory="exec",PinType.PinSubCategory="",PinType.PinSubCategoryObject=None,PinType.PinSubCategoryMemberReference=(),PinType.PinValueType=(),PinType.ContainerType=None,PinType.bIsReference=False,PinType.bIsConst=False,PinType.bIsWeakPointer=False,PinType.bIsUObjectWrapper=False,PinType.bSerializeAsSinglePrecisionFloat=False,LinkedTo=(K2Node_CallFunction_31 4BE864D347EC5FD0AC1D37B3C8994BC7,),PersistentGuid=00000000000000000000000000000000,bHidden=False,bNotConnectable=False,bDefaultValueIsReadOnly=False,bDefaultValueIsIgnored=False,bAdvancedView=False,bOrphanedPin=False,)
CustomProperties Pin (PinId=9D6FD4DC41B83D3447A291A0563B0645,PinName="Array Element",Direction="EGPD_Output",PinType.PinCategory="object",PinType.PinSubCategory="",PinType.PinSubCategoryObject="/Script/Engine.BlueprintGeneratedClass'/Game/Examples/BallShooter/Blueprints/BallShooterTarget.BallShooterTarget_C'",PinType.PinSubCategoryMemberReference=(),PinType.PinValueType=(),PinType.ContainerType=None,PinType.bIsReference=False,PinType.bIsConst=False,PinType.bIsWeakPointer=False,PinType.bIsUObjectWrapper=False,PinType.bSerializeAsSinglePrecisionFloat=False,LinkedTo=(K2Node_CallFunction_31 A1DB7CE1460EFF536070A8A67A29D614,),PersistentGuid=00000000000000000000000000000000,bHidden=False,bNotConnectable=False,bDefaultValueIsReadOnly=False,bDefaultValueIsIgnored=False,bAdvancedView=False,bOrphanedPin=False,)
CustomProperties Pin (PinId=6B1E64234143BCA3285193901D270F43,PinName="Array Index",Direction="EGPD_Output",PinType.PinCategory="int",PinType.PinSubCategory="",PinType.PinSubCategoryObject=None,PinType.PinSubCategoryMemberReference=(),PinType.PinValueType=(),PinType.ContainerType=None,PinType.bIsReference=False,PinType.bIsConst=False,PinType.bIsWeakPointer=False,PinType.bIsUObjectWrapper=False,PinType.bSerializeAsSinglePrecisionFloat=False,PersistentGuid=00000000000000000000000000000000,bHidden=False,bNotConnectable=False,bDefaultValueIsReadOnly=False,bDefaultValueIsIgnored=False,bAdvancedView=False,bOrphanedPin=False,)
CustomProperties Pin (PinId=7214AB94455FE4A30BA3648CB7AE0008,PinName="Completed",Direction="EGPD_Output",PinType.PinCategory="exec",PinType.PinSubCategory="",PinType.PinSubCategoryObject=None,PinType.PinSubCategoryMemberReference=(),PinType.PinValueType=(),PinType.ContainerType=None,PinType.bIsReference=False,PinType.bIsConst=False,PinType.bIsWeakPointer=False,PinType.bIsUObjectWrapper=False,PinType.bSerializeAsSinglePrecisionFloat=False,LinkedTo=(K2Node_CallArrayFunction_2 BCAB10454C12080B87E2DDBE9C85A6CA,),PersistentGuid=00000000000000000000000000000000,bHidden=False,bNotConnectable=False,bDefaultValueIsReadOnly=False,bDefaultValueIsIgnored=False,bAdvancedView=False,bOrphanedPin=False,)
End Object
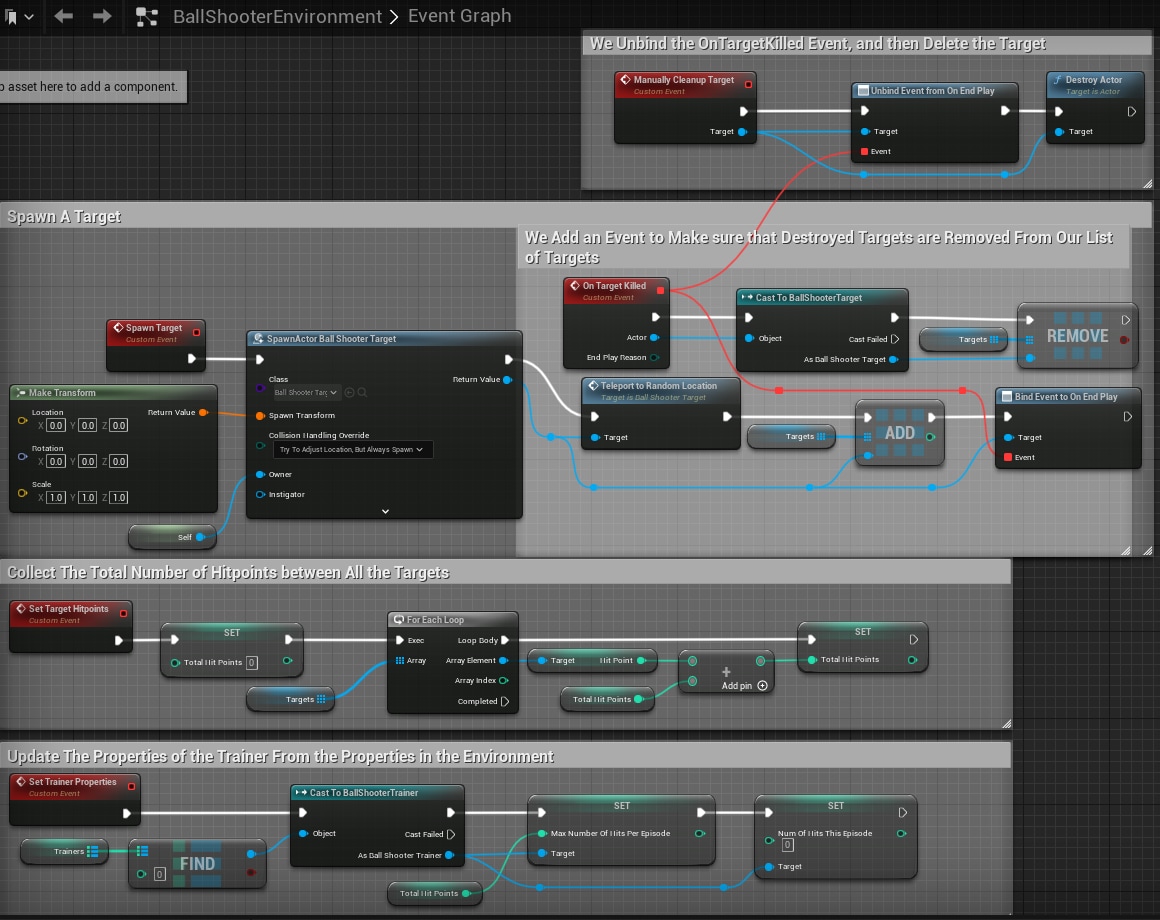
Begin Object Class=/Script/UnrealEd.EdGraphNode_Comment Name="EdGraphNode_Comment_4" ExportPath="/Script/UnrealEd.EdGraphNode_Comment'/Game/Examples/BallShooter/Blueprints/BallShooterEnvironment.BallShooterEnvironment:EventGraph.EdGraphNode_Comment_4'"
bCommentBubbleVisible_InDetailsPanel=False
NodePosX=1040
NodePosY=928
NodeWidth=912
NodeHeight=496
bCommentBubblePinned=False
bCommentBubbleVisible=False
NodeComment="We Add an Event to Make sure that Destroyed Targets are Removed From Our List of Targets"
NodeGuid=50F76CC5448383C3DDDF39826BC5AE79
End Object
Begin Object Class=/Script/UnrealEd.EdGraphNode_Comment Name="EdGraphNode_Comment_6" ExportPath="/Script/UnrealEd.EdGraphNode_Comment'/Game/Examples/BallShooter/Blueprints/BallShooterEnvironment.BallShooterEnvironment:EventGraph.EdGraphNode_Comment_6'"
bCommentBubbleVisible_InDetailsPanel=False
NodePosX=1136
NodePosY=640
NodeWidth=848
NodeHeight=240
bCommentBubblePinned=False
bCommentBubbleVisible=False
NodeComment="We Unbind the OnTargetKilled Event, and then Delete the Target"
NodeGuid=70C546E143514B9B78EB83A80EB374A5
End Object
Begin Object Class=/Script/BlueprintGraph.K2Node_CustomEvent Name="K2Node_CustomEvent_4" ExportPath="/Script/BlueprintGraph.K2Node_CustomEvent'/Game/Examples/BallShooter/Blueprints/BallShooterEnvironment.BallShooterEnvironment:EventGraph.K2Node_CustomEvent_4'"
CustomFunctionName="Spawn Target"
NodePosX=432
NodePosY=1071
NodeGuid=1C43556E4D9D775530F1C3A68D03054D
CustomProperties Pin (PinId=3F7A14BC46A974D1F27B73BF1B3F4E84,PinName="OutputDelegate",Direction="EGPD_Output",PinType.PinCategory="delegate",PinType.PinSubCategory="",PinType.PinSubCategoryObject=None,PinType.PinSubCategoryMemberReference=(MemberParent="/Script/Engine.BlueprintGeneratedClass'/Game/Examples/BallShooter/Blueprints/BallShooterEnvironment.BallShooterEnvironment_C'",MemberName="Spawn Target",MemberGuid=1C43556E4D9D775530F1C3A68D03054D),PinType.PinValueType=(),PinType.ContainerType=None,PinType.bIsReference=False,PinType.bIsConst=False,PinType.bIsWeakPointer=False,PinType.bIsUObjectWrapper=False,PinType.bSerializeAsSinglePrecisionFloat=False,PersistentGuid=00000000000000000000000000000000,bHidden=False,bNotConnectable=False,bDefaultValueIsReadOnly=False,bDefaultValueIsIgnored=False,bAdvancedView=False,bOrphanedPin=False,)
CustomProperties Pin (PinId=7313E2134DE4A0F90CCEF3AAA532E8A1,PinName="then",Direction="EGPD_Output",PinType.PinCategory="exec",PinType.PinSubCategory="",PinType.PinSubCategoryObject=None,PinType.PinSubCategoryMemberReference=(),PinType.PinValueType=(),PinType.ContainerType=None,PinType.bIsReference=False,PinType.bIsConst=False,PinType.bIsWeakPointer=False,PinType.bIsUObjectWrapper=False,PinType.bSerializeAsSinglePrecisionFloat=False,LinkedTo=(K2Node_SpawnActorFromClass_0 E0E89CEC374E4F5BA4048F9FB3D78635,),PersistentGuid=00000000000000000000000000000000,bHidden=False,bNotConnectable=False,bDefaultValueIsReadOnly=False,bDefaultValueIsIgnored=False,bAdvancedView=False,bOrphanedPin=False,)
End Object
Begin Object Class=/Script/BlueprintGraph.K2Node_SpawnActorFromClass Name="K2Node_SpawnActorFromClass_0" ExportPath="/Script/BlueprintGraph.K2Node_SpawnActorFromClass'/Game/Examples/BallShooter/Blueprints/BallShooterEnvironment.BallShooterEnvironment:EventGraph.K2Node_SpawnActorFromClass_0'"
NodePosX=640
NodePosY=1088
AdvancedPinDisplay=Hidden
ErrorType=1
NodeGuid=5152C89245817019618171A8D1DBF14E
CustomProperties Pin (PinId=E0E89CEC374E4F5BA4048F9FB3D78635,PinName="execute",PinType.PinCategory="exec",PinType.PinSubCategory="",PinType.PinSubCategoryObject=None,PinType.PinSubCategoryMemberReference=(),PinType.PinValueType=(),PinType.ContainerType=None,PinType.bIsReference=False,PinType.bIsConst=False,PinType.bIsWeakPointer=False,PinType.bIsUObjectWrapper=False,PinType.bSerializeAsSinglePrecisionFloat=False,LinkedTo=(K2Node_CustomEvent_4 7313E2134DE4A0F90CCEF3AAA532E8A1,),PersistentGuid=00000000000000000000000000000000,bHidden=False,bNotConnectable=False,bDefaultValueIsReadOnly=False,bDefaultValueIsIgnored=False,bAdvancedView=False,bOrphanedPin=False,)
CustomProperties Pin (PinId=1F9464B23256467B9C12DA97249D6EF3,PinName="then",Direction="EGPD_Output",PinType.PinCategory="exec",PinType.PinSubCategory="",PinType.PinSubCategoryObject=None,PinType.PinSubCategoryMemberReference=(),PinType.PinValueType=(),PinType.ContainerType=None,PinType.bIsReference=False,PinType.bIsConst=False,PinType.bIsWeakPointer=False,PinType.bIsUObjectWrapper=False,PinType.bSerializeAsSinglePrecisionFloat=False,LinkedTo=(K2Node_CallFunction_10 DFBE199D4B4DCF3485C95CA4DCE81924,),PersistentGuid=00000000000000000000000000000000,bHidden=False,bNotConnectable=False,bDefaultValueIsReadOnly=False,bDefaultValueIsIgnored=False,bAdvancedView=False,bOrphanedPin=False,)
CustomProperties Pin (PinId=E31B095E37C74F16AFDEA2CD3D3EBB4D,PinName="Class",PinType.PinCategory="class",PinType.PinSubCategory="",PinType.PinSubCategoryObject="/Script/CoreUObject.Class'/Script/Engine.Actor'",PinType.PinSubCategoryMemberReference=(),PinType.PinValueType=(),PinType.ContainerType=None,PinType.bIsReference=False,PinType.bIsConst=False,PinType.bIsWeakPointer=False,PinType.bIsUObjectWrapper=False,PinType.bSerializeAsSinglePrecisionFloat=False,DefaultObject="/Game/Examples/BallShooter/Blueprints/BallShooterTarget.BallShooterTarget_C",PersistentGuid=00000000000000000000000000000000,bHidden=False,bNotConnectable=False,bDefaultValueIsReadOnly=False,bDefaultValueIsIgnored=False,bAdvancedView=False,bOrphanedPin=False,)
CustomProperties Pin (PinId=3158AFA69DB1466EBBCEAA66F4C95A4C,PinName="ReturnValue",Direction="EGPD_Output",PinType.PinCategory="object",PinType.PinSubCategory="",PinType.PinSubCategoryObject="/Script/Engine.BlueprintGeneratedClass'/Game/Examples/BallShooter/Blueprints/BallShooterTarget.BallShooterTarget_C'",PinType.PinSubCategoryMemberReference=(),PinType.PinValueType=(),PinType.ContainerType=None,PinType.bIsReference=False,PinType.bIsConst=False,PinType.bIsWeakPointer=False,PinType.bIsUObjectWrapper=False,PinType.bSerializeAsSinglePrecisionFloat=False,LinkedTo=(K2Node_Knot_1 418A886E4F209FA142F6F2812BF760C6,),PersistentGuid=00000000000000000000000000000000,bHidden=False,bNotConnectable=False,bDefaultValueIsReadOnly=False,bDefaultValueIsIgnored=False,bAdvancedView=False,bOrphanedPin=False,)
CustomProperties Pin (PinId=0D8A8A40C42043A88FA7657747E5AC86,PinName="SpawnTransform",PinType.PinCategory="struct",PinType.PinSubCategory="",PinType.PinSubCategoryObject="/Script/CoreUObject.ScriptStruct'/Script/CoreUObject.Transform'",PinType.PinSubCategoryMemberReference=(),PinType.PinValueType=(),PinType.ContainerType=None,PinType.bIsReference=False,PinType.bIsConst=False,PinType.bIsWeakPointer=False,PinType.bIsUObjectWrapper=False,PinType.bSerializeAsSinglePrecisionFloat=False,LinkedTo=(K2Node_CallFunction_17 8E65D946493AE514D2B14681B58CFF42,),PersistentGuid=00000000000000000000000000000000,bHidden=False,bNotConnectable=False,bDefaultValueIsReadOnly=False,bDefaultValueIsIgnored=False,bAdvancedView=False,bOrphanedPin=False,)
CustomProperties Pin (PinId=FA2385BD7039482789678F0F48CE8638,PinName="CollisionHandlingOverride",PinType.PinCategory="byte",PinType.PinSubCategory="",PinType.PinSubCategoryObject="/Script/CoreUObject.Enum'/Script/Engine.ESpawnActorCollisionHandlingMethod'",PinType.PinSubCategoryMemberReference=(),PinType.PinValueType=(),PinType.ContainerType=None,PinType.bIsReference=False,PinType.bIsConst=False,PinType.bIsWeakPointer=False,PinType.bIsUObjectWrapper=False,PinType.bSerializeAsSinglePrecisionFloat=False,DefaultValue="AdjustIfPossibleButAlwaysSpawn",PersistentGuid=00000000000000000000000000000000,bHidden=False,bNotConnectable=False,bDefaultValueIsReadOnly=False,bDefaultValueIsIgnored=False,bAdvancedView=False,bOrphanedPin=False,)
CustomProperties Pin (PinId=AC071FF27EB14702836C940E696F2257,PinName="TransformScaleMethod",PinType.PinCategory="byte",PinType.PinSubCategory="",PinType.PinSubCategoryObject="/Script/CoreUObject.Enum'/Script/Engine.ESpawnActorScaleMethod'",PinType.PinSubCategoryMemberReference=(),PinType.PinValueType=(),PinType.ContainerType=None,PinType.bIsReference=False,PinType.bIsConst=False,PinType.bIsWeakPointer=False,PinType.bIsUObjectWrapper=False,PinType.bSerializeAsSinglePrecisionFloat=False,DefaultValue="MultiplyWithRoot",PersistentGuid=00000000000000000000000000000000,bHidden=False,bNotConnectable=False,bDefaultValueIsReadOnly=False,bDefaultValueIsIgnored=False,bAdvancedView=True,bOrphanedPin=False,)
CustomProperties Pin (PinId=35C5C1D23BE2429697363FC3E9541EE0,PinName="Owner",PinType.PinCategory="object",PinType.PinSubCategory="",PinType.PinSubCategoryObject="/Script/CoreUObject.Class'/Script/Engine.Actor'",PinType.PinSubCategoryMemberReference=(),PinType.PinValueType=(),PinType.ContainerType=None,PinType.bIsReference=False,PinType.bIsConst=False,PinType.bIsWeakPointer=False,PinType.bIsUObjectWrapper=False,PinType.bSerializeAsSinglePrecisionFloat=False,LinkedTo=(K2Node_Self_0 9ABF4ACB4692F850ECBE4AAA2E2C5623,),PersistentGuid=00000000000000000000000000000000,bHidden=False,bNotConnectable=False,bDefaultValueIsReadOnly=False,bDefaultValueIsIgnored=False,bAdvancedView=True,bOrphanedPin=False,)
CustomProperties Pin (PinId=A66676D922774C7BB17B1D89F6BF90AE,PinName="Instigator",PinToolTip="Instigator\nPawn Object Reference\n\nPawn responsible for damage and other gameplay events caused by this actor.",PinType.PinCategory="object",PinType.PinSubCategory="",PinType.PinSubCategoryObject="/Script/CoreUObject.Class'/Script/Engine.Pawn'",PinType.PinSubCategoryMemberReference=(),PinType.PinValueType=(),PinType.ContainerType=None,PinType.bIsReference=False,PinType.bIsConst=False,PinType.bIsWeakPointer=False,PinType.bIsUObjectWrapper=True,PinType.bSerializeAsSinglePrecisionFloat=False,AutogeneratedDefaultValue="None",PersistentGuid=00000000000000000000000000000000,bHidden=False,bNotConnectable=False,bDefaultValueIsReadOnly=False,bDefaultValueIsIgnored=False,bAdvancedView=False,bOrphanedPin=False,)
End Object
Begin Object Class=/Script/BlueprintGraph.K2Node_CallFunction Name="K2Node_CallFunction_10" ExportPath="/Script/BlueprintGraph.K2Node_CallFunction'/Game/Examples/BallShooter/Blueprints/BallShooterEnvironment.BallShooterEnvironment:EventGraph.K2Node_CallFunction_10'"
FunctionReference=(MemberParent="/Script/Engine.BlueprintGeneratedClass'/Game/Examples/BallShooter/Blueprints/BallShooterTarget.BallShooterTarget_C'",MemberName="teleportToRandomLocation",MemberGuid=FA7E23BC41B85ACED529E0B03EBCA12A)
NodePosX=1136
NodePosY=1158
ErrorType=1
NodeGuid=FF0E04794C848D3C7D6289825F9A0D70
CustomProperties Pin (PinId=DFBE199D4B4DCF3485C95CA4DCE81924,PinName="execute",PinToolTip="\nExec",PinType.PinCategory="exec",PinType.PinSubCategory="",PinType.PinSubCategoryObject=None,PinType.PinSubCategoryMemberReference=(),PinType.PinValueType=(),PinType.ContainerType=None,PinType.bIsReference=False,PinType.bIsConst=False,PinType.bIsWeakPointer=False,PinType.bIsUObjectWrapper=False,PinType.bSerializeAsSinglePrecisionFloat=False,LinkedTo=(K2Node_SpawnActorFromClass_0 1F9464B23256467B9C12DA97249D6EF3,),PersistentGuid=00000000000000000000000000000000,bHidden=False,bNotConnectable=False,bDefaultValueIsReadOnly=False,bDefaultValueIsIgnored=False,bAdvancedView=False,bOrphanedPin=False,)
CustomProperties Pin (PinId=EDE8B9CA48899CDBAD1F6E883FAE75DE,PinName="then",PinToolTip="\nExec",Direction="EGPD_Output",PinType.PinCategory="exec",PinType.PinSubCategory="",PinType.PinSubCategoryObject=None,PinType.PinSubCategoryMemberReference=(),PinType.PinValueType=(),PinType.ContainerType=None,PinType.bIsReference=False,PinType.bIsConst=False,PinType.bIsWeakPointer=False,PinType.bIsUObjectWrapper=False,PinType.bSerializeAsSinglePrecisionFloat=False,LinkedTo=(K2Node_CallArrayFunction_0 7156B28D401EB8A5A2302480F4D9F373,),PersistentGuid=00000000000000000000000000000000,bHidden=False,bNotConnectable=False,bDefaultValueIsReadOnly=False,bDefaultValueIsIgnored=False,bAdvancedView=False,bOrphanedPin=False,)
CustomProperties Pin (PinId=2B444A8D40E4CF80D9A375861B8DEF1E,PinName="self",PinFriendlyName=NSLOCTEXT("K2Node", "Target", "Target"),PinToolTip="Target\nBall Shooter Target Object Reference",PinType.PinCategory="object",PinType.PinSubCategory="",PinType.PinSubCategoryObject="/Script/Engine.BlueprintGeneratedClass'/Game/Examples/BallShooter/Blueprints/BallShooterTarget.BallShooterTarget_C'",PinType.PinSubCategoryMemberReference=(),PinType.PinValueType=(),PinType.ContainerType=None,PinType.bIsReference=False,PinType.bIsConst=False,PinType.bIsWeakPointer=False,PinType.bIsUObjectWrapper=False,PinType.bSerializeAsSinglePrecisionFloat=False,LinkedTo=(K2Node_Knot_1 372A11AD46451348E31C0BA5C3331C0B,),PersistentGuid=00000000000000000000000000000000,bHidden=False,bNotConnectable=False,bDefaultValueIsReadOnly=False,bDefaultValueIsIgnored=False,bAdvancedView=False,bOrphanedPin=False,)
End Object
Begin Object Class=/Script/BlueprintGraph.K2Node_Knot Name="K2Node_Knot_0" ExportPath="/Script/BlueprintGraph.K2Node_Knot'/Game/Examples/BallShooter/Blueprints/BallShooterEnvironment.BallShooterEnvironment:EventGraph.K2Node_Knot_0'"
NodePosX=1456
NodePosY=1312
NodeGuid=11BE026C4E07F94B5E22B18166C4F429
CustomProperties Pin (PinId=D5D3592D4AC40084D44092ABE14DD9AB,PinName="InputPin",PinType.PinCategory="object",PinType.PinSubCategory="",PinType.PinSubCategoryObject="/Script/Engine.BlueprintGeneratedClass'/Game/Examples/BallShooter/Blueprints/BallShooterTarget.BallShooterTarget_C'",PinType.PinSubCategoryMemberReference=(),PinType.PinValueType=(),PinType.ContainerType=None,PinType.bIsReference=False,PinType.bIsConst=False,PinType.bIsWeakPointer=False,PinType.bIsUObjectWrapper=False,PinType.bSerializeAsSinglePrecisionFloat=False,LinkedTo=(K2Node_Knot_19 6B015716454256BC5A073FADFEF7CC28,),PersistentGuid=00000000000000000000000000000000,bHidden=False,bNotConnectable=False,bDefaultValueIsReadOnly=False,bDefaultValueIsIgnored=True,bAdvancedView=False,bOrphanedPin=False,)
CustomProperties Pin (PinId=63BDF6D6488D0D2B8CFE9BA6F3CAD092,PinName="OutputPin",Direction="EGPD_Output",PinType.PinCategory="object",PinType.PinSubCategory="",PinType.PinSubCategoryObject="/Script/Engine.BlueprintGeneratedClass'/Game/Examples/BallShooter/Blueprints/BallShooterTarget.BallShooterTarget_C'",PinType.PinSubCategoryMemberReference=(),PinType.PinValueType=(),PinType.ContainerType=None,PinType.bIsReference=False,PinType.bIsConst=False,PinType.bIsWeakPointer=False,PinType.bIsUObjectWrapper=False,PinType.bSerializeAsSinglePrecisionFloat=False,LinkedTo=(K2Node_CallArrayFunction_0 6BBBB0DC4B404A11DB3D41B060A1446F,K2Node_Knot_2 5E93EC8D4FA7ACE9A9321DB42DFC3CAF,),PersistentGuid=00000000000000000000000000000000,bHidden=False,bNotConnectable=False,bDefaultValueIsReadOnly=False,bDefaultValueIsIgnored=False,bAdvancedView=False,bOrphanedPin=False,)
End Object
Begin Object Class=/Script/BlueprintGraph.K2Node_Knot Name="K2Node_Knot_1" ExportPath="/Script/BlueprintGraph.K2Node_Knot'/Game/Examples/BallShooter/Blueprints/BallShooterEnvironment.BallShooterEnvironment:EventGraph.K2Node_Knot_1'"
NodePosX=1072
NodePosY=1237
NodeGuid=E3FF03D8425406C3048E618518B0941A
CustomProperties Pin (PinId=418A886E4F209FA142F6F2812BF760C6,PinName="InputPin",PinType.PinCategory="object",PinType.PinSubCategory="",PinType.PinSubCategoryObject="/Script/Engine.BlueprintGeneratedClass'/Game/Examples/BallShooter/Blueprints/BallShooterTarget.BallShooterTarget_C'",PinType.PinSubCategoryMemberReference=(),PinType.PinValueType=(),PinType.ContainerType=None,PinType.bIsReference=False,PinType.bIsConst=False,PinType.bIsWeakPointer=False,PinType.bIsUObjectWrapper=False,PinType.bSerializeAsSinglePrecisionFloat=False,LinkedTo=(K2Node_SpawnActorFromClass_0 3158AFA69DB1466EBBCEAA66F4C95A4C,),PersistentGuid=00000000000000000000000000000000,bHidden=False,bNotConnectable=False,bDefaultValueIsReadOnly=False,bDefaultValueIsIgnored=True,bAdvancedView=False,bOrphanedPin=False,)
CustomProperties Pin (PinId=372A11AD46451348E31C0BA5C3331C0B,PinName="OutputPin",Direction="EGPD_Output",PinType.PinCategory="object",PinType.PinSubCategory="",PinType.PinSubCategoryObject="/Script/Engine.BlueprintGeneratedClass'/Game/Examples/BallShooter/Blueprints/BallShooterTarget.BallShooterTarget_C'",PinType.PinSubCategoryMemberReference=(),PinType.PinValueType=(),PinType.ContainerType=None,PinType.bIsReference=False,PinType.bIsConst=False,PinType.bIsWeakPointer=False,PinType.bIsUObjectWrapper=False,PinType.bSerializeAsSinglePrecisionFloat=False,LinkedTo=(K2Node_CallFunction_10 2B444A8D40E4CF80D9A375861B8DEF1E,K2Node_Knot_19 4D668F2F4C1BD941EE91F8AEDC494B6F,),PersistentGuid=00000000000000000000000000000000,bHidden=False,bNotConnectable=False,bDefaultValueIsReadOnly=False,bDefaultValueIsIgnored=False,bAdvancedView=False,bOrphanedPin=False,)
End Object
Begin Object Class=/Script/BlueprintGraph.K2Node_VariableGet Name="K2Node_VariableGet_0" ExportPath="/Script/BlueprintGraph.K2Node_VariableGet'/Game/Examples/BallShooter/Blueprints/BallShooterEnvironment.BallShooterEnvironment:EventGraph.K2Node_VariableGet_0'"
VariableReference=(MemberName="Targets",MemberGuid=773BA7DA44BC6F425C0CD1890FAE1D77,bSelfContext=True)
NodePosX=1381
NodePosY=1227
NodeGuid=09AC6D594D728AF941B25F83E1F9F399
CustomProperties Pin (PinId=7602BB0543BF1BA90C798CA126622B5A,PinName="Targets",Direction="EGPD_Output",PinType.PinCategory="object",PinType.PinSubCategory="",PinType.PinSubCategoryObject="/Script/Engine.BlueprintGeneratedClass'/Game/Examples/BallShooter/Blueprints/BallShooterTarget.BallShooterTarget_C'",PinType.PinSubCategoryMemberReference=(),PinType.PinValueType=(),PinType.ContainerType=Array,PinType.bIsReference=False,PinType.bIsConst=False,PinType.bIsWeakPointer=False,PinType.bIsUObjectWrapper=False,PinType.bSerializeAsSinglePrecisionFloat=False,LinkedTo=(K2Node_CallArrayFunction_0 4D71475E48D3AAA6B69996A23F93B8FB,),PersistentGuid=00000000000000000000000000000000,bHidden=False,bNotConnectable=False,bDefaultValueIsReadOnly=False,bDefaultValueIsIgnored=False,bAdvancedView=False,bOrphanedPin=False,)
CustomProperties Pin (PinId=E31DB300442EFF73E5A3259B5C74CEA1,PinName="self",PinFriendlyName=NSLOCTEXT("K2Node", "Target", "Target"),PinType.PinCategory="object",PinType.PinSubCategory="",PinType.PinSubCategoryObject="/Script/Engine.BlueprintGeneratedClass'/Game/Examples/BallShooter/Blueprints/BallShooterEnvironment.BallShooterEnvironment_C'",PinType.PinSubCategoryMemberReference=(),PinType.PinValueType=(),PinType.ContainerType=None,PinType.bIsReference=False,PinType.bIsConst=False,PinType.bIsWeakPointer=False,PinType.bIsUObjectWrapper=False,PinType.bSerializeAsSinglePrecisionFloat=False,PersistentGuid=00000000000000000000000000000000,bHidden=True,bNotConnectable=False,bDefaultValueIsReadOnly=False,bDefaultValueIsIgnored=False,bAdvancedView=False,bOrphanedPin=False,)
End Object
Begin Object Class=/Script/BlueprintGraph.K2Node_CallArrayFunction Name="K2Node_CallArrayFunction_0" ExportPath="/Script/BlueprintGraph.K2Node_CallArrayFunction'/Game/Examples/BallShooter/Blueprints/BallShooterEnvironment.BallShooterEnvironment:EventGraph.K2Node_CallArrayFunction_0'"
FunctionReference=(MemberParent="/Script/CoreUObject.Class'/Script/Engine.KismetArrayLibrary'",MemberName="Array_Add")
NodePosX=1541
NodePosY=1190
NodeGuid=3DEF89B24C605AEBD6DB0DBD5D9CDD60
CustomProperties Pin (PinId=7156B28D401EB8A5A2302480F4D9F373,PinName="execute",PinToolTip="\nExec",PinType.PinCategory="exec",PinType.PinSubCategory="",PinType.PinSubCategoryObject=None,PinType.PinSubCategoryMemberReference=(),PinType.PinValueType=(),PinType.ContainerType=None,PinType.bIsReference=False,PinType.bIsConst=False,PinType.bIsWeakPointer=False,PinType.bIsUObjectWrapper=False,PinType.bSerializeAsSinglePrecisionFloat=False,LinkedTo=(K2Node_CallFunction_10 EDE8B9CA48899CDBAD1F6E883FAE75DE,),PersistentGuid=00000000000000000000000000000000,bHidden=False,bNotConnectable=False,bDefaultValueIsReadOnly=False,bDefaultValueIsIgnored=False,bAdvancedView=False,bOrphanedPin=False,)
CustomProperties Pin (PinId=E1727B0747558B3F4B7D6FA129D4655E,PinName="then",PinToolTip="\nExec",Direction="EGPD_Output",PinType.PinCategory="exec",PinType.PinSubCategory="",PinType.PinSubCategoryObject=None,PinType.PinSubCategoryMemberReference=(),PinType.PinValueType=(),PinType.ContainerType=None,PinType.bIsReference=False,PinType.bIsConst=False,PinType.bIsWeakPointer=False,PinType.bIsUObjectWrapper=False,PinType.bSerializeAsSinglePrecisionFloat=False,LinkedTo=(K2Node_AssignDelegate_0 86FA158D4EBB8E99A0063BBFB5CAFA7D,),PersistentGuid=00000000000000000000000000000000,bHidden=False,bNotConnectable=False,bDefaultValueIsReadOnly=False,bDefaultValueIsIgnored=False,bAdvancedView=False,bOrphanedPin=False,)
CustomProperties Pin (PinId=6EBB3FC5445AE98C77E5AB8680979EAE,PinName="self",PinFriendlyName=NSLOCTEXT("K2Node", "Target", "Target"),PinToolTip="Target\nKismet Array Library Object Reference",PinType.PinCategory="object",PinType.PinSubCategory="",PinType.PinSubCategoryObject="/Script/CoreUObject.Class'/Script/Engine.KismetArrayLibrary'",PinType.PinSubCategoryMemberReference=(),PinType.PinValueType=(),PinType.ContainerType=None,PinType.bIsReference=False,PinType.bIsConst=False,PinType.bIsWeakPointer=False,PinType.bIsUObjectWrapper=False,PinType.bSerializeAsSinglePrecisionFloat=False,DefaultObject="/Script/Engine.Default__KismetArrayLibrary",PersistentGuid=00000000000000000000000000000000,bHidden=True,bNotConnectable=False,bDefaultValueIsReadOnly=False,bDefaultValueIsIgnored=False,bAdvancedView=False,bOrphanedPin=False,)
CustomProperties Pin (PinId=4D71475E48D3AAA6B69996A23F93B8FB,PinName="TargetArray",PinToolTip="Target Array\nArray of Ball Shooter Target Object References\n\nThe array to add item to",PinType.PinCategory="object",PinType.PinSubCategory="",PinType.PinSubCategoryObject="/Script/Engine.BlueprintGeneratedClass'/Game/Examples/BallShooter/Blueprints/BallShooterTarget.BallShooterTarget_C'",PinType.PinSubCategoryMemberReference=(),PinType.PinValueType=(),PinType.ContainerType=Array,PinType.bIsReference=True,PinType.bIsConst=True,PinType.bIsWeakPointer=False,PinType.bIsUObjectWrapper=False,PinType.bSerializeAsSinglePrecisionFloat=False,LinkedTo=(K2Node_VariableGet_0 7602BB0543BF1BA90C798CA126622B5A,),PersistentGuid=00000000000000000000000000000000,bHidden=False,bNotConnectable=False,bDefaultValueIsReadOnly=False,bDefaultValueIsIgnored=True,bAdvancedView=False,bOrphanedPin=False,)
CustomProperties Pin (PinId=6BBBB0DC4B404A11DB3D41B060A1446F,PinName="NewItem",PinToolTip="New Item\nBall Shooter Target Object Reference (by ref)\n\nThe item to add to the array",PinType.PinCategory="object",PinType.PinSubCategory="",PinType.PinSubCategoryObject="/Script/Engine.BlueprintGeneratedClass'/Game/Examples/BallShooter/Blueprints/BallShooterTarget.BallShooterTarget_C'",PinType.PinSubCategoryMemberReference=(),PinType.PinValueType=(),PinType.ContainerType=None,PinType.bIsReference=True,PinType.bIsConst=True,PinType.bIsWeakPointer=False,PinType.bIsUObjectWrapper=False,PinType.bSerializeAsSinglePrecisionFloat=False,LinkedTo=(K2Node_Knot_0 63BDF6D6488D0D2B8CFE9BA6F3CAD092,),PersistentGuid=00000000000000000000000000000000,bHidden=False,bNotConnectable=False,bDefaultValueIsReadOnly=False,bDefaultValueIsIgnored=False,bAdvancedView=False,bOrphanedPin=False,)
CustomProperties Pin (PinId=6E139C8748B739B9049B6FA099CF5AAB,PinName="ReturnValue",PinToolTip="Return Value\nInteger\n\nThe index of the newly added item",Direction="EGPD_Output",PinType.PinCategory="int",PinType.PinSubCategory="",PinType.PinSubCategoryObject=None,PinType.PinSubCategoryMemberReference=(),PinType.PinValueType=(),PinType.ContainerType=None,PinType.bIsReference=False,PinType.bIsConst=False,PinType.bIsWeakPointer=False,PinType.bIsUObjectWrapper=False,PinType.bSerializeAsSinglePrecisionFloat=False,DefaultValue="0",AutogeneratedDefaultValue="0",PersistentGuid=00000000000000000000000000000000,bHidden=False,bNotConnectable=False,bDefaultValueIsReadOnly=False,bDefaultValueIsIgnored=False,bAdvancedView=False,bOrphanedPin=False,)
End Object
Begin Object Class=/Script/BlueprintGraph.K2Node_CustomEvent Name="K2Node_CustomEvent_0" ExportPath="/Script/BlueprintGraph.K2Node_CustomEvent'/Game/Examples/BallShooter/Blueprints/BallShooterEnvironment.BallShooterEnvironment:EventGraph.K2Node_CustomEvent_0'"
CustomFunctionName="On Target Killed"
NodePosX=1120
NodePosY=1008
NodeGuid=CB26188F46AD43B42A9A2692288F41F2
CustomProperties Pin (PinId=DA10B1984E92B126FB09CE9D0F767D2E,PinName="OutputDelegate",Direction="EGPD_Output",PinType.PinCategory="delegate",PinType.PinSubCategory="",PinType.PinSubCategoryObject=None,PinType.PinSubCategoryMemberReference=(MemberParent="/Script/Engine.BlueprintGeneratedClass'/Game/Examples/BallShooter/Blueprints/BallShooterEnvironment.BallShooterEnvironment_C'",MemberName="On Target Killed",MemberGuid=CB26188F46AD43B42A9A2692288F41F2),PinType.PinValueType=(),PinType.ContainerType=None,PinType.bIsReference=False,PinType.bIsConst=False,PinType.bIsWeakPointer=False,PinType.bIsUObjectWrapper=False,PinType.bSerializeAsSinglePrecisionFloat=False,LinkedTo=(K2Node_Knot_5 B7F4E13147F9BD004C95E68308729F9C,K2Node_RemoveDelegate_0 A1CAB1B94B18DABD42F247B0BB560786,),PersistentGuid=00000000000000000000000000000000,bHidden=False,bNotConnectable=False,bDefaultValueIsReadOnly=False,bDefaultValueIsIgnored=False,bAdvancedView=False,bOrphanedPin=False,)
CustomProperties Pin (PinId=A52A36F047563A99081BB3ADC0C688CB,PinName="then",Direction="EGPD_Output",PinType.PinCategory="exec",PinType.PinSubCategory="",PinType.PinSubCategoryObject=None,PinType.PinSubCategoryMemberReference=(),PinType.PinValueType=(),PinType.ContainerType=None,PinType.bIsReference=False,PinType.bIsConst=False,PinType.bIsWeakPointer=False,PinType.bIsUObjectWrapper=False,PinType.bSerializeAsSinglePrecisionFloat=False,LinkedTo=(K2Node_DynamicCast_0 072F8BBF42E4A2063BA88EA249D746E6,),PersistentGuid=00000000000000000000000000000000,bHidden=False,bNotConnectable=False,bDefaultValueIsReadOnly=False,bDefaultValueIsIgnored=False,bAdvancedView=False,bOrphanedPin=False,)
CustomProperties Pin (PinId=E88FACB54D1595FDCF2A0BAABA7969CE,PinName="Actor",Direction="EGPD_Output",PinType.PinCategory="object",PinType.PinSubCategory="",PinType.PinSubCategoryObject="/Script/CoreUObject.Class'/Script/Engine.Actor'",PinType.PinSubCategoryMemberReference=(),PinType.PinValueType=(),PinType.ContainerType=None,PinType.bIsReference=False,PinType.bIsConst=False,PinType.bIsWeakPointer=False,PinType.bIsUObjectWrapper=False,PinType.bSerializeAsSinglePrecisionFloat=False,LinkedTo=(K2Node_DynamicCast_0 CFEB5A65466C46F3257D3B9AB5BFA791,),PersistentGuid=00000000000000000000000000000000,bHidden=False,bNotConnectable=False,bDefaultValueIsReadOnly=False,bDefaultValueIsIgnored=False,bAdvancedView=False,bOrphanedPin=False,)
CustomProperties Pin (PinId=8183CC924CB230BE8E6DE1963A4145BE,PinName="EndPlayReason",Direction="EGPD_Output",PinType.PinCategory="byte",PinType.PinSubCategory="",PinType.PinSubCategoryObject="/Script/CoreUObject.Enum'/Script/Engine.EEndPlayReason'",PinType.PinSubCategoryMemberReference=(),PinType.PinValueType=(),PinType.ContainerType=None,PinType.bIsReference=False,PinType.bIsConst=False,PinType.bIsWeakPointer=False,PinType.bIsUObjectWrapper=False,PinType.bSerializeAsSinglePrecisionFloat=False,DefaultValue="Destroyed",AutogeneratedDefaultValue="Destroyed",PersistentGuid=00000000000000000000000000000000,bHidden=False,bNotConnectable=False,bDefaultValueIsReadOnly=False,bDefaultValueIsIgnored=False,bAdvancedView=False,bOrphanedPin=False,)
CustomProperties UserDefinedPin (PinName="Actor",PinType=(PinCategory="object",PinSubCategoryObject="/Script/CoreUObject.Class'/Script/Engine.Actor'"),DesiredPinDirection=EGPD_Output)
CustomProperties UserDefinedPin (PinName="EndPlayReason",PinType=(PinCategory="byte",PinSubCategoryObject="/Script/CoreUObject.Enum'/Script/Engine.EEndPlayReason'"),DesiredPinDirection=EGPD_Output,PinDefaultValue="Destroyed")
End Object
Begin Object Class=/Script/BlueprintGraph.K2Node_AssignDelegate Name="K2Node_AssignDelegate_0" ExportPath="/Script/BlueprintGraph.K2Node_AssignDelegate'/Game/Examples/BallShooter/Blueprints/BallShooterEnvironment.BallShooterEnvironment:EventGraph.K2Node_AssignDelegate_0'"
DelegateReference=(MemberParent="/Script/CoreUObject.Class'/Script/Engine.Actor'",MemberName="OnEndPlay")
NodePosX=1744
NodePosY=1174
NodeGuid=EB71BFF0433F650D853C5C8E0065FA50
CustomProperties Pin (PinId=86FA158D4EBB8E99A0063BBFB5CAFA7D,PinName="execute",PinType.PinCategory="exec",PinType.PinSubCategory="",PinType.PinSubCategoryObject=None,PinType.PinSubCategoryMemberReference=(),PinType.PinValueType=(),PinType.ContainerType=None,PinType.bIsReference=False,PinType.bIsConst=False,PinType.bIsWeakPointer=False,PinType.bIsUObjectWrapper=False,PinType.bSerializeAsSinglePrecisionFloat=False,LinkedTo=(K2Node_CallArrayFunction_0 E1727B0747558B3F4B7D6FA129D4655E,),PersistentGuid=00000000000000000000000000000000,bHidden=False,bNotConnectable=False,bDefaultValueIsReadOnly=False,bDefaultValueIsIgnored=False,bAdvancedView=False,bOrphanedPin=False,)
CustomProperties Pin (PinId=98DFCE7B49E479343BD765BE8D9CF13A,PinName="then",Direction="EGPD_Output",PinType.PinCategory="exec",PinType.PinSubCategory="",PinType.PinSubCategoryObject=None,PinType.PinSubCategoryMemberReference=(),PinType.PinValueType=(),PinType.ContainerType=None,PinType.bIsReference=False,PinType.bIsConst=False,PinType.bIsWeakPointer=False,PinType.bIsUObjectWrapper=False,PinType.bSerializeAsSinglePrecisionFloat=False,PersistentGuid=00000000000000000000000000000000,bHidden=False,bNotConnectable=False,bDefaultValueIsReadOnly=False,bDefaultValueIsIgnored=False,bAdvancedView=False,bOrphanedPin=False,)
CustomProperties Pin (PinId=9EEC18F94EE45E5F2DEBCC950A1059E7,PinName="self",PinFriendlyName=NSLOCTEXT("K2Node", "BaseMCDelegateSelfPinName", "Target"),PinType.PinCategory="object",PinType.PinSubCategory="",PinType.PinSubCategoryObject="/Script/CoreUObject.Class'/Script/Engine.Actor'",PinType.PinSubCategoryMemberReference=(),PinType.PinValueType=(),PinType.ContainerType=None,PinType.bIsReference=False,PinType.bIsConst=False,PinType.bIsWeakPointer=False,PinType.bIsUObjectWrapper=False,PinType.bSerializeAsSinglePrecisionFloat=False,LinkedTo=(K2Node_Knot_2 E206246F4D302513DD889C80B5A90BD8,),PersistentGuid=00000000000000000000000000000000,bHidden=False,bNotConnectable=False,bDefaultValueIsReadOnly=False,bDefaultValueIsIgnored=False,bAdvancedView=False,bOrphanedPin=False,)
CustomProperties Pin (PinId=3C0089524CDDA9E63853BEA28156FACD,PinName="Delegate",PinFriendlyName=NSLOCTEXT("K2Node", "PinFriendlyDelegatetName", "Event"),PinType.PinCategory="delegate",PinType.PinSubCategory="",PinType.PinSubCategoryObject=None,PinType.PinSubCategoryMemberReference=(MemberParent="/Script/CoreUObject.Package'/Script/Engine'",MemberName="ActorEndPlaySignature__DelegateSignature"),PinType.PinValueType=(),PinType.ContainerType=None,PinType.bIsReference=True,PinType.bIsConst=True,PinType.bIsWeakPointer=False,PinType.bIsUObjectWrapper=False,PinType.bSerializeAsSinglePrecisionFloat=False,LinkedTo=(K2Node_Knot_6 D9811EDF48E61BB899F6E8AE5EA93807,),PersistentGuid=00000000000000000000000000000000,bHidden=False,bNotConnectable=False,bDefaultValueIsReadOnly=False,bDefaultValueIsIgnored=False,bAdvancedView=False,bOrphanedPin=False,)
End Object
Begin Object Class=/Script/BlueprintGraph.K2Node_VariableGet Name="K2Node_VariableGet_12" ExportPath="/Script/BlueprintGraph.K2Node_VariableGet'/Game/Examples/BallShooter/Blueprints/BallShooterEnvironment.BallShooterEnvironment:EventGraph.K2Node_VariableGet_12'"
VariableReference=(MemberName="Targets",MemberGuid=773BA7DA44BC6F425C0CD1890FAE1D77,bSelfContext=True)
NodePosX=1637
NodePosY=1083
NodeGuid=6BF9606F4F27A2A42F012A932C80F889
CustomProperties Pin (PinId=7602BB0543BF1BA90C798CA126622B5A,PinName="Targets",Direction="EGPD_Output",PinType.PinCategory="object",PinType.PinSubCategory="",PinType.PinSubCategoryObject="/Script/Engine.BlueprintGeneratedClass'/Game/Examples/BallShooter/Blueprints/BallShooterTarget.BallShooterTarget_C'",PinType.PinSubCategoryMemberReference=(),PinType.PinValueType=(),PinType.ContainerType=Array,PinType.bIsReference=False,PinType.bIsConst=False,PinType.bIsWeakPointer=False,PinType.bIsUObjectWrapper=False,PinType.bSerializeAsSinglePrecisionFloat=False,LinkedTo=(K2Node_CallArrayFunction_1 57575B434930F1DBA4BBCD8B3E41108B,),PersistentGuid=00000000000000000000000000000000,bHidden=False,bNotConnectable=False,bDefaultValueIsReadOnly=False,bDefaultValueIsIgnored=False,bAdvancedView=False,bOrphanedPin=False,)
CustomProperties Pin (PinId=E31DB300442EFF73E5A3259B5C74CEA1,PinName="self",PinFriendlyName=NSLOCTEXT("K2Node", "Target", "Target"),PinType.PinCategory="object",PinType.PinSubCategory="",PinType.PinSubCategoryObject="/Script/Engine.BlueprintGeneratedClass'/Game/Examples/BallShooter/Blueprints/BallShooterEnvironment.BallShooterEnvironment_C'",PinType.PinSubCategoryMemberReference=(),PinType.PinValueType=(),PinType.ContainerType=None,PinType.bIsReference=False,PinType.bIsConst=False,PinType.bIsWeakPointer=False,PinType.bIsUObjectWrapper=False,PinType.bSerializeAsSinglePrecisionFloat=False,PersistentGuid=00000000000000000000000000000000,bHidden=True,bNotConnectable=False,bDefaultValueIsReadOnly=False,bDefaultValueIsIgnored=False,bAdvancedView=False,bOrphanedPin=False,)
End Object
Begin Object Class=/Script/BlueprintGraph.K2Node_CallArrayFunction Name="K2Node_CallArrayFunction_1" ExportPath="/Script/BlueprintGraph.K2Node_CallArrayFunction'/Game/Examples/BallShooter/Blueprints/BallShooterEnvironment.BallShooterEnvironment:EventGraph.K2Node_CallArrayFunction_1'"
FunctionReference=(MemberParent="/Script/CoreUObject.Class'/Script/Engine.KismetArrayLibrary'",MemberName="Array_RemoveItem")
NodePosX=1781
NodePosY=1046
NodeGuid=457B69324C13657E79D23587B7A29264
CustomProperties Pin (PinId=A6BB004945177E41E1C89EB9905A43C2,PinName="execute",PinToolTip="\nExec",PinType.PinCategory="exec",PinType.PinSubCategory="",PinType.PinSubCategoryObject=None,PinType.PinSubCategoryMemberReference=(),PinType.PinValueType=(),PinType.ContainerType=None,PinType.bIsReference=False,PinType.bIsConst=False,PinType.bIsWeakPointer=False,PinType.bIsUObjectWrapper=False,PinType.bSerializeAsSinglePrecisionFloat=False,LinkedTo=(K2Node_DynamicCast_0 6F4B5439461C78A8A5E3F79E09320EA8,),PersistentGuid=00000000000000000000000000000000,bHidden=False,bNotConnectable=False,bDefaultValueIsReadOnly=False,bDefaultValueIsIgnored=False,bAdvancedView=False,bOrphanedPin=False,)
CustomProperties Pin (PinId=1797D763427B163B70929F9AD271E562,PinName="then",PinToolTip="\nExec",Direction="EGPD_Output",PinType.PinCategory="exec",PinType.PinSubCategory="",PinType.PinSubCategoryObject=None,PinType.PinSubCategoryMemberReference=(),PinType.PinValueType=(),PinType.ContainerType=None,PinType.bIsReference=False,PinType.bIsConst=False,PinType.bIsWeakPointer=False,PinType.bIsUObjectWrapper=False,PinType.bSerializeAsSinglePrecisionFloat=False,PersistentGuid=00000000000000000000000000000000,bHidden=False,bNotConnectable=False,bDefaultValueIsReadOnly=False,bDefaultValueIsIgnored=False,bAdvancedView=False,bOrphanedPin=False,)
CustomProperties Pin (PinId=C69AE5C04CF5B71835D184BAFAE78028,PinName="self",PinFriendlyName=NSLOCTEXT("K2Node", "Target", "Target"),PinToolTip="Target\nKismet Array Library Object Reference",PinType.PinCategory="object",PinType.PinSubCategory="",PinType.PinSubCategoryObject="/Script/CoreUObject.Class'/Script/Engine.KismetArrayLibrary'",PinType.PinSubCategoryMemberReference=(),PinType.PinValueType=(),PinType.ContainerType=None,PinType.bIsReference=False,PinType.bIsConst=False,PinType.bIsWeakPointer=False,PinType.bIsUObjectWrapper=False,PinType.bSerializeAsSinglePrecisionFloat=False,DefaultObject="/Script/Engine.Default__KismetArrayLibrary",PersistentGuid=00000000000000000000000000000000,bHidden=True,bNotConnectable=False,bDefaultValueIsReadOnly=False,bDefaultValueIsIgnored=False,bAdvancedView=False,bOrphanedPin=False,)
CustomProperties Pin (PinId=57575B434930F1DBA4BBCD8B3E41108B,PinName="TargetArray",PinToolTip="Target Array\nArray of Ball Shooter Target Object References\n\nThe array to remove from *",PinType.PinCategory="object",PinType.PinSubCategory="",PinType.PinSubCategoryObject="/Script/Engine.BlueprintGeneratedClass'/Game/Examples/BallShooter/Blueprints/BallShooterTarget.BallShooterTarget_C'",PinType.PinSubCategoryMemberReference=(),PinType.PinValueType=(),PinType.ContainerType=Array,PinType.bIsReference=True,PinType.bIsConst=True,PinType.bIsWeakPointer=False,PinType.bIsUObjectWrapper=False,PinType.bSerializeAsSinglePrecisionFloat=False,LinkedTo=(K2Node_VariableGet_12 7602BB0543BF1BA90C798CA126622B5A,),PersistentGuid=00000000000000000000000000000000,bHidden=False,bNotConnectable=False,bDefaultValueIsReadOnly=False,bDefaultValueIsIgnored=True,bAdvancedView=False,bOrphanedPin=False,)
CustomProperties Pin (PinId=C13DCA9343FED20C794622ABF3AEB07B,PinName="Item",PinToolTip="Item\nBall Shooter Target Object Reference (by ref)\n\nThe item to remove from the array *",PinType.PinCategory="object",PinType.PinSubCategory="",PinType.PinSubCategoryObject="/Script/Engine.BlueprintGeneratedClass'/Game/Examples/BallShooter/Blueprints/BallShooterTarget.BallShooterTarget_C'",PinType.PinSubCategoryMemberReference=(),PinType.PinValueType=(),PinType.ContainerType=None,PinType.bIsReference=True,PinType.bIsConst=True,PinType.bIsWeakPointer=False,PinType.bIsUObjectWrapper=False,PinType.bSerializeAsSinglePrecisionFloat=False,LinkedTo=(K2Node_DynamicCast_0 5BC336654EEB76DAADC328A404171CB2,),PersistentGuid=00000000000000000000000000000000,bHidden=False,bNotConnectable=False,bDefaultValueIsReadOnly=False,bDefaultValueIsIgnored=False,bAdvancedView=False,bOrphanedPin=False,)
CustomProperties Pin (PinId=C62CCD024D9912E6DE3BF38A39E0F612,PinName="ReturnValue",PinToolTip="Return Value\nBoolean\n\nTrue if one or more items were removed",Direction="EGPD_Output",PinType.PinCategory="bool",PinType.PinSubCategory="",PinType.PinSubCategoryObject=None,PinType.PinSubCategoryMemberReference=(),PinType.PinValueType=(),PinType.ContainerType=None,PinType.bIsReference=False,PinType.bIsConst=False,PinType.bIsWeakPointer=False,PinType.bIsUObjectWrapper=False,PinType.bSerializeAsSinglePrecisionFloat=False,DefaultValue="false",AutogeneratedDefaultValue="false",PersistentGuid=00000000000000000000000000000000,bHidden=False,bNotConnectable=False,bDefaultValueIsReadOnly=False,bDefaultValueIsIgnored=False,bAdvancedView=False,bOrphanedPin=False,)
End Object
Begin Object Class=/Script/BlueprintGraph.K2Node_Knot Name="K2Node_Knot_2" ExportPath="/Script/BlueprintGraph.K2Node_Knot'/Game/Examples/BallShooter/Blueprints/BallShooterEnvironment.BallShooterEnvironment:EventGraph.K2Node_Knot_2'"
NodePosX=1637
NodePosY=1312
NodeGuid=119ED2D947AE692FF0C70D92534231C4
CustomProperties Pin (PinId=5E93EC8D4FA7ACE9A9321DB42DFC3CAF,PinName="InputPin",PinType.PinCategory="object",PinType.PinSubCategory="",PinType.PinSubCategoryObject="/Script/Engine.BlueprintGeneratedClass'/Game/Examples/BallShooter/Blueprints/BallShooterTarget.BallShooterTarget_C'",PinType.PinSubCategoryMemberReference=(),PinType.PinValueType=(),PinType.ContainerType=None,PinType.bIsReference=False,PinType.bIsConst=False,PinType.bIsWeakPointer=False,PinType.bIsUObjectWrapper=False,PinType.bSerializeAsSinglePrecisionFloat=False,LinkedTo=(K2Node_Knot_0 63BDF6D6488D0D2B8CFE9BA6F3CAD092,),PersistentGuid=00000000000000000000000000000000,bHidden=False,bNotConnectable=False,bDefaultValueIsReadOnly=False,bDefaultValueIsIgnored=True,bAdvancedView=False,bOrphanedPin=False,)
CustomProperties Pin (PinId=E206246F4D302513DD889C80B5A90BD8,PinName="OutputPin",Direction="EGPD_Output",PinType.PinCategory="object",PinType.PinSubCategory="",PinType.PinSubCategoryObject="/Script/Engine.BlueprintGeneratedClass'/Game/Examples/BallShooter/Blueprints/BallShooterTarget.BallShooterTarget_C'",PinType.PinSubCategoryMemberReference=(),PinType.PinValueType=(),PinType.ContainerType=None,PinType.bIsReference=False,PinType.bIsConst=False,PinType.bIsWeakPointer=False,PinType.bIsUObjectWrapper=False,PinType.bSerializeAsSinglePrecisionFloat=False,LinkedTo=(K2Node_AssignDelegate_0 9EEC18F94EE45E5F2DEBCC950A1059E7,),PersistentGuid=00000000000000000000000000000000,bHidden=False,bNotConnectable=False,bDefaultValueIsReadOnly=False,bDefaultValueIsIgnored=False,bAdvancedView=False,bOrphanedPin=False,)
End Object
Begin Object Class=/Script/BlueprintGraph.K2Node_DynamicCast Name="K2Node_DynamicCast_0" ExportPath="/Script/BlueprintGraph.K2Node_DynamicCast'/Game/Examples/BallShooter/Blueprints/BallShooterEnvironment.BallShooterEnvironment:EventGraph.K2Node_DynamicCast_0'"
TargetType="/Script/Engine.BlueprintGeneratedClass'/Game/Examples/BallShooter/Blueprints/BallShooterTarget.BallShooterTarget_C'"
NodePosX=1365
NodePosY=1026
NodeGuid=333B87F5427E408B0754D2B8EDD6F0F2
CustomProperties Pin (PinId=072F8BBF42E4A2063BA88EA249D746E6,PinName="execute",PinType.PinCategory="exec",PinType.PinSubCategory="",PinType.PinSubCategoryObject=None,PinType.PinSubCategoryMemberReference=(),PinType.PinValueType=(),PinType.ContainerType=None,PinType.bIsReference=False,PinType.bIsConst=False,PinType.bIsWeakPointer=False,PinType.bIsUObjectWrapper=False,PinType.bSerializeAsSinglePrecisionFloat=False,LinkedTo=(K2Node_CustomEvent_0 A52A36F047563A99081BB3ADC0C688CB,),PersistentGuid=00000000000000000000000000000000,bHidden=False,bNotConnectable=False,bDefaultValueIsReadOnly=False,bDefaultValueIsIgnored=False,bAdvancedView=False,bOrphanedPin=False,)
CustomProperties Pin (PinId=6F4B5439461C78A8A5E3F79E09320EA8,PinName="then",Direction="EGPD_Output",PinType.PinCategory="exec",PinType.PinSubCategory="",PinType.PinSubCategoryObject=None,PinType.PinSubCategoryMemberReference=(),PinType.PinValueType=(),PinType.ContainerType=None,PinType.bIsReference=False,PinType.bIsConst=False,PinType.bIsWeakPointer=False,PinType.bIsUObjectWrapper=False,PinType.bSerializeAsSinglePrecisionFloat=False,LinkedTo=(K2Node_CallArrayFunction_1 A6BB004945177E41E1C89EB9905A43C2,),PersistentGuid=00000000000000000000000000000000,bHidden=False,bNotConnectable=False,bDefaultValueIsReadOnly=False,bDefaultValueIsIgnored=False,bAdvancedView=False,bOrphanedPin=False,)
CustomProperties Pin (PinId=161F6F904284FD9306693384D9FC80D7,PinName="CastFailed",Direction="EGPD_Output",PinType.PinCategory="exec",PinType.PinSubCategory="",PinType.PinSubCategoryObject=None,PinType.PinSubCategoryMemberReference=(),PinType.PinValueType=(),PinType.ContainerType=None,PinType.bIsReference=False,PinType.bIsConst=False,PinType.bIsWeakPointer=False,PinType.bIsUObjectWrapper=False,PinType.bSerializeAsSinglePrecisionFloat=False,PersistentGuid=00000000000000000000000000000000,bHidden=False,bNotConnectable=False,bDefaultValueIsReadOnly=False,bDefaultValueIsIgnored=False,bAdvancedView=False,bOrphanedPin=False,)
CustomProperties Pin (PinId=CFEB5A65466C46F3257D3B9AB5BFA791,PinName="Object",PinType.PinCategory="Object",PinType.PinSubCategory="",PinType.PinSubCategoryObject="/Script/CoreUObject.Class'/Script/CoreUObject.Object'",PinType.PinSubCategoryMemberReference=(),PinType.PinValueType=(),PinType.ContainerType=None,PinType.bIsReference=False,PinType.bIsConst=False,PinType.bIsWeakPointer=False,PinType.bIsUObjectWrapper=False,PinType.bSerializeAsSinglePrecisionFloat=False,LinkedTo=(K2Node_CustomEvent_0 E88FACB54D1595FDCF2A0BAABA7969CE,),PersistentGuid=00000000000000000000000000000000,bHidden=False,bNotConnectable=False,bDefaultValueIsReadOnly=False,bDefaultValueIsIgnored=False,bAdvancedView=False,bOrphanedPin=False,)
CustomProperties Pin (PinId=5BC336654EEB76DAADC328A404171CB2,PinName="AsBall Shooter Target",Direction="EGPD_Output",PinType.PinCategory="Object",PinType.PinSubCategory="",PinType.PinSubCategoryObject="/Script/Engine.BlueprintGeneratedClass'/Game/Examples/BallShooter/Blueprints/BallShooterTarget.BallShooterTarget_C'",PinType.PinSubCategoryMemberReference=(),PinType.PinValueType=(),PinType.ContainerType=None,PinType.bIsReference=False,PinType.bIsConst=False,PinType.bIsWeakPointer=False,PinType.bIsUObjectWrapper=False,PinType.bSerializeAsSinglePrecisionFloat=False,LinkedTo=(K2Node_CallArrayFunction_1 C13DCA9343FED20C794622ABF3AEB07B,),PersistentGuid=00000000000000000000000000000000,bHidden=False,bNotConnectable=False,bDefaultValueIsReadOnly=False,bDefaultValueIsIgnored=False,bAdvancedView=False,bOrphanedPin=False,)
CustomProperties Pin (PinId=FEEFEAF74000628E84DA4AB434A0CEA2,PinName="bSuccess",Direction="EGPD_Output",PinType.PinCategory="bool",PinType.PinSubCategory="",PinType.PinSubCategoryObject=None,PinType.PinSubCategoryMemberReference=(),PinType.PinValueType=(),PinType.ContainerType=None,PinType.bIsReference=False,PinType.bIsConst=False,PinType.bIsWeakPointer=False,PinType.bIsUObjectWrapper=False,PinType.bSerializeAsSinglePrecisionFloat=False,PersistentGuid=00000000000000000000000000000000,bHidden=True,bNotConnectable=False,bDefaultValueIsReadOnly=False,bDefaultValueIsIgnored=False,bAdvancedView=False,bOrphanedPin=False,)
End Object
Begin Object Class=/Script/BlueprintGraph.K2Node_Knot Name="K2Node_Knot_19" ExportPath="/Script/BlueprintGraph.K2Node_Knot'/Game/Examples/BallShooter/Blueprints/BallShooterEnvironment.BallShooterEnvironment:EventGraph.K2Node_Knot_19'"
NodePosX=1136
NodePosY=1312
NodeGuid=7DC43FE543199D11AAA661993ACA7A3B
CustomProperties Pin (PinId=4D668F2F4C1BD941EE91F8AEDC494B6F,PinName="InputPin",PinType.PinCategory="object",PinType.PinSubCategory="",PinType.PinSubCategoryObject="/Script/Engine.BlueprintGeneratedClass'/Game/Examples/BallShooter/Blueprints/BallShooterTarget.BallShooterTarget_C'",PinType.PinSubCategoryMemberReference=(),PinType.PinValueType=(),PinType.ContainerType=None,PinType.bIsReference=False,PinType.bIsConst=False,PinType.bIsWeakPointer=False,PinType.bIsUObjectWrapper=False,PinType.bSerializeAsSinglePrecisionFloat=False,LinkedTo=(K2Node_Knot_1 372A11AD46451348E31C0BA5C3331C0B,),PersistentGuid=00000000000000000000000000000000,bHidden=False,bNotConnectable=False,bDefaultValueIsReadOnly=False,bDefaultValueIsIgnored=True,bAdvancedView=False,bOrphanedPin=False,)
CustomProperties Pin (PinId=6B015716454256BC5A073FADFEF7CC28,PinName="OutputPin",Direction="EGPD_Output",PinType.PinCategory="object",PinType.PinSubCategory="",PinType.PinSubCategoryObject="/Script/Engine.BlueprintGeneratedClass'/Game/Examples/BallShooter/Blueprints/BallShooterTarget.BallShooterTarget_C'",PinType.PinSubCategoryMemberReference=(),PinType.PinValueType=(),PinType.ContainerType=None,PinType.bIsReference=False,PinType.bIsConst=False,PinType.bIsWeakPointer=False,PinType.bIsUObjectWrapper=False,PinType.bSerializeAsSinglePrecisionFloat=False,LinkedTo=(K2Node_Knot_0 D5D3592D4AC40084D44092ABE14DD9AB,),PersistentGuid=00000000000000000000000000000000,bHidden=False,bNotConnectable=False,bDefaultValueIsReadOnly=False,bDefaultValueIsIgnored=False,bAdvancedView=False,bOrphanedPin=False,)
End Object
Begin Object Class=/Script/BlueprintGraph.K2Node_CallFunction Name="K2Node_CallFunction_17" ExportPath="/Script/BlueprintGraph.K2Node_CallFunction'/Game/Examples/BallShooter/Blueprints/BallShooterEnvironment.BallShooterEnvironment:EventGraph.K2Node_CallFunction_17'"
bIsPureFunc=True
FunctionReference=(MemberParent="/Script/CoreUObject.Class'/Script/Engine.KismetMathLibrary'",MemberName="MakeTransform")
NodePosX=288
NodePosY=1168
NodeGuid=B161355D4F9B865D4236D9B869F23F58
CustomProperties Pin (PinId=0BA921164570B25D5E36079D379351D5,PinName="self",PinFriendlyName=NSLOCTEXT("K2Node", "Target", "Target"),PinType.PinCategory="object",PinType.PinSubCategory="",PinType.PinSubCategoryObject="/Script/CoreUObject.Class'/Script/Engine.KismetMathLibrary'",PinType.PinSubCategoryMemberReference=(),PinType.PinValueType=(),PinType.ContainerType=None,PinType.bIsReference=False,PinType.bIsConst=False,PinType.bIsWeakPointer=False,PinType.bIsUObjectWrapper=False,PinType.bSerializeAsSinglePrecisionFloat=False,DefaultObject="/Script/Engine.Default__KismetMathLibrary",PersistentGuid=00000000000000000000000000000000,bHidden=True,bNotConnectable=False,bDefaultValueIsReadOnly=False,bDefaultValueIsIgnored=False,bAdvancedView=False,bOrphanedPin=False,)
CustomProperties Pin (PinId=4A2C6F4A4FBD1202861F35A5EA73C3CF,PinName="Location",PinType.PinCategory="struct",PinType.PinSubCategory="",PinType.PinSubCategoryObject="/Script/CoreUObject.ScriptStruct'/Script/CoreUObject.Vector'",PinType.PinSubCategoryMemberReference=(),PinType.PinValueType=(),PinType.ContainerType=None,PinType.bIsReference=False,PinType.bIsConst=False,PinType.bIsWeakPointer=False,PinType.bIsUObjectWrapper=False,PinType.bSerializeAsSinglePrecisionFloat=False,DefaultValue="0, 0, 0",AutogeneratedDefaultValue="0, 0, 0",PersistentGuid=00000000000000000000000000000000,bHidden=False,bNotConnectable=False,bDefaultValueIsReadOnly=False,bDefaultValueIsIgnored=False,bAdvancedView=False,bOrphanedPin=False,)
CustomProperties Pin (PinId=E853CB8B443705446440B0885B7BF81F,PinName="Rotation",PinType.PinCategory="struct",PinType.PinSubCategory="",PinType.PinSubCategoryObject="/Script/CoreUObject.ScriptStruct'/Script/CoreUObject.Rotator'",PinType.PinSubCategoryMemberReference=(),PinType.PinValueType=(),PinType.ContainerType=None,PinType.bIsReference=False,PinType.bIsConst=False,PinType.bIsWeakPointer=False,PinType.bIsUObjectWrapper=False,PinType.bSerializeAsSinglePrecisionFloat=False,DefaultValue="0, 0, 0",AutogeneratedDefaultValue="0, 0, 0",PersistentGuid=00000000000000000000000000000000,bHidden=False,bNotConnectable=False,bDefaultValueIsReadOnly=False,bDefaultValueIsIgnored=False,bAdvancedView=False,bOrphanedPin=False,)
CustomProperties Pin (PinId=853F225A466316C024A773990952AEC8,PinName="Scale",PinType.PinCategory="struct",PinType.PinSubCategory="",PinType.PinSubCategoryObject="/Script/CoreUObject.ScriptStruct'/Script/CoreUObject.Vector'",PinType.PinSubCategoryMemberReference=(),PinType.PinValueType=(),PinType.ContainerType=None,PinType.bIsReference=False,PinType.bIsConst=False,PinType.bIsWeakPointer=False,PinType.bIsUObjectWrapper=False,PinType.bSerializeAsSinglePrecisionFloat=False,DefaultValue="1.000000,1.000000,1.000000",AutogeneratedDefaultValue="1.000000,1.000000,1.000000",PersistentGuid=00000000000000000000000000000000,bHidden=False,bNotConnectable=False,bDefaultValueIsReadOnly=False,bDefaultValueIsIgnored=False,bAdvancedView=False,bOrphanedPin=False,)
CustomProperties Pin (PinId=8E65D946493AE514D2B14681B58CFF42,PinName="ReturnValue",Direction="EGPD_Output",PinType.PinCategory="struct",PinType.PinSubCategory="",PinType.PinSubCategoryObject="/Script/CoreUObject.ScriptStruct'/Script/CoreUObject.Transform'",PinType.PinSubCategoryMemberReference=(),PinType.PinValueType=(),PinType.ContainerType=None,PinType.bIsReference=False,PinType.bIsConst=False,PinType.bIsWeakPointer=False,PinType.bIsUObjectWrapper=False,PinType.bSerializeAsSinglePrecisionFloat=False,LinkedTo=(K2Node_SpawnActorFromClass_0 0D8A8A40C42043A88FA7657747E5AC86,),PersistentGuid=00000000000000000000000000000000,bHidden=False,bNotConnectable=False,bDefaultValueIsReadOnly=False,bDefaultValueIsIgnored=False,bAdvancedView=False,bOrphanedPin=False,)
End Object
Begin Object Class=/Script/BlueprintGraph.K2Node_Self Name="K2Node_Self_0" ExportPath="/Script/BlueprintGraph.K2Node_Self'/Game/Examples/BallShooter/Blueprints/BallShooterEnvironment.BallShooterEnvironment:EventGraph.K2Node_Self_0'"
NodePosX=464
NodePosY=1376
NodeGuid=9FA023F14DF01FC14C7FA1AB4CF09B57
CustomProperties Pin (PinId=9ABF4ACB4692F850ECBE4AAA2E2C5623,PinName="self",Direction="EGPD_Output",PinType.PinCategory="object",PinType.PinSubCategory="self",PinType.PinSubCategoryObject=None,PinType.PinSubCategoryMemberReference=(),PinType.PinValueType=(),PinType.ContainerType=None,PinType.bIsReference=False,PinType.bIsConst=False,PinType.bIsWeakPointer=False,PinType.bIsUObjectWrapper=False,PinType.bSerializeAsSinglePrecisionFloat=False,LinkedTo=(K2Node_SpawnActorFromClass_0 35C5C1D23BE2429697363FC3E9541EE0,),PersistentGuid=00000000000000000000000000000000,bHidden=False,bNotConnectable=False,bDefaultValueIsReadOnly=False,bDefaultValueIsIgnored=False,bAdvancedView=False,bOrphanedPin=False,)
End Object
Begin Object Class=/Script/BlueprintGraph.K2Node_CustomEvent Name="K2Node_CustomEvent_10" ExportPath="/Script/BlueprintGraph.K2Node_CustomEvent'/Game/Examples/BallShooter/Blueprints/BallShooterEnvironment.BallShooterEnvironment:EventGraph.K2Node_CustomEvent_10'"
CustomFunctionName="Manually Cleanup Target"
NodePosX=1184
NodePosY=704
NodeGuid=45FAB2D442008EAD87BCE98977451CF0
CustomProperties Pin (PinId=52125F0C45DB825B14EEFA9F972F00EB,PinName="OutputDelegate",Direction="EGPD_Output",PinType.PinCategory="delegate",PinType.PinSubCategory="",PinType.PinSubCategoryObject=None,PinType.PinSubCategoryMemberReference=(MemberParent="/Script/Engine.BlueprintGeneratedClass'/Game/Examples/BallShooter/Blueprints/BallShooterEnvironment.BallShooterEnvironment_C'",MemberName="Manually Cleanup Target",MemberGuid=45FAB2D442008EAD87BCE98977451CF0),PinType.PinValueType=(),PinType.ContainerType=None,PinType.bIsReference=False,PinType.bIsConst=False,PinType.bIsWeakPointer=False,PinType.bIsUObjectWrapper=False,PinType.bSerializeAsSinglePrecisionFloat=False,PersistentGuid=00000000000000000000000000000000,bHidden=False,bNotConnectable=False,bDefaultValueIsReadOnly=False,bDefaultValueIsIgnored=False,bAdvancedView=False,bOrphanedPin=False,)
CustomProperties Pin (PinId=B6B6F2FA4F859BAB349842874FE89082,PinName="then",Direction="EGPD_Output",PinType.PinCategory="exec",PinType.PinSubCategory="",PinType.PinSubCategoryObject=None,PinType.PinSubCategoryMemberReference=(),PinType.PinValueType=(),PinType.ContainerType=None,PinType.bIsReference=False,PinType.bIsConst=False,PinType.bIsWeakPointer=False,PinType.bIsUObjectWrapper=False,PinType.bSerializeAsSinglePrecisionFloat=False,LinkedTo=(K2Node_RemoveDelegate_0 DC1676034F46ABF8FEE12AB4A9D88E8A,),PersistentGuid=00000000000000000000000000000000,bHidden=False,bNotConnectable=False,bDefaultValueIsReadOnly=False,bDefaultValueIsIgnored=False,bAdvancedView=False,bOrphanedPin=False,)
CustomProperties Pin (PinId=36C7FE6943FE88D46D8C769DD84352E0,PinName="Target",Direction="EGPD_Output",PinType.PinCategory="object",PinType.PinSubCategory="",PinType.PinSubCategoryObject="/Script/CoreUObject.Class'/Script/Engine.Actor'",PinType.PinSubCategoryMemberReference=(),PinType.PinValueType=(),PinType.ContainerType=None,PinType.bIsReference=False,PinType.bIsConst=False,PinType.bIsWeakPointer=False,PinType.bIsUObjectWrapper=False,PinType.bSerializeAsSinglePrecisionFloat=False,LinkedTo=(K2Node_RemoveDelegate_0 CAF5C9B84211311446EA09AE6915F55C,K2Node_Knot_43 ACB3EDF0431F020409CB20B90656D271,),PersistentGuid=00000000000000000000000000000000,bHidden=False,bNotConnectable=False,bDefaultValueIsReadOnly=False,bDefaultValueIsIgnored=False,bAdvancedView=False,bOrphanedPin=False,)
CustomProperties UserDefinedPin (PinName="Target",PinType=(PinCategory="object",PinSubCategoryObject="/Script/CoreUObject.Class'/Script/Engine.Actor'"),DesiredPinDirection=EGPD_Output)
End Object
Begin Object Class=/Script/BlueprintGraph.K2Node_CallFunction Name="K2Node_CallFunction_1" ExportPath="/Script/BlueprintGraph.K2Node_CallFunction'/Game/Examples/BallShooter/Blueprints/BallShooterEnvironment.BallShooterEnvironment:EventGraph.K2Node_CallFunction_1'"
FunctionReference=(MemberName="K2_DestroyActor",bSelfContext=True)
NodePosX=1824
NodePosY=704
NodeGuid=BF68D5B5495FF757F8FC5BB8D10D7037
CustomProperties Pin (PinId=B1DCC855266643A3907D7AE3E413712F,PinName="execute",PinToolTip="\nExec",PinType.PinCategory="exec",PinType.PinSubCategory="",PinType.PinSubCategoryObject=None,PinType.PinSubCategoryMemberReference=(),PinType.PinValueType=(),PinType.ContainerType=None,PinType.bIsReference=False,PinType.bIsConst=False,PinType.bIsWeakPointer=False,PinType.bIsUObjectWrapper=False,PinType.bSerializeAsSinglePrecisionFloat=False,LinkedTo=(K2Node_RemoveDelegate_0 A47B314B412DFFBD65A13C900B5A7E70,),PersistentGuid=00000000000000000000000000000000,bHidden=False,bNotConnectable=False,bDefaultValueIsReadOnly=False,bDefaultValueIsIgnored=False,bAdvancedView=False,bOrphanedPin=False,)
CustomProperties Pin (PinId=EDE2720873F64D05AE86117262E1A031,PinName="then",PinToolTip="\nExec",Direction="EGPD_Output",PinType.PinCategory="exec",PinType.PinSubCategory="",PinType.PinSubCategoryObject=None,PinType.PinSubCategoryMemberReference=(),PinType.PinValueType=(),PinType.ContainerType=None,PinType.bIsReference=False,PinType.bIsConst=False,PinType.bIsWeakPointer=False,PinType.bIsUObjectWrapper=False,PinType.bSerializeAsSinglePrecisionFloat=False,PersistentGuid=00000000000000000000000000000000,bHidden=False,bNotConnectable=False,bDefaultValueIsReadOnly=False,bDefaultValueIsIgnored=False,bAdvancedView=False,bOrphanedPin=False,)
CustomProperties Pin (PinId=426A9A22169A43128352490FED2213DD,PinName="self",PinFriendlyName=NSLOCTEXT("K2Node", "Target", "Target"),PinToolTip="Target\nActor Object Reference",PinType.PinCategory="object",PinType.PinSubCategory="",PinType.PinSubCategoryObject="/Script/CoreUObject.Class'/Script/Engine.Actor'",PinType.PinSubCategoryMemberReference=(),PinType.PinValueType=(),PinType.ContainerType=None,PinType.bIsReference=False,PinType.bIsConst=False,PinType.bIsWeakPointer=False,PinType.bIsUObjectWrapper=False,PinType.bSerializeAsSinglePrecisionFloat=False,LinkedTo=(K2Node_Knot_44 7586998A4521E59D05A459A0F1F81CBA,),PersistentGuid=00000000000000000000000000000000,bHidden=False,bNotConnectable=False,bDefaultValueIsReadOnly=False,bDefaultValueIsIgnored=False,bAdvancedView=False,bOrphanedPin=False,)
End Object
Begin Object Class=/Script/BlueprintGraph.K2Node_RemoveDelegate Name="K2Node_RemoveDelegate_0" ExportPath="/Script/BlueprintGraph.K2Node_RemoveDelegate'/Game/Examples/BallShooter/Blueprints/BallShooterEnvironment.BallShooterEnvironment:EventGraph.K2Node_RemoveDelegate_0'"
DelegateReference=(MemberParent="/Script/CoreUObject.Class'/Script/Engine.Actor'",MemberName="OnEndPlay")
NodePosX=1536
NodePosY=720
NodeGuid=6CD9A5AC44DD48A91022DDA55AB7B3E2
CustomProperties Pin (PinId=DC1676034F46ABF8FEE12AB4A9D88E8A,PinName="execute",PinType.PinCategory="exec",PinType.PinSubCategory="",PinType.PinSubCategoryObject=None,PinType.PinSubCategoryMemberReference=(),PinType.PinValueType=(),PinType.ContainerType=None,PinType.bIsReference=False,PinType.bIsConst=False,PinType.bIsWeakPointer=False,PinType.bIsUObjectWrapper=False,PinType.bSerializeAsSinglePrecisionFloat=False,LinkedTo=(K2Node_CustomEvent_10 B6B6F2FA4F859BAB349842874FE89082,),PersistentGuid=00000000000000000000000000000000,bHidden=False,bNotConnectable=False,bDefaultValueIsReadOnly=False,bDefaultValueIsIgnored=False,bAdvancedView=False,bOrphanedPin=False,)
CustomProperties Pin (PinId=A47B314B412DFFBD65A13C900B5A7E70,PinName="then",Direction="EGPD_Output",PinType.PinCategory="exec",PinType.PinSubCategory="",PinType.PinSubCategoryObject=None,PinType.PinSubCategoryMemberReference=(),PinType.PinValueType=(),PinType.ContainerType=None,PinType.bIsReference=False,PinType.bIsConst=False,PinType.bIsWeakPointer=False,PinType.bIsUObjectWrapper=False,PinType.bSerializeAsSinglePrecisionFloat=False,LinkedTo=(K2Node_CallFunction_1 B1DCC855266643A3907D7AE3E413712F,),PersistentGuid=00000000000000000000000000000000,bHidden=False,bNotConnectable=False,bDefaultValueIsReadOnly=False,bDefaultValueIsIgnored=False,bAdvancedView=False,bOrphanedPin=False,)
CustomProperties Pin (PinId=CAF5C9B84211311446EA09AE6915F55C,PinName="self",PinFriendlyName=NSLOCTEXT("K2Node", "BaseMCDelegateSelfPinName", "Target"),PinType.PinCategory="object",PinType.PinSubCategory="",PinType.PinSubCategoryObject="/Script/CoreUObject.Class'/Script/Engine.Actor'",PinType.PinSubCategoryMemberReference=(),PinType.PinValueType=(),PinType.ContainerType=None,PinType.bIsReference=False,PinType.bIsConst=False,PinType.bIsWeakPointer=False,PinType.bIsUObjectWrapper=False,PinType.bSerializeAsSinglePrecisionFloat=False,LinkedTo=(K2Node_CustomEvent_10 36C7FE6943FE88D46D8C769DD84352E0,),PersistentGuid=00000000000000000000000000000000,bHidden=False,bNotConnectable=False,bDefaultValueIsReadOnly=False,bDefaultValueIsIgnored=False,bAdvancedView=False,bOrphanedPin=False,)
CustomProperties Pin (PinId=A1CAB1B94B18DABD42F247B0BB560786,PinName="Delegate",PinFriendlyName=NSLOCTEXT("K2Node", "PinFriendlyDelegatetName", "Event"),PinType.PinCategory="Delegate",PinType.PinSubCategory="",PinType.PinSubCategoryObject=None,PinType.PinSubCategoryMemberReference=(MemberParent="/Script/CoreUObject.Package'/Script/Engine'",MemberName="ActorEndPlaySignature__DelegateSignature"),PinType.PinValueType=(),PinType.ContainerType=None,PinType.bIsReference=True,PinType.bIsConst=True,PinType.bIsWeakPointer=False,PinType.bIsUObjectWrapper=False,PinType.bSerializeAsSinglePrecisionFloat=False,LinkedTo=(K2Node_CustomEvent_0 DA10B1984E92B126FB09CE9D0F767D2E,),PersistentGuid=00000000000000000000000000000000,bHidden=False,bNotConnectable=False,bDefaultValueIsReadOnly=False,bDefaultValueIsIgnored=False,bAdvancedView=False,bOrphanedPin=False,)
End Object
Begin Object Class=/Script/BlueprintGraph.K2Node_Knot Name="K2Node_Knot_43" ExportPath="/Script/BlueprintGraph.K2Node_Knot'/Game/Examples/BallShooter/Blueprints/BallShooterEnvironment.BallShooterEnvironment:EventGraph.K2Node_Knot_43'"
NodePosX=1536
NodePosY=848
NodeGuid=67ECB0AE4F9C76E769F7DDB674C6DE7B
CustomProperties Pin (PinId=ACB3EDF0431F020409CB20B90656D271,PinName="InputPin",PinType.PinCategory="object",PinType.PinSubCategory="",PinType.PinSubCategoryObject="/Script/CoreUObject.Class'/Script/Engine.Actor'",PinType.PinSubCategoryMemberReference=(),PinType.PinValueType=(),PinType.ContainerType=None,PinType.bIsReference=False,PinType.bIsConst=False,PinType.bIsWeakPointer=False,PinType.bIsUObjectWrapper=False,PinType.bSerializeAsSinglePrecisionFloat=False,LinkedTo=(K2Node_CustomEvent_10 36C7FE6943FE88D46D8C769DD84352E0,),PersistentGuid=00000000000000000000000000000000,bHidden=False,bNotConnectable=False,bDefaultValueIsReadOnly=False,bDefaultValueIsIgnored=True,bAdvancedView=False,bOrphanedPin=False,)
CustomProperties Pin (PinId=E78C3D7D4FF2F2999D063C8E4F011EA2,PinName="OutputPin",Direction="EGPD_Output",PinType.PinCategory="object",PinType.PinSubCategory="",PinType.PinSubCategoryObject="/Script/CoreUObject.Class'/Script/Engine.Actor'",PinType.PinSubCategoryMemberReference=(),PinType.PinValueType=(),PinType.ContainerType=None,PinType.bIsReference=False,PinType.bIsConst=False,PinType.bIsWeakPointer=False,PinType.bIsUObjectWrapper=False,PinType.bSerializeAsSinglePrecisionFloat=False,LinkedTo=(K2Node_Knot_44 1B5B017C4AE4551E63A3A38367F13E4C,),PersistentGuid=00000000000000000000000000000000,bHidden=False,bNotConnectable=False,bDefaultValueIsReadOnly=False,bDefaultValueIsIgnored=False,bAdvancedView=False,bOrphanedPin=False,)
End Object
Begin Object Class=/Script/BlueprintGraph.K2Node_Knot Name="K2Node_Knot_44" ExportPath="/Script/BlueprintGraph.K2Node_Knot'/Game/Examples/BallShooter/Blueprints/BallShooterEnvironment.BallShooterEnvironment:EventGraph.K2Node_Knot_44'"
NodePosX=1744
NodePosY=848
NodeGuid=CF1D0185484A6C8BC91501BF3ECAEC9C
CustomProperties Pin (PinId=1B5B017C4AE4551E63A3A38367F13E4C,PinName="InputPin",PinType.PinCategory="object",PinType.PinSubCategory="",PinType.PinSubCategoryObject="/Script/CoreUObject.Class'/Script/Engine.Actor'",PinType.PinSubCategoryMemberReference=(),PinType.PinValueType=(),PinType.ContainerType=None,PinType.bIsReference=False,PinType.bIsConst=False,PinType.bIsWeakPointer=False,PinType.bIsUObjectWrapper=False,PinType.bSerializeAsSinglePrecisionFloat=False,LinkedTo=(K2Node_Knot_43 E78C3D7D4FF2F2999D063C8E4F011EA2,),PersistentGuid=00000000000000000000000000000000,bHidden=False,bNotConnectable=False,bDefaultValueIsReadOnly=False,bDefaultValueIsIgnored=True,bAdvancedView=False,bOrphanedPin=False,)
CustomProperties Pin (PinId=7586998A4521E59D05A459A0F1F81CBA,PinName="OutputPin",Direction="EGPD_Output",PinType.PinCategory="object",PinType.PinSubCategory="",PinType.PinSubCategoryObject="/Script/CoreUObject.Class'/Script/Engine.Actor'",PinType.PinSubCategoryMemberReference=(),PinType.PinValueType=(),PinType.ContainerType=None,PinType.bIsReference=False,PinType.bIsConst=False,PinType.bIsWeakPointer=False,PinType.bIsUObjectWrapper=False,PinType.bSerializeAsSinglePrecisionFloat=False,LinkedTo=(K2Node_CallFunction_1 426A9A22169A43128352490FED2213DD,),PersistentGuid=00000000000000000000000000000000,bHidden=False,bNotConnectable=False,bDefaultValueIsReadOnly=False,bDefaultValueIsIgnored=False,bAdvancedView=False,bOrphanedPin=False,)
End Object
Begin Object Class=/Script/BlueprintGraph.K2Node_CustomEvent Name="K2Node_CustomEvent_11" ExportPath="/Script/BlueprintGraph.K2Node_CustomEvent'/Game/Examples/BallShooter/Blueprints/BallShooterEnvironment.BallShooterEnvironment:EventGraph.K2Node_CustomEvent_11'"
CustomFunctionName="Set Trainer Properties"
NodePosX=288
NodePosY=1744
NodeGuid=2DED793D4D1832E32B73BC8C1ED00998
CustomProperties Pin (PinId=20D06FF54A0B45B4B6C5EBAA49F62063,PinName="OutputDelegate",Direction="EGPD_Output",PinType.PinCategory="delegate",PinType.PinSubCategory="",PinType.PinSubCategoryObject=None,PinType.PinSubCategoryMemberReference=(MemberParent="/Script/Engine.BlueprintGeneratedClass'/Game/Examples/BallShooter/Blueprints/BallShooterEnvironment.BallShooterEnvironment_C'",MemberName="Set Trainer Properties",MemberGuid=2DED793D4D1832E32B73BC8C1ED00998),PinType.PinValueType=(),PinType.ContainerType=None,PinType.bIsReference=False,PinType.bIsConst=False,PinType.bIsWeakPointer=False,PinType.bIsUObjectWrapper=False,PinType.bSerializeAsSinglePrecisionFloat=False,PersistentGuid=00000000000000000000000000000000,bHidden=False,bNotConnectable=False,bDefaultValueIsReadOnly=False,bDefaultValueIsIgnored=False,bAdvancedView=False,bOrphanedPin=False,)
CustomProperties Pin (PinId=B896A4574D482AA0AD8A8EA7F5DEDD23,PinName="then",Direction="EGPD_Output",PinType.PinCategory="exec",PinType.PinSubCategory="",PinType.PinSubCategoryObject=None,PinType.PinSubCategoryMemberReference=(),PinType.PinValueType=(),PinType.ContainerType=None,PinType.bIsReference=False,PinType.bIsConst=False,PinType.bIsWeakPointer=False,PinType.bIsUObjectWrapper=False,PinType.bSerializeAsSinglePrecisionFloat=False,LinkedTo=(K2Node_DynamicCast_3 42DEA31F4C3F9A6CFC0E9A8ED7AA40F2,),PersistentGuid=00000000000000000000000000000000,bHidden=False,bNotConnectable=False,bDefaultValueIsReadOnly=False,bDefaultValueIsIgnored=False,bAdvancedView=False,bOrphanedPin=False,)
End Object
Begin Object Class=/Script/UnrealEd.EdGraphNode_Comment Name="EdGraphNode_Comment_3" ExportPath="/Script/UnrealEd.EdGraphNode_Comment'/Game/Examples/BallShooter/Blueprints/BallShooterEnvironment.BallShooterEnvironment:EventGraph.EdGraphNode_Comment_3'"
bCommentBubbleVisible_InDetailsPanel=False
NodePosX=272
NodePosY=1696
NodeWidth=1504
NodeHeight=272
bCommentBubblePinned=False
bCommentBubbleVisible=False
NodeComment="Update The Properties of the Trainer From the Properties in the Environment"
NodeGuid=7DCF2F754F84AA30610A498409C24A57
End Object
Begin Object Class=/Script/BlueprintGraph.K2Node_Knot Name="K2Node_Knot_4" ExportPath="/Script/BlueprintGraph.K2Node_Knot'/Game/Examples/BallShooter/Blueprints/BallShooterEnvironment.BallShooterEnvironment:EventGraph.K2Node_Knot_4'"
NodePosX=1328
NodePosY=1904
NodeGuid=1B1A8E204E4296EA652721871BCCF9D6
CustomProperties Pin (PinId=11CACC6E4038274D9201D7AABEC96B9E,PinName="InputPin",PinType.PinCategory="object",PinType.PinSubCategory="",PinType.PinSubCategoryObject="/Script/Engine.BlueprintGeneratedClass'/Game/Examples/BallShooter/Blueprints/BallShooterTrainer.BallShooterTrainer_C'",PinType.PinSubCategoryMemberReference=(),PinType.PinValueType=(),PinType.ContainerType=None,PinType.bIsReference=False,PinType.bIsConst=False,PinType.bIsWeakPointer=False,PinType.bIsUObjectWrapper=False,PinType.bSerializeAsSinglePrecisionFloat=False,LinkedTo=(K2Node_Knot_3 CC59244D44C11F86D0DEC8B5FFC82079,),PersistentGuid=00000000000000000000000000000000,bHidden=False,bNotConnectable=False,bDefaultValueIsReadOnly=False,bDefaultValueIsIgnored=True,bAdvancedView=False,bOrphanedPin=False,)
CustomProperties Pin (PinId=7D17B0974E12E9DFB4578A97878A9F94,PinName="OutputPin",Direction="EGPD_Output",PinType.PinCategory="object",PinType.PinSubCategory="",PinType.PinSubCategoryObject="/Script/Engine.BlueprintGeneratedClass'/Game/Examples/BallShooter/Blueprints/BallShooterTrainer.BallShooterTrainer_C'",PinType.PinSubCategoryMemberReference=(),PinType.PinValueType=(),PinType.ContainerType=None,PinType.bIsReference=False,PinType.bIsConst=False,PinType.bIsWeakPointer=False,PinType.bIsUObjectWrapper=False,PinType.bSerializeAsSinglePrecisionFloat=False,LinkedTo=(K2Node_VariableSet_2 C3A2EE8D4A03D372E8855F88B5FEE427,),PersistentGuid=00000000000000000000000000000000,bHidden=False,bNotConnectable=False,bDefaultValueIsReadOnly=False,bDefaultValueIsIgnored=False,bAdvancedView=False,bOrphanedPin=False,)
End Object
Begin Object Class=/Script/BlueprintGraph.K2Node_Knot Name="K2Node_Knot_3" ExportPath="/Script/BlueprintGraph.K2Node_Knot'/Game/Examples/BallShooter/Blueprints/BallShooterEnvironment.BallShooterEnvironment:EventGraph.K2Node_Knot_3'"
NodePosX=1056
NodePosY=1904
NodeGuid=B22D3E664C14DDB0527EB5A3EA990F5F
CustomProperties Pin (PinId=1B15D8974DD4E72B096BD18DC973C3B4,PinName="InputPin",PinType.PinCategory="object",PinType.PinSubCategory="",PinType.PinSubCategoryObject="/Script/Engine.BlueprintGeneratedClass'/Game/Examples/BallShooter/Blueprints/BallShooterTrainer.BallShooterTrainer_C'",PinType.PinSubCategoryMemberReference=(),PinType.PinValueType=(),PinType.ContainerType=None,PinType.bIsReference=False,PinType.bIsConst=False,PinType.bIsWeakPointer=False,PinType.bIsUObjectWrapper=False,PinType.bSerializeAsSinglePrecisionFloat=False,LinkedTo=(K2Node_DynamicCast_3 B3CEF3BF4A750FD3EA260FBD2CC40D3A,),PersistentGuid=00000000000000000000000000000000,bHidden=False,bNotConnectable=False,bDefaultValueIsReadOnly=False,bDefaultValueIsIgnored=True,bAdvancedView=False,bOrphanedPin=False,)
CustomProperties Pin (PinId=CC59244D44C11F86D0DEC8B5FFC82079,PinName="OutputPin",Direction="EGPD_Output",PinType.PinCategory="object",PinType.PinSubCategory="",PinType.PinSubCategoryObject="/Script/Engine.BlueprintGeneratedClass'/Game/Examples/BallShooter/Blueprints/BallShooterTrainer.BallShooterTrainer_C'",PinType.PinSubCategoryMemberReference=(),PinType.PinValueType=(),PinType.ContainerType=None,PinType.bIsReference=False,PinType.bIsConst=False,PinType.bIsWeakPointer=False,PinType.bIsUObjectWrapper=False,PinType.bSerializeAsSinglePrecisionFloat=False,LinkedTo=(K2Node_Knot_4 11CACC6E4038274D9201D7AABEC96B9E,),PersistentGuid=00000000000000000000000000000000,bHidden=False,bNotConnectable=False,bDefaultValueIsReadOnly=False,bDefaultValueIsIgnored=False,bAdvancedView=False,bOrphanedPin=False,)
End Object
Begin Object Class=/Script/BlueprintGraph.K2Node_VariableSet Name="K2Node_VariableSet_2" ExportPath="/Script/BlueprintGraph.K2Node_VariableSet'/Game/Examples/BallShooter/Blueprints/BallShooterEnvironment.BallShooterEnvironment:EventGraph.K2Node_VariableSet_2'"
VariableReference=(MemberParent="/Script/Engine.BlueprintGeneratedClass'/Game/Examples/BallShooter/Blueprints/BallShooterTrainer.BallShooterTrainer_C'",MemberName="numOfHitsThisEpisode",MemberGuid=F0B5D04C46B3619FBA69BFB19BF4F50A)
SelfContextInfo=NotSelfContext
NodePosX=1392
NodePosY=1776
NodeGuid=00B7FA434C15E9A974F0AD9163774EAF
CustomProperties Pin (PinId=C14846DB410DE8A254F00A9A6237DE5C,PinName="execute",PinType.PinCategory="exec",PinType.PinSubCategory="",PinType.PinSubCategoryObject=None,PinType.PinSubCategoryMemberReference=(),PinType.PinValueType=(),PinType.ContainerType=None,PinType.bIsReference=False,PinType.bIsConst=False,PinType.bIsWeakPointer=False,PinType.bIsUObjectWrapper=False,PinType.bSerializeAsSinglePrecisionFloat=False,LinkedTo=(K2Node_VariableSet_0 B713C7AD4D84E6732C50D0841D00413E,),PersistentGuid=00000000000000000000000000000000,bHidden=False,bNotConnectable=False,bDefaultValueIsReadOnly=False,bDefaultValueIsIgnored=False,bAdvancedView=False,bOrphanedPin=False,)
CustomProperties Pin (PinId=2ACB0D9E4AED7486CAEB9CBCB582344B,PinName="then",Direction="EGPD_Output",PinType.PinCategory="exec",PinType.PinSubCategory="",PinType.PinSubCategoryObject=None,PinType.PinSubCategoryMemberReference=(),PinType.PinValueType=(),PinType.ContainerType=None,PinType.bIsReference=False,PinType.bIsConst=False,PinType.bIsWeakPointer=False,PinType.bIsUObjectWrapper=False,PinType.bSerializeAsSinglePrecisionFloat=False,PersistentGuid=00000000000000000000000000000000,bHidden=False,bNotConnectable=False,bDefaultValueIsReadOnly=False,bDefaultValueIsIgnored=False,bAdvancedView=False,bOrphanedPin=False,)
CustomProperties Pin (PinId=FD7370D348ED5525BA01F4B13D9101F7,PinName="numOfHitsThisEpisode",PinType.PinCategory="int",PinType.PinSubCategory="",PinType.PinSubCategoryObject=None,PinType.PinSubCategoryMemberReference=(),PinType.PinValueType=(),PinType.ContainerType=None,PinType.bIsReference=False,PinType.bIsConst=False,PinType.bIsWeakPointer=False,PinType.bIsUObjectWrapper=False,PinType.bSerializeAsSinglePrecisionFloat=False,DefaultValue="0",AutogeneratedDefaultValue="0",PersistentGuid=00000000000000000000000000000000,bHidden=False,bNotConnectable=False,bDefaultValueIsReadOnly=False,bDefaultValueIsIgnored=False,bAdvancedView=False,bOrphanedPin=False,)
CustomProperties Pin (PinId=D119EDE74391BC8A0EA9D795D0479D1B,PinName="Output_Get",PinToolTip="Retrieves the value of the variable, can use instead of a separate Get node",Direction="EGPD_Output",PinType.PinCategory="int",PinType.PinSubCategory="",PinType.PinSubCategoryObject=None,PinType.PinSubCategoryMemberReference=(),PinType.PinValueType=(),PinType.ContainerType=None,PinType.bIsReference=False,PinType.bIsConst=False,PinType.bIsWeakPointer=False,PinType.bIsUObjectWrapper=False,PinType.bSerializeAsSinglePrecisionFloat=False,DefaultValue="0",AutogeneratedDefaultValue="0",PersistentGuid=00000000000000000000000000000000,bHidden=False,bNotConnectable=False,bDefaultValueIsReadOnly=False,bDefaultValueIsIgnored=False,bAdvancedView=False,bOrphanedPin=False,)
CustomProperties Pin (PinId=C3A2EE8D4A03D372E8855F88B5FEE427,PinName="self",PinFriendlyName=NSLOCTEXT("K2Node", "Target", "Target"),PinType.PinCategory="object",PinType.PinSubCategory="",PinType.PinSubCategoryObject="/Script/Engine.BlueprintGeneratedClass'/Game/Examples/BallShooter/Blueprints/BallShooterTrainer.BallShooterTrainer_C'",PinType.PinSubCategoryMemberReference=(),PinType.PinValueType=(),PinType.ContainerType=None,PinType.bIsReference=False,PinType.bIsConst=False,PinType.bIsWeakPointer=False,PinType.bIsUObjectWrapper=False,PinType.bSerializeAsSinglePrecisionFloat=False,LinkedTo=(K2Node_Knot_4 7D17B0974E12E9DFB4578A97878A9F94,),PersistentGuid=00000000000000000000000000000000,bHidden=False,bNotConnectable=False,bDefaultValueIsReadOnly=False,bDefaultValueIsIgnored=False,bAdvancedView=False,bOrphanedPin=False,)
End Object
Begin Object Class=/Script/BlueprintGraph.K2Node_VariableGet Name="K2Node_VariableGet_9" ExportPath="/Script/BlueprintGraph.K2Node_VariableGet'/Game/Examples/BallShooter/Blueprints/BallShooterEnvironment.BallShooterEnvironment:EventGraph.K2Node_VariableGet_9'"
VariableReference=(MemberName="totalHitPoints",MemberGuid=D641D66C464461CE425B0DB7BEA1CEDC,bSelfContext=True)
NodePosX=848
NodePosY=1904
NodeGuid=8545A830447DF284B48E3D9D3E414B34
CustomProperties Pin (PinId=C43EC3584B5A52AEDF9F33BC7B363275,PinName="totalHitPoints",Direction="EGPD_Output",PinType.PinCategory="int",PinType.PinSubCategory="",PinType.PinSubCategoryObject=None,PinType.PinSubCategoryMemberReference=(),PinType.PinValueType=(),PinType.ContainerType=None,PinType.bIsReference=False,PinType.bIsConst=False,PinType.bIsWeakPointer=False,PinType.bIsUObjectWrapper=False,PinType.bSerializeAsSinglePrecisionFloat=False,DefaultValue="0",AutogeneratedDefaultValue="0",LinkedTo=(K2Node_VariableSet_0 EDE797784B27F9D45D6651BB322BFB3C,),PersistentGuid=00000000000000000000000000000000,bHidden=False,bNotConnectable=False,bDefaultValueIsReadOnly=False,bDefaultValueIsIgnored=False,bAdvancedView=False,bOrphanedPin=False,)
CustomProperties Pin (PinId=4522F6DD491DE05C2327A9829708753B,PinName="self",PinFriendlyName=NSLOCTEXT("K2Node", "Target", "Target"),PinType.PinCategory="object",PinType.PinSubCategory="",PinType.PinSubCategoryObject="/Script/Engine.BlueprintGeneratedClass'/Game/Examples/BallShooter/Blueprints/BallShooterEnvironment.BallShooterEnvironment_C'",PinType.PinSubCategoryMemberReference=(),PinType.PinValueType=(),PinType.ContainerType=None,PinType.bIsReference=False,PinType.bIsConst=False,PinType.bIsWeakPointer=False,PinType.bIsUObjectWrapper=False,PinType.bSerializeAsSinglePrecisionFloat=False,PersistentGuid=00000000000000000000000000000000,bHidden=True,bNotConnectable=False,bDefaultValueIsReadOnly=False,bDefaultValueIsIgnored=False,bAdvancedView=False,bOrphanedPin=False,)
End Object
Begin Object Class=/Script/BlueprintGraph.K2Node_VariableSet Name="K2Node_VariableSet_0" ExportPath="/Script/BlueprintGraph.K2Node_VariableSet'/Game/Examples/BallShooter/Blueprints/BallShooterEnvironment.BallShooterEnvironment:EventGraph.K2Node_VariableSet_0'"
VariableReference=(MemberParent="/Script/Engine.BlueprintGeneratedClass'/Game/Examples/BallShooter/Blueprints/BallShooterTrainer.BallShooterTrainer_C'",MemberName="maxNumberOfHitsPerEpisode",MemberGuid=69CD135547DC773E2A3022A360EF5A57)
SelfContextInfo=NotSelfContext
NodePosX=1056
NodePosY=1776
NodeGuid=86B5CF554790839D8BD770AF1265D775
CustomProperties Pin (PinId=BAA4C4654100D3E0A58BCB8C6A3C8DC8,PinName="execute",PinType.PinCategory="exec",PinType.PinSubCategory="",PinType.PinSubCategoryObject=None,PinType.PinSubCategoryMemberReference=(),PinType.PinValueType=(),PinType.ContainerType=None,PinType.bIsReference=False,PinType.bIsConst=False,PinType.bIsWeakPointer=False,PinType.bIsUObjectWrapper=False,PinType.bSerializeAsSinglePrecisionFloat=False,LinkedTo=(K2Node_DynamicCast_3 69ED5A874F591E3A0B89A6A4E1B5E1B8,),PersistentGuid=00000000000000000000000000000000,bHidden=False,bNotConnectable=False,bDefaultValueIsReadOnly=False,bDefaultValueIsIgnored=False,bAdvancedView=False,bOrphanedPin=False,)
CustomProperties Pin (PinId=B713C7AD4D84E6732C50D0841D00413E,PinName="then",Direction="EGPD_Output",PinType.PinCategory="exec",PinType.PinSubCategory="",PinType.PinSubCategoryObject=None,PinType.PinSubCategoryMemberReference=(),PinType.PinValueType=(),PinType.ContainerType=None,PinType.bIsReference=False,PinType.bIsConst=False,PinType.bIsWeakPointer=False,PinType.bIsUObjectWrapper=False,PinType.bSerializeAsSinglePrecisionFloat=False,LinkedTo=(K2Node_VariableSet_2 C14846DB410DE8A254F00A9A6237DE5C,),PersistentGuid=00000000000000000000000000000000,bHidden=False,bNotConnectable=False,bDefaultValueIsReadOnly=False,bDefaultValueIsIgnored=False,bAdvancedView=False,bOrphanedPin=False,)
CustomProperties Pin (PinId=EDE797784B27F9D45D6651BB322BFB3C,PinName="maxNumberOfHitsPerEpisode",PinType.PinCategory="int",PinType.PinSubCategory="",PinType.PinSubCategoryObject=None,PinType.PinSubCategoryMemberReference=(),PinType.PinValueType=(),PinType.ContainerType=None,PinType.bIsReference=False,PinType.bIsConst=False,PinType.bIsWeakPointer=False,PinType.bIsUObjectWrapper=False,PinType.bSerializeAsSinglePrecisionFloat=False,DefaultValue="0",AutogeneratedDefaultValue="0",LinkedTo=(K2Node_VariableGet_9 C43EC3584B5A52AEDF9F33BC7B363275,),PersistentGuid=00000000000000000000000000000000,bHidden=False,bNotConnectable=False,bDefaultValueIsReadOnly=False,bDefaultValueIsIgnored=False,bAdvancedView=False,bOrphanedPin=False,)
CustomProperties Pin (PinId=39A6D97F434937FC7AA245985F79D95F,PinName="Output_Get",PinToolTip="Retrieves the value of the variable, can use instead of a separate Get node",Direction="EGPD_Output",PinType.PinCategory="int",PinType.PinSubCategory="",PinType.PinSubCategoryObject=None,PinType.PinSubCategoryMemberReference=(),PinType.PinValueType=(),PinType.ContainerType=None,PinType.bIsReference=False,PinType.bIsConst=False,PinType.bIsWeakPointer=False,PinType.bIsUObjectWrapper=False,PinType.bSerializeAsSinglePrecisionFloat=False,DefaultValue="0",AutogeneratedDefaultValue="0",PersistentGuid=00000000000000000000000000000000,bHidden=False,bNotConnectable=False,bDefaultValueIsReadOnly=False,bDefaultValueIsIgnored=False,bAdvancedView=False,bOrphanedPin=False,)
CustomProperties Pin (PinId=2D346B0342B1400C42D3EBB7281E747B,PinName="self",PinFriendlyName=NSLOCTEXT("K2Node", "Target", "Target"),PinType.PinCategory="object",PinType.PinSubCategory="",PinType.PinSubCategoryObject="/Script/Engine.BlueprintGeneratedClass'/Game/Examples/BallShooter/Blueprints/BallShooterTrainer.BallShooterTrainer_C'",PinType.PinSubCategoryMemberReference=(),PinType.PinValueType=(),PinType.ContainerType=None,PinType.bIsReference=False,PinType.bIsConst=False,PinType.bIsWeakPointer=False,PinType.bIsUObjectWrapper=False,PinType.bSerializeAsSinglePrecisionFloat=False,LinkedTo=(K2Node_DynamicCast_3 B3CEF3BF4A750FD3EA260FBD2CC40D3A,),PersistentGuid=00000000000000000000000000000000,bHidden=False,bNotConnectable=False,bDefaultValueIsReadOnly=False,bDefaultValueIsIgnored=False,bAdvancedView=False,bOrphanedPin=False,)
End Object
Begin Object Class=/Script/BlueprintGraph.K2Node_DynamicCast Name="K2Node_DynamicCast_3" ExportPath="/Script/BlueprintGraph.K2Node_DynamicCast'/Game/Examples/BallShooter/Blueprints/BallShooterEnvironment.BallShooterEnvironment:EventGraph.K2Node_DynamicCast_3'"
TargetType="/Script/Engine.BlueprintGeneratedClass'/Game/Examples/BallShooter/Blueprints/BallShooterTrainer.BallShooterTrainer_C'"
NodePosX=704
NodePosY=1760
NodeGuid=2034683D4361D29C767122902D2DD188
CustomProperties Pin (PinId=42DEA31F4C3F9A6CFC0E9A8ED7AA40F2,PinName="execute",PinType.PinCategory="exec",PinType.PinSubCategory="",PinType.PinSubCategoryObject=None,PinType.PinSubCategoryMemberReference=(),PinType.PinValueType=(),PinType.ContainerType=None,PinType.bIsReference=False,PinType.bIsConst=False,PinType.bIsWeakPointer=False,PinType.bIsUObjectWrapper=False,PinType.bSerializeAsSinglePrecisionFloat=False,LinkedTo=(K2Node_CustomEvent_11 B896A4574D482AA0AD8A8EA7F5DEDD23,),PersistentGuid=00000000000000000000000000000000,bHidden=False,bNotConnectable=False,bDefaultValueIsReadOnly=False,bDefaultValueIsIgnored=False,bAdvancedView=False,bOrphanedPin=False,)
CustomProperties Pin (PinId=69ED5A874F591E3A0B89A6A4E1B5E1B8,PinName="then",Direction="EGPD_Output",PinType.PinCategory="exec",PinType.PinSubCategory="",PinType.PinSubCategoryObject=None,PinType.PinSubCategoryMemberReference=(),PinType.PinValueType=(),PinType.ContainerType=None,PinType.bIsReference=False,PinType.bIsConst=False,PinType.bIsWeakPointer=False,PinType.bIsUObjectWrapper=False,PinType.bSerializeAsSinglePrecisionFloat=False,LinkedTo=(K2Node_VariableSet_0 BAA4C4654100D3E0A58BCB8C6A3C8DC8,),PersistentGuid=00000000000000000000000000000000,bHidden=False,bNotConnectable=False,bDefaultValueIsReadOnly=False,bDefaultValueIsIgnored=False,bAdvancedView=False,bOrphanedPin=False,)
CustomProperties Pin (PinId=71D8F8E0435B76C340437997181825F1,PinName="CastFailed",Direction="EGPD_Output",PinType.PinCategory="exec",PinType.PinSubCategory="",PinType.PinSubCategoryObject=None,PinType.PinSubCategoryMemberReference=(),PinType.PinValueType=(),PinType.ContainerType=None,PinType.bIsReference=False,PinType.bIsConst=False,PinType.bIsWeakPointer=False,PinType.bIsUObjectWrapper=False,PinType.bSerializeAsSinglePrecisionFloat=False,PersistentGuid=00000000000000000000000000000000,bHidden=False,bNotConnectable=False,bDefaultValueIsReadOnly=False,bDefaultValueIsIgnored=False,bAdvancedView=False,bOrphanedPin=False,)
CustomProperties Pin (PinId=F6DE953C4473F73305C13B909746F73E,PinName="Object",PinType.PinCategory="object",PinType.PinSubCategory="",PinType.PinSubCategoryObject="/Script/CoreUObject.Class'/Script/CoreUObject.Object'",PinType.PinSubCategoryMemberReference=(),PinType.PinValueType=(),PinType.ContainerType=None,PinType.bIsReference=False,PinType.bIsConst=False,PinType.bIsWeakPointer=False,PinType.bIsUObjectWrapper=False,PinType.bSerializeAsSinglePrecisionFloat=False,LinkedTo=(K2Node_CallFunction_13 619EE6374E77986AC5F1E58A4B288EFC,),PersistentGuid=00000000000000000000000000000000,bHidden=False,bNotConnectable=False,bDefaultValueIsReadOnly=False,bDefaultValueIsIgnored=False,bAdvancedView=False,bOrphanedPin=False,)
CustomProperties Pin (PinId=B3CEF3BF4A750FD3EA260FBD2CC40D3A,PinName="AsBall Shooter Trainer",Direction="EGPD_Output",PinType.PinCategory="object",PinType.PinSubCategory="",PinType.PinSubCategoryObject="/Script/Engine.BlueprintGeneratedClass'/Game/Examples/BallShooter/Blueprints/BallShooterTrainer.BallShooterTrainer_C'",PinType.PinSubCategoryMemberReference=(),PinType.PinValueType=(),PinType.ContainerType=None,PinType.bIsReference=False,PinType.bIsConst=False,PinType.bIsWeakPointer=False,PinType.bIsUObjectWrapper=False,PinType.bSerializeAsSinglePrecisionFloat=False,LinkedTo=(K2Node_VariableSet_0 2D346B0342B1400C42D3EBB7281E747B,K2Node_Knot_3 1B15D8974DD4E72B096BD18DC973C3B4,),PersistentGuid=00000000000000000000000000000000,bHidden=False,bNotConnectable=False,bDefaultValueIsReadOnly=False,bDefaultValueIsIgnored=False,bAdvancedView=False,bOrphanedPin=False,)
CustomProperties Pin (PinId=41A70FB341DB81AAA27D2CBCA45A5ECE,PinName="bSuccess",Direction="EGPD_Output",PinType.PinCategory="bool",PinType.PinSubCategory="",PinType.PinSubCategoryObject=None,PinType.PinSubCategoryMemberReference=(),PinType.PinValueType=(),PinType.ContainerType=None,PinType.bIsReference=False,PinType.bIsConst=False,PinType.bIsWeakPointer=False,PinType.bIsUObjectWrapper=False,PinType.bSerializeAsSinglePrecisionFloat=False,PersistentGuid=00000000000000000000000000000000,bHidden=True,bNotConnectable=False,bDefaultValueIsReadOnly=False,bDefaultValueIsIgnored=False,bAdvancedView=False,bOrphanedPin=False,)
End Object
Begin Object Class=/Script/BlueprintGraph.K2Node_CallFunction Name="K2Node_CallFunction_13" ExportPath="/Script/BlueprintGraph.K2Node_CallFunction'/Game/Examples/BallShooter/Blueprints/BallShooterEnvironment.BallShooterEnvironment:EventGraph.K2Node_CallFunction_13'"
bIsPureFunc=True
FunctionReference=(MemberParent="/Script/CoreUObject.Class'/Script/Engine.BlueprintMapLibrary'",MemberName="Map_Find")
NodePosX=464
NodePosY=1840
NodeGuid=27B1947D4D441E7EE16F49B2C57AAC74
CustomProperties Pin (PinId=298EAAEC4704E7B528982CA7BCE98146,PinName="self",PinFriendlyName=NSLOCTEXT("K2Node", "Target", "Target"),PinType.PinCategory="object",PinType.PinSubCategory="",PinType.PinSubCategoryObject="/Script/CoreUObject.Class'/Script/Engine.BlueprintMapLibrary'",PinType.PinSubCategoryMemberReference=(),PinType.PinValueType=(),PinType.ContainerType=None,PinType.bIsReference=False,PinType.bIsConst=False,PinType.bIsWeakPointer=False,PinType.bIsUObjectWrapper=False,PinType.bSerializeAsSinglePrecisionFloat=False,DefaultObject="/Script/Engine.Default__BlueprintMapLibrary",PersistentGuid=00000000000000000000000000000000,bHidden=True,bNotConnectable=False,bDefaultValueIsReadOnly=False,bDefaultValueIsIgnored=False,bAdvancedView=False,bOrphanedPin=False,)
CustomProperties Pin (PinId=3B1B98974F795F19F00E989E8FDF74C8,PinName="TargetMap",PinType.PinCategory="int",PinType.PinSubCategory="",PinType.PinSubCategoryObject=None,PinType.PinSubCategoryMemberReference=(),PinType.PinValueType=(TerminalCategory="object",TerminalSubCategoryObject="/Script/CoreUObject.Class'/Script/Schola.AbstractTrainer'"),PinType.ContainerType=Map,PinType.bIsReference=True,PinType.bIsConst=True,PinType.bIsWeakPointer=False,PinType.bIsUObjectWrapper=False,PinType.bSerializeAsSinglePrecisionFloat=False,LinkedTo=(K2Node_VariableGet_5 F493172F4EBD7FE1555FF8BC14C4DA16,),PersistentGuid=00000000000000000000000000000000,bHidden=False,bNotConnectable=False,bDefaultValueIsReadOnly=False,bDefaultValueIsIgnored=True,bAdvancedView=False,bOrphanedPin=False,)
CustomProperties Pin (PinId=EFE8AFEB4E0FFC8D707AE799D94671D9,PinName="Key",PinType.PinCategory="int",PinType.PinSubCategory="",PinType.PinSubCategoryObject=None,PinType.PinSubCategoryMemberReference=(),PinType.PinValueType=(),PinType.ContainerType=None,PinType.bIsReference=True,PinType.bIsConst=True,PinType.bIsWeakPointer=False,PinType.bIsUObjectWrapper=False,PinType.bSerializeAsSinglePrecisionFloat=False,PersistentGuid=00000000000000000000000000000000,bHidden=False,bNotConnectable=False,bDefaultValueIsReadOnly=False,bDefaultValueIsIgnored=False,bAdvancedView=False,bOrphanedPin=False,)
CustomProperties Pin (PinId=619EE6374E77986AC5F1E58A4B288EFC,PinName="Value",Direction="EGPD_Output",PinType.PinCategory="object",PinType.PinSubCategory="",PinType.PinSubCategoryObject="/Script/CoreUObject.Class'/Script/Schola.AbstractTrainer'",PinType.PinSubCategoryMemberReference=(),PinType.PinValueType=(),PinType.ContainerType=None,PinType.bIsReference=False,PinType.bIsConst=False,PinType.bIsWeakPointer=False,PinType.bIsUObjectWrapper=False,PinType.bSerializeAsSinglePrecisionFloat=False,LinkedTo=(K2Node_DynamicCast_3 F6DE953C4473F73305C13B909746F73E,),PersistentGuid=00000000000000000000000000000000,bHidden=False,bNotConnectable=False,bDefaultValueIsReadOnly=False,bDefaultValueIsIgnored=False,bAdvancedView=False,bOrphanedPin=False,)
CustomProperties Pin (PinId=02E3D42F4B3AFB476CD7B4973F33FE93,PinName="ReturnValue",Direction="EGPD_Output",PinType.PinCategory="bool",PinType.PinSubCategory="",PinType.PinSubCategoryObject=None,PinType.PinSubCategoryMemberReference=(),PinType.PinValueType=(),PinType.ContainerType=None,PinType.bIsReference=False,PinType.bIsConst=False,PinType.bIsWeakPointer=False,PinType.bIsUObjectWrapper=False,PinType.bSerializeAsSinglePrecisionFloat=False,DefaultValue="false",AutogeneratedDefaultValue="false",PersistentGuid=00000000000000000000000000000000,bHidden=False,bNotConnectable=False,bDefaultValueIsReadOnly=False,bDefaultValueIsIgnored=False,bAdvancedView=False,bOrphanedPin=False,)
End Object
Begin Object Class=/Script/BlueprintGraph.K2Node_VariableGet Name="K2Node_VariableGet_5" ExportPath="/Script/BlueprintGraph.K2Node_VariableGet'/Game/Examples/BallShooter/Blueprints/BallShooterEnvironment.BallShooterEnvironment:EventGraph.K2Node_VariableGet_5'"
VariableReference=(MemberName="Trainers",bSelfContext=True)
NodePosX=304
NodePosY=1840
NodeGuid=9B10A09141FE2089A85F4AA068E19762
CustomProperties Pin (PinId=F493172F4EBD7FE1555FF8BC14C4DA16,PinName="Trainers",PinFriendlyName="Trainers",Direction="EGPD_Output",PinType.PinCategory="int",PinType.PinSubCategory="",PinType.PinSubCategoryObject=None,PinType.PinSubCategoryMemberReference=(),PinType.PinValueType=(TerminalCategory="object",TerminalSubCategoryObject="/Script/CoreUObject.Class'/Script/Schola.AbstractTrainer'"),PinType.ContainerType=Map,PinType.bIsReference=False,PinType.bIsConst=False,PinType.bIsWeakPointer=False,PinType.bIsUObjectWrapper=False,PinType.bSerializeAsSinglePrecisionFloat=False,LinkedTo=(K2Node_CallFunction_13 3B1B98974F795F19F00E989E8FDF74C8,),PersistentGuid=00000000000000000000000000000000,bHidden=False,bNotConnectable=False,bDefaultValueIsReadOnly=False,bDefaultValueIsIgnored=False,bAdvancedView=False,bOrphanedPin=False,)
CustomProperties Pin (PinId=523D2E0C40F5F8F36B5E2C9915D23CC3,PinName="self",PinFriendlyName=NSLOCTEXT("K2Node", "Target", "Target"),PinType.PinCategory="object",PinType.PinSubCategory="",PinType.PinSubCategoryObject="/Script/CoreUObject.Class'/Script/Schola.AbstractScholaEnvironment'",PinType.PinSubCategoryMemberReference=(),PinType.PinValueType=(),PinType.ContainerType=None,PinType.bIsReference=False,PinType.bIsConst=False,PinType.bIsWeakPointer=False,PinType.bIsUObjectWrapper=False,PinType.bSerializeAsSinglePrecisionFloat=False,PersistentGuid=00000000000000000000000000000000,bHidden=True,bNotConnectable=False,bDefaultValueIsReadOnly=False,bDefaultValueIsIgnored=False,bAdvancedView=False,bOrphanedPin=False,)
End Object
Begin Object Class=/Script/BlueprintGraph.K2Node_CustomEvent Name="K2Node_CustomEvent_12" ExportPath="/Script/BlueprintGraph.K2Node_CustomEvent'/Game/Examples/BallShooter/Blueprints/BallShooterEnvironment.BallShooterEnvironment:EventGraph.K2Node_CustomEvent_12'"
CustomFunctionName="Set Target Hitpoints"
NodePosX=288
NodePosY=1488
NodeGuid=7297BF074D3EBCB5F14EF3994B2F9D03
CustomProperties Pin (PinId=BF81597D402A6D127DE5A2AF65C24C10,PinName="OutputDelegate",Direction="EGPD_Output",PinType.PinCategory="delegate",PinType.PinSubCategory="",PinType.PinSubCategoryObject=None,PinType.PinSubCategoryMemberReference=(MemberParent="/Script/Engine.BlueprintGeneratedClass'/Game/Examples/BallShooter/Blueprints/BallShooterEnvironment.BallShooterEnvironment_C'",MemberName="Set Target Hitpoints",MemberGuid=7297BF074D3EBCB5F14EF3994B2F9D03),PinType.PinValueType=(),PinType.ContainerType=None,PinType.bIsReference=False,PinType.bIsConst=False,PinType.bIsWeakPointer=False,PinType.bIsUObjectWrapper=False,PinType.bSerializeAsSinglePrecisionFloat=False,PersistentGuid=00000000000000000000000000000000,bHidden=False,bNotConnectable=False,bDefaultValueIsReadOnly=False,bDefaultValueIsIgnored=False,bAdvancedView=False,bOrphanedPin=False,)
CustomProperties Pin (PinId=62FD73074784B23D64249E9672528EFE,PinName="then",Direction="EGPD_Output",PinType.PinCategory="exec",PinType.PinSubCategory="",PinType.PinSubCategoryObject=None,PinType.PinSubCategoryMemberReference=(),PinType.PinValueType=(),PinType.ContainerType=None,PinType.bIsReference=False,PinType.bIsConst=False,PinType.bIsWeakPointer=False,PinType.bIsUObjectWrapper=False,PinType.bSerializeAsSinglePrecisionFloat=False,LinkedTo=(K2Node_VariableSet_3 849CB7AD4020C1D7A3F4D98F664CA118,),PersistentGuid=00000000000000000000000000000000,bHidden=False,bNotConnectable=False,bDefaultValueIsReadOnly=False,bDefaultValueIsIgnored=False,bAdvancedView=False,bOrphanedPin=False,)
End Object
Begin Object Class=/Script/BlueprintGraph.K2Node_VariableSet Name="K2Node_VariableSet_3" ExportPath="/Script/BlueprintGraph.K2Node_VariableSet'/Game/Examples/BallShooter/Blueprints/BallShooterEnvironment.BallShooterEnvironment:EventGraph.K2Node_VariableSet_3'"
VariableReference=(MemberName="totalHitPoints",MemberGuid=D641D66C464461CE425B0DB7BEA1CEDC,bSelfContext=True)
NodePosX=512
NodePosY=1520
NodeGuid=B09C46344EEA37047DA93985E648E7BF
CustomProperties Pin (PinId=849CB7AD4020C1D7A3F4D98F664CA118,PinName="execute",PinType.PinCategory="exec",PinType.PinSubCategory="",PinType.PinSubCategoryObject=None,PinType.PinSubCategoryMemberReference=(),PinType.PinValueType=(),PinType.ContainerType=None,PinType.bIsReference=False,PinType.bIsConst=False,PinType.bIsWeakPointer=False,PinType.bIsUObjectWrapper=False,PinType.bSerializeAsSinglePrecisionFloat=False,LinkedTo=(K2Node_CustomEvent_12 62FD73074784B23D64249E9672528EFE,),PersistentGuid=00000000000000000000000000000000,bHidden=False,bNotConnectable=False,bDefaultValueIsReadOnly=False,bDefaultValueIsIgnored=False,bAdvancedView=False,bOrphanedPin=False,)
CustomProperties Pin (PinId=53265B1447FA8DF4163F9F85F5BCDB11,PinName="then",Direction="EGPD_Output",PinType.PinCategory="exec",PinType.PinSubCategory="",PinType.PinSubCategoryObject=None,PinType.PinSubCategoryMemberReference=(),PinType.PinValueType=(),PinType.ContainerType=None,PinType.bIsReference=False,PinType.bIsConst=False,PinType.bIsWeakPointer=False,PinType.bIsUObjectWrapper=False,PinType.bSerializeAsSinglePrecisionFloat=False,LinkedTo=(K2Node_MacroInstance_2 AF1BB77A4D71D52686D01AB0F1B2ECEA,),PersistentGuid=00000000000000000000000000000000,bHidden=False,bNotConnectable=False,bDefaultValueIsReadOnly=False,bDefaultValueIsIgnored=False,bAdvancedView=False,bOrphanedPin=False,)
CustomProperties Pin (PinId=E9864F1D48ACD3B362656398E8D2D7E1,PinName="totalHitPoints",PinType.PinCategory="int",PinType.PinSubCategory="",PinType.PinSubCategoryObject=None,PinType.PinSubCategoryMemberReference=(),PinType.PinValueType=(),PinType.ContainerType=None,PinType.bIsReference=False,PinType.bIsConst=False,PinType.bIsWeakPointer=False,PinType.bIsUObjectWrapper=False,PinType.bSerializeAsSinglePrecisionFloat=False,DefaultValue="0",AutogeneratedDefaultValue="0",PersistentGuid=00000000000000000000000000000000,bHidden=False,bNotConnectable=False,bDefaultValueIsReadOnly=False,bDefaultValueIsIgnored=False,bAdvancedView=False,bOrphanedPin=False,)
CustomProperties Pin (PinId=5E68384C4BB3A3CE8E4080BF614D136F,PinName="Output_Get",PinToolTip="Retrieves the value of the variable, can use instead of a separate Get node",Direction="EGPD_Output",PinType.PinCategory="int",PinType.PinSubCategory="",PinType.PinSubCategoryObject=None,PinType.PinSubCategoryMemberReference=(),PinType.PinValueType=(),PinType.ContainerType=None,PinType.bIsReference=False,PinType.bIsConst=False,PinType.bIsWeakPointer=False,PinType.bIsUObjectWrapper=False,PinType.bSerializeAsSinglePrecisionFloat=False,DefaultValue="0",AutogeneratedDefaultValue="0",PersistentGuid=00000000000000000000000000000000,bHidden=False,bNotConnectable=False,bDefaultValueIsReadOnly=False,bDefaultValueIsIgnored=False,bAdvancedView=False,bOrphanedPin=False,)
CustomProperties Pin (PinId=386B2B224900378A195F8791C435E729,PinName="self",PinFriendlyName=NSLOCTEXT("K2Node", "Target", "Target"),PinType.PinCategory="object",PinType.PinSubCategory="",PinType.PinSubCategoryObject="/Script/Engine.BlueprintGeneratedClass'/Game/Examples/BallShooter/Blueprints/BallShooterEnvironment.BallShooterEnvironment_C'",PinType.PinSubCategoryMemberReference=(),PinType.PinValueType=(),PinType.ContainerType=None,PinType.bIsReference=False,PinType.bIsConst=False,PinType.bIsWeakPointer=False,PinType.bIsUObjectWrapper=False,PinType.bSerializeAsSinglePrecisionFloat=False,PersistentGuid=00000000000000000000000000000000,bHidden=True,bNotConnectable=False,bDefaultValueIsReadOnly=False,bDefaultValueIsIgnored=False,bAdvancedView=False,bOrphanedPin=False,)
End Object
Begin Object Class=/Script/BlueprintGraph.K2Node_VariableGet Name="K2Node_VariableGet_13" ExportPath="/Script/BlueprintGraph.K2Node_VariableGet'/Game/Examples/BallShooter/Blueprints/BallShooterEnvironment.BallShooterEnvironment:EventGraph.K2Node_VariableGet_13'"
VariableReference=(MemberName="Targets",MemberGuid=773BA7DA44BC6F425C0CD1890FAE1D77,bSelfContext=True)
NodePosX=640
NodePosY=1616
NodeGuid=BE64C7C949B660580B5AE485E4AF2FD1
CustomProperties Pin (PinId=58210E79426D29A55B06CF9C9C8EC303,PinName="Targets",Direction="EGPD_Output",PinType.PinCategory="object",PinType.PinSubCategory="",PinType.PinSubCategoryObject="/Script/Engine.BlueprintGeneratedClass'/Game/Examples/BallShooter/Blueprints/BallShooterTarget.BallShooterTarget_C'",PinType.PinSubCategoryMemberReference=(),PinType.PinValueType=(),PinType.ContainerType=Array,PinType.bIsReference=False,PinType.bIsConst=False,PinType.bIsWeakPointer=False,PinType.bIsUObjectWrapper=False,PinType.bSerializeAsSinglePrecisionFloat=False,LinkedTo=(K2Node_MacroInstance_2 4F635E774A1B3FBADC70EB8CC0B89D75,),PersistentGuid=00000000000000000000000000000000,bHidden=False,bNotConnectable=False,bDefaultValueIsReadOnly=False,bDefaultValueIsIgnored=False,bAdvancedView=False,bOrphanedPin=False,)
CustomProperties Pin (PinId=BF8F382448AE7A4E9A582DA01E18D072,PinName="self",PinFriendlyName=NSLOCTEXT("K2Node", "Target", "Target"),PinType.PinCategory="object",PinType.PinSubCategory="",PinType.PinSubCategoryObject="/Script/Engine.BlueprintGeneratedClass'/Game/Examples/BallShooter/Blueprints/BallShooterEnvironment.BallShooterEnvironment_C'",PinType.PinSubCategoryMemberReference=(),PinType.PinValueType=(),PinType.ContainerType=None,PinType.bIsReference=False,PinType.bIsConst=False,PinType.bIsWeakPointer=False,PinType.bIsUObjectWrapper=False,PinType.bSerializeAsSinglePrecisionFloat=False,PersistentGuid=00000000000000000000000000000000,bHidden=True,bNotConnectable=False,bDefaultValueIsReadOnly=False,bDefaultValueIsIgnored=False,bAdvancedView=False,bOrphanedPin=False,)
End Object
Begin Object Class=/Script/BlueprintGraph.K2Node_VariableSet Name="K2Node_VariableSet_1" ExportPath="/Script/BlueprintGraph.K2Node_VariableSet'/Game/Examples/BallShooter/Blueprints/BallShooterEnvironment.BallShooterEnvironment:EventGraph.K2Node_VariableSet_1'"
VariableReference=(MemberName="totalHitPoints",MemberGuid=D641D66C464461CE425B0DB7BEA1CEDC,bSelfContext=True)
NodePosX=1456
NodePosY=1519
NodeGuid=DAA363B244944080087D3E931309156F
CustomProperties Pin (PinId=C31DCF8C426B2CA8960E6D8A5825DD35,PinName="execute",PinType.PinCategory="exec",PinType.PinSubCategory="",PinType.PinSubCategoryObject=None,PinType.PinSubCategoryMemberReference=(),PinType.PinValueType=(),PinType.ContainerType=None,PinType.bIsReference=False,PinType.bIsConst=False,PinType.bIsWeakPointer=False,PinType.bIsUObjectWrapper=False,PinType.bSerializeAsSinglePrecisionFloat=False,LinkedTo=(K2Node_MacroInstance_2 B24E6E2B4E8A36460DCF7083C66BC0C5,),PersistentGuid=00000000000000000000000000000000,bHidden=False,bNotConnectable=False,bDefaultValueIsReadOnly=False,bDefaultValueIsIgnored=False,bAdvancedView=False,bOrphanedPin=False,)
CustomProperties Pin (PinId=67B895684F0853FA0EFAA894F18C3B7D,PinName="then",Direction="EGPD_Output",PinType.PinCategory="exec",PinType.PinSubCategory="",PinType.PinSubCategoryObject=None,PinType.PinSubCategoryMemberReference=(),PinType.PinValueType=(),PinType.ContainerType=None,PinType.bIsReference=False,PinType.bIsConst=False,PinType.bIsWeakPointer=False,PinType.bIsUObjectWrapper=False,PinType.bSerializeAsSinglePrecisionFloat=False,PersistentGuid=00000000000000000000000000000000,bHidden=False,bNotConnectable=False,bDefaultValueIsReadOnly=False,bDefaultValueIsIgnored=False,bAdvancedView=False,bOrphanedPin=False,)
CustomProperties Pin (PinId=09021BBE4403B8A42C54E287A2BFF83E,PinName="totalHitPoints",PinType.PinCategory="int",PinType.PinSubCategory="",PinType.PinSubCategoryObject=None,PinType.PinSubCategoryMemberReference=(),PinType.PinValueType=(),PinType.ContainerType=None,PinType.bIsReference=False,PinType.bIsConst=False,PinType.bIsWeakPointer=False,PinType.bIsUObjectWrapper=False,PinType.bSerializeAsSinglePrecisionFloat=False,DefaultValue="0",AutogeneratedDefaultValue="0",LinkedTo=(K2Node_PromotableOperator_1 E3FB3E1A49D0C00B42D6CA9BD69715BA,),PersistentGuid=00000000000000000000000000000000,bHidden=False,bNotConnectable=False,bDefaultValueIsReadOnly=False,bDefaultValueIsIgnored=False,bAdvancedView=False,bOrphanedPin=False,)
CustomProperties Pin (PinId=E2B60DA94CEDD223C9C9219D41FF9D34,PinName="Output_Get",PinToolTip="Retrieves the value of the variable, can use instead of a separate Get node",Direction="EGPD_Output",PinType.PinCategory="int",PinType.PinSubCategory="",PinType.PinSubCategoryObject=None,PinType.PinSubCategoryMemberReference=(),PinType.PinValueType=(),PinType.ContainerType=None,PinType.bIsReference=False,PinType.bIsConst=False,PinType.bIsWeakPointer=False,PinType.bIsUObjectWrapper=False,PinType.bSerializeAsSinglePrecisionFloat=False,DefaultValue="0",AutogeneratedDefaultValue="0",PersistentGuid=00000000000000000000000000000000,bHidden=False,bNotConnectable=False,bDefaultValueIsReadOnly=False,bDefaultValueIsIgnored=False,bAdvancedView=False,bOrphanedPin=False,)
CustomProperties Pin (PinId=4A91B6F445479EE2D8DB88BA3CB89898,PinName="self",PinFriendlyName=NSLOCTEXT("K2Node", "Target", "Target"),PinType.PinCategory="object",PinType.PinSubCategory="",PinType.PinSubCategoryObject="/Script/Engine.BlueprintGeneratedClass'/Game/Examples/BallShooter/Blueprints/BallShooterEnvironment.BallShooterEnvironment_C'",PinType.PinSubCategoryMemberReference=(),PinType.PinValueType=(),PinType.ContainerType=None,PinType.bIsReference=False,PinType.bIsConst=False,PinType.bIsWeakPointer=False,PinType.bIsUObjectWrapper=False,PinType.bSerializeAsSinglePrecisionFloat=False,PersistentGuid=00000000000000000000000000000000,bHidden=True,bNotConnectable=False,bDefaultValueIsReadOnly=False,bDefaultValueIsIgnored=False,bAdvancedView=False,bOrphanedPin=False,)
End Object
Begin Object Class=/Script/BlueprintGraph.K2Node_VariableGet Name="K2Node_VariableGet_8" ExportPath="/Script/BlueprintGraph.K2Node_VariableGet'/Game/Examples/BallShooter/Blueprints/BallShooterEnvironment.BallShooterEnvironment:EventGraph.K2Node_VariableGet_8'"
VariableReference=(MemberName="totalHitPoints",MemberGuid=D641D66C464461CE425B0DB7BEA1CEDC,bSelfContext=True)
NodePosX=1104
NodePosY=1616
NodeGuid=35C841734832F60504321C8021505CF9
CustomProperties Pin (PinId=18F90F724F2182334D43B7BBCBC8423D,PinName="totalHitPoints",Direction="EGPD_Output",PinType.PinCategory="int",PinType.PinSubCategory="",PinType.PinSubCategoryObject=None,PinType.PinSubCategoryMemberReference=(),PinType.PinValueType=(),PinType.ContainerType=None,PinType.bIsReference=False,PinType.bIsConst=False,PinType.bIsWeakPointer=False,PinType.bIsUObjectWrapper=False,PinType.bSerializeAsSinglePrecisionFloat=False,DefaultValue="0",AutogeneratedDefaultValue="0",LinkedTo=(K2Node_PromotableOperator_1 1C3A2B7C45666C3B9A84C8BD082D36AB,),PersistentGuid=00000000000000000000000000000000,bHidden=False,bNotConnectable=False,bDefaultValueIsReadOnly=False,bDefaultValueIsIgnored=False,bAdvancedView=False,bOrphanedPin=False,)
CustomProperties Pin (PinId=F17324B94E774B4FA83CCA824252D946,PinName="self",PinFriendlyName=NSLOCTEXT("K2Node", "Target", "Target"),PinType.PinCategory="object",PinType.PinSubCategory="",PinType.PinSubCategoryObject="/Script/Engine.BlueprintGeneratedClass'/Game/Examples/BallShooter/Blueprints/BallShooterEnvironment.BallShooterEnvironment_C'",PinType.PinSubCategoryMemberReference=(),PinType.PinValueType=(),PinType.ContainerType=None,PinType.bIsReference=False,PinType.bIsConst=False,PinType.bIsWeakPointer=False,PinType.bIsUObjectWrapper=False,PinType.bSerializeAsSinglePrecisionFloat=False,PersistentGuid=00000000000000000000000000000000,bHidden=True,bNotConnectable=False,bDefaultValueIsReadOnly=False,bDefaultValueIsIgnored=False,bAdvancedView=False,bOrphanedPin=False,)
End Object
Begin Object Class=/Script/BlueprintGraph.K2Node_VariableGet Name="K2Node_VariableGet_7" ExportPath="/Script/BlueprintGraph.K2Node_VariableGet'/Game/Examples/BallShooter/Blueprints/BallShooterEnvironment.BallShooterEnvironment:EventGraph.K2Node_VariableGet_7'"
VariableReference=(MemberParent="/Script/Engine.BlueprintGeneratedClass'/Game/Examples/BallShooter/Blueprints/BallShooterTarget.BallShooterTarget_C'",MemberName="hitPoint",MemberGuid=D7C5C3689C5041E19F06CC4B01F35D8D)
SelfContextInfo=NotSelfContext
NodePosX=1056
NodePosY=1559
NodeGuid=866E762F42872AE0242797853F8F9054
CustomProperties Pin (PinId=473E04C44DD09C077A683CAB4A363581,PinName="hitPoint",Direction="EGPD_Output",PinType.PinCategory="int",PinType.PinSubCategory="",PinType.PinSubCategoryObject=None,PinType.PinSubCategoryMemberReference=(),PinType.PinValueType=(),PinType.ContainerType=None,PinType.bIsReference=False,PinType.bIsConst=False,PinType.bIsWeakPointer=False,PinType.bIsUObjectWrapper=False,PinType.bSerializeAsSinglePrecisionFloat=False,DefaultValue="0",AutogeneratedDefaultValue="0",LinkedTo=(K2Node_PromotableOperator_1 8F0489034E2C53D23E0136A956B6210B,),PersistentGuid=00000000000000000000000000000000,bHidden=False,bNotConnectable=False,bDefaultValueIsReadOnly=False,bDefaultValueIsIgnored=False,bAdvancedView=False,bOrphanedPin=False,)
CustomProperties Pin (PinId=6E464DD349CBB1B430FAD5BCE9296D84,PinName="self",PinFriendlyName=NSLOCTEXT("K2Node", "Target", "Target"),PinType.PinCategory="object",PinType.PinSubCategory="",PinType.PinSubCategoryObject="/Script/Engine.BlueprintGeneratedClass'/Game/Examples/BallShooter/Blueprints/BallShooterTarget.BallShooterTarget_C'",PinType.PinSubCategoryMemberReference=(),PinType.PinValueType=(),PinType.ContainerType=None,PinType.bIsReference=False,PinType.bIsConst=False,PinType.bIsWeakPointer=False,PinType.bIsUObjectWrapper=False,PinType.bSerializeAsSinglePrecisionFloat=False,LinkedTo=(K2Node_MacroInstance_2 529B028A40A39DDDB46579B7ED910FE4,),PersistentGuid=00000000000000000000000000000000,bHidden=False,bNotConnectable=False,bDefaultValueIsReadOnly=False,bDefaultValueIsIgnored=False,bAdvancedView=False,bOrphanedPin=False,)
End Object
Begin Object Class=/Script/BlueprintGraph.K2Node_PromotableOperator Name="K2Node_PromotableOperator_1" ExportPath="/Script/BlueprintGraph.K2Node_PromotableOperator'/Game/Examples/BallShooter/Blueprints/BallShooterEnvironment.BallShooterEnvironment:EventGraph.K2Node_PromotableOperator_1'"
OperationName="Add"
bIsPureFunc=True
FunctionReference=(MemberParent="/Script/CoreUObject.Class'/Script/Engine.KismetMathLibrary'",MemberName="Add_IntInt")
NodePosX=1280
NodePosY=1560
NodeGuid=973A009E4B556FFFD40346961CEBA2F7
CustomProperties Pin (PinId=8F0489034E2C53D23E0136A956B6210B,PinName="A",PinType.PinCategory="int",PinType.PinSubCategory="",PinType.PinSubCategoryObject=None,PinType.PinSubCategoryMemberReference=(),PinType.PinValueType=(),PinType.ContainerType=None,PinType.bIsReference=False,PinType.bIsConst=False,PinType.bIsWeakPointer=False,PinType.bIsUObjectWrapper=False,PinType.bSerializeAsSinglePrecisionFloat=False,LinkedTo=(K2Node_VariableGet_7 473E04C44DD09C077A683CAB4A363581,),PersistentGuid=00000000000000000000000000000000,bHidden=False,bNotConnectable=False,bDefaultValueIsReadOnly=False,bDefaultValueIsIgnored=False,bAdvancedView=False,bOrphanedPin=False,)
CustomProperties Pin (PinId=1C3A2B7C45666C3B9A84C8BD082D36AB,PinName="B",PinType.PinCategory="int",PinType.PinSubCategory="",PinType.PinSubCategoryObject=None,PinType.PinSubCategoryMemberReference=(),PinType.PinValueType=(),PinType.ContainerType=None,PinType.bIsReference=False,PinType.bIsConst=False,PinType.bIsWeakPointer=False,PinType.bIsUObjectWrapper=False,PinType.bSerializeAsSinglePrecisionFloat=False,LinkedTo=(K2Node_VariableGet_8 18F90F724F2182334D43B7BBCBC8423D,),PersistentGuid=00000000000000000000000000000000,bHidden=False,bNotConnectable=False,bDefaultValueIsReadOnly=False,bDefaultValueIsIgnored=False,bAdvancedView=False,bOrphanedPin=False,)
CustomProperties Pin (PinId=E3FB3E1A49D0C00B42D6CA9BD69715BA,PinName="ReturnValue",Direction="EGPD_Output",PinType.PinCategory="int",PinType.PinSubCategory="",PinType.PinSubCategoryObject=None,PinType.PinSubCategoryMemberReference=(),PinType.PinValueType=(),PinType.ContainerType=None,PinType.bIsReference=False,PinType.bIsConst=False,PinType.bIsWeakPointer=False,PinType.bIsUObjectWrapper=False,PinType.bSerializeAsSinglePrecisionFloat=False,LinkedTo=(K2Node_VariableSet_1 09021BBE4403B8A42C54E287A2BFF83E,),PersistentGuid=00000000000000000000000000000000,bHidden=False,bNotConnectable=False,bDefaultValueIsReadOnly=False,bDefaultValueIsIgnored=False,bAdvancedView=False,bOrphanedPin=False,)
End Object
Begin Object Class=/Script/BlueprintGraph.K2Node_MacroInstance Name="K2Node_MacroInstance_2" ExportPath="/Script/BlueprintGraph.K2Node_MacroInstance'/Game/Examples/BallShooter/Blueprints/BallShooterEnvironment.BallShooterEnvironment:EventGraph.K2Node_MacroInstance_2'"
MacroGraphReference=(MacroGraph="/Script/Engine.EdGraph'/Engine/EditorBlueprintResources/StandardMacros.StandardMacros:ForEachLoop'",GraphBlueprint="/Script/Engine.Blueprint'/Engine/EditorBlueprintResources/StandardMacros.StandardMacros'",GraphGuid=99DBFD5540A796041F72A5A9DA655026)
ResolvedWildcardType=(PinCategory="object",PinSubCategoryObject="/Script/Engine.BlueprintGeneratedClass'/Game/Examples/BallShooter/Blueprints/BallShooterTarget.BallShooterTarget_C'",ContainerType=Array)
NodePosX=848
NodePosY=1504
NodeGuid=549869464CDE00DBE542A48133345C9E
CustomProperties Pin (PinId=AF1BB77A4D71D52686D01AB0F1B2ECEA,PinName="Exec",PinType.PinCategory="exec",PinType.PinSubCategory="",PinType.PinSubCategoryObject=None,PinType.PinSubCategoryMemberReference=(),PinType.PinValueType=(),PinType.ContainerType=None,PinType.bIsReference=False,PinType.bIsConst=False,PinType.bIsWeakPointer=False,PinType.bIsUObjectWrapper=False,PinType.bSerializeAsSinglePrecisionFloat=False,LinkedTo=(K2Node_VariableSet_3 53265B1447FA8DF4163F9F85F5BCDB11,),PersistentGuid=00000000000000000000000000000000,bHidden=False,bNotConnectable=False,bDefaultValueIsReadOnly=False,bDefaultValueIsIgnored=False,bAdvancedView=False,bOrphanedPin=False,)
CustomProperties Pin (PinId=4F635E774A1B3FBADC70EB8CC0B89D75,PinName="Array",PinType.PinCategory="object",PinType.PinSubCategory="",PinType.PinSubCategoryObject="/Script/Engine.BlueprintGeneratedClass'/Game/Examples/BallShooter/Blueprints/BallShooterTarget.BallShooterTarget_C'",PinType.PinSubCategoryMemberReference=(),PinType.PinValueType=(),PinType.ContainerType=Array,PinType.bIsReference=False,PinType.bIsConst=False,PinType.bIsWeakPointer=False,PinType.bIsUObjectWrapper=False,PinType.bSerializeAsSinglePrecisionFloat=False,LinkedTo=(K2Node_VariableGet_13 58210E79426D29A55B06CF9C9C8EC303,),PersistentGuid=00000000000000000000000000000000,bHidden=False,bNotConnectable=False,bDefaultValueIsReadOnly=False,bDefaultValueIsIgnored=False,bAdvancedView=False,bOrphanedPin=False,)
CustomProperties Pin (PinId=B24E6E2B4E8A36460DCF7083C66BC0C5,PinName="LoopBody",Direction="EGPD_Output",PinType.PinCategory="exec",PinType.PinSubCategory="",PinType.PinSubCategoryObject=None,PinType.PinSubCategoryMemberReference=(),PinType.PinValueType=(),PinType.ContainerType=None,PinType.bIsReference=False,PinType.bIsConst=False,PinType.bIsWeakPointer=False,PinType.bIsUObjectWrapper=False,PinType.bSerializeAsSinglePrecisionFloat=False,LinkedTo=(K2Node_VariableSet_1 C31DCF8C426B2CA8960E6D8A5825DD35,),PersistentGuid=00000000000000000000000000000000,bHidden=False,bNotConnectable=False,bDefaultValueIsReadOnly=False,bDefaultValueIsIgnored=False,bAdvancedView=False,bOrphanedPin=False,)
CustomProperties Pin (PinId=529B028A40A39DDDB46579B7ED910FE4,PinName="Array Element",Direction="EGPD_Output",PinType.PinCategory="object",PinType.PinSubCategory="",PinType.PinSubCategoryObject="/Script/Engine.BlueprintGeneratedClass'/Game/Examples/BallShooter/Blueprints/BallShooterTarget.BallShooterTarget_C'",PinType.PinSubCategoryMemberReference=(),PinType.PinValueType=(),PinType.ContainerType=None,PinType.bIsReference=False,PinType.bIsConst=False,PinType.bIsWeakPointer=False,PinType.bIsUObjectWrapper=False,PinType.bSerializeAsSinglePrecisionFloat=False,LinkedTo=(K2Node_VariableGet_7 6E464DD349CBB1B430FAD5BCE9296D84,),PersistentGuid=00000000000000000000000000000000,bHidden=False,bNotConnectable=False,bDefaultValueIsReadOnly=False,bDefaultValueIsIgnored=False,bAdvancedView=False,bOrphanedPin=False,)
CustomProperties Pin (PinId=5941FE5A4642FD3A780905BBBBF0AA94,PinName="Array Index",Direction="EGPD_Output",PinType.PinCategory="int",PinType.PinSubCategory="",PinType.PinSubCategoryObject=None,PinType.PinSubCategoryMemberReference=(),PinType.PinValueType=(),PinType.ContainerType=None,PinType.bIsReference=False,PinType.bIsConst=False,PinType.bIsWeakPointer=False,PinType.bIsUObjectWrapper=False,PinType.bSerializeAsSinglePrecisionFloat=False,PersistentGuid=00000000000000000000000000000000,bHidden=False,bNotConnectable=False,bDefaultValueIsReadOnly=False,bDefaultValueIsIgnored=False,bAdvancedView=False,bOrphanedPin=False,)
CustomProperties Pin (PinId=CC359BD34C74EB6EBB38D0B5DACE35D1,PinName="Completed",Direction="EGPD_Output",PinType.PinCategory="exec",PinType.PinSubCategory="",PinType.PinSubCategoryObject=None,PinType.PinSubCategoryMemberReference=(),PinType.PinValueType=(),PinType.ContainerType=None,PinType.bIsReference=False,PinType.bIsConst=False,PinType.bIsWeakPointer=False,PinType.bIsUObjectWrapper=False,PinType.bSerializeAsSinglePrecisionFloat=False,PersistentGuid=00000000000000000000000000000000,bHidden=False,bNotConnectable=False,bDefaultValueIsReadOnly=False,bDefaultValueIsIgnored=False,bAdvancedView=False,bOrphanedPin=False,)
End Object
Begin Object Class=/Script/UnrealEd.EdGraphNode_Comment Name="EdGraphNode_Comment_7" ExportPath="/Script/UnrealEd.EdGraphNode_Comment'/Game/Examples/BallShooter/Blueprints/BallShooterEnvironment.BallShooterEnvironment:EventGraph.EdGraphNode_Comment_7'"
bCommentBubbleVisible_InDetailsPanel=False
CommentDepth=-2
NodePosX=272
NodePosY=896
NodeWidth=1712
NodeHeight=528
bCommentBubblePinned=False
bCommentBubbleVisible=False
NodeComment="Spawn A Target"
NodeGuid=E9B9DF2844F312D8FA3720B490B99A49
End Object
Begin Object Class=/Script/UnrealEd.EdGraphNode_Comment Name="EdGraphNode_Comment_8" ExportPath="/Script/UnrealEd.EdGraphNode_Comment'/Game/Examples/BallShooter/Blueprints/BallShooterEnvironment.BallShooterEnvironment:EventGraph.EdGraphNode_Comment_8'"
bCommentBubbleVisible_InDetailsPanel=False
NodePosX=272
NodePosY=1424
NodeWidth=1504
NodeHeight=256
bCommentBubblePinned=False
bCommentBubbleVisible=False
NodeComment="Collect The Total Number of Hitpoints between All the Targets"
NodeGuid=AEEDD8954652BAD1AF35E7AEC1D48225
End Object
Begin Object Class=/Script/BlueprintGraph.K2Node_Knot Name="K2Node_Knot_5" ExportPath="/Script/BlueprintGraph.K2Node_Knot'/Game/Examples/BallShooter/Blueprints/BallShooterEnvironment.BallShooterEnvironment:EventGraph.K2Node_Knot_5'"
NodePosX=1408
NodePosY=1168
NodeGuid=A1ED47CF44F92D5D54F6CEA4EECB1950
CustomProperties Pin (PinId=B7F4E13147F9BD004C95E68308729F9C,PinName="InputPin",PinType.PinCategory="delegate",PinType.PinSubCategory="",PinType.PinSubCategoryObject=None,PinType.PinSubCategoryMemberReference=(MemberParent="/Script/Engine.BlueprintGeneratedClass'/Game/Examples/BallShooter/Blueprints/BallShooterEnvironment.BallShooterEnvironment_C'",MemberName="On Target Killed",MemberGuid=CB26188F46AD43B42A9A2692288F41F2),PinType.PinValueType=(),PinType.ContainerType=None,PinType.bIsReference=False,PinType.bIsConst=False,PinType.bIsWeakPointer=False,PinType.bIsUObjectWrapper=False,PinType.bSerializeAsSinglePrecisionFloat=False,LinkedTo=(K2Node_CustomEvent_0 DA10B1984E92B126FB09CE9D0F767D2E,),PersistentGuid=00000000000000000000000000000000,bHidden=False,bNotConnectable=False,bDefaultValueIsReadOnly=False,bDefaultValueIsIgnored=True,bAdvancedView=False,bOrphanedPin=False,)
CustomProperties Pin (PinId=8B3A7C6840FA5BCDD69DD3B7219CB046,PinName="OutputPin",Direction="EGPD_Output",PinType.PinCategory="delegate",PinType.PinSubCategory="",PinType.PinSubCategoryObject=None,PinType.PinSubCategoryMemberReference=(MemberParent="/Script/Engine.BlueprintGeneratedClass'/Game/Examples/BallShooter/Blueprints/BallShooterEnvironment.BallShooterEnvironment_C'",MemberName="On Target Killed",MemberGuid=CB26188F46AD43B42A9A2692288F41F2),PinType.PinValueType=(),PinType.ContainerType=None,PinType.bIsReference=False,PinType.bIsConst=False,PinType.bIsWeakPointer=False,PinType.bIsUObjectWrapper=False,PinType.bSerializeAsSinglePrecisionFloat=False,LinkedTo=(K2Node_Knot_6 6827362340B14D8D63C9BFAD1AC45471,),PersistentGuid=00000000000000000000000000000000,bHidden=False,bNotConnectable=False,bDefaultValueIsReadOnly=False,bDefaultValueIsIgnored=False,bAdvancedView=False,bOrphanedPin=False,)
End Object
Begin Object Class=/Script/BlueprintGraph.K2Node_Knot Name="K2Node_Knot_6" ExportPath="/Script/BlueprintGraph.K2Node_Knot'/Game/Examples/BallShooter/Blueprints/BallShooterEnvironment.BallShooterEnvironment:EventGraph.K2Node_Knot_6'"
NodePosX=1680
NodePosY=1168
NodeGuid=BEE7F8BC4AAF15C7963F73BF3588023F
CustomProperties Pin (PinId=6827362340B14D8D63C9BFAD1AC45471,PinName="InputPin",PinType.PinCategory="delegate",PinType.PinSubCategory="",PinType.PinSubCategoryObject=None,PinType.PinSubCategoryMemberReference=(MemberParent="/Script/Engine.BlueprintGeneratedClass'/Game/Examples/BallShooter/Blueprints/BallShooterEnvironment.BallShooterEnvironment_C'",MemberName="On Target Killed",MemberGuid=CB26188F46AD43B42A9A2692288F41F2),PinType.PinValueType=(),PinType.ContainerType=None,PinType.bIsReference=False,PinType.bIsConst=False,PinType.bIsWeakPointer=False,PinType.bIsUObjectWrapper=False,PinType.bSerializeAsSinglePrecisionFloat=False,LinkedTo=(K2Node_Knot_5 8B3A7C6840FA5BCDD69DD3B7219CB046,),PersistentGuid=00000000000000000000000000000000,bHidden=False,bNotConnectable=False,bDefaultValueIsReadOnly=False,bDefaultValueIsIgnored=True,bAdvancedView=False,bOrphanedPin=False,)
CustomProperties Pin (PinId=D9811EDF48E61BB899F6E8AE5EA93807,PinName="OutputPin",Direction="EGPD_Output",PinType.PinCategory="delegate",PinType.PinSubCategory="",PinType.PinSubCategoryObject=None,PinType.PinSubCategoryMemberReference=(MemberParent="/Script/Engine.BlueprintGeneratedClass'/Game/Examples/BallShooter/Blueprints/BallShooterEnvironment.BallShooterEnvironment_C'",MemberName="On Target Killed",MemberGuid=CB26188F46AD43B42A9A2692288F41F2),PinType.PinValueType=(),PinType.ContainerType=None,PinType.bIsReference=False,PinType.bIsConst=False,PinType.bIsWeakPointer=False,PinType.bIsUObjectWrapper=False,PinType.bSerializeAsSinglePrecisionFloat=False,LinkedTo=(K2Node_AssignDelegate_0 3C0089524CDDA9E63853BEA28156FACD,),PersistentGuid=00000000000000000000000000000000,bHidden=False,bNotConnectable=False,bDefaultValueIsReadOnly=False,bDefaultValueIsIgnored=False,bAdvancedView=False,bOrphanedPin=False,)
End Object
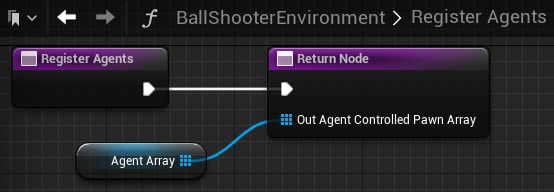
Begin Object Class=/Script/BlueprintGraph.K2Node_FunctionEntry Name="K2Node_FunctionEntry_0" ExportPath="/Script/BlueprintGraph.K2Node_FunctionEntry'/Game/Examples/BallShooter/Blueprints/BallShooterEnvironment.BallShooterEnvironment:RegisterAgents.K2Node_FunctionEntry_0'"
FunctionReference=(MemberParent="/Script/CoreUObject.Class'/Script/Schola.BlueprintScholaEnvironment'",MemberName="RegisterAgents")
NodePosX=32
NodeGuid=960584A3461B4B76ADBA2B45CD327BAC
CustomProperties Pin (PinId=C2E1B3D3F9324884AD96EF1A0E98030E,PinName="then",Direction="EGPD_Output",PinType.PinCategory="exec",PinType.PinSubCategory="",PinType.PinSubCategoryObject=None,PinType.PinSubCategoryMemberReference=(),PinType.PinValueType=(),PinType.ContainerType=None,PinType.bIsReference=False,PinType.bIsConst=False,PinType.bIsWeakPointer=False,PinType.bIsUObjectWrapper=False,PinType.bSerializeAsSinglePrecisionFloat=False,LinkedTo=(K2Node_FunctionResult_0 F0A8C152BA084E45BD49425581D7C2A4,),PersistentGuid=00000000000000000000000000000000,bHidden=False,bNotConnectable=False,bDefaultValueIsReadOnly=False,bDefaultValueIsIgnored=False,bAdvancedView=False,bOrphanedPin=False,)
End Object
Begin Object Class=/Script/BlueprintGraph.K2Node_FunctionResult Name="K2Node_FunctionResult_0" ExportPath="/Script/BlueprintGraph.K2Node_FunctionResult'/Game/Examples/BallShooter/Blueprints/BallShooterEnvironment.BallShooterEnvironment:RegisterAgents.K2Node_FunctionResult_0'"
FunctionReference=(MemberParent="/Script/CoreUObject.Class'/Script/Schola.BlueprintScholaEnvironment'",MemberName="RegisterAgents")
NodePosX=288
NodeGuid=16EA23C4A93848C29AB881F24FEE7870
CustomProperties Pin (PinId=F0A8C152BA084E45BD49425581D7C2A4,PinName="execute",PinType.PinCategory="exec",PinType.PinSubCategory="",PinType.PinSubCategoryObject=None,PinType.PinSubCategoryMemberReference=(),PinType.PinValueType=(),PinType.ContainerType=None,PinType.bIsReference=False,PinType.bIsConst=False,PinType.bIsWeakPointer=False,PinType.bIsUObjectWrapper=False,PinType.bSerializeAsSinglePrecisionFloat=False,LinkedTo=(K2Node_FunctionEntry_0 C2E1B3D3F9324884AD96EF1A0E98030E,),PersistentGuid=00000000000000000000000000000000,bHidden=False,bNotConnectable=False,bDefaultValueIsReadOnly=False,bDefaultValueIsIgnored=False,bAdvancedView=False,bOrphanedPin=False,)
CustomProperties Pin (PinId=023F0CE6DEF446DB98D62AEA38A9BED7,PinName="OutAgentControlledPawnArray",PinToolTip="Out Agent Controlled Pawn Array\nArray of Pawn Object References",PinType.PinCategory="object",PinType.PinSubCategory="",PinType.PinSubCategoryObject="/Script/CoreUObject.Class'/Script/Engine.Pawn'",PinType.PinSubCategoryMemberReference=(),PinType.PinValueType=(),PinType.ContainerType=Array,PinType.bIsReference=False,PinType.bIsConst=False,PinType.bIsWeakPointer=False,PinType.bIsUObjectWrapper=False,PinType.bSerializeAsSinglePrecisionFloat=False,LinkedTo=(K2Node_VariableGet_0 957A23D826454E54B40D7205B7F9E933,),PersistentGuid=00000000000000000000000000000000,bHidden=False,bNotConnectable=False,bDefaultValueIsReadOnly=False,bDefaultValueIsIgnored=False,bAdvancedView=False,bOrphanedPin=False,)
End Object
Begin Object Class=/Script/BlueprintGraph.K2Node_VariableGet Name="K2Node_VariableGet_0" ExportPath="/Script/BlueprintGraph.K2Node_VariableGet'/Game/Examples/BallShooter/Blueprints/BallShooterEnvironment.BallShooterEnvironment:RegisterAgents.K2Node_VariableGet_0'"
VariableReference=(MemberName="agentArray",MemberGuid=E6989E75FAB34F6697727E1D1E4DBD5A,bSelfContext=True)
NodePosX=96
NodePosY=96
NodeGuid=47DA4DA3B1B74475B0E89855B804E71E
CustomProperties Pin (PinId=957A23D826454E54B40D7205B7F9E933,PinName="agentArray",Direction="EGPD_Output",PinType.PinCategory="object",PinType.PinSubCategory="",PinType.PinSubCategoryObject="/Script/CoreUObject.Class'/Script/Engine.Pawn'",PinType.PinSubCategoryMemberReference=(),PinType.PinValueType=(),PinType.ContainerType=Array,PinType.bIsReference=False,PinType.bIsConst=False,PinType.bIsWeakPointer=False,PinType.bIsUObjectWrapper=False,PinType.bSerializeAsSinglePrecisionFloat=False,LinkedTo=(K2Node_FunctionResult_0 023F0CE6DEF446DB98D62AEA38A9BED7,),PersistentGuid=00000000000000000000000000000000,bHidden=False,bNotConnectable=False,bDefaultValueIsReadOnly=False,bDefaultValueIsIgnored=False,bAdvancedView=False,bOrphanedPin=False,)
CustomProperties Pin (PinId=90FAC7D4AD254C10AB6F29B691A3730F,PinName="self",PinFriendlyName=NSLOCTEXT("K2Node", "Target", "Target"),PinType.PinCategory="object",PinType.PinSubCategory="",PinType.PinSubCategoryObject="/Script/Engine.BlueprintGeneratedClass'/Game/Examples/BallShooter/Blueprints/BallShooterEnvironment.BallShooterEnvironment_C'",PinType.PinSubCategoryMemberReference=(),PinType.PinValueType=(),PinType.ContainerType=None,PinType.bIsReference=False,PinType.bIsConst=False,PinType.bIsWeakPointer=False,PinType.bIsUObjectWrapper=False,PinType.bSerializeAsSinglePrecisionFloat=False,PersistentGuid=00000000000000000000000000000000,bHidden=True,bNotConnectable=False,bDefaultValueIsReadOnly=False,bDefaultValueIsIgnored=False,bAdvancedView=False,bOrphanedPin=False,)
End Object
Registering the Agent
-
Click on the
BallShooterEnvironmentin the map.-
Go to
Detailspanel →Default→Agent Array. -
Add a new element.
-
Select
BallShooterAgentin the drop-down menu.
-
-
Open the
BallShooterAgentclass in the blueprint editor.-
Go to Details Panel.
-
Search for AIController.
-
In the drop-down, select
BallShooterTrainer.
-


Starting Training
We will train the agent using the Proximal Policy Optimization (PPO) algorithm for 100,000 steps. The following two methods run the same training. Running from the terminal may be more convenient for hyperparameter tuning, while running from the Unreal Editor may be more convenient when editing the game.
-
Run the game in Unreal Engine (by clicking the green triangle).
-
Open a terminal or command prompt, and run the following Python script:
Copied!
schola-sb3 -p 8000 -t 100000 PPO
Note
To run with RLlib, use the schola-rllib command instead of schola-sb3.
Copied!
schola-rllib -p 8000 -t 100000
Schola can also run the training script directly from the Unreal Editor.
-
Go to
Edit→Project Settings, and scroll down to find Schola. -
Check the
Run Script on Playbox. -
Change
ScriptSettings→SB3Settings→Timestepsto 100000. -
Run the game in Unreal Engine (by clicking the green triangle).
Note
By default, Schola runs the python command when launching Python. If you have Python installed differently, such as python3.9, or /usr/bin/python3, please change
-
ScriptSettings→EnvTypetoCustom Python Path. -
ScriptSettings→CustomPythonPathto your Python path or alias.
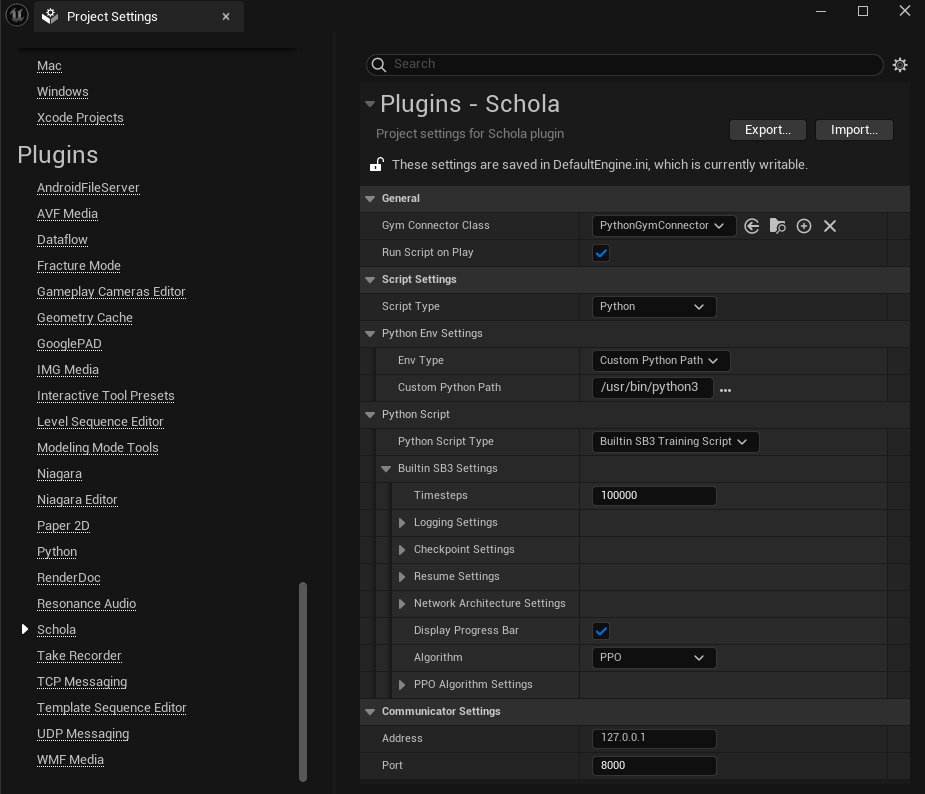
Note
To run with RLlib, make the following changes the Edit → Project Settings:
-
Change
ScriptSettings→PythonScriptTypetoBuiltin RLlib Training Script. -
Change
ScriptSettings→RLlibSettings→Timestepsto 100000.
Enabling TensorBoard
TensorBoard is a visualization tool provided by TensorFlow that allows you to track and visualize metrics such as loss and reward during training.
Add the --enable-tensorboard flag to the command to enable TensorBoard. The --log-dir flag sets the directory where the logs are saved.
Copied!
schola-sb3 -p 8000 -t 100000 --enable-tensorboard --log-dir experiment_ball_shooter PPO
Note
Running with RLlib using schola-rllib already enables TensorBoard by default.
Schola can also run the training script directly from the Unreal Editor.
-
Go to
Edit→Project Settings, and scroll down to find Schola. -
Check the
ScriptSettings→SB3Settings→LoggingSettings→SaveTBLogsbox. -
Set the
ScriptSettings→SB3Settings→LoggingSettings→SaveTBLogstoexperiment_ball_shooteror another location for the logs to be saved. -
Run the game in Unreal Engine (by clicking the green triangle).
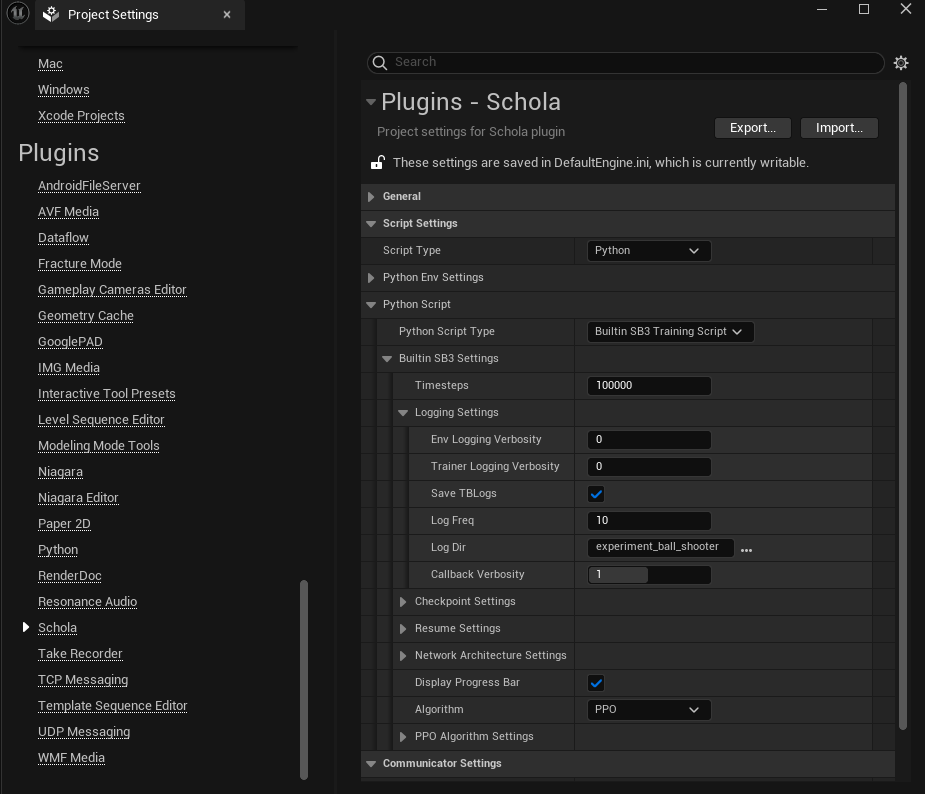
Note
Running with RLlib already enables TensorBoard by default.
After training, you can view the training progress in TensorBoard by running the following command in the terminal or command prompt. Make sure to first install TensorBoard, and set the --logdir to the directory where the logs are saved.
Copied!
tensorboard --logdir experiment_ball_shooter/PPO_1
Note
Logs for subsequent schola-sb3 runs will be in PPO_2, PPO_3, etc.
Note
If you are running with RLlib, the logs will be saved in the ckpt/PPO_timestamp directory.