FSR™ Ray Regeneration 1.1.0
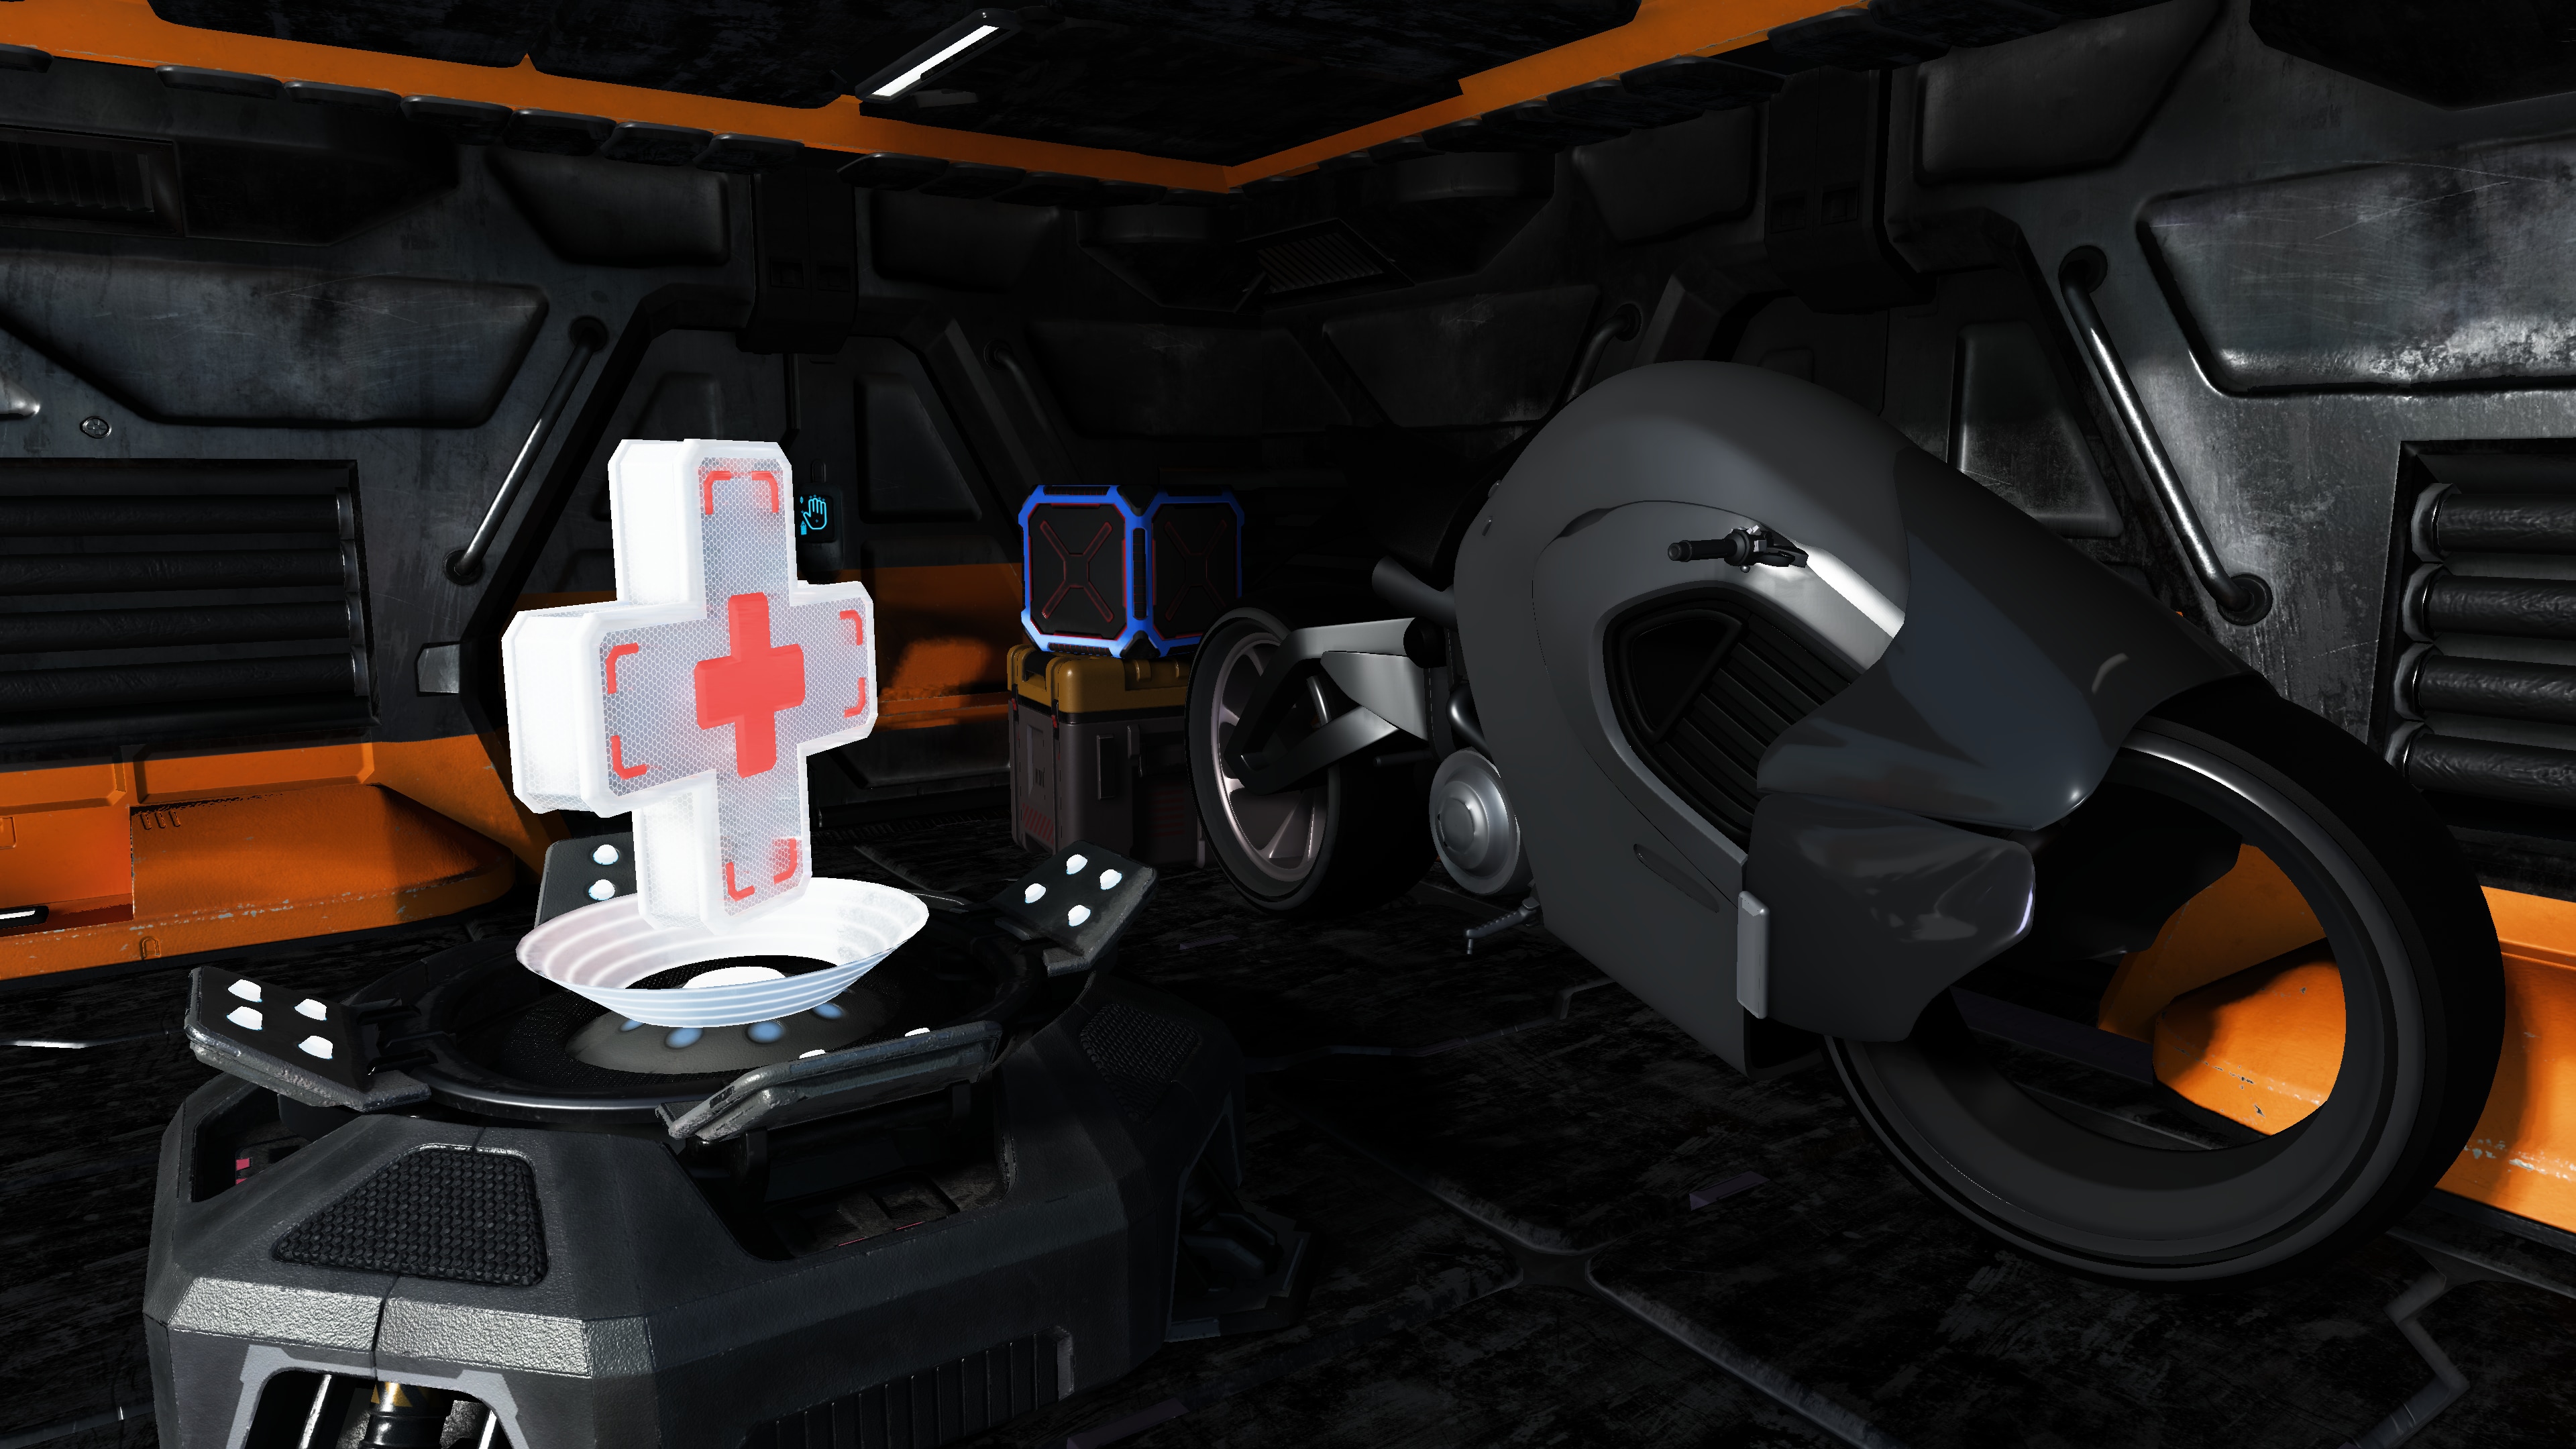
Figure 1: Sample output from FSR™ Ray Regeneration.
FSR™ Ray Regeneration is a machine learning-based denoiser for ray-traced workloads. It improves visual quality by reducing noise in rendered frames while preserving detail.
Table of contents
- Introduction
- Getting started
- Performance
- Debugging
- Best practices
- Requirements
- Version history
- References
- See also
Introduction
Since the advent of hardware-accelerated ray tracing, real-time game and rendering engines have increasingly adopted ray tracing techniques. From realistic reflections to finely detailed shadows, ray tracing has significantly elevated visual fidelity in modern games. As GPU ray tracing capabilities continue to improve, developers are pushing the boundaries of global illumination and exploring real-time path tracing. However, raw ray-traced outputs are inherently noisy, making effective denoising essential for producing clean, high-quality images.
Denoising transforms noisy ray- or path-traced outputs into coherent, visually accurate images, often leveraging both spatial and temporal information. FSR™ Ray Regeneration performs this task with a key advantage: it uses machine learning to dynamically determine optimal filter weights, delivering superior results compared to purely analytical methods.
Decoupled denoising vs. joint denoising
FSR™ Ray Regeneration performs denoising independently of upscaling, making it a decoupled denoiser. In contrast, denoising and upscaling can also be combined into a single, joint operation. Both approaches are valid, but decoupling denoising into its own dispatch call simplifies adding additional rendered content afterward.
Although upscaling is not strictly required for denoising, rendering expensive ray-traced effects, especially path tracing, at native resolution can be very demanding on hardware. With significant advancements in upscaling technology, incorporating upscaling into the rendering pipeline is strongly recommended. Additionally, the temporal anti-aliasing provided by upscalers such as FSR™ 4 adds an extra layer of smoothing when used alongside FSR™ Ray Regeneration. For optimal visual results, FSR™ Ray Regeneration should be paired with FSR™ 4.
Denoising modes
To maximize compatibility and efficiency when denoising your game’s specific workloads, FSR™ Ray Regeneration provides multiple input/output configurations:
| Configuration | Inputs |
|---|---|
FFX_DENOISER_MODE_4_SIGNALS | Direct specular, direct diffuse, indirect specular, indirect diffuse |
FFX_DENOISER_MODE_2_SIGNALS | Fused specular and diffuse |
FFX_DENOISER_MODE_1_SIGNAL | Fused specular and diffuse into one signal |
The selected mode is specified via the mode member of the ffxCreateContextDescDenoiser context creation description.
Additionally, you can denoise the dominant light visibility as a separate signal by adding the FFX_DENOISER_ENABLE_DOMINANT_LIGHT to the flags member of the ffxCreateContextDescDenoiser context creation description.
Getting started
Setting up your project
FSR™ Ray Regeneration is part of the FSR™ SDK. Before getting started, make sure to read the Getting Started with the FSR™ API guide. Once familiar with the API, follow these steps to prepare your project for FSR™ Ray Regeneration:
- Add the FSR™ API include headers to your project’s include directories.
- Add the FSR™ Ray Regeneration headers to your project’s include directories.
- Link your project against
amd_fidelityfx_loader_dx12.lib, located in FidelityFX/signedbin. - Copy
amd_fidelityfx_loader_dx12.dllandamd_fidelityfx_denoiser_dx12.dllfrom FidelityFX/signedbin into your project’s executable directory.
Querying support
Before creating a context, you can check for support by using the ffxQuery API to enumerate the available contexts.
If the query returns no contexts, support for FSR™ Ray Regeneration is not available.
The FSR™ Ray Regeneration sample demonstrates how to query and handle the available contexts:
uint64_t DenoiserVersionCount = 0;ffx::QueryDescGetVersions queryDesc = {};queryDesc.createDescType = FFX_API_EFFECT_ID_DENOISER;queryDesc.device = m_device;queryDesc.outputCount = &DenoiserVersionCount;ffx::Query(queryDesc);
m_DenoiserVersionIds.resize(DenoiserVersionCount);m_DenoiserVersionStrings.resize(DenoiserVersionCount);
queryDesc.versionIds = m_DenoiserVersionIds.data();queryDesc.versionNames = m_DenoiserVersionStrings.data();ffx::Query(queryDesc);
m_DenoiserAvailable = !m_DenoiserVersionIds.empty();
Creating the context
To start using FSR™ Ray Regeneration, you need to create a denoiser context.
This requires filling out an ffxCreateContextDescDenoiser struct along with a backend description.
Then, pass these structs to ffxCreateContext.
The parameters you provide determine the internal resource allocations and pipeline state compilations.
Creating contexts in time-critical paths is not recommended due to their initialization cost.
If the hardware does not support FSR™ Ray Regeneration, ffxCreateContext will return an error and the context pointer will remain unset.
ffx::CreateBackendDX12Desc backendDesc = {};backendDesc.device = GetDevice()->GetImpl()->DX12Device();
ffx::CreateContextDescDenoiser createDesc = {};createDesc.version = FFX_DENOISER_VERSION;createDesc.maxRenderSize = { resInfo.UpscaleWidth, resInfo.UpscaleHeight };createDesc.mode = m_DenoiserMode;
// Optional flagsif (m_EnableDebugging)    createDesc.flags |= FFX_DENOISER_ENABLE_DEBUGGING;if (m_EnableDominantLightVisibilityDenoising)    createDesc.flags |= FFX_DENOISER_ENABLE_DOMINANT_LIGHT;
// Create the denoiser contextffx::CreateContext(m_pDenoiserContext, nullptr, createDesc, backendDesc);
For use cases that require a specific context version, you can override it by passing an optional ffxOverrideVersion description to ffxCreateContext.
ffx::CreateContextDescOverrideVersion versionOverride = {};versionOverride.versionId = m_DenoiserVersionIds[m_SelectedDenoiserVersion];
// Create the denoiser contextffx::CreateContext(m_pDenoiserContext, nullptr, createDesc, backendDesc, versionOverride);
Dispatching
Denoising is performed on the GPU using ffxDispatch.
This function takes a ffxDispatchDescDenoiser struct along with input/output structs for the signals.
The templated ffx_api.hpp allows chaining multiple inputs together as variable arguments.
This enables concise calls for the different signal configurations.
Example: 4 signals + dominant light
// Denoise 4 signals + dominant lightffx::DispatchDescDenoiser dispatchDesc = {};ffx::DispatchDescDenoiserInput4Signals dispatchDenoiserInputs = {};ffx::DispatchDescDenoiserInputDominantLight dispatchDenoiserInputsDominantLight = {};
// Fill in the structs with the appropriate data:// ...
ffx::Dispatch(m_pDenoiserContext, dispatchDesc, dispatchDenoiserInputs, dispatchDenoiserInputsDominantLight);
Example: 4 signals
// Denoise 4 signalsffx::DispatchDescDenoiser dispatchDesc = {};ffx::DispatchDescDenoiserInput4Signals dispatchDenoiserInputs = {};
// Fill in the structs with the appropriate data:// ...
ffx::Dispatch(m_pDenoiserContext, dispatchDesc, dispatchDenoiserInputs);
Example: 2 signals + dominant light
// Denoise 2 signals + dominant lightffx::DispatchDescDenoiser dispatchDesc = {};ffx::DispatchDescDenoiserInput2Signals dispatchDenoiserInputs = {};ffx::DispatchDescDenoiserInputDominantLight dispatchDenoiserInputsDominantLight = {};
// Fill in the structs with the appropriate data:// ...
ffx::Dispatch(m_pDenoiserContext, dispatchDesc, dispatchDenoiserInputs, dispatchDenoiserInputsDominantLight);
Example: 2 signals
// Denoise 2 signals + dominant lightffx::DispatchDescDenoiser dispatchDesc = {};ffx::DispatchDescDenoiserInput2Signals dispatchDenoiserInputs = {};
// Fill in the structs with the appropriate data:// ...
ffx::Dispatch(m_pDenoiserContext, dispatchDesc, dispatchDenoiserInputs);
Example: 1 fused signal + dominant light
// Denoise just 1 fused signal + dominant lightffx::DispatchDescDenoiser dispatchDesc = {};ffx::DispatchDescDenoiserInput1Signal dispatchDenoiserInputs = {};ffx::DispatchDescDenoiserInputDominantLight dispatchDenoiserInputsDominantLight = {};
// Fill in the structs with the appropriate data:// ...
ffx::Dispatch(m_pDenoiserContext, dispatchDesc, dispatchDenoiserInputs, dispatchDenoiserInputsDominantLight);
Example: 1 fused signal
// Denoise just 1 fused signalffx::DispatchDescDenoiser dispatchDesc = {};ffx::DispatchDescDenoiserInput1Signal dispatchDenoiserInputs = {};
// Fill in the structs with the appropriate data:// ...
ffx::Dispatch(m_pDenoiserContext, dispatchDesc, dispatchDenoiserInputs);
The dispatch call requires additional parameters that provide per-frame information and resources. These are mandatory for accurate temporal and spatial denoising.
| Parameter | Description |
|---|---|
linearDepth | Resource containing absolute linear depth values for the current frame. Preferred format: R32_FLOATR: linear depth (abs(CurrentLinearDepth)) |
motionVectors | Resource containing motion vectors for the current frame. Preferred format: RGBA16_FLOATRG: pixel movement in 2D (PreviousUV - CurrentUV)B: absolute linear depth delta (abs(PreviousLinearDepth) - abs(CurrentLinearDepth)) |
normals | Resource containing normals and roughness for the current frame. Preferred format: RGB10A2_UNORMRG: octahedrally encoded normals (see Encoding normals)B: linear roughnessA: material type (see Encoding material type) |
specularAlbedo | Resource containing specular albedo for the current frame (see Generating specular albedo). If FFX_DENOISER_DISPATCH_NON_GAMMA_ALBEDO is not added to flags, all channels are expected to be encoded using sqrt.Preferred format: RGBA8_UNORMRGB: specular albedo |
diffuseAlbedo | Resource containing diffuse albedo for the current frame. If FFX_DENOISER_DISPATCH_NON_GAMMA_ALBEDO is not added to flags, all channels are expected to be encoded using sqrt.Preferred format: RGBA8_UNORMRGB: diffuse albedo (e.g., BaseColor * (1 - Metalness)) |
motionVectorScale | RG: The scale factor for transforming the 2D motion vectors into UV space.For 2D motion vectors computed as PreviousUV - CurrentUV, use { .x = +1.0f, .y = +1.0f }.For 2D motion vectors computed as PreviousNDC - CurrentNDC, use { .x = +0.5f, .y = -0.5f }B: The scale factor for transforming the linear depth delta.For linear depth deltas computed as abs(PreviousLinearDepth) - abs(CurrentLinearDepth), use { .z = +1.0f }. |
jitterOffsets | Subpixel jitter offsets applied to the camera projection, expressed in screen pixels. |
cameraPositionDelta | Camera movement since last frame (PreviousPosition - CurrentPosition). |
cameraRight | Right (left) vector of the camera if using a right-handed (left-handed) coordinate system, expressed in world space. |
cameraUp | Up vector of the camera, expressed in world space. |
cameraForward | Forward direction of the camera, expressed in world space (i.e., the direction the camera is looking). |
cameraAspectRatio | Aspect ratio of the camera. |
cameraNear | Distance to the near plane of the camera. |
cameraFar | Distance to the far plane of the camera. |
cameraFovAngleVertical | Vertical field of view of the camera, expressed in radians. |
renderSize | Resolution used for rendering the current frame input resources. |
deltaTime | Time elapsed since the last frame, expressed in milliseconds. |
frameIndex | Index of the current frame. |
flags | Zero or a combination of values from FfxApiDispatchDenoiserFlags. |
Depth values and depth deltas are computed using absolute linear depth.
- Absolute means the depth value is independent of whether the camera is facing forward or backward in view space.
- Linear means the depth is expressed in view space, rather than NDC space. The dispatch parameters below are closely related and must remain consistent to ensure correct reprojection.
| Parameter | Description |
|---|---|
linearDepth | abs(CurrentLinearDepth) |
motionVectors | abs(PreviousLinearDepth) - abs(CurrentLinearDepth) |
cameraForward | Forward direction of the camera, expressed in world space (i.e., the direction the camera is looking). |
cameraRight, cameraUp and cameraForward correspond to the view-to-world basis vectors, potentially permuted and/or sign-inverted to account for axis mappings and flips introduced by the view-to-clip (view-to-projection) transform.
Configuring settings
To achieve the best results with FSR™ Ray Regeneration, some settings may need to be adjusted. The default values are already set to sensible presets and are not simply zeros. A recommended best practice when modifying settings is to first query the current defaults via the API. This ensures that you start from a valid baseline.
Example code for querying the default value of the stability bias setting:
float stabilityBias;
ffx::QueryDescDenoiserGetDefaultKeyValue queryDesc = {};queryDesc.key   = FFX_API_CONFIGURE_DENOISER_KEY_STABILITY_BIAS;queryDesc.count = 1u;queryDesc.data  = &stabilityBias;
ffx::Query(m_pDenoiserContext, queryDesc);
New denoiser settings can be committed at any time before calling ffxDispatch and do not need to be updated every frame.
To apply the settings, use ffxConfigure.
Example code for configuring the stability bias setting with a custom value:
float stabilityBias = ...;
ffx::ConfigureDescDenoiserKeyValue configureDesc = {};configureDesc.key   = FFX_API_CONFIGURE_DENOISER_KEY_STABILITY_BIAS;configureDesc.count = 1u;configureDesc.data  = &stabilityBias;
ffx::Configure(m_pDenoiserContext, configureDesc);
Querying the currently used version
The denoiser context in FSR™ Ray Regeneration follows the same design pattern as FSR™ Upscaling and FSR™ Frame Generation.
This means a driver override may be present, so the actual context version might differ from the version defined in the header as FFX_DENOISER_VERSION.
To determine the actual version of the context, use the following ffxQuery function:
uint32_t versionMajor = 0;uint32_t versionMinor = 0;uint32_t versionPatch = 0;
ffx::QueryDescDenoiserGetVersion queryDesc = {};queryDesc.device = m_device;queryDesc.major = &versionMajor;queryDesc.minor = &versionMinor;queryDesc.patch = &versionPatch;
ffx::Query(m_pDenoiserContext, queryDesc);
Cleaning up
The application is responsible for cleaning up any created denoiser context.
This is done by calling ffxDestroyContext with the context to be destroyed.
Performance
FSR™ Ray Regeneration performance may vary depending on your target hardware and configuration.
Denoising 4 signals + dominant light signal:
| Target Render Resolution | Average [ms] |
|---|---|
| 960x540 | 1.13 |
| 1920x1080 | 4.09 |
| 2560x1440 | 7.72 |
Denoising 4 signals:
| Target Render Resolution | Average [ms] |
|---|---|
| 960x540 | 1.09 |
| 1920x1080 | 3.93 |
| 2560x1440 | 7.37 |
Denoising 2 signals + dominant light signal:
| Target Render Resolution | Average [ms] |
|---|---|
| 960x540 | 0.94 |
| 1920x1080 | 3.33 |
| 2560x1440 | 6.34 |
Denoising 2 signals:
| Target Render Resolution | Average [ms] |
|---|---|
| 960x540 | 0.87 |
| 1920x1080 | 3.05 |
| 2560x1440 | 5.84 |
Denoising 1 signal + dominant light signal:
| Target Render Resolution | Average [ms] |
|---|---|
| 960x540 | 0.85 |
| 1920x1080 | 2.85 |
| 2560x1440 | 5.51 |
Denoising 1 signal:
| Target Render Resolution | Average [ms] |
|---|---|
| 960x540 | 0.78 |
| 1920x1080 | 2.63 |
| 2560x1440 | 5.18 |
Performance figures are accurate at the time of writing for an AMD Radeon™ RX 9070 XT and are subject to change.
Memory requirements
FSR™ Ray Regeneration requires additional GPU local memory for use by the GPU. When using the API, this memory is allocated during context creation via the series of callbacks that make up the backend interface. This memory is used to store intermediate surfaces computed by the algorithm, as well as surfaces that persist across multiple frames of the application.
The tables below summarize the memory usage of FSR™ Ray Regeneration under various operating conditions.
Denoising 4 signals + dominant light signal:
| Render Resolution | Total Working Set [MB] | Persistent Working Set [MB] | Aliasable Working Set [MB] |
|---|---|---|---|
| 960x540 | 109 | 57 | 52 |
| 1920x1080 | 386 | 196 | 190 |
| 2560x1440 | 656 | 350 | 306 |
Denoising 4 signals:
| Render Resolution | Total Working Set [MB] | Persistent Working Set [MB] | Aliasable Working Set [MB] |
|---|---|---|---|
| 960x540 | 104 | 52 | 52 |
| 1920x1080 | 369 | 179 | 190 |
| 2560x1440 | 626 | 320 | 306 |
Denoising 2 signals + dominant light signal:
| Render Resolution | Total Working Set [MB] | Persistent Working Set [MB] | Aliasable Working Set [MB] |
|---|---|---|---|
| 960x540 | 91 | 39 | 52 |
| 1920x1080 | 322 | 132 | 190 |
| 2560x1440 | 542 | 236 | 306 |
Denoising 2 signals:
| Render Resolution | Total Working Set [MB] | Persistent Working Set [MB] | Aliasable Working Set [MB] |
|---|---|---|---|
| 960x540 | 87 | 35 | 52 |
| 1920x1080 | 306 | 116 | 190 |
| 2560x1440 | 512 | 206 | 306 |
Denoising 1 signal + dominant light signal:
| Render Resolution | Total Working Set [MB] | Persistent Working Set [MB] | Aliasable Working Set [MB] |
|---|---|---|---|
| 960x540 | 82 | 30 | 52 |
| 1920x1080 | 288 | 100 | 188 |
| 2560x1440 | 480 | 177 | 303 |
Denoising 1 signal:
| Render Resolution | Total Working Set [MB] | Persistent Working Set [MB] | Aliasable Working Set [MB] |
|---|---|---|---|
| 960x540 | 78 | 26 | 52 |
| 1920x1080 | 274 | 84 | 190 |
| 2560x1440 | 454 | 148 | 306 |
Memory figures are accurate at the time of writing for an AMD Radeon™ RX 9070 XT and are subject to change.
An application can query the amount of GPU local memory required by FSR™ Ray Regeneration before creating a denoiser context.
See code examples for calling ffxQuery:
FfxApiEffectMemoryUsage memory = {};ffx::QueryDescDenoiserGetGPUMemoryUsage queryDesc = {};queryDesc.device = m_device;queryDesc.maxRenderSize = denoiserContextDesc.maxRenderSize;queryDesc.mode = denoiserContextDesc.mode;queryDesc.flags = denoiserContextDesc.flags;queryDesc.gpuMemoryUsage = &memory;
ffx::Query(queryDesc, versionOverride);
LOG(L"Denoiser GPU Memory Usage totalUsageInBytes %.3f MB aliasableUsageInBytes %.3f MB",    memory.totalUsageInBytes     / 1048576.f,    memory.aliasableUsageInBytes / 1048576.f);
Debugging
Debug view
When the FSR™ Ray Regeneration context is created with FFX_DENOISER_ENABLE_DEBUGGING, integrations can provide an optional ffxDispatchDescDenoiserDebugView description to the dispatch call.
This will enable an extra output pass to run internally and output relevant debug information into an app-provided render target.
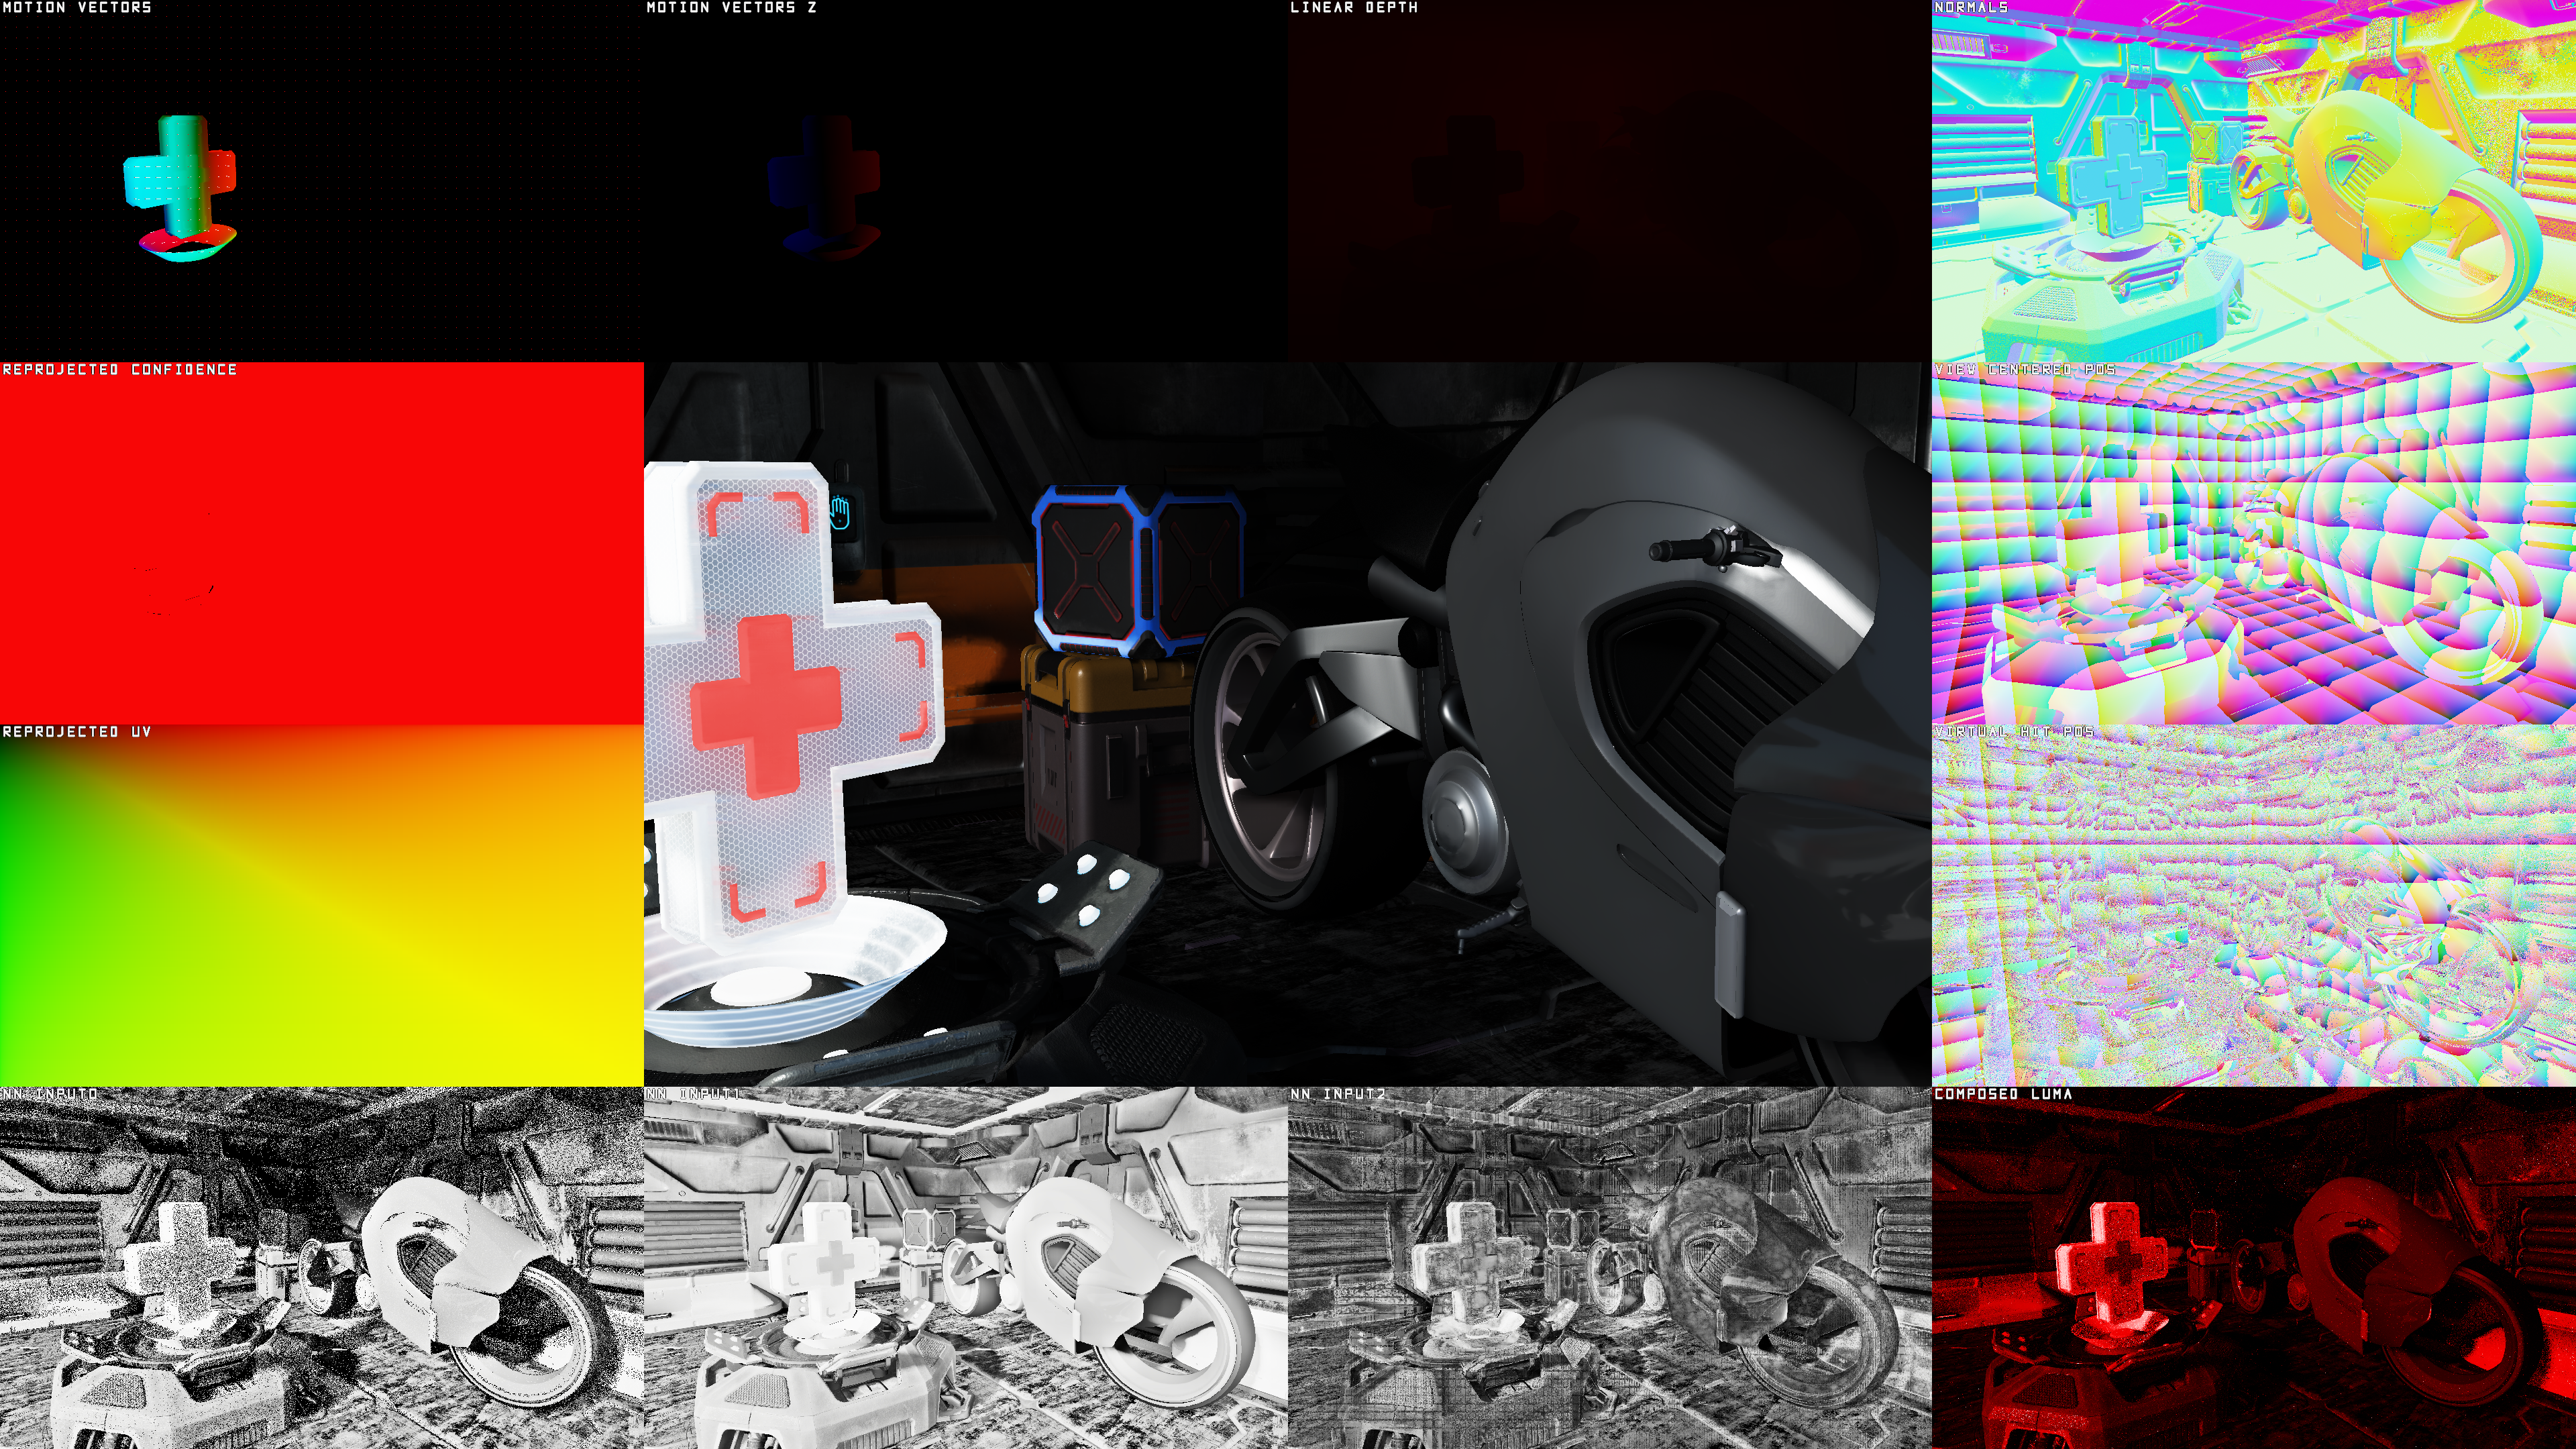
Figure 2: FSR™ Ray Regeneration debug view in overview mode.
| Data | Description |
|---|---|
Motion Vectors | Pixel screen motion, the XY-components of the motionVectors input. |
Motion Vectors Z | Pixel z motion (i.e. Linear Depth Delta), the Z-component of the motionVectors input.Blue for negative deltas, Red for positive deltas. |
Linear Depth | Value of the linearDepth input.Clamped to 1024 units. |
Normals | Decoded normals of the normals input. |
Reprojected Confidence | Indicates the per pixel confidence of a history sample. Black means the sample will not contribute in the accumulation. |
Reprojected UV | UV that will be used to sample history information. |
View Centered Pos | Reconstructed position centered around the camera. This information is useful to validate that input camera parameters are correct. |
Virtual Hit Pos | Reconstructed virtual hit position used for low-roughness specular samples. This information is useful to validate that input camera parameters and specular ray length are correct. |
NN Input0 | First input channel to the neural network. |
NN Input1 | Second input channel to the neural network. |
NN Input2 | Third input channel to the neural network. |
Composed Luma | Luminance of the composited input signals. |
Providing the ffxDispatchDescDenoiserDebugView to the dispatch call automatically enables the debug pass internally.
Output information is written to an app-provided render target and it is therefore up to the app itself to implement how to composite the output information to the screen.
FSR™ Ray Regeneration expects the output target to be in a 4-component format as all four data components are used.
In the output target the RGB channels contains the color information to display and the A channel indicates which pixels have been written to.
The mode parameter toggles between an overview mode or fullscreen mode of a single data viewport.
The viewportIndex controls which viewport to display if FFX_API_DENOISER_DEBUG_VIEW_MODE_FULLSCREEN_VIEWPORT is selected as the active mode.
The viewportIndex is clamped between 0 and FFX_API_DENOISER_DEBUG_VIEW_MAX_VIEWPORTS - 1.
ffx::DispatchDescDenoiserDebugView dispatchDenoiserDebugView = {};dispatchDenoiserDebugView.output = SDKWrapper::ffxGetResourceApi(m_pDebugView->GetResource(), FFX_API_RESOURCE_STATE_UNORDERED_ACCESS);dispatchDenoiserDebugView.outputSize = { m_pDebugView->GetDesc().Width, m_pDebugView->GetDesc().Height };dispatchDenoiserDebugView.mode = m_DebugViewMode;dispatchDenoiserDebugView.viewportIndex = (uint32_t)m_DebugViewport;| Parameter | Description |
|---|---|
output | Target output resource to write debug visualization data into. |
outputSize | The resolution of the output resource. |
mode | An entry of FfxApiDenoiserDebugViewMode that selects the mode used for visualization.FFX_API_DENOISER_DEBUG_VIEW_MODE_OVERVIEWFFX_API_DENOISER_DEBUG_VIEW_MODE_FULLSCREEN_VIEWPORT |
viewportIndex | When mode is set to FFX_API_DENOISER_DEBUG_VIEW_MODE_FULLSCREEN_VIEWPORT, use this index to indicate which debug viewport to fullscreen.The value is clamped between 0 and FFX_API_DENOISER_DEBUG_VIEW_MAX_VIEWPORTS - 1 |
Best practices
Generating noisy signals
FSR™ Ray Regeneration, depending on the selected mode, expects one or more low-sample input radiance signals for denoising. High-quality inputs are essential to achieve the best results, as the algorithm is not designed to “correct” artefacts present in the input data. Below are some guidelines for generating high-quality noisy inputs.
Stochastic sampling
In most physically-based path tracers, stochastic sampling is used to simulate realistic lighting behaviors such as shadows, reflections, and indirect lighting. Stochastic sampling introduces randomness into ray directions so that, over many samples, the result converges to a noise-free signal. At low sample counts, this randomness produces perceivable noise in the rendered image. This noise is exactly what FSR™ Ray Regeneration targets for denoising. Understanding and managing the quality of this noise is critical for achieving optimal denoising results.
| Noisy Input | Denoised Output |
|---|---|
 |  |
Figure 3: left: Noisy ray-traced input to FSR™ Ray Regeneration. right: Corresponding denoised output from FSR™ Ray Regeneration.
Noise
We recommend using white noise and high-quality hash functions with minimal correlations when driving stochastic sampling.
Examples of suitable hash functions include xxhash32 and lowbias32.
A good practice is to ensure that your ray-traced image converges to a noise-free result when using many samples without denoising. If it does not, verify whether your chosen noise or hash function is introducing unwanted correlations or other artifacts that are difficult to denoise.
While blue noise often performs well in many scenarios, it can introduce correlation artifacts if its period is not sufficiently large. For this reason, white noise is generally preferred for FSR™ Ray Regeneration inputs.
Noise reduction techniques such as ReSTIR can help reduce noise in the input signals. However, these techniques often introduce cross-sample dependencies that FSR™ Ray Regeneration is not designed to handle. In such cases, it is important to disrupt correlation patterns using strategies like permutation sampling or randomization of temporal reuse.
Usage of radiance caching
Tracing paths recursively quickly becomes too expensive for real-time rendering. To manage this cost, many real-time path tracers apply radiance caching after only a few recursive bounces. Radiance caching provides a precomputed store of radiance that can be sampled by direction, enabling early ray termination and significantly reducing computational overhead.
Using a radiance cache generally results in a more complete signal, since additional lighting contributions, too expensive to compute per frame, are incorporated through cached samples. This is naturally beneficial for FSR™ Ray Regeneration, as more complete inputs typically yield more complete and stable outputs.
However, the caching process often trades accuracy for performance, which may introduce artifacts into the final image. Watch out for low-frequency noise or temporal inconsistencies, as these issues can be amplified by the denoiser if not mitigated.
See AMD GI-1.0 for examples and guidance on radiance caching.
Tweakable denoiser settings
Even with high-quality inputs and the recommended best practices applied, some artifacts may still remain.
FSR™ Ray Regeneration exposes a number of tweakable settings, defined in FfxApiConfigureDenoiserKey, that allow fine-grained control over denoiser behavior.
These parameters can help balance stability, sharpness, and noise reduction to best suit your application.
It is recommended to start from the default settings queried from the API and then adjust selectively according to what works best for your application. For guidance on retrieving and applying these settings, see Configuring settings.
Providing motion vectors
Space
A key part of any temporal algorithm is the provision of motion vectors.
FSR™ Ray Regeneration accepts motion vectors in a 2.5D format:
- The
XYcomponents represent screen-space pixel motion, encoding the movement from a pixel in the current frame to the same pixel in the previous frame. - The
Zcomponent represents the linear view-spacezdelta.

Figure 4: A 2D motion vector from a pixel in the current frame to the corresponding pixel in the previous frame.
If your application computes motion vectors in a space other than UV space (for example, NDC space), you can use the motionVectorScale member of the ffxDispatchDescDenoiser dispatch description to scale them appropriately for FSR™ Ray Regeneration.
Example HLSL and C++ code illustrating NDC-space motion vector scaling:
// GPU: Example of NDC motion vector computation
float3 motionVector;
// 2D motion expressed in NDC spacemotionVector.xy = (previousPosition.xy / previousPosition.w) - (currentPosition.xy / currentPosition.w) - cancelJitter;
// Absolute linear depth deltamotionVector.z = abs(previousPosition.w) - abs(currentPosition.w);
// CPU: Matching FSR™ Ray Regeneration motionVectorScale configuration to convert motion vectors from NDC to UV spacedispatchDesc.motionVectorScale.x = +0.5f;dispatchDesc.motionVectorScale.y = -0.5f;
dispatchDesc.motionVectorScale.z = +1.0f;Coverage
FSR™ Ray Regeneration achieves higher-quality denoising when more objects provide valid motion vectors. It is therefore recommended that all opaque, alpha-tested, and alpha-blended objects write motion vectors for every pixel they cover. Additionally, if vertex shader effects are applied, such as scrolling UVs or procedural vertex animations, these transformations should also be incorporated into the motion vector computation to ensure optimal results.
Encoding normals
Each 3D normal vector represents a direction on the unit sphere. To store normals efficiently, we can project the unit sphere onto a 2D plane and remap each normal vector as a 2D UV coordinate. This process is called octahedral encoding. The normals passed to FSR™ Ray Regeneration are required to be stored using octahedral encoding.
Below are examples of how to encode and decode normals using this method.
Octahedral encoding of normals:
float2 NormalToOctahedronUv(float3 N){ N.xy /= abs(N.x) + abs(N.y) + abs(N.z); float2 k = sign(N.xy); float s = saturate(-N.z); N.xy = lerp(N.xy, (1.0 - abs(N.yx)) * k, s); return N.xy * 0.5 + 0.5;}Octahedral decoding of normals:
float3 OctahedronUvToNormal(float2 UV){ UV = UV * 2.0f - 1.0f; float3 N = float3(UV, 1.0f - abs(UV.x) - abs(UV.y)); float t = saturate(-N.z); float2 s = sign(N.xy); N.xy += s * t; return normalize(N);}Encoding material type
The alpha channel of the normals member of the ffxDispatchDescDenoiser dispatch description is used to encode the material type.
The material type is a lightweight way to distinguish different surface materials from one another.
FSR™ Ray Regeneration will reject mixing between two pixels if their material IDs do not match.
This prevents cross-material blending and is an effective solution for avoiding ghosting artifacts in complex material setups.
FSR™ Ray Regeneration supports three material type variations.
Material type 0 is reserved as the default material.
Upon encoding the material type into the normals member of the ffxDispatchDescDenoiser input, the stored value should be a normalized fraction relative to the maximum number of supported materials.
// ... ray tracing pass ...
uint materialType = hit.materialType;float materialTypeFrac = materialType / 3.0;
outNormalsResource[pixel] = float4(normalOctahedralUv, roughness, materialTypeFrac);Generating specular albedo
Specular albedo can be generated using various methods. In most physically-based rendering pipelines, similar computations are already performed as part of the lighting computations. These computations can be reused to generate a standalone specular albedo feature map.
Below are two commonly used methods for generating specular albedo in real-time rendering applications.
Example: BRDF lookup table
A BRDF LUT is generated offline and stored in a floating-point texture. At runtime, this LUT is sampled to look up approximate BRDF characteristics, commonly used in the split-sum approximation for image-based lighting.

Figure 5: A typical GGX BRDF look-up table.
The following HLSL code snippet illustrates how to sample the BRDF LUT and use the resulting scale and bias to generate specular albedo:
// ... ray tracing pass ...
float NoV = dot(normal, view);float2 brdf = BrdfLUT.SampleLevel(LinearSampler, float2(NoV, hit.materialRoughness), 0);
const float3 MinReflectance = float3(0.04, 0.04, 0.04);float3 F0 = lerp(MinReflectance, hit.materialAlbedo.rgb, hit.materialMetallic);float3 specularAlbedo = F0 * brdf.x + brdf.y;
// ...
Example: BRDF Approximation
The following HLSL code snippets illustrate how to approximate the BRDF influence at runtime without the need for an offline baked LUT:
// [Ray Tracing Gems, Chapter 32]float3 ApproximateBRDF(float3 F0, float alpha, float NoV){    NoV = abs(NoV);    float4 x = float4(1.0, NoV, NoV*NoV, NoV*NoV*NoV);    float4 y = float4(1.0, alpha, alpha*alpha, alpha*alpha*alpha);
    float2x2 M1 = float2x2(0.99044, -1.28514,                           1.29678, -0.755907);
    float3x3 M2 = float3x3(1.0,      2.92338, 59.4188,                           20.3225, -27.0302, 222.592,                           121.563,  626.13,  316.627);
    float2x2 M3 = float2x2(0.0365463, 3.32707,                           9.0632,   -9.04756);
    float3x3 M4 = float3x3(1.0,      3.59685, -1.36772,                           9.04401, -16.3174,  9.22949,                           5.56589,  19.7886, -20.2123);
    float bias = dot(mul(M1, x.xy), y.xy) * rcp(dot(mul(M2, x.xyw), y.xyw));    float scale = dot(mul(M3, x.xy), y.xy) * rcp(dot(mul(M4, x.xzw), y.xyw));
    // Hack for specular reflectance of 0    bias *= saturate(F0.g * 50);    return mad(F0, max(0, scale), max(0, bias));}
// ... ray tracing pass ...
const float3 MinReflectance = float3(0.04, 0.04, 0.04);float3 F0 = lerp(MinReflectance, hit.materialAlbedo.rgb, hit.materialMetallic);
float alpha = hit.materialRoughness * hit.materialRoughness;float NoV = dot(normal, view);
float3 specularAlbedo = ApproximateBRDF(F0, alpha, NoV);
// ...
Requirements
- AMD FSR™ Ray Regeneration requires an AMD Radeon™ RX 9000 Series GPU or later.
- DirectX® 12 + Shader Model 6.6
- Windows® 11
Version history
| Version | Date |
|---|---|
| 1.1.0 | March 18, 2026 |
| 1.0.0 | December 10, 2025 |
For more details, refer to the changelog.