Using AMD FreeSync™ Premium Pro HDR Color Spaces
The first in a series of four tutorials related to AMD Freesync™ Premium Pro HDR. This tutorial covers terminology related to color.
This is part two of a series of posts on AMD FreeSync™ Premium Pro HDR Technology (FreeSync HDR hereafter!). The first post covered color spaces to get you used to common terminology and some of the problems that FreeSync HDR solves. Part 3 covers gamut mapping.
In this post, we cover the terminology of tone mapping, what tone mapping is, as well as different monitor features that influence how well a tone mapper will work. Afterwards, we will wrap it up and see how FreeSync HDR lets you directly tone map to the monitor’s native luminance range, along with some pitfalls that can occur along the way.
Before we get into tone mapping, we will first need to define some terminology that is commonly used when working with tone mapping.
Tone mapping deals with modifying the luminosity/brightness of a pixel. The brightness of a pixel is a measure of how much light is shot out of it, the more light radiates the brighter the pixel will be perceived. This is generally measured in nits, or the SI unit called candela per square meter (cd/m2). This measure is useful because everything related to brightness for our purposes is typically measured in nits. For example, the maximum brightness of a monitor and the maximum perceived brightness of the human eye are all commonly measured in nits, allowing us to directly compare how much of the perceivable range we are covering.
Each monitor has a different maximum and minimum number of photons it can emit per pixel. For example, an LCD monitor cannot show a completely black pixel because its backlight is (likely) always on. The range of brightness values that a monitor can therefore display is called the monitor’s dynamic range.
For example, a monitor that can display colors at 0.1 nits to 600 nits has a dynamic range of 599.9 nits. A game scene also has its own dynamic range defined by the brightest and darkest parts of any given frame. Another way of describing the dynamic range is using stops as the unit. Stops represent a doubling of brightness for each unit and are often used when describing the dynamic range of cameras (3 stops is twice as bright as 2 stops).
When rendering games, you find that most objects in a scene are inside a similar dynamic range where they aren’t very bright, nor very dark. We call this average range the mid tones in a game. Game objects like lights and the sun are brighter then this range, and conversely very dark objects are darker. It is important that game developers know what the mid tones of their game scenes are, since they will be very important to preserve once we talk about tone mapping.
There are many optical illusions that occur with how we perceive images, versus how they really are. For example, if we want to have something be perceived as very bright, we can slowly change the color to white as we increase its brightness. This can make certain parts of an image look far brighter than they actually are, and we call this effect shift to white.
In current games that use physically-based rendering (PBR), you can see shifts to white in the specular highlights of materials. The specular highlights are not encoded in PBR as a bright white, but instead as very bright version of the surface’s color that they fall on.
Due to the limited dynamic range of our monitors, we cannot display the true brightness of the specular highlight, so we instead shift it to white based off its luminance, making it perceived as much brighter than it really is. We will see how this effect comes into play when we start talking about tone mapping.
Tone mapping is the process of converting a larger source dynamic range to a smaller target dynamic range while still preserving the overall look of the content’s brightness. In the context of a game, we usually tone map our rendered frames to the dynamic range of some display format, such as sRGB or HDR10.
A game can simulate content with brightness levels in the thousand or ten thousand nit range, but most monitors can only display luminance values up to 300-400 nits, so we need to somehow compress the source dynamic range without distorting the look of the frame. This is done using a tone mapping curve, which is a non-linear curve that maps our source dynamic range to our target dynamic range.

In the above image of the ACES tone mapper, we show what a typical tone mapping curve looks like. You’ll notice that a tone mapper usually maps the darkest and brightest colors to a small luminance range, while the mid tones get mapped to the largest luminance range. Tone mappers usually take on this basic form, but the mapped luminance range sizes are often tweaked by the developer for each of their games.
For example, if our game usually takes place in a dark environment, we wouldn’t want to squish the dark colors into a small luminance range like we did above, and would instead assign more range to them, while removing range from the brightest regions. For a more in depth explanation on how to manipulate a tone mapping curve, you can watch this GDC talk by Timothy Lottes.
Due to PBR, many emissive objects are significantly brighter than they used to be, giving us realistic light ratios in our game worlds, but means our tone mapper must know how to correctly map their luminance values to those displayable by the monitor while preserving the scene’s overall brightness.
For example, if our monitor has a max brightness of 300 nits, but our game has a car headlight that shines at 500 nits and a sun that shines at 1000 nits, we still want the player to recognize that the sun is brighter than the car headlight. We can add more range to the brighter parts of our curve, but we would end up making the overall game look darker since the range for the mid-tones would be smaller. This issue can be mitigated by taking advantage of shifting to white, the emissive object’s influence on the scene around it, as well as the human visual system’s poor ability to discern very bright colors.
Since we are poor at telling the difference between very bright objects, we can assign a very small luminance range for the luminance values that are above our game’s average luminance range. This will fix our lack of luminance in the mid tones, but it will make the sun appear just as bright as a car headlight.
We can fix this issue by making our tone mapper shift very bright colors to white, making them appear brighter than they really are. The sun will also appear brighter because it brightens the scene around it significantly more than a car headlight, making us perceive it as a brighter object.
We often think of the dynamic range of a monitor as its ability to output brightness, but in reality, it also depends on the ambient light we are viewing the output from the monitor in. For example, if we are viewing a monitor in a bright room, then the darkest colors are going to be brighter since the monitor reflects some of the ambient light back at us.
The net effect is that our dynamic range becomes smaller than what we expected, changing the look of our game. Below we show how the dynamic range of a 400 nit monitor changes based off of screen reflectance in 1000 nit ambient light:
If we use the same monitor but in a room with 0.05 nit ambient light, we get the following results:
The take away here is that HDR (and SDR!) isn’t just a function of the monitor’s display capabilities, but also of the environment in which we are viewing it. The end result is, the brighter the ambient light, the smaller our dynamic range becomes, and the brighter our darkest colors become.
In a real game, the user adjusts the in-game brightness settings to cope with the ambient light, but we could potentially also take advantage of that information within our tone mapper. In a dark room, the user generally turns brightness down to not hurt their eyes from the bright light, but this lowers our dynamic range. We could instead have a lower brightness setting correspond to lowering the brightness of mid tones and dark colors so that the overall image becomes darker, while allowing the app to use the monitor’s full dynamic range.
If we are in a bright room, we want increasing brightness to increase the dark colors and mid tone brightness and keep everything else the same, since in a bright room our monitor has a very high minimum luminance and we want to make sure that we are above that.
The above recommendations allow for smarter brightness control that lets us take advantage of the monitor’s dynamic range in whatever ambient light the user decides to view it in. You can find more about this topic in this GDC talk by Timothy Lottes.
When we display a bright white image on an LED-lit monitor, if that monitor can output colors at 600 nits, say, then we expect every pixel to be displayed at that luminance. The problem is, monitors have physical limitations that prevent them from being able to display every pixel at maximum brightness.
Instead, manufacturers noticed that most pixels in regular images aren’t super bright, and so they build their monitors such that only around 10% of pixels at any time can be at maximum brightness. To do this, nearby pixels need to be made dimmer so that more power can be put to making those other pixels brighter. This is called local dimming.
The implementation of local dimming depends heavily on whether the monitor has an edge-lit or full array backlight. Edge-lit monitors only have LEDs on the side of the screen, allowing the monitor to only selectively brighten or dim rough horizontal and vertical bands of the image. Full array monitors have a grid of LEDs (usually much less than the number of pixels) behind the screen, allowing the monitor to selectively dim and brighten rough quads of the image.
With both backlight types, when one LED is very bright, other LEDs need to be made dimmer since the monitors have a fixed power budget. This is achieved using a tone mapping pass that the monitor applies to figure out which parts of the image should get dimmer and which parts can remain bright. By doing this, the monitor manufacturer can sometimes double their maximum luminance — one of their key marketing numbers — but only if a small number of pixels are set to a high luminance value in a region.
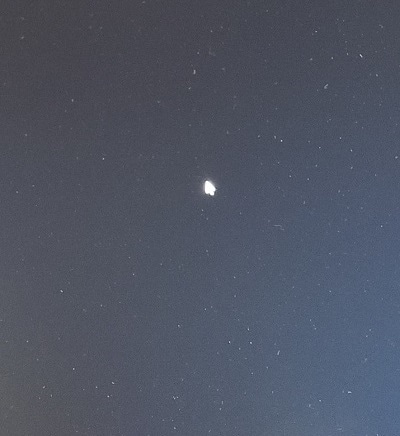
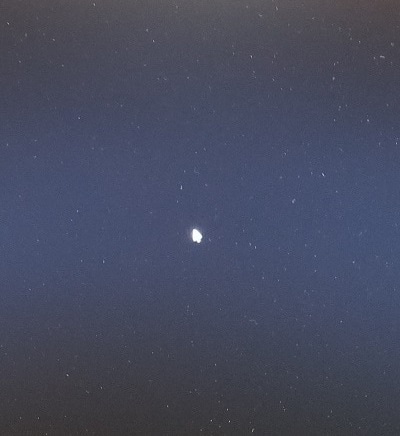
This technique comes with an artifact called haloing (sometimes referred to as blooming). If the image you’re displaying on your monitor is a moon in the night sky, say, then the entire scene is supposed to be dark, except for the moon which should remain bright. In an edge-lit monitor, local dimming may cause the horizontal and vertical bands that the moon falls in to be brighter, making any dark objects in those bands brighter than they should be.
With a full array monitor, only the grid cell the moon falls in will be made brighter, but the moon will usually be smaller than that grid cell, making the dark pixels around it brighter than intended. You can see an example of these artifacts in the images below, where the first image has local dimming off while the second has local dimming on, and we can see a horizontal band of light where the mouse is:
Local dimming can be an unwanted effect due to the image artifacts it presents on consumer monitors, especially in dark scenes with some bright objects like a night sky, but it can also provide brighter luminance values and contrast ratios, making better looking images. Whether local dimming is good or not depends very heavily on the content being displayed, and so we will be looking at what FreeSync HDR provides to let developers manipulate this monitor feature. You can find more about local dimming here.
FreeSync HDR provides the developer with knowledge of the monitor’s true dynamic range, allowing the game to better tone map itself to the monitor’s capabilities. In FreeSync HDR, you can query the minimum and maximum luminance values that are displayable by the monitor, with and without local dimming. These values can then be fed to the game’s tone mapper so that it knows the exact dynamic range. The game also has the choice of disabling local dimming using FreeSync HDR if the developer feels that its artifacts are not worth it. This is a choice the developer must make via testing how their game looks with and without local dimming, and so we can’t provide a hard or fast rule for you to follow.
When adding FreeSync HDR to your HDR10-supporting game, it is important to remember that no monitor currently can display the full dynamic range of HDR10. So, when you try to apply the same tone mapper that you use for HDR10 to FreeSync HDR, you want to assign more of the output range to the mid tones since they are the most common element in your scene. Naively scaling your tone mapping curves can reduce the number of mid tones in your frame, and so you need to experiment to see what kind of tone mapping curve provides the best output for your content in FreeSync HDR.
Another issue that may be encountered when making a tone mapper for FreeSync HDR is the maximum luminance of the display. If you enable local dimming, then you expect that the maximum luminance is much brighter. This is true but only for small parts of the scene at a time, since the monitor cannot supply maximum brightness across the whole image.
What the monitor does when the scene is too bright to display at maximum luminance is to tone map the provided frame so that it displays closer to the maximum luminance with local dimming disabled, which can be 100 or 200 nits lower. In such cases, the game’s tone mapper would not know to adjust, and it would continue tone mapping as if the luminance range for the monitor is brighter than it really is, resulting in darker than expected scenes. These effects generally occur in bright daylight scenes, and so local dimming’s benefit mostly occurs when the scene’s average light level becomes darker, say at dusk or at night, or indoors.
If your game consists mostly of bright scenes, then the tone mapper should assume that the full benefits of local dimming will not occur, and it should start to limit the output brightness range once we start to get close to the monitors max luminance with local dimming disabled.
FreeSync HDR provides you with knowledge and access to the monitors full dynamic range, and control over the physical brightness, allowing you to take advantage of it and provide really great image quality for your users. We have gone over how dynamic range features like local dimming work, as well as why doing naïve ports of tone mappers from HDR10 may result in overly dark images.
In the next post we will be going over what gamut mapping is and how it works in FreeSync HDR!